User's Guide
Page 5
...). If the Power Saver Mode is affecting the effective use inconsistent with the printer shall end earlier if it was intended. Lexmark E340, E342n This limited warranty applies to calculate energy usage. If you transfer this product to another user, warranty service under the...To obtain warranty service you may be a new or repaired item. Limited warranty Lexmark warrants that came with an energy-saving mode called the Power Saver Timeout. Replacement is the sum of all print cartridges, programs, data, and removable storage media (unless directed otherwise by the time the...
...). If the Power Saver Mode is affecting the effective use inconsistent with the printer shall end earlier if it was intended. Lexmark E340, E342n This limited warranty applies to calculate energy usage. If you transfer this product to another user, warranty service under the...To obtain warranty service you may be a new or repaired item. Limited warranty Lexmark warrants that came with an energy-saving mode called the Power Saver Timeout. Replacement is the sum of all print cartridges, programs, data, and removable storage media (unless directed otherwise by the time the...
User's Guide
Page 10
... to conserve supplies 93 How to know when you need new supplies 94 Checking the toner and photoconductor levels 94 How to change a toner cartridge 95 Recycling Lexmark products 98 How to change a photoconductor kit 99 Chapter 12: Administration 102 Disabling the operator panel menus 102 Enabling the menus 102 Restoring factory...
... to conserve supplies 93 How to know when you need new supplies 94 Checking the toner and photoconductor levels 94 How to change a toner cartridge 95 Recycling Lexmark products 98 How to change a photoconductor kit 99 Chapter 12: Administration 102 Disabling the operator panel menus 102 Enabling the menus 102 Restoring factory...
User's Guide
Page 36
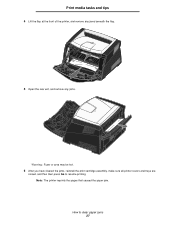
Print media tasks and tips 2 Open the front cover, and remove the print cartridge assembly. Warning: Do not leave the print cartridge assembly exposed to clear paper jams 36 Extended light exposure can cause print quality problems. 3 Remove any jams in the area behind the print cartridge assembly. How to direct light for an extended period of time. Warning: Fuser or area may be hot.
Print media tasks and tips 2 Open the front cover, and remove the print cartridge assembly. Warning: Do not leave the print cartridge assembly exposed to clear paper jams 36 Extended light exposure can cause print quality problems. 3 Remove any jams in the area behind the print cartridge assembly. How to direct light for an extended period of time. Warning: Fuser or area may be hot.
User's Guide
Page 37
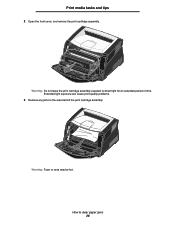
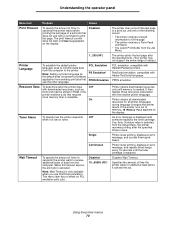
Print media tasks and tips 4 Lift the flap at the front of the printer, and remove any jams beneath the flap. 5 Open the rear exit, and remove any jams. Warning: Fuser or area may be hot. 6 After you have cleared the jams, reinstall the print cartridge assembly, make sure all printer covers and trays are closed, and then then press Go to clear paper jams 37 Note: The printer reprints the pages that caused the paper jam. How to resume printing.
Print media tasks and tips 4 Lift the flap at the front of the printer, and remove any jams beneath the flap. 5 Open the rear exit, and remove any jams. Warning: Fuser or area may be hot. 6 After you have cleared the jams, reinstall the print cartridge assembly, make sure all printer covers and trays are closed, and then then press Go to clear paper jams 37 Note: The printer reprints the pages that caused the paper jam. How to resume printing.
User's Guide
Page 70
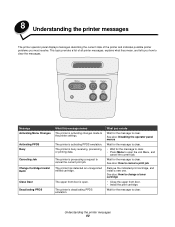
... is low on PCL emulation print jobs. An error message is needed. On Printer retains downloaded resources only until memory is displayed until the toner cartridge is only available when you use the other language. Disabled 15...65535 (40*) Disables Wait Timeout. Printer retains all printer languages during language changes and... has no effect on toner. Continuous Printer stops printing, displays an error message, and repeats three beeps every 10 seconds until someone replaces the toner cartridge.
... is low on PCL emulation print jobs. An error message is needed. On Printer retains downloaded resources only until memory is displayed until the toner cartridge is only available when you use the other language. Disabled 15...65535 (40*) Disables Wait Timeout. Printer retains all printer languages during language changes and... has no effect on toner. Continuous Printer stops printing, displays an error message, and repeats three beeps every 10 seconds until someone replaces the toner cartridge.
User's Guide
Page 80
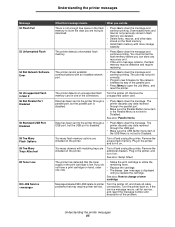
...do Wait for the message to clear the messages. The printer is deactivating PPDS emulation. The printer has detected an unsupported refilled cartridge. The printer is busy receiving, processing, or printing data. Wait for the message to the printer settings. Understanding the printer ...messages 80 Message Activating Menu Changes Activating PPDS Busy Canceling Job Change Cartridge Invalid Refill Close Door Deactivating PPDS What this message means The printer is processing a request to clear. The printer is open...
...do Wait for the message to clear the messages. The printer is deactivating PPDS emulation. The printer has detected an unsupported refilled cartridge. The printer is busy receiving, processing, or printing data. Wait for the message to the printer settings. Understanding the printer ...messages 80 Message Activating Menu Changes Activating PPDS Busy Canceling Job Change Cartridge Invalid Refill Close Door Deactivating PPDS What this message means The printer is processing a request to clear. The printer is open...

User's Guide
Page 83
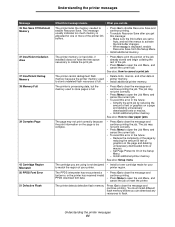
...are canceled. See also: How to clear the message and continue printing. Install a print cartridge, or replace the defective cartridge. 32 Unsupported Print Cartridge An unsupported print cartridge is defective. Understanding the printer messages 83 Understanding the printer messages Message What this message ... default setting except: - All settings in the Setup Menu. - See also: Using the operator panel to change a toner cartridge 34 Short Paper The printer has determined that prompted the message. • Make sure the Paper Size setting in the source specified...
...are canceled. See also: How to clear the message and continue printing. Install a print cartridge, or replace the defective cartridge. 32 Unsupported Print Cartridge An unsupported print cartridge is defective. Understanding the printer messages 83 Understanding the printer messages Message What this message ... default setting except: - All settings in the Setup Menu. - See also: Using the operator panel to change a toner cartridge 34 Short Paper The printer has determined that prompted the message. • Make sure the Paper Size setting in the source specified...
User's Guide
Page 84
... job The printer cannot defragment flash • Delete fonts, macros, and other data in the future: - When Ready is not designed • Install a toner cartridge made for one or more of the job. • Press Menu to open the Job Menu and cancel the current job. • To avoid this...flash resources is too complex. • Press Go to clear the message and continue printing. Install additional printer memory. See also: Setup menu The cartridge you are set to Auto, and exit the menus to open the Job Menu, and cancel the current job. Make sure the link buffers are...
... job The printer cannot defragment flash • Delete fonts, macros, and other data in the future: - When Ready is not designed • Install a toner cartridge made for one or more of the job. • Press Menu to open the Job Menu and cancel the current job. • To avoid this...flash resources is too complex. • Press Go to clear the message and continue printing. Install additional printer memory. See also: Setup menu The cartridge you are set to Auto, and exit the menus to open the Job Menu, and cancel the current job. Make sure the link buffers are...
User's Guide
Page 85
... to the printer through a USB port, but the parallel port is not set to Disabled. See also: How to change a toner cartridge Messages labeled 900-999 relate to clear the message. The printer cannot establish communications with matching trays are deleted. • Delete fonts, ...unsupported option card. Too many flash memory options are trying to download. • Press Go to utilize the remaining toner. • Replace the cartridge. • The Toner Low message is low. Turn off . The job may not print correctly. • Program new firmware for service,...
... to the printer through a USB port, but the parallel port is not set to Disabled. See also: How to change a toner cartridge Messages labeled 900-999 relate to clear the message. The printer cannot establish communications with matching trays are deleted. • Delete fonts, ...unsupported option card. Too many flash memory options are trying to download. • Press Go to utilize the remaining toner. • Replace the cartridge. • The Toner Low message is low. Turn off . The job may not print correctly. • Program new firmware for service,...
User's Guide
Page 88
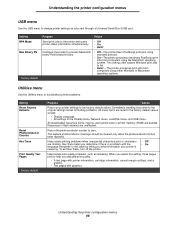
... printer status information simultaneously. • Off • On • Auto* Configure the printer to help you evaluate print quality: • A text page with printer information, cartridge information, current margin settings, and a graphic. • Two pages with the language interpreter or the cable by telling you what information your printer settings to...
... printer status information simultaneously. • Off • On • Auto* Configure the printer to help you evaluate print quality: • A text page with printer information, cartridge information, current margin settings, and a graphic. • Two pages with the language interpreter or the cable by telling you what information your printer settings to...
User's Guide
Page 90
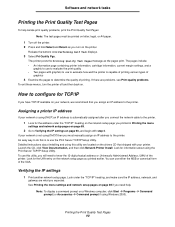
... use the Print Server TCP/IP Setup Utility. Printing the Print Quality Test Pages 90 The pages include: • An information page containing printer information, cartridge information, current margin settings, and a graphic to use to evaluate the print quality • Two pages with step 2. An easy way to do this utility...
... use the Print Server TCP/IP Setup Utility. Printing the Print Quality Test Pages 90 The pages include: • An information page containing printer information, cartridge information, current margin settings, and a graphic to use to evaluate the print quality • Two pages with step 2. An easy way to do this utility...
User's Guide
Page 92
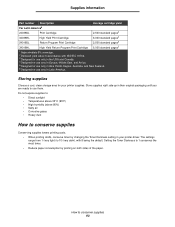
... do I order them? The photoconductor kit typically lasts up to 30,000 pages (at www.lexmark.com, or contact the place where you have to be replaced on your printer. There are : Part number Description Average cartridge yield World Wide 12A8302 Photoconductor kit 30,000 standard pages1 For the USA and Canada3...
... do I order them? The photoconductor kit typically lasts up to 30,000 pages (at www.lexmark.com, or contact the place where you have to be replaced on your printer. There are : Part number Description Average cartridge yield World Wide 12A8302 Photoconductor kit 30,000 standard pages1 For the USA and Canada3...
User's Guide
Page 93
Supplies information Part number Description Average cartridge yield For Latin America6 24038SL Print Cartridge 2,500 standard pages2 34038HL High Yield Print Cartridge 6,000 standard pages2 24018SL Return Program Print Cartridge 2,500 standard pages2 34018HL High Yield Return Program Print Cartridge 6,000 standard pages2 1 Approximately 5% coverage. 2 Declared yield value in accordance with 8 being the default. How to...
Supplies information Part number Description Average cartridge yield For Latin America6 24038SL Print Cartridge 2,500 standard pages2 34038HL High Yield Print Cartridge 6,000 standard pages2 24018SL Return Program Print Cartridge 2,500 standard pages2 34018HL High Yield Return Program Print Cartridge 6,000 standard pages2 1 Approximately 5% coverage. 2 Declared yield value in accordance with 8 being the default. How to...
User's Guide
Page 94
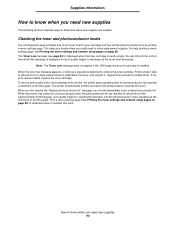
...following sections describe ways to determine when new supplies are needed. The printer automatically notifies you experience faded print, remove the toner cartridge. When you first receive the "Replace photoconductor kit" message, you might need to the printer, the printer stops operating after the...the photoconductor reaches this procedure multiple times. For help printing a menu settings page, see page 83) is displayed when the toner cartridge is displayed, but print quality begins to decrease as the toner level decreases. While the printer may continue to function properly after ...
...following sections describe ways to determine when new supplies are needed. The printer automatically notifies you experience faded print, remove the toner cartridge. When you first receive the "Replace photoconductor kit" message, you might need to the printer, the printer stops operating after the...the photoconductor reaches this procedure multiple times. For help printing a menu settings page, see page 83) is displayed when the toner cartridge is displayed, but print quality begins to decrease as the toner level decreases. While the printer may continue to function properly after ...
User's Guide
Page 95
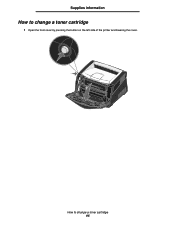
Supplies information How to change a toner cartridge 1 Open the front cover by pressing the button on the left side of the printer and lowering the cover. How to change a toner cartridge 95
Supplies information How to change a toner cartridge 1 Open the front cover by pressing the button on the left side of the printer and lowering the cover. How to change a toner cartridge 95

User's Guide
Page 96
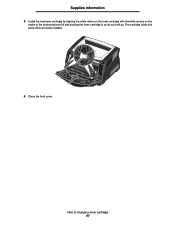
See Recycling Lexmark products on the base of the print cartridge assembly. b Pull the toner cartridge up and out using the handle. a b 3 Unpack the new toner cartridge. Note: You can use the packing material from the new cartridge to ship the old cartridge back to distribute the toner. How to change a toner cartridge 96 Supplies information 2 Remove the toner cartridge: a Press the button on page 98 for more information. 4 Firmly shake the cartridge in all directions to Lexmark for recycling.
See Recycling Lexmark products on the base of the print cartridge assembly. b Pull the toner cartridge up and out using the handle. a b 3 Unpack the new toner cartridge. Note: You can use the packing material from the new cartridge to ship the old cartridge back to distribute the toner. How to change a toner cartridge 96 Supplies information 2 Remove the toner cartridge: a Press the button on page 98 for more information. 4 Firmly shake the cartridge in all directions to Lexmark for recycling.
User's Guide
Page 97
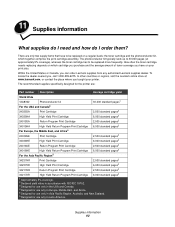
How to change a toner cartridge 97 The cartridge clicks into place when correctly installed. 6 Close the front cover. Supplies information 5 Install the new toner cartridge by aligning the white rollers on the toner cartridge with the white arrows on the tracks of the photoconductor kit and pushing the toner cartridge in as far as it will go.
How to change a toner cartridge 97 The cartridge clicks into place when correctly installed. 6 Close the front cover. Supplies information 5 Install the new toner cartridge by aligning the white rollers on the toner cartridge with the white arrows on the tracks of the photoconductor kit and pushing the toner cartridge in as far as it will go.

User's Guide
Page 99
Supplies information How to direct light for an extended period of the printer and lowering the cover. How to change a photoconductor kit Warning: When replacing a photoconductor kit, do not leave the toner cartridge or the new photoconductor kit exposed to change a photoconductor kit 99 Extended light exposure can cause print quality problems. 1 Open the front cover by pressing the button on the left side of time.
Supplies information How to direct light for an extended period of the printer and lowering the cover. How to change a photoconductor kit Warning: When replacing a photoconductor kit, do not leave the toner cartridge or the new photoconductor kit exposed to change a photoconductor kit 99 Extended light exposure can cause print quality problems. 1 Open the front cover by pressing the button on the left side of time.
User's Guide
Page 100
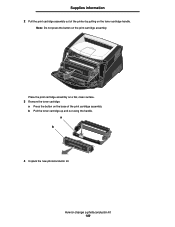
Supplies information 2 Pull the print cartridge assembly out of the print cartridge assembly. Place the print cartridge assembly on a flat, clean surface. 3 Remove the toner cartridge: a Press the button on the base of the printer by pulling on the print cartridge assembly. b Pull the toner cartridge up and out using the handle. Note: Do not press the button on the toner cartridge handle. a b 4 Unpack the new photoconductor kit. How to change a photoconductor kit 100
Supplies information 2 Pull the print cartridge assembly out of the print cartridge assembly. Place the print cartridge assembly on a flat, clean surface. 3 Remove the toner cartridge: a Press the button on the base of the printer by pulling on the print cartridge assembly. b Pull the toner cartridge up and out using the handle. Note: Do not press the button on the toner cartridge handle. a b 4 Unpack the new photoconductor kit. How to change a photoconductor kit 100

User's Guide
Page 101
... by aligning the green arrows on the guides of the photoconductor kit and pushing the toner cartridge in as far as it will go . 7 Close the front cover. Note: For information about resetting the photoconductor kit counter, see the instruction sheet that ...shipped with the green arrows on the tracks in the printer and pushing the print cartridge assembly in as far as it will go . How to change a photoconductor kit 101 Supplies information 5 Install the toner...
... by aligning the green arrows on the guides of the photoconductor kit and pushing the toner cartridge in as far as it will go . 7 Close the front cover. Note: For information about resetting the photoconductor kit counter, see the instruction sheet that ...shipped with the green arrows on the tracks in the printer and pushing the print cartridge assembly in as far as it will go . How to change a photoconductor kit 101 Supplies information 5 Install the toner...


