User's Guide
Page 5
... the time the printer spends in each mode's energy usage. Setting the Power Saver Timeout to the EPA Sleep Mode. Lexmark E340, E342n This limited warranty applies to present the feature or option with an energy-saving mode called the Power Saver Timeout. Limited warranty... that the warranty period for any supplies and for any other than Lexmark or a Lexmark authorized servicer • Operation of a product beyond repair, or if the product is not free of all print cartridges, programs, data, and removable storage media (unless directed otherwise by lowering power consumption during...
... the time the printer spends in each mode's energy usage. Setting the Power Saver Timeout to the EPA Sleep Mode. Lexmark E340, E342n This limited warranty applies to present the feature or option with an energy-saving mode called the Power Saver Timeout. Limited warranty... that the warranty period for any supplies and for any other than Lexmark or a Lexmark authorized servicer • Operation of a product beyond repair, or if the product is not free of all print cartridges, programs, data, and removable storage media (unless directed otherwise by lowering power consumption during...
User's Guide
Page 10
... to conserve supplies 93 How to know when you need new supplies 94 Checking the toner and photoconductor levels 94 How to change a toner cartridge 95 Recycling Lexmark products 98 How to change a photoconductor kit 99 Chapter 12: Administration 102 Disabling the operator panel menus 102 Enabling the menus 102 Restoring factory...
... to conserve supplies 93 How to know when you need new supplies 94 Checking the toner and photoconductor levels 94 How to change a toner cartridge 95 Recycling Lexmark products 98 How to change a photoconductor kit 99 Chapter 12: Administration 102 Disabling the operator panel menus 102 Enabling the menus 102 Restoring factory...
User's Guide
Page 36
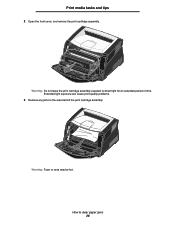
Print media tasks and tips 2 Open the front cover, and remove the print cartridge assembly. Extended light exposure can cause print quality problems. 3 Remove any jams in the area behind the print cartridge assembly. How to direct light for an extended period of time. Warning: Fuser or area may be hot. Warning: Do not leave the print cartridge assembly exposed to clear paper jams 36
Print media tasks and tips 2 Open the front cover, and remove the print cartridge assembly. Extended light exposure can cause print quality problems. 3 Remove any jams in the area behind the print cartridge assembly. How to direct light for an extended period of time. Warning: Fuser or area may be hot. Warning: Do not leave the print cartridge assembly exposed to clear paper jams 36
User's Guide
Page 37
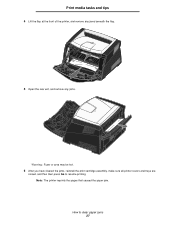
How to resume printing. Note: The printer reprints the pages that caused the paper jam. Print media tasks and tips 4 Lift the flap at the front of the printer, and remove any jams beneath the flap. 5 Open the rear exit, and remove any jams. Warning: Fuser or area may be hot. 6 After you have cleared the jams, reinstall the print cartridge assembly, make sure all printer covers and trays are closed, and then then press Go to clear paper jams 37
How to resume printing. Note: The printer reprints the pages that caused the paper jam. Print media tasks and tips 4 Lift the flap at the front of the printer, and remove any jams beneath the flap. 5 Open the rear exit, and remove any jams. Warning: Fuser or area may be hot. 6 After you have cleared the jams, reinstall the print cartridge assembly, make sure all printer covers and trays are closed, and then then press Go to clear paper jams 37
User's Guide
Page 70
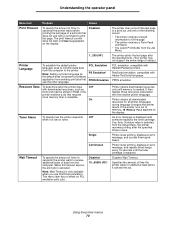
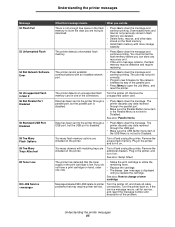
...effect on the display. An error message is replaced. The print timeout counter does not start until someone replaces the toner cartridge. Disabled 15...65535 (40*) Disables Wait Timeout. Printer retains all downloaded resources for additional data before printing the last ... PostScript emulation. Continuous Printer stops printing, displays an error message, and repeats three beeps every 10 seconds until the toner cartridge is displayed until Waiting appears on PCL emulation print jobs. PCL Emulation PS Emulation* PPDS Emulation PCL emulation, compatible with downloaded...
...effect on the display. An error message is replaced. The print timeout counter does not start until someone replaces the toner cartridge. Disabled 15...65535 (40*) Disables Wait Timeout. Printer retains all downloaded resources for additional data before printing the last ... PostScript emulation. Continuous Printer stops printing, displays an error message, and repeats three beeps every 10 seconds until the toner cartridge is displayed until Waiting appears on PCL emulation print jobs. PCL Emulation PS Emulation* PPDS Emulation PCL emulation, compatible with downloaded...
User's Guide
Page 80
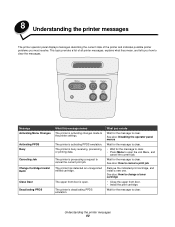
...; Wait for the message to clear. Wait for the message to clear. See also: How to cancel a print job Remove the indicated print cartridge, and install a new one. Wait for the message to cancel the current print job. Understanding the printer messages 80 The printer has detected an... unsupported refilled cartridge. The printer is deactivating PPDS emulation. The upper front door is processing a request to clear. The printer is open the Job Menu, and...
...; Wait for the message to clear. Wait for the message to clear. See also: How to cancel a print job Remove the indicated print cartridge, and install a new one. Wait for the message to cancel the current print job. Understanding the printer messages 80 The printer has detected an... unsupported refilled cartridge. The printer is deactivating PPDS emulation. The upper front door is processing a request to clear. The printer is open the Job Menu, and...

User's Guide
Page 83
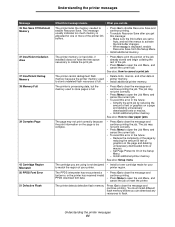
...formatted data. • Press Go to clear the message and continue printing. See also: Using the operator panel to change a toner cartridge 34 Short Paper The printer has determined that prompted the message. • Make sure the Paper Size setting in the source specified on... printer messages 83 Wait for the formatted data. • Press Menu to clear. Install a print cartridge, or replace the defective cartridge. 32 Unsupported Print Cartridge An unsupported print cartridge is defective. If MP Feeder Size is set to Universal, make sure your paper is correct for the...
...formatted data. • Press Go to clear the message and continue printing. See also: Using the operator panel to change a toner cartridge 34 Short Paper The printer has determined that prompted the message. • Make sure the Paper Size setting in the source specified on... printer messages 83 Wait for the formatted data. • Press Menu to clear. Install a print cartridge, or replace the defective cartridge. 32 Unsupported Print Cartridge An unsupported print cartridge is defective. If MP Feeder Size is set to Universal, make sure your paper is correct for the...
User's Guide
Page 84
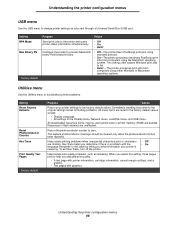
...printer region. Press Go to open the Job Menu, and cancel the current job. to enable Resource Save. See also: Setup menu The cartridge you can do The printer lacks the memory needed to store undeleted flash resources is displayed, enable Resource Save from the Setup Menu. •... printer messages Message 35 Res Save Off Deficient Memory 37 Insufficient Collation Area 37 Insufficient Defrag Memory 38 Memory Full 39 Complex Page 42 Cartridge Region Mismatch 50 PPDS Font Error 51 Defective Flash What this message: - The PPDS interpreter has encountered a font error, or the ...
...printer region. Press Go to open the Job Menu, and cancel the current job. to enable Resource Save. See also: Setup menu The cartridge you can do The printer lacks the memory needed to store undeleted flash resources is displayed, enable Resource Save from the Setup Menu. •... printer messages Message 35 Res Save Off Deficient Memory 37 Insufficient Collation Area 37 Insufficient Defrag Memory 38 Memory Full 39 Complex Page 42 Cartridge Region Mismatch 50 PPDS Font Error 51 Defective Flash What this message: - The PPDS interpreter has encountered a font error, or the ...
User's Guide
Page 85
...continue printing. Remove the memory card in one now. • Shake the print cartridge to utilize the remaining toner. • Replace the cartridge. • The Toner Low message is displayed until you replace the cartridge. Remove the excess flash memory. If you do There is not set to clear... the message. See also: How to change a toner cartridge Messages labeled 900-999 relate to printer problems that the toner supply in the print cartridge is disabled. • Press Go to Disabled. You must format the flash memory before you ...
...continue printing. Remove the memory card in one now. • Shake the print cartridge to utilize the remaining toner. • Replace the cartridge. • The Toner Low message is displayed until you replace the cartridge. Remove the excess flash memory. If you do There is not set to clear... the message. See also: How to change a toner cartridge Messages labeled 900-999 relate to printer problems that the toner supply in the print cartridge is disabled. • Press Go to Disabled. You must format the flash memory before you ...
User's Guide
Page 88
... the photoconductor counter to help you select this setting, three pages print to zero. When you evaluate print quality: • A text page with printer information, cartridge information, current margin settings, and a graphic. • Two pages with the language interpreter or the cable by telling you determine if there is receiving. Sometimes...
... the photoconductor counter to help you select this setting, three pages print to zero. When you evaluate print quality: • A text page with printer information, cartridge information, current margin settings, and a graphic. • Two pages with the language interpreter or the cable by telling you determine if there is receiving. Sometimes...
User's Guide
Page 90
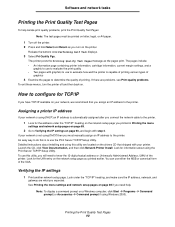
... you printed earlier. Software and network tasks Printing the Print Quality Test Pages To help . The pages include: • An information page containing printer information, cartridge information, current margin settings, and a graphic to use either the MSB or canonical form of the printer. Assigning a printer IP address If your printer. Launch...
... you printed earlier. Software and network tasks Printing the Print Quality Test Pages To help . The pages include: • An information page containing printer information, cartridge information, current margin settings, and a graphic to use either the MSB or canonical form of the printer. Assigning a printer IP address If your printer. Launch...
User's Guide
Page 92
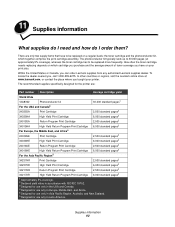
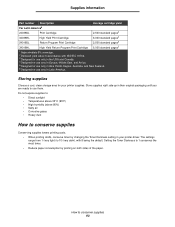
... printer. 11 Supplies information What supplies do I need and how do I order them? To locate the dealer nearest you can order Lexmark supplies from any authorized Lexmark supplies dealer. There are : Part number Description Average cartridge yield World Wide 12A8302 Photoconductor kit 30,000 standard pages1 For the USA and Canada3 24035SA Print...
... printer. 11 Supplies information What supplies do I need and how do I order them? To locate the dealer nearest you can order Lexmark supplies from any authorized Lexmark supplies dealer. There are : Part number Description Average cartridge yield World Wide 12A8302 Photoconductor kit 30,000 standard pages1 For the USA and Canada3 24035SA Print...
User's Guide
Page 93
... use only in Latin America. Supplies information Part number Description Average cartridge yield For Latin America6 24038SL Print Cartridge 2,500 standard pages2 34038HL High Yield Print Cartridge 6,000 standard pages2 24018SL Return Program Print Cartridge 2,500 standard pages2 34018HL High Yield Return Program Print Cartridge 6,000 standard pages2 1 Approximately 5% coverage. 2 Declared yield value in accordance...
... use only in Latin America. Supplies information Part number Description Average cartridge yield For Latin America6 24038SL Print Cartridge 2,500 standard pages2 34038HL High Yield Print Cartridge 6,000 standard pages2 24018SL Return Program Print Cartridge 2,500 standard pages2 34018HL High Yield Return Program Print Cartridge 6,000 standard pages2 1 Approximately 5% coverage. 2 Declared yield value in accordance...
User's Guide
Page 94
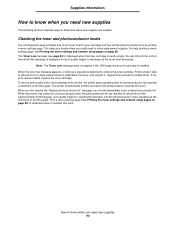
...page 89) to determine when it . You can determine approximately how much toner is left in your cartridge and how full the photoconductor kit is nearly empty. When the toner low message appears, or when you...Note: The Toner Low message does not appear if the 1500-page starter print cartridge is displayed, but print quality begins to decrease as the toner level decreases. If the print remains ...faded, replace the toner cartridge. While the printer may continue to function properly after the photoconductor has reached a maximum of...
...page 89) to determine when it . You can determine approximately how much toner is left in your cartridge and how full the photoconductor kit is nearly empty. When the toner low message appears, or when you...Note: The Toner Low message does not appear if the 1500-page starter print cartridge is displayed, but print quality begins to decrease as the toner level decreases. If the print remains ...faded, replace the toner cartridge. While the printer may continue to function properly after the photoconductor has reached a maximum of...
User's Guide
Page 95
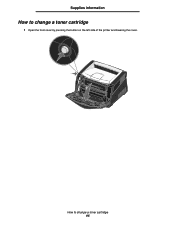
Supplies information How to change a toner cartridge 1 Open the front cover by pressing the button on the left side of the printer and lowering the cover. How to change a toner cartridge 95
Supplies information How to change a toner cartridge 1 Open the front cover by pressing the button on the left side of the printer and lowering the cover. How to change a toner cartridge 95

User's Guide
Page 96
Supplies information 2 Remove the toner cartridge: a Press the button on page 98 for recycling. Note: You can use the packing material from the new cartridge to ship the old cartridge back to Lexmark for more information. 4 Firmly shake the cartridge in all directions to change a toner cartridge 96 b Pull the toner cartridge up and out using the handle. See Recycling Lexmark products on the base of the print cartridge assembly. a b 3 Unpack the new toner cartridge. How to distribute the toner.
Supplies information 2 Remove the toner cartridge: a Press the button on page 98 for recycling. Note: You can use the packing material from the new cartridge to ship the old cartridge back to Lexmark for more information. 4 Firmly shake the cartridge in all directions to change a toner cartridge 96 b Pull the toner cartridge up and out using the handle. See Recycling Lexmark products on the base of the print cartridge assembly. a b 3 Unpack the new toner cartridge. How to distribute the toner.
User's Guide
Page 97
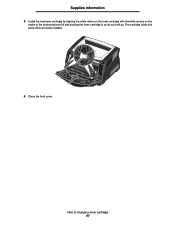
The cartridge clicks into place when correctly installed. 6 Close the front cover. How to change a toner cartridge 97 Supplies information 5 Install the new toner cartridge by aligning the white rollers on the toner cartridge with the white arrows on the tracks of the photoconductor kit and pushing the toner cartridge in as far as it will go.
The cartridge clicks into place when correctly installed. 6 Close the front cover. How to change a toner cartridge 97 Supplies information 5 Install the new toner cartridge by aligning the white rollers on the toner cartridge with the white arrows on the tracks of the photoconductor kit and pushing the toner cartridge in as far as it will go.

User's Guide
Page 99
How to change a photoconductor kit Warning: When replacing a photoconductor kit, do not leave the toner cartridge or the new photoconductor kit exposed to change a photoconductor kit 99 Extended light exposure can cause print quality problems. 1 Open the front cover by pressing the button on the left side of time. Supplies information How to direct light for an extended period of the printer and lowering the cover.
How to change a photoconductor kit Warning: When replacing a photoconductor kit, do not leave the toner cartridge or the new photoconductor kit exposed to change a photoconductor kit 99 Extended light exposure can cause print quality problems. 1 Open the front cover by pressing the button on the left side of time. Supplies information How to direct light for an extended period of the printer and lowering the cover.
User's Guide
Page 100
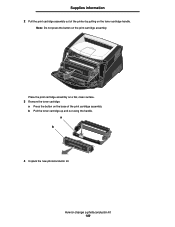
How to change a photoconductor kit 100 Note: Do not press the button on the toner cartridge handle. a b 4 Unpack the new photoconductor kit. Place the print cartridge assembly on a flat, clean surface. 3 Remove the toner cartridge: a Press the button on the base of the printer by pulling on the print cartridge assembly. Supplies information 2 Pull the print cartridge assembly out of the print cartridge assembly. b Pull the toner cartridge up and out using the handle.
How to change a photoconductor kit 100 Note: Do not press the button on the toner cartridge handle. a b 4 Unpack the new photoconductor kit. Place the print cartridge assembly on a flat, clean surface. 3 Remove the toner cartridge: a Press the button on the base of the printer by pulling on the print cartridge assembly. Supplies information 2 Pull the print cartridge assembly out of the print cartridge assembly. b Pull the toner cartridge up and out using the handle.

User's Guide
Page 101
...the tracks of the photoconductor kit and pushing the toner cartridge in as far as it will go . 7 Close the front cover. Supplies information 5 Install the toner cartridge into the printer by aligning the white rollers on the toner cartridge with the white arrows on the tracks in the ...printer and pushing the print cartridge assembly in as far as it will go . Note: For information about...
...the tracks of the photoconductor kit and pushing the toner cartridge in as far as it will go . 7 Close the front cover. Supplies information 5 Install the toner cartridge into the printer by aligning the white rollers on the toner cartridge with the white arrows on the tracks in the ...printer and pushing the print cartridge assembly in as far as it will go . Note: For information about...


