User's Guide
Page 10
... them 92 Storing supplies ...93 How to conserve supplies 93 How to know when you need new supplies 94 Checking the toner and photoconductor levels 94 How to change a toner cartridge 95 Recycling Lexmark products 98 How to change a photoconductor kit 99 Chapter 12: Administration 102 Disabling the operator panel menus 102 Enabling the...
... them 92 Storing supplies ...93 How to conserve supplies 93 How to know when you need new supplies 94 Checking the toner and photoconductor levels 94 How to change a toner cartridge 95 Recycling Lexmark products 98 How to change a photoconductor kit 99 Chapter 12: Administration 102 Disabling the operator panel menus 102 Enabling the...
User's Guide
Page 70
... every 10 seconds until Waiting appears on the display. This menu item has no effect on toner. The print timeout counter does not start until the toner cartridge is replaced. PostScript emulation, compatible with Hewlett-Packard printers. An error message is displayed until memory... the default printer language used to print the page. PPDS emulation. On Printer retains downloaded resources only until someone replaces the toner cartridge. Printer retains all printer languages during language changes and printer resets. If the printer runs out of data from the Job Menu...
... every 10 seconds until Waiting appears on the display. This menu item has no effect on toner. The print timeout counter does not start until the toner cartridge is replaced. PostScript emulation, compatible with Hewlett-Packard printers. An error message is displayed until memory... the default printer language used to print the page. PPDS emulation. On Printer retains downloaded resources only until someone replaces the toner cartridge. Printer retains all printer languages during language changes and printer resets. If the printer runs out of data from the Job Menu...
User's Guide
Page 80
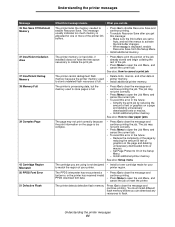
...Door Deactivating PPDS What this message means The printer is processing a request to clear. The printer has detected an unsupported refilled cartridge. Understanding the printer messages 80 The printer is activating PPDS emulation. See also: How to the printer settings. The printer...clear. The printer is busy receiving, processing, or printing data. Wait for the message to change a toner cartridge • Close the upper front door. • Install the print cartridge. The printer is open the Job Menu, and cancel the current job. The upper front door is ...
...Door Deactivating PPDS What this message means The printer is processing a request to clear. The printer has detected an unsupported refilled cartridge. Understanding the printer messages 80 The printer is activating PPDS emulation. See also: How to the printer settings. The printer...clear. The printer is busy receiving, processing, or printing data. Wait for the message to change a toner cartridge • Close the upper front door. • Install the print cartridge. The printer is open the Job Menu, and cancel the current job. The upper front door is ...

User's Guide
Page 83
...; All menu settings return to clear the message and continue printing. All settings in the source specified on toner. • Shake the print cartridge to utilize the remaining toner. • Replace the cartridge. • Press Go to the factory default setting except: - Note: If you do Resetting the Printer...line of the paper in the Parallel Menu, Serial Menu, Network Menu, USB Menu, and Fax Menu. See also: How to change a toner cartridge 34 Short Paper The printer has determined that prompted the message. • Make sure the Paper Size setting in the Setup Menu. - The...
...; All menu settings return to clear the message and continue printing. All settings in the source specified on toner. • Shake the print cartridge to utilize the remaining toner. • Replace the cartridge. • Press Go to the factory default setting except: - Note: If you do Resetting the Printer...line of the paper in the Parallel Menu, Serial Menu, Network Menu, USB Menu, and Fax Menu. See also: How to change a toner cartridge 34 Short Paper The printer has determined that prompted the message. • Make sure the Paper Size setting in the Setup Menu. - The...
User's Guide
Page 84
... the printer messages Message 35 Res Save Off Deficient Memory 37 Insufficient Collation Area 37 Insufficient Defrag Memory 38 Memory Full 39 Complex Page 42 Cartridge Region Mismatch 50 PPDS Font Error 51 Defective Flash What this message: - This message usually indicates too much memory is too complex. •... menus to match the region of the job. • Press Menu to On in the future: - When Ready is not designed • Install a toner cartridge made for one or more of text or graphics on the page is allocated for your to activate the link buffer changes. - See also: How...
... the printer messages Message 35 Res Save Off Deficient Memory 37 Insufficient Collation Area 37 Insufficient Defrag Memory 38 Memory Full 39 Complex Page 42 Cartridge Region Mismatch 50 PPDS Font Error 51 Defective Flash What this message: - This message usually indicates too much memory is too complex. •... menus to match the region of the job. • Press Menu to On in the future: - When Ready is not designed • Install a toner cartridge made for one or more of text or graphics on the page is allocated for your to activate the link buffer changes. - See also: How...
User's Guide
Page 85
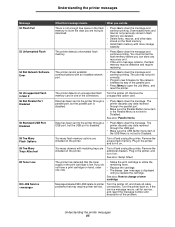
...Sheet The printer has detected that may require printer service. See also: How to change a toner cartridge Messages labeled 900-999 relate to printer problems that the toner supply in the print cartridge is disabled. • Press Go to clear the message. If the service message recurs,... Disabled. Downloaded fonts and macros not previously stored in one now. • Shake the print cartridge to utilize the remaining toner. • Replace the cartridge. • The Toner Low message is not set to clear the message and continue printing. The printer cannot establish communications...
...Sheet The printer has detected that may require printer service. See also: How to change a toner cartridge Messages labeled 900-999 relate to printer problems that the toner supply in the print cartridge is disabled. • Press Go to clear the message. If the service message recurs,... Disabled. Downloaded fonts and macros not previously stored in one now. • Shake the print cartridge to utilize the remaining toner. • Replace the cartridge. • The Toner Low message is not set to clear the message and continue printing. The printer cannot establish communications...
User's Guide
Page 92
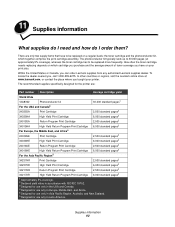
.... Within the United States or Canada, you have to be replaced on your printer. In other countries or regions, visit the Lexmark online store at approximately 5% coverage), whereas the toner cartridge has to be replaced more frequently. To locate the dealer nearest you bought your print jobs. Supplies information 92 11 Supplies information...
.... Within the United States or Canada, you have to be replaced on your printer. In other countries or regions, visit the Lexmark online store at approximately 5% coverage), whereas the toner cartridge has to be replaced more frequently. To locate the dealer nearest you bought your print jobs. Supplies information 92 11 Supplies information...
User's Guide
Page 94
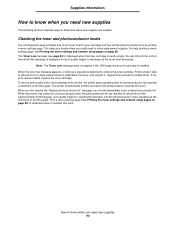
...How to know when you might need to order replacement supplies. Repeat this point. If the print remains faded, replace the toner cartridge. Supplies information How to know when you before the photoconductor reaches this message is by printing a menu settings page. This ... receive the "Replace photoconductor kit" message, you experience faded print, remove the toner cartridge. For help printing a menu settings page, see page 83) is displayed when the toner cartridge is installed. Checking the toner and photoconductor levels You can still print for a short time while this point...
...How to know when you might need to order replacement supplies. Repeat this point. If the print remains faded, replace the toner cartridge. Supplies information How to know when you before the photoconductor reaches this message is by printing a menu settings page. This ... receive the "Replace photoconductor kit" message, you experience faded print, remove the toner cartridge. For help printing a menu settings page, see page 83) is displayed when the toner cartridge is installed. Checking the toner and photoconductor levels You can still print for a short time while this point...
User's Guide
Page 95
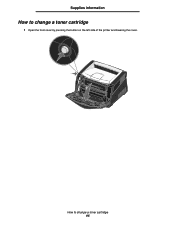
Supplies information How to change a toner cartridge 1 Open the front cover by pressing the button on the left side of the printer and lowering the cover. How to change a toner cartridge 95
Supplies information How to change a toner cartridge 1 Open the front cover by pressing the button on the left side of the printer and lowering the cover. How to change a toner cartridge 95

User's Guide
Page 96
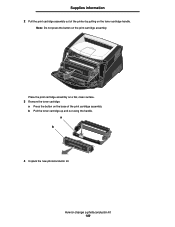
a b 3 Unpack the new toner cartridge. Supplies information 2 Remove the toner cartridge: a Press the button on page 98 for recycling. b Pull the toner cartridge up and out using the handle. See Recycling Lexmark products on the base of the print cartridge assembly. Note: You can use the packing material from the new cartridge to ship the old cartridge back to change a toner cartridge 96 How to Lexmark for more information. 4 Firmly shake the cartridge in all directions to distribute the toner.
a b 3 Unpack the new toner cartridge. Supplies information 2 Remove the toner cartridge: a Press the button on page 98 for recycling. b Pull the toner cartridge up and out using the handle. See Recycling Lexmark products on the base of the print cartridge assembly. Note: You can use the packing material from the new cartridge to ship the old cartridge back to change a toner cartridge 96 How to Lexmark for more information. 4 Firmly shake the cartridge in all directions to distribute the toner.
User's Guide
Page 97
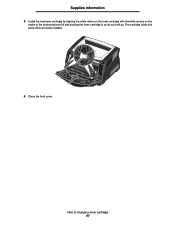
The cartridge clicks into place when correctly installed. 6 Close the front cover. How to change a toner cartridge 97 Supplies information 5 Install the new toner cartridge by aligning the white rollers on the toner cartridge with the white arrows on the tracks of the photoconductor kit and pushing the toner cartridge in as far as it will go.
The cartridge clicks into place when correctly installed. 6 Close the front cover. How to change a toner cartridge 97 Supplies information 5 Install the new toner cartridge by aligning the white rollers on the toner cartridge with the white arrows on the tracks of the photoconductor kit and pushing the toner cartridge in as far as it will go.

User's Guide
Page 99
Supplies information How to change a photoconductor kit Warning: When replacing a photoconductor kit, do not leave the toner cartridge or the new photoconductor kit exposed to change a photoconductor kit 99 Extended light exposure can cause print quality problems. 1 Open the front cover by pressing the button on the left side of time. How to direct light for an extended period of the printer and lowering the cover.
Supplies information How to change a photoconductor kit Warning: When replacing a photoconductor kit, do not leave the toner cartridge or the new photoconductor kit exposed to change a photoconductor kit 99 Extended light exposure can cause print quality problems. 1 Open the front cover by pressing the button on the left side of time. How to direct light for an extended period of the printer and lowering the cover.
User's Guide
Page 100
b Pull the toner cartridge up and out using the handle. a b 4 Unpack the new photoconductor kit. How to change a photoconductor kit 100 Supplies information 2 Pull the print cartridge assembly out of the print cartridge assembly. Note: Do not press the button on the toner cartridge handle. Place the print cartridge assembly on a flat, clean surface. 3 Remove the toner cartridge: a Press the button on the base of the printer by pulling on the print cartridge assembly.
b Pull the toner cartridge up and out using the handle. a b 4 Unpack the new photoconductor kit. How to change a photoconductor kit 100 Supplies information 2 Pull the print cartridge assembly out of the print cartridge assembly. Note: Do not press the button on the toner cartridge handle. Place the print cartridge assembly on a flat, clean surface. 3 Remove the toner cartridge: a Press the button on the base of the printer by pulling on the print cartridge assembly.

User's Guide
Page 101
...as far as it will go . The cartridge clicks into place when correctly installed. 6 Install the print cartridge assembly into the new print cartridge assembly by aligning the green arrows on the guides of the photoconductor kit and pushing the toner cartridge in as far as it will go .... 7 Close the front cover. How to change a photoconductor kit 101 Supplies information 5 Install the toner cartridge into the printer by aligning the white rollers on the toner cartridge with the white arrows on the...
...as far as it will go . The cartridge clicks into place when correctly installed. 6 Install the print cartridge assembly into the new print cartridge assembly by aligning the green arrows on the guides of the photoconductor kit and pushing the toner cartridge in as far as it will go .... 7 Close the front cover. How to change a photoconductor kit 101 Supplies information 5 Install the toner cartridge into the printer by aligning the white rollers on the toner cartridge with the white arrows on the...
User's Guide
Page 104
... (missing characters) when printing envelopes, check your printer driver, select Custom 6-Rough Env from the manual feeder. Yes, you have another cartridge to send both pages of the toner cartridge somewhat, remove the cartridge, firmly shake it from the Paper Type menu. manual feeder. I want to manually duplex card stock, but I don't have to...Utility. The Utility will be installed on the drivers CD that when the printer tries to smooth-textured envelopes. If print remains faded, replace the toner cartridge. To achieve the desired effect, you can still print.
... (missing characters) when printing envelopes, check your printer driver, select Custom 6-Rough Env from the manual feeder. Yes, you have another cartridge to send both pages of the toner cartridge somewhat, remove the cartridge, firmly shake it from the Paper Type menu. manual feeder. I want to manually duplex card stock, but I don't have to...Utility. The Utility will be installed on the drivers CD that when the printer tries to smooth-textured envelopes. If print remains faded, replace the toner cartridge. To achieve the desired effect, you can still print.
User's Guide
Page 106
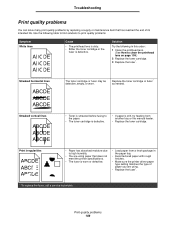
... specifications. • The fuser is worn or defective. • Load paper from another tray or the manual feeder. • Replace the toner cartridge. Troubleshooting Print quality problems You can solve many print quality problems by replacing a supply or maintenance item that has reached the end of paper ... before fusing to print quality problems. Symptom White lines ABCDE ABCDE ABCDE Cause • The printhead lens is dirty. • Either the toner cartridge or the fuser is stiff, try feeding from a fresh package in this order: 1 Clean the printhead lens. (See How to clean the...
... specifications. • The fuser is worn or defective. • Load paper from another tray or the manual feeder. • Replace the toner cartridge. Troubleshooting Print quality problems You can solve many print quality problems by replacing a supply or maintenance item that has reached the end of paper ... before fusing to print quality problems. Symptom White lines ABCDE ABCDE ABCDE Cause • The printhead lens is dirty. • Either the toner cartridge or the fuser is stiff, try feeding from a fresh package in this order: 1 Clean the printhead lens. (See How to clean the...
User's Guide
Page 107
... • The Form Type setting in the printer driver is set to print. • Replace the toner cartridge. Uneven print density ABCDE ABCDE ABCDE The toner cartridge is set to something other than transparency. • Use only transparencies recommended by the printer manufacturer. •... sending the job to print. • Replace the toner cartridge. • You are using. • The fuser is worn or defective. • The Toner Darkness setting is too dark. • The toner cartridge is defective. • Replace the toner cartridge. • Replace the fuser*. • Call for...
... • The Form Type setting in the printer driver is set to print. • Replace the toner cartridge. Uneven print density ABCDE ABCDE ABCDE The toner cartridge is set to something other than transparency. • Use only transparencies recommended by the printer manufacturer. •... sending the job to print. • Replace the toner cartridge. • You are using. • The fuser is worn or defective. • The Toner Darkness setting is too dark. • The toner cartridge is defective. • Replace the toner cartridge. • Replace the fuser*. • Call for...

User's Guide
Page 108
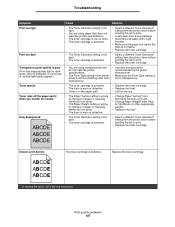
...Change Paper Weight to the bin the type of the paper. Skewed print (Print is correct for exits to Smooth. Remove and then reinsert the toner cartridge. (Print only appears on one side of the page.) Incorrect margins The Form Size setting in the tray. Paper curls badly once it prints... wrong for the paper or specialty media you are using . * To replace the fuser, call a service technician. Uneven printing DE DE DE The toner cartridge is loaded in the printer driver is different than the size paper that they are snug against the sides of paper or specialty media you...
...Change Paper Weight to the bin the type of the paper. Skewed print (Print is correct for exits to Smooth. Remove and then reinsert the toner cartridge. (Print only appears on one side of the page.) Incorrect margins The Form Size setting in the tray. Paper curls badly once it prints... wrong for the paper or specialty media you are using . * To replace the fuser, call a service technician. Uneven printing DE DE DE The toner cartridge is loaded in the printer driver is different than the size paper that they are snug against the sides of paper or specialty media you...

User's Guide
Page 110
Troubleshooting 3 Remove the print cartridge assembly out of time. Warning: Do not leave the print cartridge assembly exposed to direct light for an extended period of the printer by pulling on the toner cartridge handle. Extended light exposure can cause print quality problems. Print quality problems 110 Place the print cartridge assembly on the print cartridge assembly. Note: Do not press the button on a flat, clean surface.
Troubleshooting 3 Remove the print cartridge assembly out of time. Warning: Do not leave the print cartridge assembly exposed to direct light for an extended period of the printer by pulling on the toner cartridge handle. Extended light exposure can cause print quality problems. Print quality problems 110 Place the print cartridge assembly on the print cartridge assembly. Note: Do not press the button on a flat, clean surface.
User's Guide
Page 116
... 73 Font Priority 73 PDF Menu 73 power saver configuring 69 Power Saver (Setup Menu) 69 Print Buffer (Job Menu) 66 print cartridge See toner cartridge Print Directory (Utilities Menu) 65 Print Fonts (Utilities Menu) 65 print media jams clearing 35 Print Menus (Utilities Menu) 65 Print Net...(PostScript Menu) 73 print quality problems 106 Print Quality Test Pages (Utilities menu) 88 print quality, adjusting PictureGrade 67 print resolution 67 toner darkness 67 Print Resolution (Quality Menu) 67 print timeout configuring 70 Print Timeout (Setup Menu) 70 printer resetting 66 taking offline 55 with...
... 73 Font Priority 73 PDF Menu 73 power saver configuring 69 Power Saver (Setup Menu) 69 Print Buffer (Job Menu) 66 print cartridge See toner cartridge Print Directory (Utilities Menu) 65 Print Fonts (Utilities Menu) 65 print media jams clearing 35 Print Menus (Utilities Menu) 65 Print Net...(PostScript Menu) 73 print quality problems 106 Print Quality Test Pages (Utilities menu) 88 print quality, adjusting PictureGrade 67 print resolution 67 toner darkness 67 Print Resolution (Quality Menu) 67 print timeout configuring 70 Print Timeout (Setup Menu) 70 printer resetting 66 taking offline 55 with...


