User's Guide
Page 13
...computer. Installing printer software using the drivers CD You can be available on the drivers CD. Updates for the printer software may be used . Windows The drivers CD can install printer drivers and software for the following operating systems must install some necessary printer software on the printer. If the... OK. 13 The Plug and Play screen appears, and a printer object is the letter of the printer software on the Lexmark Web site at www.lexmark.com. You must use the Add Printer Wizard to install a Local printer, then click Have Disk. 4 Specify the location of the ...
...computer. Installing printer software using the drivers CD You can be available on the drivers CD. Updates for the printer software may be used . Windows The drivers CD can install printer drivers and software for the following operating systems must install some necessary printer software on the printer. If the... OK. 13 The Plug and Play screen appears, and a printer object is the letter of the printer software on the Lexmark Web site at www.lexmark.com. You must use the Add Printer Wizard to install a Local printer, then click Have Disk. 4 Specify the location of the ...
User's Guide
Page 14
... on the computer. Installing the Local Printer Settings Utility 1 Launch the drivers CD. 2 Click Install Printer Software. 3 Select the Custom install path. 4 Under Tools, select Local Printer Settings Utility. 5 Click Finish to menu. To access the Local Printer Setup Utility from your desktop, click Start Æ Programs Æ Lexmark Æ Local Printer Settings Utility. b Double-click the...
... on the computer. Installing the Local Printer Settings Utility 1 Launch the drivers CD. 2 Click Install Printer Software. 3 Select the Custom install path. 4 Under Tools, select Local Printer Settings Utility. 5 Click Finish to menu. To access the Local Printer Setup Utility from your desktop, click Start Æ Programs Æ Lexmark Æ Local Printer Settings Utility. b Double-click the...

User's Guide
Page 15
.... 3 Double-click Desktop Printer Utility. 4 Select Printer (USB), and click OK. 5 In the USB Printer Selection section, click Change. All the printer driver packages support local printing using Lexmark printers in the Printer List, make sure the USB cable is properly connected, and the printer is turned on the computer. The driver package for the printer. a Insert the drivers CD. A PPD file...
.... 3 Double-click Desktop Printer Utility. 4 Select Printer (USB), and click OK. 5 In the USB Printer Selection section, click Change. All the printer driver packages support local printing using Lexmark printers in the Printer List, make sure the USB cable is properly connected, and the printer is turned on the computer. The driver package for the printer. a Insert the drivers CD. A PPD file...
User's Guide
Page 16
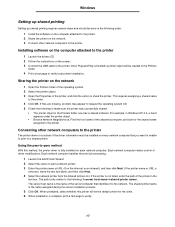
... using a local cable, such as Ethernet. • Printer drivers are installed on every computer you want to enable to print directly to the network printer. 16 Both network printing methods require the installation of printer software and the creation of the computers on the network ...using a network cable, such as USB. • Printer drivers are typically installed on the screen. Select...
... using a local cable, such as Ethernet. • Printer drivers are installed on every computer you want to enable to print directly to the network printer. 16 Both network printing methods require the installation of printer software and the creation of the computers on the network ...using a network cable, such as USB. • Printer drivers are typically installed on the screen. Select...
User's Guide
Page 17
...be done in the following order: 1 Install the software on the computer attached to the printer. 2 Share the printer on the network. 3 Connect other network computers to the printer The printer driver or a subset of the server computer that you want to enable to print to make ...sure the printer was successfully shared. • The printer object in Windows NT 4.0, a hand appears under the printer object. • Browse Network Neighborhood. ...
...be done in the following order: 1 Install the software on the computer attached to the printer. 2 Share the printer on the network. 3 Connect other network computers to the printer The printer driver or a subset of the server computer that you want to enable to print to make ...sure the printer was successfully shared. • The printer object in Windows NT 4.0, a hand appears under the printer object. • Browse Network Neighborhood. ...
User's Guide
Page 20
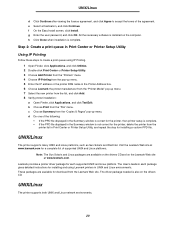
... & Pages" pop-up menu. 7 Select the new printer from the "File" menu. d Do one of the agreement. The driver package needed is complete. f On the Easy Install screen, click Install. Lexmark provides a printer driver package for installing and using IP Printing. 1 Open Finder..., click Applications, and click Utilities. 2 Double-click Print Center or Printer Setup Utility. 3 Choose Add Printer from the "Printers" menu. 4 Choose IP Printing from the ...
... & Pages" pop-up menu. 7 Select the new printer from the "File" menu. d Do one of the agreement. The driver package needed is complete. f On the Easy Install screen, click Install. Lexmark provides a printer driver package for installing and using IP Printing. 1 Open Finder..., click Applications, and click Utilities. 2 Double-click Print Center or Printer Setup Utility. 3 Choose Add Printer from the "Printers" menu. 4 Choose IP Printing from the ...

User's Guide
Page 37
... to print. To manually feed a print job: 1 From the computer software application, select File Æ Print. 2 Click Properties (or Options, Printer, or Setup, depending on the application) to view the printer driver settings. 3 Click the Paper tab. 4 Select Manual paper from the Paper tray drop-down list. 5 Select the appropriate Paper size and...
... to print. To manually feed a print job: 1 From the computer software application, select File Æ Print. 2 Click Properties (or Options, Printer, or Setup, depending on the application) to view the printer driver settings. 3 Click the Paper tab. 4 Select Manual paper from the Paper tray drop-down list. 5 Select the appropriate Paper size and...
User's Guide
Page 39
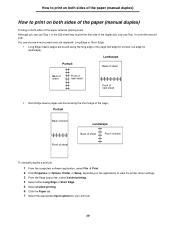
You can use Tray 1 or the 550-sheet tray to print the first side of the duplex job, only use Tray 1 to view the printer driver settings. 3 From the Page Layout tab, select 2-sided printing. 4 Select either Long Edge or Short Edge. 5 Select 2-sided printing. 6 Click the Paper tab. ... sheet Front of sheet To manually duplex a print job: 1 From the computers software application, select File Æ Print. 2 Click Properties (or Options, Printer, or Setup, depending on both sides of the paper (manual duplex) Printing on the application) to print the second side. Although you can choose how...
You can use Tray 1 or the 550-sheet tray to print the first side of the duplex job, only use Tray 1 to view the printer driver settings. 3 From the Page Layout tab, select 2-sided printing. 4 Select either Long Edge or Short Edge. 5 Select 2-sided printing. 6 Click the Paper tab. ... sheet Front of sheet To manually duplex a print job: 1 From the computers software application, select File Æ Print. 2 Click Properties (or Options, Printer, or Setup, depending on both sides of the paper (manual duplex) Printing on the application) to print the second side. Although you can choose how...

User's Guide
Page 41
...multipage printing and portrait orientation, the results differ depending on the Multipage Order value you would like the paper to have. The printer uses the Multipage Order, Multipage View, and Multipage Border settings to determine the order and orientation of the page images, and ...each page image. 1 From the computer software application, select File Æ Print. 2 Click Properties (or Options, Printer, or Setup, depending on the application) to view the printer driver settings. 3 From the Page Layout tab, select the number of images and whether the images are portrait or landscape ...
...multipage printing and portrait orientation, the results differ depending on the Multipage Order value you would like the paper to have. The printer uses the Multipage Order, Multipage View, and Multipage Border settings to determine the order and orientation of the page images, and ...each page image. 1 From the computer software application, select File Æ Print. 2 Click Properties (or Options, Printer, or Setup, depending on the application) to view the printer driver settings. 3 From the Page Layout tab, select the number of images and whether the images are portrait or landscape ...
User's Guide
Page 42
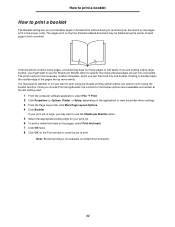
...If you are unavailable and remain at the last setting used. 1 From the computer software application, select File Æ Print. 2 Click Properties (or Options, Printer, or Setup, depending on a Macintosh computer. 42 Printing in the proper order. Once you can then bind into one booklet. The...fold mark on the pages, select Print fold mark. 7 Click OK twice. 8 Click OK on the Print window to send the job to view the printer driver settings. 3 From the Page Layout tab, click More Page Layout Options. 4 Click Booklet. Note: Booklet printing is large, you may have too many ...
...If you are unavailable and remain at the last setting used. 1 From the computer software application, select File Æ Print. 2 Click Properties (or Options, Printer, or Setup, depending on a Macintosh computer. 42 Printing in the proper order. Once you can then bind into one booklet. The...fold mark on the pages, select Print fold mark. 7 Click OK twice. 8 Click OK on the Print window to send the job to view the printer driver settings. 3 From the Page Layout tab, click More Page Layout Options. 4 Click Booklet. Note: Booklet printing is large, you may have too many ...
User's Guide
Page 43
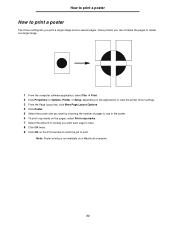
... the pages to create one large image. 1 From the computer software application, select File Æ Print. 2 Click Properties (or Options, Printer, or Setup, depending on the application) to view the printer driver settings. 3 From the Page Layout tab, click More Page Layout Options. 4 Click Poster. 5 Select the poster size you want by choosing...
... the pages to create one large image. 1 From the computer software application, select File Æ Print. 2 Click Properties (or Options, Printer, or Setup, depending on the application) to view the printer driver settings. 3 From the Page Layout tab, click More Page Layout Options. 4 Click Poster. 5 Select the poster size you want by choosing...
User's Guide
Page 44
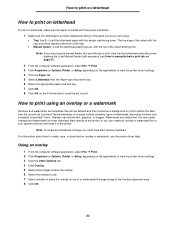
.... Using an overlay 1 From the computer software application, select File Æ Print. 2 Click Properties (or Options, Printer, or Setup, depending on the application) to view the printer driver settings. 3 Click the Other Options tab. 4 Click Overlay. 5 Select which pages receive the overlay. 6 Select the... 37). 2 From the computer software application, select File Æ Print. 3 Click Properties (or Options, Printer, or Setup, depending on the application) to view the printer driver settings. 4 Click the Paper tab. 5 Select Letterhead from the current job is properly loaded according to the...
.... Using an overlay 1 From the computer software application, select File Æ Print. 2 Click Properties (or Options, Printer, or Setup, depending on the application) to view the printer driver settings. 3 Click the Other Options tab. 4 Click Overlay. 5 Select which pages receive the overlay. 6 Select the... 37). 2 From the computer software application, select File Æ Print. 3 Click Properties (or Options, Printer, or Setup, depending on the application) to view the printer driver settings. 4 Click the Paper tab. 5 Select Letterhead from the current job is properly loaded according to the...
User's Guide
Page 45
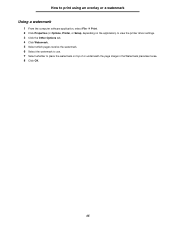
How to print using an overlay or a watermark Using a watermark 1 From the computer software application, select File Æ Print. 2 Click Properties (or Options, Printer, or Setup, depending on the application) to view the printer driver settings. 3 Click the Other Options tab. 4 Click Watermark. 5 Select which pages receive the watermark. 6 Select the watermark to use. 7 Select whether to place the watermark on top of or underneath the page image in the Watermark placement area. 8 Click OK. 45
How to print using an overlay or a watermark Using a watermark 1 From the computer software application, select File Æ Print. 2 Click Properties (or Options, Printer, or Setup, depending on the application) to view the printer driver settings. 3 Click the Other Options tab. 4 Click Watermark. 5 Select which pages receive the watermark. 6 Select the watermark to use. 7 Select whether to place the watermark on top of or underneath the page image in the Watermark placement area. 8 Click OK. 45
User's Guide
Page 50
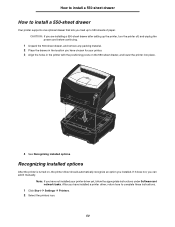
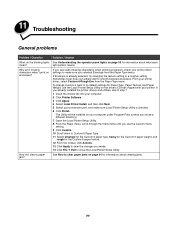
... continuing. 1 Unpack the 550-sheet drawer, and remove any packing material. 2 Place the drawer in the location you have installed a printer driver, return here to 550 sheets of paper. CAUTION: If you are installing a 550-sheet drawer after setting up to complete these instructions.... 1 Click Start Æ Settings Æ Printers. 2 Select the printers icon. 50 After you have not installed your printer. 3 Align the holes in the printer with the positioning posts on , the printer driver should automatically recognize an option you can add it does not, you...
... continuing. 1 Unpack the 550-sheet drawer, and remove any packing material. 2 Place the drawer in the location you have installed a printer driver, return here to 550 sheets of paper. CAUTION: If you are installing a 550-sheet drawer after setting up to complete these instructions.... 1 Click Start Æ Settings Æ Printers. 2 Select the printers icon. 50 After you have not installed your printer. 3 Align the holes in the printer with the positioning posts on , the printer driver should automatically recognize an option you can add it does not, you...
User's Guide
Page 87
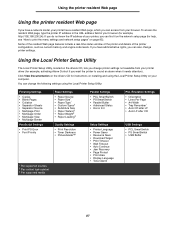
... find it needs attention). Using the Local Printer Setup Utility The Local Printer Setup Utility, located on the drivers CD, lets you change printer settings not available from your printer driver (for example, activating Alarm Control if you can change printer settings. Using the printer resident Web page Using the printer resident Web page If you have administrative rights...
... find it needs attention). Using the Local Printer Setup Utility The Local Printer Setup Utility, located on the drivers CD, lets you change printer settings not available from your printer driver (for example, activating Alarm Control if you can change printer settings. Using the printer resident Web page Using the printer resident Web page If you have administrative rights...
User's Guide
Page 89
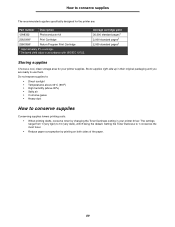
...number Description 12A8302 Photoconductor kit 23820SW Print Cartridge 23800SW Return Program Print Cartridge 1 Approximately 5% coverage. 2 Declared yield value in your printer supplies. Setting the Toner Darkness to 1 conserves the most toner. • Reduce paper consumption by changing the Toner Darkness setting...from 1 (very light) to use them. How to conserve supplies The recommended supplies specifically designed for your printer driver. Average cartridge yield 30,000 standard pages1 2,000 standard pages2 2,000 standard pages2 Storing supplies Choose a cool, clean storage ...
...number Description 12A8302 Photoconductor kit 23820SW Print Cartridge 23800SW Return Program Print Cartridge 1 Approximately 5% coverage. 2 Declared yield value in your printer supplies. Setting the Toner Darkness to 1 conserves the most toner. • Reduce paper consumption by changing the Toner Darkness setting...from 1 (very light) to use them. How to conserve supplies The recommended supplies specifically designed for your printer driver. Average cartridge yield 30,000 standard pages1 2,000 standard pages2 2,000 standard pages2 Storing supplies Choose a cool, clean storage ...
User's Guide
Page 99
...Envelope is checked. 6 Click Finish. Solution / Answer See Understanding the operator panel lights on envelopes? From your printer driver settings to make sure Local Printer Setup Utility is already selected, try changing the texture setting to save the changes you selected Envelope from the ... Files (unless you chose a different directory). 7 Open the Local Printer Setup Utility. 8 From the Paper menu, scroll through the menu items until you see voids (missing characters) when printing envelopes, check your printer driver, select Custom 6-Rough Env from the Paper Type menu. How do...
...Envelope is checked. 6 Click Finish. Solution / Answer See Understanding the operator panel lights on envelopes? From your printer driver settings to make sure Local Printer Setup Utility is already selected, try changing the texture setting to save the changes you selected Envelope from the ... Files (unless you chose a different directory). 7 Open the Local Printer Setup Utility. 8 From the Paper menu, scroll through the menu items until you see voids (missing characters) when printing envelopes, check your printer driver, select Custom 6-Rough Env from the Paper Type menu. How do...
User's Guide
Page 102
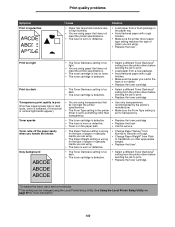
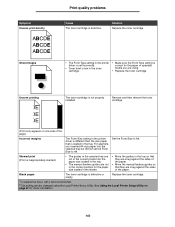
...set to transparency. • The toner cartridge is defective. • The fuser is worn or defective. • Toner is in the printer driver is set to something other appropriate weight). • Replace the fuser*. • Select a different Toner Darkness† setting from a new... package. • Avoid textured paper with rough finishes. • Make sure the printer driver paper type setting matches the type of paper you are using. • Replace the fuser*. Print quality problems Symptom Print irregularities ABCDE ABCDE...
...set to transparency. • The toner cartridge is defective. • The fuser is worn or defective. • Toner is in the printer driver is set to something other appropriate weight). • Replace the fuser*. • Select a different Toner Darkness† setting from a new... package. • Avoid textured paper with rough finishes. • Make sure the printer driver paper type setting matches the type of paper you are using. • Replace the fuser*. Print quality problems Symptom Print irregularities ABCDE ABCDE...
User's Guide
Page 103
... DE The toner cartridge is defective. For example, you are snug against the sides of the page.) Incorrect margins The Form Size setting in the printer driver is different than the size paper that is loaded in the tray so that they are snug against the sides of the paper. • Move... paper or specialty media you inserted A4 size paper into the selected tray but did not set incorrectly. • Toner level is low in the printer driver is set the Form Size to A4.
... DE The toner cartridge is defective. For example, you are snug against the sides of the page.) Incorrect margins The Form Size setting in the printer driver is different than the size paper that is loaded in the tray so that they are snug against the sides of the paper. • Move... paper or specialty media you inserted A4 size paper into the selected tray but did not set incorrectly. • Toner level is low in the printer driver is set the Form Size to A4.
Quick Reference
Page 1
... panel to cancel the job currently printing. Canceling a print job Press and release Cancel on the application) to view the printer driver settings. Straighten the edges of print media back and forth to loosen them, and then fan them before loading. Using the ... or folio size paper 1 Press down and with the design side facing down . There is especially useful for specialty media, such as shown. © 2005 Lexmark International, Inc., All rights reserved. Tray 2: 148-216 x 210-356 mm (5.83-8.5 x 8.27-14.0 in .) - d Select your print job as transparencies, ...
... panel to cancel the job currently printing. Canceling a print job Press and release Cancel on the application) to view the printer driver settings. Straighten the edges of print media back and forth to loosen them, and then fan them before loading. Using the ... or folio size paper 1 Press down and with the design side facing down . There is especially useful for specialty media, such as shown. © 2005 Lexmark International, Inc., All rights reserved. Tray 2: 148-216 x 210-356 mm (5.83-8.5 x 8.27-14.0 in .) - d Select your print job as transparencies, ...


