
User Guide
Page 2
Contents 2 Contents Safety information 6 Conventions...6 Learning about the printer 9 Finding information about the printer...9 Selecting a location for the printer...10 Printer configurations...11 Attaching cables...12 Using the control panel...14 Understanding the status of the power button and indicator light 15 Using the ...
Contents 2 Contents Safety information 6 Conventions...6 Learning about the printer 9 Finding information about the printer...9 Selecting a location for the printer...10 Printer configurations...11 Attaching cables...12 Using the control panel...14 Understanding the status of the power button and indicator light 15 Using the ...

User Guide
Page 3
... e‑mail function...30 Configuring e‑mail settings...30 Sending an e-mail...30 Creating an e-mail shortcut...31 Faxing...32 Setting up the printer to fax...32 Sending a fax...45 Scheduling a fax...46 Creating a fax destination shortcut...46 Changing the fax resolution...46 Adjusting the fax darkness...46 Viewing...
... e‑mail function...30 Configuring e‑mail settings...30 Sending an e-mail...30 Creating an e-mail shortcut...31 Faxing...32 Setting up the printer to fax...32 Sending a fax...45 Scheduling a fax...46 Creating a fax destination shortcut...46 Changing the fax resolution...46 Adjusting the fax darkness...46 Viewing...

User Guide
Page 4
... a computer 49 Securing the printer 50 Locating the security slot...50 Erasing printer memory...50 Erasing printer hard disk memory...50 Configuring printer hard disk encryption...51 Restoring factory default settings...51 Statement of Volatility...51 Maintaining the printer 53 Networking...53 Setting up ...serial printing (Windows only)...54 Cleaning printer parts...55 Ordering parts and supplies...56 Replacing parts and supplies...59 Moving the printer...93 Saving energy and paper...94 Recycling...
... a computer 49 Securing the printer 50 Locating the security slot...50 Erasing printer memory...50 Erasing printer hard disk memory...50 Configuring printer hard disk encryption...51 Restoring factory default settings...51 Statement of Volatility...51 Maintaining the printer 53 Networking...53 Setting up ...serial printing (Windows only)...54 Cleaning printer parts...55 Ordering parts and supplies...56 Replacing parts and supplies...59 Moving the printer...93 Saving energy and paper...94 Recycling...

User Guide
Page 6
... INJURY: Only a Lexmark Inline Surge Protector that is near water or wet locations. The use this product with this product. CAUTION-SHOCK HAZARD: To avoid the risk of accessories can be easily overloaded by a laser printer and may be used with the printer may result in ports... (such as Ethernet and telephone system connections) are properly installed in their marked plug-in a risk of being caught between the printer and the power cord provided with this product or the manufacturer's authorized replacement. If any electrical or cabling connections, such as furniture...
... INJURY: Only a Lexmark Inline Surge Protector that is near water or wet locations. The use this product with this product. CAUTION-SHOCK HAZARD: To avoid the risk of accessories can be easily overloaded by a laser printer and may be used with the printer may result in ports... (such as Ethernet and telephone system connections) are properly installed in their marked plug-in a risk of being caught between the printer and the power cord provided with this product or the manufacturer's authorized replacement. If any electrical or cabling connections, such as furniture...

User Guide
Page 7
... sure that there is adequate clearance around the printer. Pinch injuries may require a caster base, furniture, or other than 18 kg (40 lb) and requires two or more information on supported configurations, see www.lexmark.com/multifunctionprinters. CAUTION-SHOCK HAZARD: To avoid the... risk of electrical shock when cleaning the exterior of the printer, unplug the power cord from the electrical outlet and disconnect all cables ...
... sure that there is adequate clearance around the printer. Pinch injuries may require a caster base, furniture, or other than 18 kg (40 lb) and requires two or more information on supported configurations, see www.lexmark.com/multifunctionprinters. CAUTION-SHOCK HAZARD: To avoid the... risk of electrical shock when cleaning the exterior of the printer, unplug the power cord from the electrical outlet and disconnect all cables ...

User Guide
Page 9
...; Setting up and configuring the accessibility features of your product. Help Menu Pages-The guides may be available on the printer firmware and at http://support.lexmark.com. Help for the latest product tips, instructions, and reference material. Information Center-Authoritative online resource for Microsoft® Windows® or...
...; Setting up and configuring the accessibility features of your product. Help Menu Pages-The guides may be available on the printer firmware and at http://support.lexmark.com. Help for the latest product tips, instructions, and reference material. Information Center-Authoritative online resource for Microsoft® Windows® or...

User Guide
Page 10
...the product and easily accessible. Away from direct sunlight and humidity extremes. For more information, see the documentation that came with the printer. Away from the direct airflow of fire or electrical shock, connect the power cord to an appropriately rated and...In the U.S.-See the Statement of Limited Warranty included with the printer, or go to http://support.lexmark.com. • In other countries and regions-See the printed warranty that came with the printer or go to http://support.lexmark.com. Support contact information for ? Free from stray staples and...
...the product and easily accessible. Away from direct sunlight and humidity extremes. For more information, see the documentation that came with the printer. Away from the direct airflow of fire or electrical shock, connect the power cord to an appropriately rated and...In the U.S.-See the Statement of Limited Warranty included with the printer, or go to http://support.lexmark.com. • In other countries and regions-See the printed warranty that came with the printer or go to http://support.lexmark.com. Support contact information for ? Free from stray staples and...

User Guide
Page 11
...176;C (-40 to prevent instability causing possible injury. You can configure your printer or MFP may require a caster base, furniture, or other feature to 110°F) •... Allow the following recommended amount of space around the printer for proper ventilation: 1 Top 330 mm (13 in.) 2 Right side 152 mm (6 in.) 3 ...457 mm (18 in.) 5 Rear 203 mm (8 in.) Printer configurations CAUTION-TIPPING HAZARD: Installing one or more information on your printer by adding three optional 550‑sheet trays and an optional ...
...176;C (-40 to prevent instability causing possible injury. You can configure your printer or MFP may require a caster base, furniture, or other feature to 110°F) •... Allow the following recommended amount of space around the printer for proper ventilation: 1 Top 330 mm (13 in.) 2 Right side 152 mm (6 in.) 3 ...457 mm (18 in.) 5 Rear 203 mm (8 in.) Printer configurations CAUTION-TIPPING HAZARD: Installing one or more information on your printer by adding three optional 550‑sheet trays and an optional ...

User Guide
Page 12
...-POTENTIAL INJURY: To avoid the risk of fire or electrical shock, connect the power cord to the public switched telephone network. Learning about the printer 12 1 Control panel 2 Standard bin 3 Automatic document feeder (ADF) 4 Staple finisher 5 Standard 550‑sheet tray 6 Optional 550‑sheet trays 7 Optional 2200‑... cables CAUTION-POTENTIAL INJURY: To avoid the risk of electrical shock, do not set up this product or make any wireless network adapter, or the printer in the area shown while actively printing.
...-POTENTIAL INJURY: To avoid the risk of fire or electrical shock, connect the power cord to the public switched telephone network. Learning about the printer 12 1 Control panel 2 Standard bin 3 Automatic document feeder (ADF) 4 Staple finisher 5 Standard 550‑sheet tray 6 Optional 550‑sheet trays 7 Optional 2200‑... cables CAUTION-POTENTIAL INJURY: To avoid the risk of electrical shock, do not set up this product or make any wireless network adapter, or the printer in the area shown while actively printing.

User Guide
Page 13
...Connect additional devices (telephone or answering machine) to a properly grounded electrical outlet. Note: Remove the plug to access the port. 2 LINE port Connect the printer to an active telephone line through a standard wall jack (RJ‑11), DSL filter, or VoIP adapter, or any other adapter that allows you... do not have a dedicated fax line for the printer and if this connection method is supported in your country or region. socket Use this port if you to access the telephone line to send...
...Connect additional devices (telephone or answering machine) to a properly grounded electrical outlet. Note: Remove the plug to access the port. 2 LINE port Connect the printer to an active telephone line through a standard wall jack (RJ‑11), DSL filter, or VoIP adapter, or any other adapter that allows you... do not have a dedicated fax line for the printer and if this connection method is supported in your country or region. socket Use this port if you to access the telephone line to send...

User Guide
Page 14
... in a fax number. 6 Start button Start a job, depending on or turn off the printer. Learning about the printer 14 Using the control panel Use the To 1 Display • View the printer messages and supply status. • Set up and operate the printer. 2 Home button Go to Sleep or Hibernate mode. • Wake the...symbols in an input field. 5 Pause button Place a dial pause in an input field. 10 Indicator light Check the status of the printer. 11 Volume buttons Adjust the volume of the headset or speaker. 12 Headset or speaker port Attach a headset or speaker.
... in a fax number. 6 Start button Start a job, depending on or turn off the printer. Learning about the printer 14 Using the control panel Use the To 1 Display • View the printer messages and supply status. • Set up and operate the printer. 2 Home button Go to Sleep or Hibernate mode. • Wake the...symbols in an input field. 5 Pause button Place a dial pause in an input field. 10 Indicator light Check the status of the printer. 11 Volume buttons Adjust the volume of the headset or speaker. 12 Headset or speaker port Attach a headset or speaker.

User Guide
Page 15
Using the home screen Note: Your home screen may vary depending on the printer display. 4 Fax Send fax. 5 Settings Access the printer menus. 6 Held Faxes Show all shortcuts. The printer requires user intervention. The printer is in hibernate mode. Touch To 1 Copy Make copies. 2 E‑mail ...If Held Faxes is ready or processing data. The printer is in Hibernate mode. Power button light Off Solid amber Blinking amber Printer status The printer is off , ready, or processing data. Learning about the printer 15 Understanding the status of the power button and...
Using the home screen Note: Your home screen may vary depending on the printer display. 4 Fax Send fax. 5 Settings Access the printer menus. 6 Held Faxes Show all shortcuts. The printer requires user intervention. The printer is in hibernate mode. Touch To 1 Copy Make copies. 2 E‑mail ...If Held Faxes is ready or processing data. The printer is in Hibernate mode. Power button light Off Solid amber Blinking amber Printer status The printer is off , ready, or processing data. Learning about the printer 15 Understanding the status of the power button and...

User Guide
Page 16
...processing. • View more information on the printer warning or message, and on the home screen Touch To App Profiles Access application profiles. Scan and save documents directly to Lexmark Accessibility Restore Factory Defaults Maintenance Remote Operator Panel Visible... Home Screen Icons Site Map Update Firmware About This Printer Print Layout Finishing Setup Quality Job Accounting Image XPS PDF HTML PostScript...
...processing. • View more information on the printer warning or message, and on the home screen Touch To App Profiles Access application profiles. Scan and save documents directly to Lexmark Accessibility Restore Factory Defaults Maintenance Remote Operator Panel Visible... Home Screen Icons Site Map Update Firmware About This Printer Print Layout Finishing Setup Quality Job Accounting Image XPS PDF HTML PostScript...
User Guide
Page 17
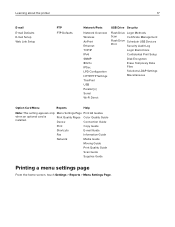
Learning about the printer 17 E‑mail E‑mail Defaults E‑mail Setup Web Link Setup FTP FTP Defaults Network/Ports USB Drive Security Network Overview Wireless AirPrint Ethernet ...
Learning about the printer 17 E‑mail E‑mail Defaults E‑mail Setup Web Link Setup FTP FTP Defaults Network/Ports USB Drive Security Network Overview Wireless AirPrint Ethernet ...

User Guide
Page 18
... using a proxy server, then temporarily disable it to load the Web page correctly. 2 Click Settings > Device > Visible Home Screen Icons. 3 Select the icons that the printer has access rights to load the Web page correctly. 2 Click Apps > Card Copy > Configure. Notes: • View the... the changes. Setting up and using the home screen applications 18 Setting up and using a proxy server, then temporarily disable it to appear on the printer home screen. The IP address appears as four sets of numbers separated by periods, such as 123.123.123.123. • If you want to...
... using a proxy server, then temporarily disable it to load the Web page correctly. 2 Click Settings > Device > Visible Home Screen Icons. 3 Select the icons that the printer has access rights to load the Web page correctly. 2 Click Apps > Card Copy > Configure. Notes: • View the... the changes. Setting up and using the home screen applications 18 Setting up and using a proxy server, then temporarily disable it to appear on the printer home screen. The IP address appears as four sets of numbers separated by periods, such as 123.123.123.123. • If you want to...

User Guide
Page 19
...documentation that the scan resolution does not exceed 200 dpi for color and 400 dpi for black and white. • You need a printer hard disk to validate and adjust the settings until no errors occur. • Only destinations created from the Embedded Web Server are con...2 Select and create a destination, and then configure the settings. Using Shortcut Center 1 From the home screen, touch Shortcut Center, and then select a printer function. 2 Touch Create Shortcut, and then configure the settings. 3 Touch Save, and then type a unique shortcut name. 4 Apply the changes. Notes...
...documentation that the scan resolution does not exceed 200 dpi for color and 400 dpi for black and white. • You need a printer hard disk to validate and adjust the settings until no errors occur. • Only destinations created from the Embedded Web Server are con...2 Select and create a destination, and then configure the settings. Using Shortcut Center 1 From the home screen, touch Shortcut Center, and then select a printer function. 2 Touch Create Shortcut, and then configure the settings. 3 Touch Save, and then type a unique shortcut name. 4 Apply the changes. Notes...

User Guide
Page 20
... 1 From the home screen, touch Settings > Paper > Media Configuration > Universal Setup. 2 Configure the settings. Note: Do not remove trays while the printer is busy. 2 Adjust the guides to match the size of equipment instability, load each tray separately. Loading paper and specialty media 20 Loading paper and...
... 1 From the home screen, touch Settings > Paper > Media Configuration > Universal Setup. 2 Configure the settings. Note: Do not remove trays while the printer is busy. 2 Adjust the guides to match the size of equipment instability, load each tray separately. Loading paper and specialty media 20 Loading paper and...

User Guide
Page 22
Loading paper and specialty media 22 Loading the multipurpose feeder 1 Open the multipurpose feeder. 2 Adjust the guide to match the size of the paper you are loading. 3 Flex, fan, and align the paper edges before loading. 4 Load the paper. • Load paper, card stock, and transparencies with the printable side facedown and the top edge entering the printer first.
Loading paper and specialty media 22 Loading the multipurpose feeder 1 Open the multipurpose feeder. 2 Adjust the guide to match the size of the paper you are loading. 3 Flex, fan, and align the paper edges before loading. 4 Load the paper. • Load paper, card stock, and transparencies with the printable side facedown and the top edge entering the printer first.

User Guide
Page 23
... Damage: The temperature of the paper guide. Loading paper and specialty media 23 • Load envelopes with the flap side up and entering the printer first. Note: To unlink trays, make sure that no trays have the same paper size or type. 4 Save the settings. Notes: • View ...using a proxy server, then temporarily disable it to the specified paper type. To avoid printing issues, match the paper type settings in the printer with the flap side up and against the left side of the fuser varies according to load the Web page correctly. 2 Click Settings > ...
... Damage: The temperature of the paper guide. Loading paper and specialty media 23 • Load envelopes with the flap side up and entering the printer first. Note: To unlink trays, make sure that no trays have the same paper size or type. 4 Save the settings. Notes: • View ...using a proxy server, then temporarily disable it to the specified paper type. To avoid printing issues, match the paper type settings in the printer with the flap side up and against the left side of the fuser varies according to load the Web page correctly. 2 Click Settings > ...

User Guide
Page 24
...: • If you insert the flash drive when an error message appears, then the printer ignores the flash drive. • If you insert the flash drive while the printer is processing other print jobs, then Busy appears on the display. Printing 24 Printing CAUTION-PINCH HAZARD...: To avoid the risk of a pinch injury, use caution in the printer before sending the print job. 1 With a document open, click File > Print. 2 If necessary, adjust the settings. 3 Send the print job. Pinch ...
...: • If you insert the flash drive when an error message appears, then the printer ignores the flash drive. • If you insert the flash drive while the printer is processing other print jobs, then Busy appears on the display. Printing 24 Printing CAUTION-PINCH HAZARD...: To avoid the risk of a pinch injury, use caution in the printer before sending the print job. 1 With a document open, click File > Print. 2 If necessary, adjust the settings. 3 Send the print job. Pinch ...


