Quick Reference
Page 1
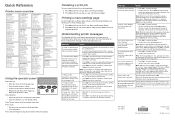
...• Exit the menus and return to clear the message. The menu settings page prints. P/N 12N0573 E.C. 548073 12N0573 * 12N0573* © Lexmark International, Inc. For more toner cartridges. 2 Paper Jam A paper jam is full. • Press Go to clear the message and continue ...then press Select. Quick Reference Printer menu overview Color Menu Print Mode Color Correction Toner Darkness Manual Color Finishing Menu Duplex Duplex Bind Copies Blank Pages Collation Separator Sheets Separator Source Multipage Print Multipage Order Multipage View Multipage Border Staple Job Staple Prime...
...• Exit the menus and return to clear the message. The menu settings page prints. P/N 12N0573 E.C. 548073 12N0573 * 12N0573* © Lexmark International, Inc. For more toner cartridges. 2 Paper Jam A paper jam is full. • Press Go to clear the message and continue ...then press Select. Quick Reference Printer menu overview Color Menu Print Mode Color Correction Toner Darkness Manual Color Finishing Menu Duplex Duplex Bind Copies Blank Pages Collation Separator Sheets Separator Source Multipage Print Multipage Order Multipage View Multipage Border Staple Job Staple Prime...
Setup Guide
Page 5
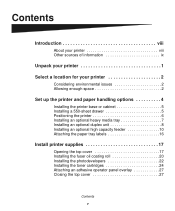
... paper handling options 4 Installing the printer base or cabinet 5 Installing a 550-sheet drawer 5 Positioning the printer 6 Installing an optional heavy media tray 7 Installing an optional duplex unit 8 Installing an optional high capacity feeder 10 Attaching the paper tray labels 16 Install printer supplies 17 Opening the top cover 17 Installing the...
... paper handling options 4 Installing the printer base or cabinet 5 Installing a 550-sheet drawer 5 Positioning the printer 6 Installing an optional heavy media tray 7 Installing an optional duplex unit 8 Installing an optional high capacity feeder 10 Attaching the paper tray labels 16 Install printer supplies 17 Opening the top cover 17 Installing the...
Setup Guide
Page 8
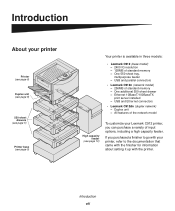
...Ethernet 10BaseT/100BaseTX print server installed - Duplex unit - Introduction viii All features of the network model High capacity feeder (see page 10) To customize your Lexmark C912 printer, you purchased a finisher to go with your printer Printer (see page 6) Duplex unit (see page 8) 550-sheet... drawers (see page 5) Printer base (see page 5) Your printer is available in three models: • Lexmark C912 (base model) - 2400...
...Ethernet 10BaseT/100BaseTX print server installed - Duplex unit - Introduction viii All features of the network model High capacity feeder (see page 10) To customize your Lexmark C912 printer, you purchased a finisher to go with your printer Printer (see page 6) Duplex unit (see page 8) 550-sheet... drawers (see page 5) Printer base (see page 5) Your printer is available in three models: • Lexmark C912 (base model) - 2400...
Setup Guide
Page 12
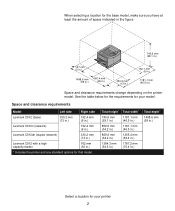
... below for the requirements for your model. Space and clearance requirements Model Left side Right side Lexmark C912 (base) 330.2 mm (13 in.) 152.4 mm (6 in.) Lexmark C912n (network) 152.4 mm (6 in.) Lexmark C912dn (duplex network) 330.2 mm (13 in.) Lexmark C912 with a high capacity feeder 762 mm (30 in.) * Includes the printer and any standard options...
... below for the requirements for your model. Space and clearance requirements Model Left side Right side Lexmark C912 (base) 330.2 mm (13 in.) 152.4 mm (6 in.) Lexmark C912n (network) 152.4 mm (6 in.) Lexmark C912dn (duplex network) 330.2 mm (13 in.) Lexmark C912 with a high capacity feeder 762 mm (30 in.) * Includes the printer and any standard options...
Setup Guide
Page 13
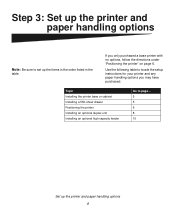
... set up the printer and paper handling options 4 Topic Installing the printer base or cabinet Installing a 550-sheet drawer Positioning the printer Installing an optional duplex unit Installing an optional high capacity feeder Go to locate the setup instructions for your printer and any paper handling options you only purchased a base...
... set up the printer and paper handling options 4 Topic Installing the printer base or cabinet Installing a 550-sheet drawer Positioning the printer Installing an optional duplex unit Installing an optional high capacity feeder Go to locate the setup instructions for your printer and any paper handling options you only purchased a base...
Setup Guide
Page 17
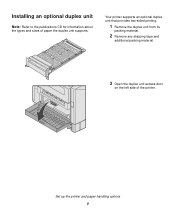
Installing an optional duplex unit Note: Refer to the publications CD for information about the types and sizes of the printer. Your printer supports an optional duplex unit that provides two-sided printing. 1 Remove the duplex unit from its packing material. 2 Remove any shipping tape and additional packing material. 3 Open the duplex unit access door on the left side of paper the duplex unit supports. Set up the printer and paper handling options 8
Installing an optional duplex unit Note: Refer to the publications CD for information about the types and sizes of the printer. Your printer supports an optional duplex unit that provides two-sided printing. 1 Remove the duplex unit from its packing material. 2 Remove any shipping tape and additional packing material. 3 Open the duplex unit access door on the left side of paper the duplex unit supports. Set up the printer and paper handling options 8
Setup Guide
Page 18
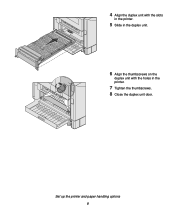
Set up the printer and paper handling options 9 4 Align the duplex unit with the slots in the printer. 5 Slide in the duplex unit. 6 Align the thumbscrews on the duplex unit with the holes in the printer. 7 Tighten the thumbscrews. 8 Close the duplex unit door.
Set up the printer and paper handling options 9 4 Align the duplex unit with the slots in the printer. 5 Slide in the duplex unit. 6 Align the thumbscrews on the duplex unit with the holes in the printer. 7 Tighten the thumbscrews. 8 Close the duplex unit door.
User's Reference
Page 5
Replacing a toner cartridge 165 Resetting the maintenance counter 170 Cleaning the LEDs 173 Closing the top cover 175 Opening the top cover 177 Removing the duplex unit 179 Removing the high capacity feeder 181 Removing the system board access cover 184 Locating memory and network options 185 Installing the system board access cover 185 Removing an optional drawer 187 Chapter 8: Troubleshooting 189 Calling for service 189 Index 192 v
Replacing a toner cartridge 165 Resetting the maintenance counter 170 Cleaning the LEDs 173 Closing the top cover 175 Opening the top cover 177 Removing the duplex unit 179 Removing the high capacity feeder 181 Removing the system board access cover 184 Locating memory and network options 185 Installing the system board access cover 185 Removing an optional drawer 187 Chapter 8: Troubleshooting 189 Calling for service 189 Index 192 v

User's Reference
Page 27
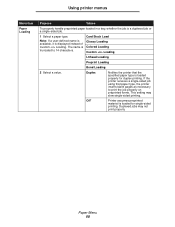
Note: Forcing the print media may cause a jam. 7 Slide the width guides until they lightly rest against the edges of the print media. Do not bend the print media. 8 Push the SET button to the left to unlock the bottom plate. Loading the multipurpose feeder 22 b Continue with step 6. 6 Gently slide the print media into the multipurpose feeder. Printing Loading letterhead a For both simplex (single-sided) and duplex (double-sided) printing on letterhead, place the printed side face up.
Note: Forcing the print media may cause a jam. 7 Slide the width guides until they lightly rest against the edges of the print media. Do not bend the print media. 8 Push the SET button to the left to unlock the bottom plate. Loading the multipurpose feeder 22 b Continue with step 6. 6 Gently slide the print media into the multipurpose feeder. Printing Loading letterhead a For both simplex (single-sided) and duplex (double-sided) printing on letterhead, place the printed side face up.
User's Reference
Page 49
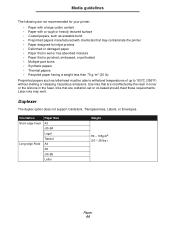
... lb) Preprinted papers such as letterhead must be able to withstand temperatures of up to 180°C (356°F) without melting or releasing hazardous emissions. Duplexer The duplex option does not support Cardstock, Transparencies, Labels, or Envelopes. Use inks that are oxidation-set or oil-based should meet these requirements. Orientation Short...
... lb) Preprinted papers such as letterhead must be able to withstand temperatures of up to 180°C (356°F) without melting or releasing hazardous emissions. Duplexer The duplex option does not support Cardstock, Transparencies, Labels, or Envelopes. Use inks that are oxidation-set or oil-based should meet these requirements. Orientation Short...
User's Reference
Page 53
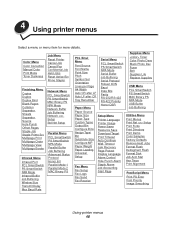
... Color Print Mode Toner Darkness Job Menu Reset Printer Cancel Job Cancel Fax Confidential Job Held Jobs Reset Active Bin Prime Stapler Finishing Menu Copies Duplex Duplex Bind Blank Pages Collation Separator Sheets Separator Source Hole Punch Offset Pages Staple Job Staple Prime Src Multipage Print Multipage Order Multipage View Multipage Border...
... Color Print Mode Toner Darkness Job Menu Reset Printer Cancel Job Cancel Fax Confidential Job Held Jobs Reset Active Bin Prime Stapler Finishing Menu Copies Duplex Duplex Bind Blank Pages Collation Separator Sheets Separator Source Hole Punch Offset Pages Staple Job Staple Prime Src Multipage Print Multipage Order Multipage View Multipage Border...

User's Reference
Page 58
... On specific job.) Does not punch holes in printed output. Prints a solid line border around each page image. To define the way duplexed pages are Rev Horizontal portrait or landscape in every printed page. Punches holes in orientation. Long Edge* Short Edge Assumes binding along the ...images are bound, and how the printing on the front (odd-numbered pages). Using printer menus Menu Item Duplex Duplex Bind Hole Punch Multipage Border Multipage Order Purpose Values To set duplexing as the default for Off* all printed output. (Select Hole Punch from the printer driver to...
... On specific job.) Does not punch holes in printed output. Prints a solid line border around each page image. To define the way duplexed pages are Rev Horizontal portrait or landscape in every printed page. Punches holes in orientation. Long Edge* Short Edge Assumes binding along the ...images are bound, and how the printing on the front (odd-numbered pages). Using printer menus Menu Item Duplex Duplex Bind Hole Punch Multipage Border Multipage Order Purpose Values To set duplexing as the default for Off* all printed output. (Select Hole Punch from the printer driver to...
User's Reference
Page 73
... that paper type, the printer inserts blank pages as necessary to 14 characters. The name is a duplexed job or a single-sided job. 1 Select a paper type. Off* Printer assumes preprinted material is loaded for duplex printing. Duplexed jobs may slow single-sided printing. Using printer menus Menu Item Paper Loading Purpose Values To properly...
... that paper type, the printer inserts blank pages as necessary to 14 characters. The name is a duplexed job or a single-sided job. 1 Select a paper type. Off* Printer assumes preprinted material is loaded for duplex printing. Duplexed jobs may slow single-sided printing. Using printer menus Menu Item Paper Loading Purpose Values To properly...
User's Reference
Page 123
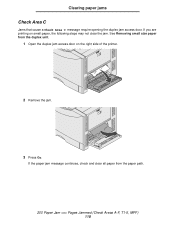
See Removing small size paper from the paper path. 200 Paper Jam Pages Jammed (Check Areas A-F, T1-5, MPF) 118 If the paper jam message continues, check and clear all paper from the duplex unit. 1 Open the duplex jam access door on small paper, the following steps may not clear the jam. If you are printing on the right side of the printer. 2 Remove the jam. 3 Press Go. Clearing paper jams Check Area C Jams that cause a Check Area C message require opening the duplex jam access door.
See Removing small size paper from the paper path. 200 Paper Jam Pages Jammed (Check Areas A-F, T1-5, MPF) 118 If the paper jam message continues, check and clear all paper from the duplex unit. 1 Open the duplex jam access door on small paper, the following steps may not clear the jam. If you are printing on the right side of the printer. 2 Remove the jam. 3 Press Go. Clearing paper jams Check Area C Jams that cause a Check Area C message require opening the duplex jam access door.
User's Reference
Page 124
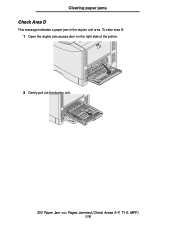
To clear area D: 1 Open the duplex jam access door on the right side of the printer. 2 Gently pull out the duplex unit. 200 Paper Jam Pages Jammed (Check Areas A-F, T1-5, MPF) 119 Clearing paper jams Check Area D This message indicates a paper jam in the duplex unit area.
To clear area D: 1 Open the duplex jam access door on the right side of the printer. 2 Gently pull out the duplex unit. 200 Paper Jam Pages Jammed (Check Areas A-F, T1-5, MPF) 119 Clearing paper jams Check Area D This message indicates a paper jam in the duplex unit area.

User's Reference
Page 125
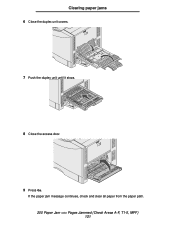
Clearing paper jams 3 Turn the paper forwarding dial counterclockwise. If the paper does not advance, go to step 4. 4 Open the duplex unit covers. 5 Remove the jam. 200 Paper Jam Pages Jammed (Check Areas A-F, T1-5, MPF) 120 If the paper advances out of the duplex unit, remove the jam and go to step 7.
Clearing paper jams 3 Turn the paper forwarding dial counterclockwise. If the paper does not advance, go to step 4. 4 Open the duplex unit covers. 5 Remove the jam. 200 Paper Jam Pages Jammed (Check Areas A-F, T1-5, MPF) 120 If the paper advances out of the duplex unit, remove the jam and go to step 7.
User's Reference
Page 126
If the paper jam message continues, check and clear all paper from the paper path. 200 Paper Jam Pages Jammed (Check Areas A-F, T1-5, MPF) 121 Clearing paper jams 6 Close the duplex unit covers. 7 Push the duplex unit until it stops. 8 Close the access door. 9 Press Go.
If the paper jam message continues, check and clear all paper from the paper path. 200 Paper Jam Pages Jammed (Check Areas A-F, T1-5, MPF) 121 Clearing paper jams 6 Close the duplex unit covers. 7 Push the duplex unit until it stops. 8 Close the access door. 9 Press Go.
User's Reference
Page 127
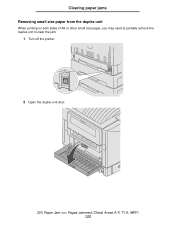
Clearing paper jams Removing small size paper from the duplex unit When printing on both sides of A5 or other small size paper, you may need to partially remove the duplex unit to clear the jam. 1 Turn off the printer. 2 Open the duplex unit door. 200 Paper Jam Pages Jammed (Check Areas A-F, T1-5, MPF) 122
Clearing paper jams Removing small size paper from the duplex unit When printing on both sides of A5 or other small size paper, you may need to partially remove the duplex unit to clear the jam. 1 Turn off the printer. 2 Open the duplex unit door. 200 Paper Jam Pages Jammed (Check Areas A-F, T1-5, MPF) 122
User's Reference
Page 128
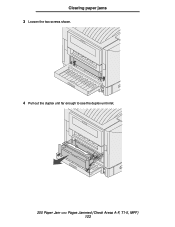
Clearing paper jams 3 Loosen the two screws shown. 4 Pull out the duplex unit far enough to see the duplex unit inlet. 200 Paper Jam Pages Jammed (Check Areas A-F, T1-5, MPF) 123
Clearing paper jams 3 Loosen the two screws shown. 4 Pull out the duplex unit far enough to see the duplex unit inlet. 200 Paper Jam Pages Jammed (Check Areas A-F, T1-5, MPF) 123
User's Reference
Page 129
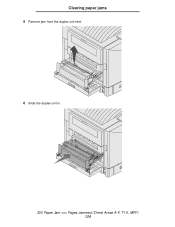
Clearing paper jams 5 Remove jam from the duplex unit inlet. 6 Slide the duplex unit in. 200 Paper Jam Pages Jammed (Check Areas A-F, T1-5, MPF) 124
Clearing paper jams 5 Remove jam from the duplex unit inlet. 6 Slide the duplex unit in. 200 Paper Jam Pages Jammed (Check Areas A-F, T1-5, MPF) 124


