

C77x - Setup Guide
Page 1
4600 MFP Option Printer and Scanner Setup Guide for the C772n printer August 2006 www.lexmark.com
4600 MFP Option Printer and Scanner Setup Guide for the C772n printer August 2006 www.lexmark.com
C77x - Setup Guide
Page 5
... to lift it, do not lift by the front of the MFP. 4 CAUTION: If you are installing options after setting up the printer, turn the printer off , and unplug the power cord from the wall outlet before continuing. Static sensitivity notice Warning: This symbol identifies static-sensitive parts. CAUTION: ... cord to lift it down. Do not set up this product or make sure your fingers are installing memory or option cards sometime after setting up the printer, turn the printer off , and unplug the power cord from the wall outlet before continuing. Do not touch in the areas near ...
... to lift it, do not lift by the front of the MFP. 4 CAUTION: If you are installing options after setting up the printer, turn the printer off , and unplug the power cord from the wall outlet before continuing. Static sensitivity notice Warning: This symbol identifies static-sensitive parts. CAUTION: ... cord to lift it down. Do not set up this product or make sure your fingers are installing memory or option cards sometime after setting up the printer, turn the printer off , and unplug the power cord from the wall outlet before continuing. Do not touch in the areas near ...
C77x - Setup Guide
Page 6
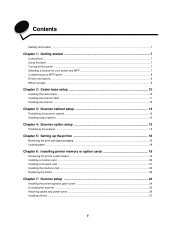
Contents Stability Information ...1 Chapter 1: Getting started 7 Conventions ...7 Using this book ...7 Turning off the printer ...7 Selecting a location for your printer and MFP 7 Customizing your MFP option ...8 Drivers and options ...9 Where to begin ...9 Chapter 2: Caster base setup 10 Installing the caster base ...10 Installing the scanner shelf ...11 Installing the scanner ...12 Chapter 3: Scanner cabinet ...
Contents Stability Information ...1 Chapter 1: Getting started 7 Conventions ...7 Using this book ...7 Turning off the printer ...7 Selecting a location for your printer and MFP 7 Customizing your MFP option ...8 Drivers and options ...9 Where to begin ...9 Chapter 2: Caster base setup 10 Installing the caster base ...10 Installing the scanner shelf ...11 Installing the scanner ...12 Chapter 3: Scanner cabinet ...
C77x - Setup Guide
Page 8
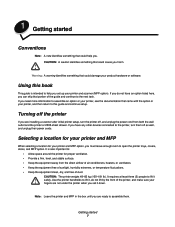
.... • Keep the equipment away from both the wall outlet and the printer or 2000-sheet drawer. Using this guide and continue setup. If you set up your printer and scanner (MFP option). CAUTION: The printer weighs 48-82 kg (105-181 lb). It requires at least three ...is also important to open the printer trays, covers, doors, and MFP option. 1 Getting started 7 CAUTION: A caution identifies something that could cause you must leave enough room to : • Allow space around the printer for your printer and MFP option, you harm. Use the printer handholds to lift it, do not...
.... • Keep the equipment away from both the wall outlet and the printer or 2000-sheet drawer. Using this guide and continue setup. If you set up your printer and scanner (MFP option). CAUTION: The printer weighs 48-82 kg (105-181 lb). It requires at least three ...is also important to open the printer trays, covers, doors, and MFP option. 1 Getting started 7 CAUTION: A caution identifies something that could cause you must leave enough room to : • Allow space around the printer for your printer and MFP option, you harm. Use the printer handholds to lift it, do not...

C77x - Setup Guide
Page 9
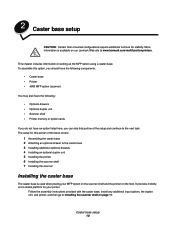
... purchased in the boxes until you are available for stability. More information is available on our Lexmark Web site at www.lexmark.com/multifunctionprinters. Customizing your MFP with various input, output, and memory options. Install the printer and any options you have all components and hardware in the following order: CAUTION: If you ordered. Note: Leave...
... purchased in the boxes until you are available for stability. More information is available on our Lexmark Web site at www.lexmark.com/multifunctionprinters. Customizing your MFP with various input, output, and memory options. Install the printer and any options you have all components and hardware in the following order: CAUTION: If you ordered. Note: Leave...

C77x - Setup Guide
Page 10
...turning on your scanner cabinet or caster base option. First, install the printer drivers located on the Software and Documentation CD that came with the printer, then install the MFP drivers located on installing the drivers and verifying the printer options are determined by your computer, you have: ...• A caster base, see page 10. • A scanner cabinet (part number 16C0700), see page 13. • Just a scanner, see Installing drivers on page 27. For more information on the 4600 MFP Software and...
...turning on your scanner cabinet or caster base option. First, install the printer drivers located on the Software and Documentation CD that came with the printer, then install the MFP drivers located on installing the drivers and verifying the printer options are determined by your computer, you have: ...• A caster base, see page 10. • A scanner cabinet (part number 16C0700), see page 13. • Just a scanner, see Installing drivers on page 27. For more information on the 4600 MFP Software and...
C77x - Setup Guide
Page 11
... on the floor. The setup for this option, you should have the following components: • Caster base • Printer • 4600 MFP option (scanner) You may also have the following: • Optional drawers • Optional duplex unit • Scanner shelf • Printer memory or option cards If you do not have an option listed here, you can skip that portion...
... on the floor. The setup for this option, you should have the following components: • Caster base • Printer • 4600 MFP option (scanner) You may also have the following: • Optional drawers • Optional duplex unit • Scanner shelf • Printer memory or option cards If you do not have an option listed here, you can skip that portion...

C77x - Setup Guide
Page 12
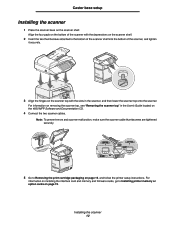
... bail curves downward. Store the cover; Caster base setup Installing the scanner shelf Note: If you remove the scanner shelf. 2 Remove the backing from the printer. You will be needed if you do not have a scanner shelf, go to the scanner shelf. 1 2 Installing the scanner shelf 11 The wire bail came... with the printer and rests in the standard output bin when installed. 6 Attach the plastic bracket to Scanner cabinet setup on page 13 or Scanner option setup on page 15. 1 Remove the top cover from the tape on top of...
... bail curves downward. Store the cover; Caster base setup Installing the scanner shelf Note: If you remove the scanner shelf. 2 Remove the backing from the printer. You will be needed if you do not have a scanner shelf, go to the scanner shelf. 1 2 Installing the scanner shelf 11 The wire bail came... with the printer and rests in the standard output bin when installed. 6 Attach the plastic bracket to Scanner cabinet setup on page 13 or Scanner option setup on page 15. 1 Remove the top cover from the tape on top of...
C77x - Setup Guide
Page 13
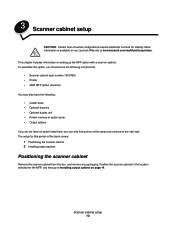
...scanner, and tighten it securely. 3 Align the hinges on the scanner top with the slots in the User's Guide located on the 4600 MFP Software and Documentation CD. 4 Connect the two scanner cables. For information on the scanner shelf. For information on installing the interface ...To prevent errors and scanner malfunction, make sure the scanner cable thumbscrews are tightened securely. 5 Go to Installing printer memory or option cards on page 16, and follow the printer setup instructions. Caster base setup Installing the scanner 1 Place the scanner base on removing the scanner top, ...
...scanner, and tighten it securely. 3 Align the hinges on the scanner top with the slots in the User's Guide located on the 4600 MFP Software and Documentation CD. 4 Connect the two scanner cables. For information on the scanner shelf. For information on installing the interface ...To prevent errors and scanner malfunction, make sure the scanner cable thumbscrews are tightened securely. 5 Go to Installing printer memory or option cards on page 16, and follow the printer setup instructions. Caster base setup Installing the scanner 1 Place the scanner base on removing the scanner top, ...
C77x - Setup Guide
Page 14
... stability. More information is available on our Lexmark Web site at www.lexmark.com/multifunctionprinters. Scanner cabinet setup 13 3 Scanner cabinet setup CAUTION: Certain floor-mounted configurations require additional furniture for this option, you should have the following components: • Scanner cabinet (part number 16C0700) • Printer • 4600 MFP option (scanner) You may also have the...
... stability. More information is available on our Lexmark Web site at www.lexmark.com/multifunctionprinters. Scanner cabinet setup 13 3 Scanner cabinet setup CAUTION: Certain floor-mounted configurations require additional furniture for this option, you should have the following components: • Scanner cabinet (part number 16C0700) • Printer • 4600 MFP option (scanner) You may also have the...
C77x - Setup Guide
Page 15
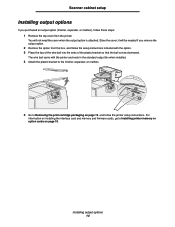
...page 19. Scanner cabinet setup Installing output options If you remove the output option. 2 Remove the option from the printer. it will not need the cover when the output option is attached. Installing output options 14 Store the cover; The wire bail came with the option. 3 Place the tips of the ... curves downward. You will be needed if you purchased an output option (finisher, expander, or mailbox), follow these steps: 1 Remove the top cover from the box, and follow the setup instructions included with the printer and rests in the standard output bin when installed. 4 Attach ...
...page 19. Scanner cabinet setup Installing output options If you remove the output option. 2 Remove the option from the printer. it will not need the cover when the output option is attached. Installing output options 14 Store the cover; The wire bail came with the option. 3 Place the tips of the ... curves downward. You will be needed if you purchased an output option (finisher, expander, or mailbox), follow these steps: 1 Remove the top cover from the box, and follow the setup instructions included with the printer and rests in the standard output bin when installed. 4 Attach ...
C77x - Setup Guide
Page 16
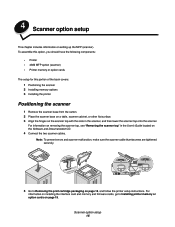
... packaging on the Software and Documentation CD. 4 Connect the two scanner cables. 4 Scanner option setup This chapter includes information on page 19. To assemble this option, you should have the following components: • Printer • 4600 MFP option (scanner) • Printer memory or option cards The setup for this portion of the book covers: 1 Positioning the scanner 2 Installing...
... packaging on the Software and Documentation CD. 4 Connect the two scanner cables. 4 Scanner option setup This chapter includes information on page 19. To assemble this option, you should have the following components: • Printer • 4600 MFP option (scanner) • Printer memory or option cards The setup for this portion of the book covers: 1 Positioning the scanner 2 Installing...

C77x - Setup Guide
Page 17
5 Setting up the printer 16 Setting up the printer Removing the print cartridge packaging Note: If you are installing a scanner after initial printer setup, the print cartridge packaging has already been removed. 1 Remove all exterior packing tape. 2 Open the front door. 3 Remove the packing strips. 4 Remove the tabs from the cartridges. 5 Discard the cartridge tabs and packaging.
5 Setting up the printer 16 Setting up the printer Removing the print cartridge packaging Note: If you are installing a scanner after initial printer setup, the print cartridge packaging has already been removed. 1 Remove all exterior packing tape. 2 Open the front door. 3 Remove the packing strips. 4 Remove the tabs from the cartridges. 5 Discard the cartridge tabs and packaging.

C77x - Setup Guide
Page 18
The print cartridge will drop down and snap into the printer. Setting up the printer 6 Shake the print cartridge. 7 Remove the cartridge cover. Warning: Do not touch the photoconductor. 8 Reinsert the print cartridge into place. 9 Repeat steps 6 through 8 to insert the remaining print cartridges. 10 Close the front cover. 1 3 2 Removing the print cartridge packaging 17
The print cartridge will drop down and snap into the printer. Setting up the printer 6 Shake the print cartridge. 7 Remove the cartridge cover. Warning: Do not touch the photoconductor. 8 Reinsert the print cartridge into place. 9 Repeat steps 6 through 8 to insert the remaining print cartridges. 10 Close the front cover. 1 3 2 Removing the print cartridge packaging 17
C77x - Setup Guide
Page 19
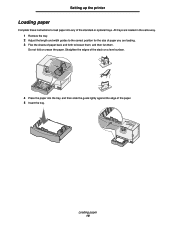
Loading paper 18 Do not fold or crease the paper. All trays are loaded in the same way. 1 Remove the tray. 2 Adjust the length and width guides to the correct position for the size of paper you are loading. 3 Flex the sheets of paper back and forth to load paper into the tray, and then slide the guide lightly against the edge of the paper. 5 Insert the tray. Straighten the edges of the stack on a level surface. 4 Place the paper into any of the standard or optional trays. Setting up the printer Loading paper Complete these instructions to loosen them, and then fan them.
Loading paper 18 Do not fold or crease the paper. All trays are loaded in the same way. 1 Remove the tray. 2 Adjust the length and width guides to the correct position for the size of paper you are loading. 3 Flex the sheets of paper back and forth to load paper into the tray, and then slide the guide lightly against the edge of the paper. 5 Insert the tray. Straighten the edges of the stack on a level surface. 4 Place the paper into any of the standard or optional trays. Setting up the printer Loading paper Complete these instructions to loosen them, and then fan them.
C77x - Setup Guide
Page 20
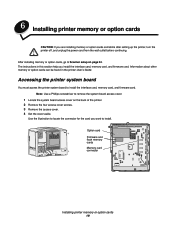
...card you want to install the interface card, memory card, and firmware card. Option card Firmware and flash memory cards Memory card connector Installing printer memory or option cards 19 After installing memory or option cards, go to remove the system board access cover. 1 Locate the system ...be found in this section help you are installing memory or option cards sometime after setting up the printer, turn the printer off, and unplug the power cord from the wall outlet before continuing. 6 Installing printer memory or option cards CAUTION: If you install the interface card, memory card...
...card you want to install the interface card, memory card, and firmware card. Option card Firmware and flash memory cards Memory card connector Installing printer memory or option cards 19 After installing memory or option cards, go to remove the system board access cover. 1 Locate the system ...be found in this section help you are installing memory or option cards sometime after setting up the printer, turn the printer off, and unplug the power cord from the wall outlet before continuing. 6 Installing printer memory or option cards CAUTION: If you install the interface card, memory card...
C77x - Setup Guide
Page 21
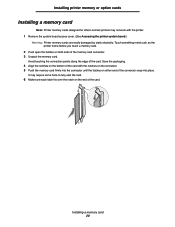
... a memory card. 2 Push open the latches on both ends of the memory card connector. 3 Unpack the memory card. Installing printer memory or option cards Installing a memory card Note: Printer memory cards designed for other Lexmark printers may require some force to fully seat the card. 6 Make sure each latch fits over the notch on the...
... a memory card. 2 Push open the latches on both ends of the memory card connector. 3 Unpack the memory card. Installing printer memory or option cards Installing a memory card Note: Printer memory cards designed for other Lexmark printers may require some force to fully seat the card. 6 Make sure each latch fits over the notch on the...
C77x - Setup Guide
Page 22
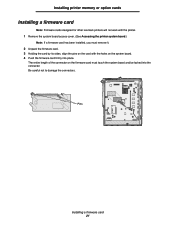
... damage the connectors. Pins Installing a firmware card 21 Installing printer memory or option cards Installing a firmware card Note: Firmware cards designed for other Lexmark printers will not work with the holes on the card with the printer. 1 Remove the system board access cover. (See Accessing the printer system board.) Note: If a firmware card has been installed...
... damage the connectors. Pins Installing a firmware card 21 Installing printer memory or option cards Installing a firmware card Note: Firmware cards designed for other Lexmark printers will not work with the holes on the card with the printer. 1 Remove the system board access cover. (See Accessing the printer system board.) Note: If a firmware card has been installed...
C77x - Setup Guide
Page 23
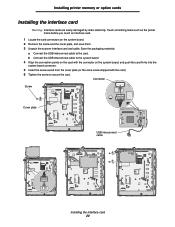
...save them. 3 Unpack the scanner interface card and cable. Connector Screw Cover plate USB interconnect cable Installing the interface card 22 Installing printer memory or option cards Installing the interface card Warning: Interface cards are easily damaged by static electricity. Touch something metal such as the... printer frame before you touch an interface card. 1 Locate the card connectors on the system board, and push the card firmly into the ...
...save them. 3 Unpack the scanner interface card and cable. Connector Screw Cover plate USB interconnect cable Installing the interface card 22 Installing printer memory or option cards Installing the interface card Warning: Interface cards are easily damaged by static electricity. Touch something metal such as the... printer frame before you touch an interface card. 1 Locate the card connectors on the system board, and push the card firmly into the ...
C77x - Setup Guide
Page 24
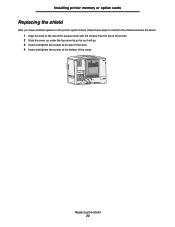
Replacing the shield 23 Installing printer memory or option cards Replacing the shield After you have installed options on the printer system board, follow these steps to reattach the shield and close the doors. 1 Align the slots at the top of the access cover with the screws near the top of the printer. 2 Slide the cover up under the top cover lip as far as it will go. 3 Insert and tighten the screws at the top of the cover. 4 Insert and tighten the screws at the bottom of the cover.
Replacing the shield 23 Installing printer memory or option cards Replacing the shield After you have installed options on the printer system board, follow these steps to reattach the shield and close the doors. 1 Align the slots at the top of the access cover with the screws near the top of the printer. 2 Slide the cover up under the top cover lip as far as it will go. 3 Insert and tighten the screws at the top of the cover. 4 Insert and tighten the screws at the bottom of the cover.


