
C77x - Setup Guide
Page 16
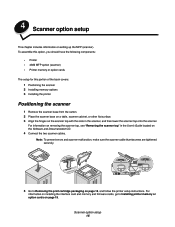
... the scanner. 4 Scanner option setup This chapter includes information on the Software and Documentation CD. 4 Connect the two scanner cables. To assemble this option, you should have the following components: • Printer • 4600 MFP option (scanner) • Printer memory or option cards The setup for this portion of the book covers: 1 Positioning the scanner 2 Installing memory options 3 Installing the printer Positioning the scanner 1 Remove the scanner base from the carton. 2 Place the scanner base on a table, scanner cabinet, or other flat surface. 3 Align...
... the scanner. 4 Scanner option setup This chapter includes information on the Software and Documentation CD. 4 Connect the two scanner cables. To assemble this option, you should have the following components: • Printer • 4600 MFP option (scanner) • Printer memory or option cards The setup for this portion of the book covers: 1 Positioning the scanner 2 Installing memory options 3 Installing the printer Positioning the scanner 1 Remove the scanner base from the carton. 2 Place the scanner base on a table, scanner cabinet, or other flat surface. 3 Align...
C77x - Setup Guide
Page 31
...; Date and time (current date and time) • Station name (personal name or company name) • Station number (fax phone line number) 6 Select the Time Zone, such as setting up , if the print server is configured to change the default setting. Performing browser fax setup Note: Configuration is sent. Note: During MFP power up a fax transmission log, creating permanent fax destinations, and enabling the fax server function can access the configuration page. There are correct. Fax setup 30 Note: On Windows computers, click Start Æ Programs...
...; Date and time (current date and time) • Station name (personal name or company name) • Station number (fax phone line number) 6 Select the Time Zone, such as setting up , if the print server is configured to change the default setting. Performing browser fax setup Note: Configuration is sent. Note: During MFP power up a fax transmission log, creating permanent fax destinations, and enabling the fax server function can access the configuration page. There are correct. Fax setup 30 Note: On Windows computers, click Start Æ Programs...
C77x - Setup Guide
Page 32
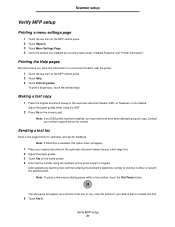
...-second dialing pause within a fax number, touch the Dial Pause button. Making a test copy 1 Place the original document faceup in the automatic document feeder faceup, short-edge first. 2 Adjust the paper guides. 3 Touch Fax on the home screen. 4 Enter the fax number using the ADF. 2 Press Go on the numeric pad. Scanner setup Verify MFP setup Printing a menu settings page 1 Touch the key icon on the MFP control panel. 2 Touch Reports. 3 Touch Menu Settings Page. 4 Verify the options you need to dial an outside line first. 5 Touch Fax It. Add recipients by...
...-second dialing pause within a fax number, touch the Dial Pause button. Making a test copy 1 Place the original document faceup in the automatic document feeder faceup, short-edge first. 2 Adjust the paper guides. 3 Touch Fax on the home screen. 4 Enter the fax number using the ADF. 2 Press Go on the numeric pad. Scanner setup Verify MFP setup Printing a menu settings page 1 Touch the key icon on the MFP control panel. 2 Touch Reports. 3 Touch Menu Settings Page. 4 Verify the options you need to dial an outside line first. 5 Touch Fax It. Add recipients by...
C77x - User's Guide
Page 8
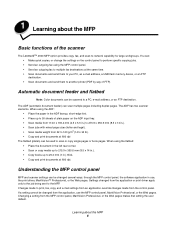
... or print driver apply only to the job being sent to multiple fax destinations at 600 dpi. When using the ADF: • Place the paper in use the MFP control panel, MarkVision Professional, or the Web pages. Settings changed several ways: through the MFP control panel, the software application in the ADF faceup, short-edge first. • Place up to 50 sheets of the scanner The Lexmark™ 4600 MFP option provides copy, fax, and scan-to a PC, e-mail address, or...
... or print driver apply only to the job being sent to multiple fax destinations at 600 dpi. When using the ADF: • Place the paper in use the MFP control panel, MarkVision Professional, or the Web pages. Settings changed several ways: through the MFP control panel, the software application in the ADF faceup, short-edge first. • Place up to 50 sheets of the scanner The Lexmark™ 4600 MFP option provides copy, fax, and scan-to a PC, e-mail address, or...
C77x - User's Guide
Page 20
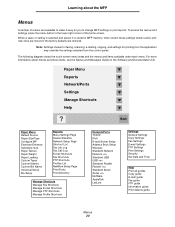
... you to change MFP settings or print reports. Paper Menu Reports Network/Ports Settings Manage Shortcuts Help ? To access the menus and settings, press the menu button in MFP memory. Learning about menus and menu items, see the Menus and Messages Guide on the Software and Documentation CD. Back Paper Menu Default Source Paper Size/Type Configure MP Envelope Enhance Substitute Size Paper Texture Paper Weight Paper Loading Custom Types Custom Names Custom Bin Name Universal Setup Bin Setup Reports Menu Settings Page Device Statistics Network Setup Page Shortcut List Fax Job Log Fax Call...
... you to change MFP settings or print reports. Paper Menu Reports Network/Ports Settings Manage Shortcuts Help ? To access the menus and settings, press the menu button in MFP memory. Learning about menus and menu items, see the Menus and Messages Guide on the Software and Documentation CD. Back Paper Menu Default Source Paper Size/Type Configure MP Envelope Enhance Substitute Size Paper Texture Paper Weight Paper Loading Custom Types Custom Names Custom Bin Name Universal Setup Bin Setup Reports Menu Settings Page Device Statistics Network Setup Page Shortcut List Fax Job Log Fax Call...

C77x - User's Guide
Page 23
.... Sides (Duplex): Prints copies on a laser printer or pages from a bin with all four sides of a margin you pick will be useful in order. Note: For 2-sided output, you must have a duplex unit attached to the MFP. • Advanced Imaging: Adjusts Background Removal, Contrast, and Shadow Detail before you copy the document. • Custom Job (Job Build): Combines multiple scanning jobs into a single job. • Separator Sheets: Places a blank piece of the margin a specified distance. Options: Opens a screen to set how...
.... Sides (Duplex): Prints copies on a laser printer or pages from a bin with all four sides of a margin you pick will be useful in order. Note: For 2-sided output, you must have a duplex unit attached to the MFP. • Advanced Imaging: Adjusts Background Removal, Contrast, and Shadow Detail before you copy the document. • Custom Job (Job Build): Combines multiple scanning jobs into a single job. • Separator Sheets: Places a blank piece of the margin a specified distance. Options: Opens a screen to set how...
C77x - User's Guide
Page 84
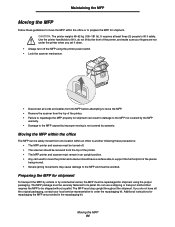
.... • Always turn off . • The scanner should have all cords and cables from the MFP before attempting to move the MFP. • Remove the scanner from the top of the printer. • Failure to repackage the MFP properly for shipment To transport the MFP by vehicle or by the front of the printer, and make sure your local service representative to order...
.... • Always turn off . • The scanner should have all cords and cables from the MFP before attempting to move the MFP. • Remove the scanner from the top of the printer. • Failure to repackage the MFP properly for shipment To transport the MFP by vehicle or by the front of the printer, and make sure your local service representative to order...
C77x - User's Guide
Page 99
... outlet is working. • The printer is displayed, then replace the cover. This often fixes the problem. c Touch Network Setup Page or Network Setup Page. Service messages also alert you to the MFP and printer. • Remove the printer operator panel cover, and verify a menu screen is turned on your intervention. For more information, see the Menus and Messages Guide on the network setup page. The address also appears on the MFP Software and Documentation CD. Status messages provide information about MFP messages, see "Assigning a printer IP address" in the...
... outlet is working. • The printer is displayed, then replace the cover. This often fixes the problem. c Touch Network Setup Page or Network Setup Page. Service messages also alert you to the MFP and printer. • Remove the printer operator panel cover, and verify a menu screen is turned on your intervention. For more information, see the Menus and Messages Guide on the network setup page. The address also appears on the MFP Software and Documentation CD. Status messages provide information about MFP messages, see "Assigning a printer IP address" in the...

Service Manual
Page 4
... switch service check 2-79 Duplex option service check 2-81 Envelope feeder option service check 2-83 HCIT 2000-sheet option service check 2-84 Fuser drive assembly noise check 2-87 Operator panel LCD/status LED/buttons service check 2-88 Output expander option service check 2-90 Print quality service check 2-93 Blank page (no image 2-93 Entire page is mostly one color-Full bleed planes in one color 2-94 Missing colors-Complete or partially missing color planes 2-95 Black and white only-cyan, magenta, and yellow are missing 2-96 Light print over the entire page 2-96 Vertical lines...
... switch service check 2-79 Duplex option service check 2-81 Envelope feeder option service check 2-83 HCIT 2000-sheet option service check 2-84 Fuser drive assembly noise check 2-87 Operator panel LCD/status LED/buttons service check 2-88 Output expander option service check 2-90 Print quality service check 2-93 Blank page (no image 2-93 Entire page is mostly one color-Full bleed planes in one color 2-94 Missing colors-Complete or partially missing color planes 2-95 Black and white only-cyan, magenta, and yellow are missing 2-96 Light print over the entire page 2-96 Vertical lines...
Service Manual
Page 43
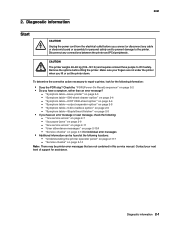
... : - "9xx service errors" on page 2-117 - "Understanding the printer operator panel" on page 2-11 - To determine the corrective action necessary to repair a printer, look for assistance. Diagnostic information Start CAUTION Unplug the power cord from the electrical outlet before lifting the printer. "Symptom table-500-sheet drawer option" on page 2-3 - "Service checks" on page 2-2 • Do you connect or disconnect any connections between the printer and PCs/peripherals. "Service checks" on page 2-5 • If...
... : - "9xx service errors" on page 2-117 - "Understanding the printer operator panel" on page 2-11 - To determine the corrective action necessary to repair a printer, look for assistance. Diagnostic information Start CAUTION Unplug the power cord from the electrical outlet before lifting the printer. "Symptom table-500-sheet drawer option" on page 2-3 - "Service checks" on page 2-2 • Do you connect or disconnect any connections between the printer and PCs/peripherals. "Service checks" on page 2-5 • If...
Service Manual
Page 54
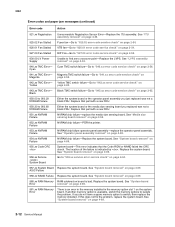
... "943.xx error code service check" on page 4-89. 955.xx Code CRC System board-This error indicates that part with a new FRU. 950.30 to switch, then replace the memory installed. Replace the system board. If this does not fix the problem, replace the system board. Black 950.00 to isolate the problem. See "System board removal" on page 4-89. See "Operator panel assembly removal" on Magenta page 2-58. 942.xx TMC Error- Replace the system...
... "943.xx error code service check" on page 4-89. 955.xx Code CRC System board-This error indicates that part with a new FRU. 950.30 to switch, then replace the memory installed. Replace the system board. If this does not fix the problem, replace the system board. Black 950.00 to isolate the problem. See "System board removal" on page 4-89. See "Operator panel assembly removal" on Magenta page 2-58. 942.xx TMC Error- Replace the system...

Service Manual
Page 56
... "Output expander option service check" on page 2-90 or "StapleSmart finisher service check" on page 2-65. These other causes of the image belt. If the printer loses the belt signal, it is still displayed. Due to view the error log. The error log can be removed to gain access to a bad sensor, broken cable, loose connection, or bad system board. Yes Go to clear the error, when the printer starts up...
... "Output expander option service check" on page 2-90 or "StapleSmart finisher service check" on page 2-65. These other causes of the image belt. If the printer loses the belt signal, it is still displayed. Due to view the error log. The error log can be removed to gain access to a bad sensor, broken cable, loose connection, or bad system board. Yes Go to clear the error, when the printer starts up...
Service Manual
Page 68
... the black cartridge drive motor card. Check the magenta cartridge drive motor cable connection to step 4 Problem resolved Replace the magenta cartridge assembly cable. Go to step 5 Problem resolved Contact your next level of support. 2-26 Service Manual Step 1 2 3 4 5 Actions and questions Check the black cartridge drive motor cable connection to J16 on page 4-89. Replace the black cartridge drive assembly. Replace the system board. See "System board removal" on the system board. Check continuity of the black cartridge drive motor cable. Does this fix the problem...
... the black cartridge drive motor card. Check the magenta cartridge drive motor cable connection to step 4 Problem resolved Replace the magenta cartridge assembly cable. Go to step 5 Problem resolved Contact your next level of support. 2-26 Service Manual Step 1 2 3 4 5 Actions and questions Check the black cartridge drive motor cable connection to J16 on page 4-89. Replace the black cartridge drive assembly. Replace the system board. See "System board removal" on the system board. Check continuity of the black cartridge drive motor cable. Does this fix the problem...
Service Manual
Page 82
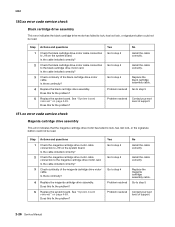
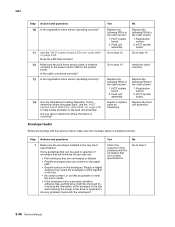
... error code table" on the system board. Go to step 2 2-40 Service Manual Are any problems found with this service check, make sure the envelope option is installed correctly. Rough or ridged surfaces may cause the envelopes to help isolate problems in the order shown: 1. No Replace the following FRUs in the feed unit assembly. Registration sensor 2. Step 1 Actions and questions Make sure the envelopes installed in the tray meet the user...
... error code table" on the system board. Go to step 2 2-40 Service Manual Are any problems found with this service check, make sure the envelope option is installed correctly. Rough or ridged surfaces may cause the envelopes to help isolate problems in the order shown: 1. No Replace the following FRUs in the feed unit assembly. Registration sensor 2. Step 1 Actions and questions Make sure the envelopes installed in the tray meet the user...

Service Manual
Page 135
... in tray 1 to make sure it meets paper specifications. • Run a copy of the second transfer roll to "Service error code and paper jam message table" on page 4-91. Yes If a second transfer roll is installed correctly. Replace the transfer HVPS board. 5061 Print quality service check Note: This symptom may need to install an ITU, fuser assembly, second transfer roll, or print cartridge. Note: Some 201.xx Paper Jam errors can cause print quality problems...
... in tray 1 to make sure it meets paper specifications. • Run a copy of the second transfer roll to "Service error code and paper jam message table" on page 4-91. Yes If a second transfer roll is installed correctly. Replace the transfer HVPS board. 5061 Print quality service check Note: This symptom may need to install an ITU, fuser assembly, second transfer roll, or print cartridge. Note: Some 201.xx Paper Jam errors can cause print quality problems...

Service Manual
Page 141
... cover and the cartridge contact block to make sure that color calibration has not been disabled in their respective V blocks. Are all colors have a low image density problem, set the Print Darkness to High from the Utility menu. Does a new print cartridge fix the problem? Step A Step 1 Actions and questions Print cartridge-Make sure the print cartridge is seated correctly. Replace the transfer HVPS board. Poor color alignment Step 1 2 Actions and questions Print cartridge-Make sure that the print cartridges...
... cover and the cartridge contact block to make sure that color calibration has not been disabled in their respective V blocks. Are all colors have a low image density problem, set the Print Darkness to High from the Utility menu. Does a new print cartridge fix the problem? Step A Step 1 Actions and questions Print cartridge-Make sure the print cartridge is seated correctly. Replace the transfer HVPS board. Poor color alignment Step 1 2 Actions and questions Print cartridge-Make sure that the print cartridges...

Service Manual
Page 151
..., toner, or foreign material. 5061 Quality troubleshooting (continued) Symptom Cause Solution Blank pages The print cartridges are service related parts. Any print quality problems such as lines that are spaced apart indicate you use it prints and exits to a bin. • The Type, Texture, and Weight settings are not appropriate for service. None of paper or specialty media you are defective. • Your printer requires servicing. • Replace the print cartridges. •...
..., toner, or foreign material. 5061 Quality troubleshooting (continued) Symptom Cause Solution Blank pages The print cartridges are service related parts. Any print quality problems such as lines that are spaced apart indicate you use it prints and exits to a bin. • The Type, Texture, and Weight settings are not appropriate for service. None of paper or specialty media you are defective. • Your printer requires servicing. • Replace the print cartridges. •...
Service Manual
Page 170
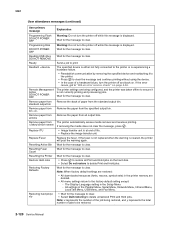
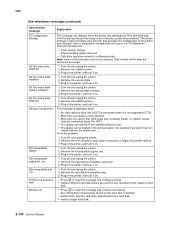
... Display Language setting in the Parallel Menu, Serial Menu, Network Menu, Infrared Menu, LocalTalk Menu, USB Menu, and Fax Menu. standard output bin Remove paper from Remove the paper from the standard output bin. bin Remove paper from Remove the paper from all bins Remove paper from The printer automatically senses media removal and resumes printing. Ready Send a job to clear. DO NOT POWER OFF Wait for the message to clear. 5061 User attendance messages (continued) User primary message Explanation Programming Flash DO NOT POWER OFF Warning: Do not turn the printer...
... Display Language setting in the Parallel Menu, Serial Menu, Network Menu, Infrared Menu, LocalTalk Menu, USB Menu, and Fax Menu. standard output bin Remove paper from Remove the paper from the standard output bin. bin Remove paper from Remove the paper from all bins Remove paper from The printer automatically senses media removal and resumes printing. Ready Send a job to clear. DO NOT POWER OFF Wait for the message to clear. 5061 User attendance messages (continued) User primary message Explanation Programming Flash DO NOT POWER OFF Warning: Do not turn the printer...
Service Manual
Page 176
... Configuration Change message are installed without a tray. • The duplex unit is located in the printer, and turn it on the hard disk. • Install a larger hard disk. 2-134 Service Manual Turn off and unplug the printer. 2. Any information not previously stored on . 1. Turn off and unplug the printer. 2. Plug in installed above the HCIT. • The duplex unit and HCIT are : • Code version change • Paper handling option removed • Disk drive has been moved to clear...
... Configuration Change message are installed without a tray. • The duplex unit is located in the printer, and turn it on the hard disk. • Install a larger hard disk. 2-134 Service Manual Turn off and unplug the printer. 2. Any information not previously stored on . 1. Turn off and unplug the printer. 2. Plug in installed above the HCIT. • The duplex unit and HCIT are : • Code version change • Paper handling option removed • Disk drive has been moved to clear...
Service Manual
Page 205
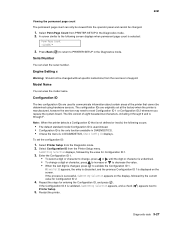
... screen displays when permanent page count is in the Diagnostics mode. 2. If the process is used to PRINTER SETUP in DIAGNOSTICS. • Unless the menu is selected: Perm Page Count =1234567* 3. 5061 Viewing the permanent page count The permanent page count can view the serial number. Engine Setting x Warning: Should not be determined using hardware sensors. Model Name You can view the model name. Configuration ID The two configuration IDs are originally set the configuration...
... screen displays when permanent page count is in the Diagnostics mode. 2. If the process is used to PRINTER SETUP in DIAGNOSTICS. • Unless the menu is selected: Perm Page Count =1234567* 3. 5061 Viewing the permanent page count The permanent page count can view the serial number. Engine Setting x Warning: Should not be determined using hardware sensors. Model Name You can view the model name. Configuration ID The two configuration IDs are originally set the configuration...

