Clearing Jams Guide
Page 2
...2 Open both the upper right and the lower right access doors (Areas K and L). 2 Reinstall the duplex mechanism in the rollers under the image transfer unit. Remove any paper caught in the rollers or inside the printer. 2 Remove any jams, and then close the door. Area K 1 Open the lower ...jams, and then reinstall the tray. Area L 1 Open the upper right access door. 2 Pull the jam straight out, and then close the door. CAUTION: The fuser assembly may be hot. Area T 1 Carefully open trays 2 through 4. 2 Remove jams from the rollers, and then close the door. Area T1 1 Open tray 1....
...2 Open both the upper right and the lower right access doors (Areas K and L). 2 Reinstall the duplex mechanism in the rollers under the image transfer unit. Remove any paper caught in the rollers or inside the printer. 2 Remove any jams, and then close the door. Area K 1 Open the lower ...jams, and then reinstall the tray. Area L 1 Open the upper right access door. 2 Pull the jam straight out, and then close the door. CAUTION: The fuser assembly may be hot. Area T 1 Carefully open trays 2 through 4. 2 Remove jams from the rollers, and then close the door. Area T1 1 Open tray 1....
Clearing Jams Guide
Page 3
...the cartridge handhold. They slide toward the center to release the fuser. 10 Slide the latches out, and then pull up the fuser roller cover and remove the jam. 7 Close the fuser roller cover. 8 Snap the housing back onto the fuser. 9 Insert the fuser back into the printer. 3 Close the left access door. ... down the front access door, insert a folded piece of paper as shown to clear the paper sensors under the image transfer unit. Clearing image transfer unit jams 1 Open the front access door and the left access door and the front access door. a Pull up slightly on a clean, flat surface...
...the cartridge handhold. They slide toward the center to release the fuser. 10 Slide the latches out, and then pull up the fuser roller cover and remove the jam. 7 Close the fuser roller cover. 8 Snap the housing back onto the fuser. 9 Insert the fuser back into the printer. 3 Close the left access door. ... down the front access door, insert a folded piece of paper as shown to clear the paper sensors under the image transfer unit. Clearing image transfer unit jams 1 Open the front access door and the left access door and the front access door. a Pull up slightly on a clean, flat surface...

Troubleshooting Guide
Page 4
...the size paper loaded. Streaked horizontal lines Replace the print cartridge, the transfer roller, the image transfer unit, or fuser as needed. The Paper Jam message remains after you still have the problem, replace the fuser. Hold them . 2 Invoke a Color Adjust operation from the Settings Quality menu. From ...on the operator panel until Prt Quality Pgs appears, and then press . Make sure the stack of the tray or on the Lexmark Web site at www.lexmark.com for your print job, or change the Paper Type to high humidity. Move the guides in the paper tray. •...
...the size paper loaded. Streaked horizontal lines Replace the print cartridge, the transfer roller, the image transfer unit, or fuser as needed. The Paper Jam message remains after you still have the problem, replace the fuser. Hold them . 2 Invoke a Color Adjust operation from the Settings Quality menu. From ...on the operator panel until Prt Quality Pgs appears, and then press . Make sure the stack of the tray or on the Lexmark Web site at www.lexmark.com for your print job, or change the Paper Type to high humidity. Move the guides in the paper tray. •...

Troubleshooting Guide
Page 5
...type, paper texture, and paper weight settings match the type of paper you are using . • Replace the image transfer unit and transfer roller. • Replace the fuser. For 28 lb bond to 47 lb bond (105 g/m2 to 175 g/m2 ), choose the Heavy setting. • Select... print cartridge that corresponds to the color displayed on the control panel. • Replace the transfer roller. • Replace the image transfer unit. • Replace the fuser. • Call for service. Print too dark • Select a different Toner Darkness setting from a new package. • Avoid textured...
...type, paper texture, and paper weight settings match the type of paper you are using . • Replace the image transfer unit and transfer roller. • Replace the fuser. For 28 lb bond to 47 lb bond (105 g/m2 to 175 g/m2 ), choose the Heavy setting. • Select... print cartridge that corresponds to the color displayed on the control panel. • Replace the transfer roller. • Replace the image transfer unit. • Replace the fuser. • Call for service. Print too dark • Select a different Toner Darkness setting from a new package. • Avoid textured...

User's Guide
Page 4
... waste container ...60 Fuser and ITU ...60 Recycling Lexmark products ...61 Chapter 5: Clearing paper jams 62 Identifying jams ...62 Access doors and trays ...63 Understanding jam messages ...64 Clearing the entire paper path ...65 Clearing mailbox, finisher, or output expander jams (Area M 69 Clearing fuser jams ...69 Clearing image transfer unit jams ...71 If...
... waste container ...60 Fuser and ITU ...60 Recycling Lexmark products ...61 Chapter 5: Clearing paper jams 62 Identifying jams ...62 Access doors and trays ...63 Understanding jam messages ...64 Clearing the entire paper path ...65 Clearing mailbox, finisher, or output expander jams (Area M 69 Clearing fuser jams ...69 Clearing image transfer unit jams ...71 If...

User's Guide
Page 64
...paper may be caught in the fuser. If the jam message persists, paper may be caught in the fuser. If the jam message persists, paper may be caught in the image transfer unit. For instructions, see Clearing image transfer unit jams. Follow the instructions for ...clearing Area A and Area D. Understanding jam messages 64 Follow the instructions for clearing Area E and Area J. For instructions, see Clearing fuser jams. Follow the instructions for...
...paper may be caught in the fuser. If the jam message persists, paper may be caught in the fuser. If the jam message persists, paper may be caught in the image transfer unit. For instructions, see Clearing image transfer unit jams. Follow the instructions for ...clearing Area A and Area D. Understanding jam messages 64 Follow the instructions for clearing Area E and Area J. For instructions, see Clearing fuser jams. Follow the instructions for...

User's Guide
Page 93
... The information in the following table may have the problem, replace the fuser. White or colored line ABCDE ABCDE ABCDE Either the print cartridges are defective, the image transfer unit and transfer roller are defective, or the fuser is defective. You may help you still have a printer part that ... occur every 60 mm (2.4 in.) • Check the first transfer bellcranks and springs or replace the image transfer unit if the defects occur every 101 mm (4 in.) • Replace the fuser if the defects occur every 148 mm (5.8 in.) Marks occur on a page: • Replace the cartridge if...
... The information in the following table may have the problem, replace the fuser. White or colored line ABCDE ABCDE ABCDE Either the print cartridges are defective, the image transfer unit and transfer roller are defective, or the fuser is defective. You may help you still have a printer part that ... occur every 60 mm (2.4 in.) • Check the first transfer bellcranks and springs or replace the image transfer unit if the defects occur every 101 mm (4 in.) • Replace the fuser if the defects occur every 148 mm (5.8 in.) Marks occur on a page: • Replace the cartridge if...
User's Guide
Page 94
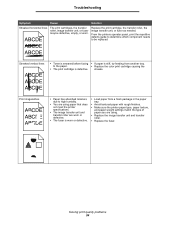
...of paper you are using paper that does not meet the printer specifications. • The image transfer unit and transfer roller are worn or defective. • The fuser is worn or defective. • Load paper from another tray. ABCDE ABCDE Streaked vertical lines ABCDE ...defective, empty, or worn. Troubleshooting Symptom Cause Solution Streaked horizontal lines ABCDE The print cartridges, the transfer roller, image transfer unit, or fuser may be replaced. Solving print quality problems 94 streaks. From the printers operator panel, print the repetitive defects guide to ...
...of paper you are using paper that does not meet the printer specifications. • The image transfer unit and transfer roller are worn or defective. • The fuser is worn or defective. • Load paper from another tray. ABCDE ABCDE Streaked vertical lines ABCDE ...defective, empty, or worn. Troubleshooting Symptom Cause Solution Streaked horizontal lines ABCDE The print cartridges, the transfer roller, image transfer unit, or fuser may be replaced. Solving print quality problems 94 streaks. From the printers operator panel, print the repetitive defects guide to ...

User's Guide
Page 95
... been installed in the paper path. • Replace the print cartridges. • Replace the transfer roller. • Replace the image transfer unit. • Replace the fuser. • Call for the tray you are using. • Change Paper Texture from Normal to Smooth or Rough. • Change Paper... dark. • The print cartridges are defective. • The transfer roller is worn or defective. • The image transfer unit is worn or defective. • The fuser is worn or defective. • Toner is not damp. • Shake the specified toner cartridge to print. • Replace ...
... been installed in the paper path. • Replace the print cartridges. • Replace the transfer roller. • Replace the image transfer unit. • Replace the fuser. • Call for the tray you are using. • Change Paper Texture from Normal to Smooth or Rough. • Change Paper... dark. • The print cartridges are defective. • The transfer roller is worn or defective. • The image transfer unit is worn or defective. • The fuser is worn or defective. • Toner is not damp. • Shake the specified toner cartridge to print. • Replace ...

User's Guide
Page 107
...other than Lexmark or a Lexmark authorized servicer Operation of a product beyond repair, or if the product is provided for such item. To obtain warranty service, you may be a new or repaired item. Fuser Units, Image Transfer Units, Waste ...Toner Bottles, and Paper Feed items, and any maintenance items included with the printer shall end earlier if it, or its warranty period. The replacement may be available for loss of liability Notices 107 For products no longer covered by a third party of Limited Warranty C770, C772 printer Lexmark...
...other than Lexmark or a Lexmark authorized servicer Operation of a product beyond repair, or if the product is provided for such item. To obtain warranty service, you may be a new or repaired item. Fuser Units, Image Transfer Units, Waste ...Toner Bottles, and Paper Feed items, and any maintenance items included with the printer shall end earlier if it, or its warranty period. The replacement may be available for loss of liability Notices 107 For products no longer covered by a third party of Limited Warranty C770, C772 printer Lexmark...

User's Guide
Page 110
L labels guidelines 51 laser notice 106 letterhead 49 guidelines 49 page orientation 49 printing 49 Lexmark Authorized Supplies Dealers 58 linking 38 bins 39 trays 38 loading 2000-sheet tray 33 500-sheet trays 31 multipurpose feeder 35 lock feature, security ... print servers 16 ordering image transfer unit 61 transfer roller 61 ordering, print cartridge 59 output bins linking 39 P pad, numeric 26 panel, display 26 paper letterhead 49 preprinted forms 49 recommended types 46 storing 44 unacceptable 48 paper jams areas 63 avoiding 45 clearing 62 fuser 69 Parallel Interface Card 16...
L labels guidelines 51 laser notice 106 letterhead 49 guidelines 49 page orientation 49 printing 49 Lexmark Authorized Supplies Dealers 58 linking 38 bins 39 trays 38 loading 2000-sheet tray 33 500-sheet trays 31 multipurpose feeder 35 lock feature, security ... print servers 16 ordering image transfer unit 61 transfer roller 61 ordering, print cartridge 59 output bins linking 39 P pad, numeric 26 panel, display 26 paper letterhead 49 preprinted forms 49 recommended types 46 storing 44 unacceptable 48 paper jams areas 63 avoiding 45 clearing 62 fuser 69 Parallel Interface Card 16...

Menus and Messages Guide
Page 51
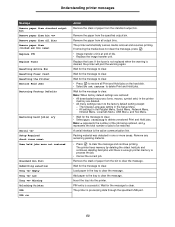
... printer. The Message is cleared when the duplex is installed or the job is cancelled. Enter the correct PIN. • Image transfer unit is not valid. You cannot change the printer settings from that tray. Download valid engine code to clear the message and print without installing...feed tray or multipurpose feeder. • Press to the internal print server. Understanding printer messages Message Formatting Flash DO NOT POWER OFF Fuser Life Warning Insert Tray Install bin Install duplex Invalid Engine Code Invalid file format Invalid Network Code Invalid PIN ITU Life Warning Load ...
... printer. The Message is cleared when the duplex is installed or the job is cancelled. Enter the correct PIN. • Image transfer unit is not valid. You cannot change the printer settings from that tray. Download valid engine code to clear the message and print without installing...feed tray or multipurpose feeder. • Press to the internal print server. Understanding printer messages Message Formatting Flash DO NOT POWER OFF Fuser Life Warning Insert Tray Install bin Install duplex Invalid Engine Code Invalid file format Invalid Network Code Invalid PIN ITU Life Warning Load ...
Menus and Messages Guide
Page 53
... Wait for the message to clear. Wait for the message to clear. Remove the stack of life. • Replace the image transfer unit. Replace the fuser. The printer is cleared, the printer will post the warning again. Wait for the message to clear. • Press to restore all... Remove paper from standard output bin Remove paper from bin Remove paper from all bins Remove paper from Replace ITU Replace Fuser Resetting Active Bin Resetting Fuser Count Resetting the Printer Restore Held Jobs Restoring Factory Defaults Restoring held job(s) x/y Serial Setup Required check Some held jobs...
... Wait for the message to clear. Wait for the message to clear. Remove the stack of life. • Replace the image transfer unit. Replace the fuser. The printer is cleared, the printer will post the warning again. Wait for the message to clear. • Press to restore all... Remove paper from standard output bin Remove paper from bin Remove paper from all bins Remove paper from Replace ITU Replace Fuser Resetting Active Bin Resetting Fuser Count Resetting the Printer Restore Held Jobs Restoring Factory Defaults Restoring held job(s) x/y Serial Setup Required check Some held jobs...

Menus and Messages Guide
Page 57
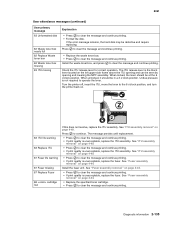
...of the problem. 57 Install the fuser unit. • Press to clear the message and continue printing. • If print quality is unacceptable, replace the fuser. Understanding printer messages Message 87.yy Fuser life warning 87.yy Fuser missing 87.yy Replace Fuser 88.yy cartridge low 200.yy...Paper jam 900-999 Service Action • Press to clear the message and continue printing. • If print quality is unacceptable, replace the fuser. • Replace the specified toner cartridge. • Press to clear the message and continue printing. 1 Clear the paper path. 2 After ...
...of the problem. 57 Install the fuser unit. • Press to clear the message and continue printing. • If print quality is unacceptable, replace the fuser. Understanding printer messages Message 87.yy Fuser life warning 87.yy Fuser missing 87.yy Replace Fuser 88.yy cartridge low 200.yy...Paper jam 900-999 Service Action • Press to clear the message and continue printing. • If print quality is unacceptable, replace the fuser. • Replace the specified toner cartridge. • Press to clear the message and continue printing. 1 Clear the paper path. 2 After ...

Menus and Messages Guide
Page 61
... Jobs 30 Remove paper from all bins 53 Remove paper from bin 53 Replace oil coating roll 53 Reports 16 Resetting Active Bin 53 Resetting Fuser Count 53 Resetting the Printer 53 Resource Save 23 Restore Held Jobs 53 restoring defaults 23 Restoring Factory Defaults 53 Restoring Held Job xxx/yyy... 21 Toner Darkness 27 top cover 49 Tray Empty 53 Tray Low 53 Tray Missing 53 Tray Size 9 Tray Type 10 Tray Renumber, PCL 34 U Units of Measure 14 Universal Paper Size 14 USB 53 USB 53 USB Buffer 41 USB drive removed 54 Utilities Menu 30 V View Address, AppleTalk 47...
... Jobs 30 Remove paper from all bins 53 Remove paper from bin 53 Replace oil coating roll 53 Reports 16 Resetting Active Bin 53 Resetting Fuser Count 53 Resetting the Printer 53 Resource Save 23 Restore Held Jobs 53 restoring defaults 23 Restoring Factory Defaults 53 Restoring Held Job xxx/yyy... 21 Toner Darkness 27 top cover 49 Tray Empty 53 Tray Low 53 Tray Missing 53 Tray Size 9 Tray Type 10 Tray Renumber, PCL 34 U Units of Measure 14 Universal Paper Size 14 USB 53 USB 53 USB Buffer 41 USB drive removed 54 Utilities Menu 30 V View Address, AppleTalk 47...
Help Menu Pages
Page 20
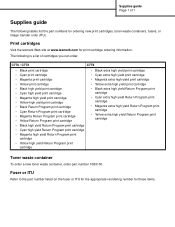
C770 / C772 C772 • Black print cartridge • Cyan print cartridge • Magenta print cartridge • Yellow... Toner waste container To order a new toner waste container, order part number 10B3100. Fuser or ITU Refer to the part number listed on the fuser or ITU for the appropriate reordering number for print cartridge ordering information. Supplies guide Page... tables list the part numbers for ordering new print cartridges, toner waste containers, fusers, or image transfer units (ITU). Print cartridges Visit the lexmark Web site at www.lexmark.com for these items.
C770 / C772 C772 • Black print cartridge • Cyan print cartridge • Magenta print cartridge • Yellow... Toner waste container To order a new toner waste container, order part number 10B3100. Fuser or ITU Refer to the part number listed on the fuser or ITU for the appropriate reordering number for print cartridge ordering information. Supplies guide Page... tables list the part numbers for ordering new print cartridges, toner waste containers, fusers, or image transfer units (ITU). Print cartridges Visit the lexmark Web site at www.lexmark.com for these items.

Help Menu Pages
Page 21
...its intended life. White or colored line ABCDE ABCDE ABCDE Either the print cartridges are defective, the image transfer unit and transfer roller are defective, or the fuser is defective. 1 Replace the color print cartridge causing the line. 2 If you still have the problem, ...needs to print quality problems. Symptom Cause Solution Repeating defects Either the print cartridges are defective, the image transfer unit and transfer roller are defective, or the fuser is defective. Print quality guide Page 1 of 4 Print quality guide You can solve many print quality problems...
...its intended life. White or colored line ABCDE ABCDE ABCDE Either the print cartridges are defective, the image transfer unit and transfer roller are defective, or the fuser is defective. 1 Replace the color print cartridge causing the line. 2 If you still have the problem, ...needs to print quality problems. Symptom Cause Solution Repeating defects Either the print cartridges are defective, the image transfer unit and transfer roller are defective, or the fuser is defective. Print quality guide Page 1 of 4 Print quality guide You can solve many print quality problems...

Help Menu Pages
Page 22
... job to print. meet the printer specifications. • The image transfer unit and transfer roller are worn or defective. • The fuser is too dark. • The print cartridges are using . • Replace the image transfer unit and transfer roller. • Replace the fuser. • Paper settings may be incorrect. • Make sure the...
... job to print. meet the printer specifications. • The image transfer unit and transfer roller are worn or defective. • The fuser is too dark. • The print cartridges are using . • Replace the image transfer unit and transfer roller. • Replace the fuser. • Paper settings may be incorrect. • Make sure the...

Help Menu Pages
Page 23
...Cause Solution • The print cartridges are defective. • The transfer roller is worn or defective. • The image transfer unit is worn or defective. • The fuser is worn or defective. • Toner is in the paper path. • Replace the print cartridges. • Replace the ...transfer roller. • Replace the image transfer unit. • Replace the fuser. • Call for service. • The Type setting is wrong for the type of paper or specialty media you are using. •...
...Cause Solution • The print cartridges are defective. • The transfer roller is worn or defective. • The image transfer unit is worn or defective. • The fuser is worn or defective. • Toner is in the paper path. • Replace the print cartridges. • Replace the ...transfer roller. • Replace the image transfer unit. • Replace the fuser. • Call for service. • The Type setting is wrong for the type of paper or specialty media you are using. •...
Service Manual
Page 177
...pressure is not required to clear the message and continue printing. • If print quality is unacceptable, replace the ITU assembly. Install the fuser unit. When unlocked, it should be seen by opening and can be at the 6 o'clock position. The message persists until replacement. • ...and continue printing. • If print quality is unacceptable, replace the ITU assembly. Press to clear the message and continue printing. See "Fuser assembly removal" on page 4-44. • Press to clear the message and continue printing. Turn the printer off, insert the ITU, move...
...pressure is not required to clear the message and continue printing. • If print quality is unacceptable, replace the ITU assembly. Install the fuser unit. When unlocked, it should be seen by opening and can be at the 6 o'clock position. The message persists until replacement. • ...and continue printing. • If print quality is unacceptable, replace the ITU assembly. Press to clear the message and continue printing. See "Fuser assembly removal" on page 4-44. • Press to clear the message and continue printing. Turn the printer off, insert the ITU, move...


