Troubleshooting Guide
Page 1
... may not be supported. For information regarding tested and approved USB flash memory devices, see the Lexmark Web site at www.lexmark.com. Load media in Adobe Acrobat. 2 Click the printer icon. Copies of these possibilities, turn the printer off and contact Customer Support. Printer has insufficient memory. Turn the printer off, wait about 10 seconds, and...
... may not be supported. For information regarding tested and approved USB flash memory devices, see the Lexmark Web site at www.lexmark.com. Load media in Adobe Acrobat. 2 Click the printer icon. Copies of these possibilities, turn the printer off and contact Customer Support. Printer has insufficient memory. Turn the printer off, wait about 10 seconds, and...
Troubleshooting Guide
Page 4
... printed sheet, find the straightest of the appropriate area or has been superimposed over another color area. The printer performs its power-on the Software and Documentation CD. Adjusting the color alignment 1 Make sure the printer is displayed, and then press . Printing Quality Test Pages appears, and then the pages print. Note: If you have...
... printed sheet, find the straightest of the appropriate area or has been superimposed over another color area. The printer performs its power-on the Software and Documentation CD. Adjusting the color alignment 1 Make sure the printer is displayed, and then press . Printing Quality Test Pages appears, and then the pages print. Note: If you have...
User's Guide
Page 2
... the printer off , and unplug the power cord before continuing. This product is designed, tested, and approved to meet strict global safety standards with the use of other than those specified herein may result in the user documentation, to a professional service person. Lexmark is near the product and... lift it safely. If you are installing a 550-sheet drawer after setting up the printer, turn them off , and unplug the power cord before touching. This product uses a laser. The safety features of some parts may cause the media to release emissions. CAUTION: Make sure that ...
... the printer off , and unplug the power cord before continuing. This product is designed, tested, and approved to meet strict global safety standards with the use of other than those specified herein may result in the user documentation, to a professional service person. Lexmark is near the product and... lift it safely. If you are installing a 550-sheet drawer after setting up the printer, turn them off , and unplug the power cord before touching. This product uses a laser. The safety features of some parts may cause the media to release emissions. CAUTION: Make sure that ...
User's Guide
Page 4
...Supported paper sizes...41 Support for paper types ...43 Paper types and weights ...43 Paper capacities ...44 Printing...45 Installing printer software...45 Printing a document from Windows 45 Printing a document from a Macintosh computer 45 Printing confidential and other held jobs ... the print quality test pages 50 Printing a duplex job manually from a Macintosh computer 50 Printing only black text and graphics 50 Configuring the printer for black-only printing 51 Removing the color supplies ...51 Configuring the printer for color printing and replacing the color supplies 54 Canceling ...
...Supported paper sizes...41 Support for paper types ...43 Paper types and weights ...43 Paper capacities ...44 Printing...45 Installing printer software...45 Printing a document from Windows 45 Printing a document from a Macintosh computer 45 Printing confidential and other held jobs ... the print quality test pages 50 Printing a duplex job manually from a Macintosh computer 50 Printing only black text and graphics 50 Configuring the printer for black-only printing 51 Removing the color supplies ...51 Configuring the printer for color printing and replacing the color supplies 54 Canceling ...

User's Guide
Page 47
...is on and Ready or Busy appears. 2 Insert a USB flash memory device into the USB Direct interface. Devices only supporting USB low-speed capabilities are tested and approved for use the numeric keypad to print, and then press . To print from a USB flash memory device A USB Direct interface is available... site at www.lexmark.com. Devices formatted with NTFS (New Technology File System) or any other file system are automatically deleted from the USB key. Warning: Do not remove the USB key, or touch the printer near the area of the USB key while actively reading, writing, or printing from ...
...is on and Ready or Busy appears. 2 Insert a USB flash memory device into the USB Direct interface. Devices only supporting USB low-speed capabilities are tested and approved for use the numeric keypad to print, and then press . To print from a USB flash memory device A USB Direct interface is available... site at www.lexmark.com. Devices formatted with NTFS (New Technology File System) or any other file system are automatically deleted from the USB key. Warning: Do not remove the USB key, or touch the printer near the area of the USB key while actively reading, writing, or printing from ...

User's Guide
Page 50
... list, choose Paper Handling. 9 Make sure Page order is set the printer to Color Lock Out mode, and remove and store the color printing supplies. Resetting the Printer appears briefly, followed by a clock, and then Ready appears. Printing the print quality test pages Print the print quality test pages to isolate print quality problems. 1 Turn the...
... list, choose Paper Handling. 9 Make sure Page order is set the printer to Color Lock Out mode, and remove and store the color printing supplies. Resetting the Printer appears briefly, followed by a clock, and then Ready appears. Printing the print quality test pages Print the print quality test pages to isolate print quality problems. 1 Turn the...
User's Guide
Page 69
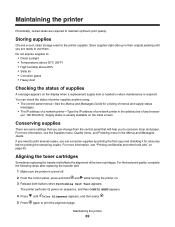
.... If you need to print several copies, you to conserve toner and paper. The printer performs its power-on . 3 Release both buttons when Performing Self Test appears. Maintaining the printer 69 Storing supplies Choose a cool, clean storage area for a listing of menus and ...printer Periodically, certain tasks are ready to use them. Do not expose supplies to maintain optimum print quality. Aligning the toner cartridges Sometimes replacing the transfer belt affects the alignment of supplies A message appears on page 45. Store supplies right side up in their original packing until Color...
.... If you need to print several copies, you to conserve toner and paper. The printer performs its power-on . 3 Release both buttons when Performing Self Test appears. Maintaining the printer 69 Storing supplies Choose a cool, clean storage area for a listing of menus and ...printer Periodically, certain tasks are ready to use them. Do not expose supplies to maintain optimum print quality. Aligning the toner cartridges Sometimes replacing the transfer belt affects the alignment of supplies A message appears on page 45. Store supplies right side up in their original packing until Color...

User's Guide
Page 75
...keep menu settings from being changed. 1 Make sure the printer is turned off . 2 From the control panel, press and hold and while turning the printer on . 3 Release both buttons when Performing Self Test appears. Administrative support Adjusting the brightness or contrast of the... display Note: These options are disabled. Resetting the Printer appears briefly, followed by a clock, and then ...
...keep menu settings from being changed. 1 Make sure the printer is turned off . 2 From the control panel, press and hold and while turning the printer on . 3 Release both buttons when Performing Self Test appears. Administrative support Adjusting the brightness or contrast of the... display Note: These options are disabled. Resetting the Printer appears briefly, followed by a clock, and then ...

User's Guide
Page 76
...6 Press until Exit Config Menu appears, and then press . Quick Start mode is on by default. You can restore the original printer settings, often referred to normal operating temperature. This reduces the overall time required to print a job from a standby mode. Restoring ... indicate the active settings. Submitting Selection appears, followed by a clock, and then Ready appears. 3 Release both buttons when Performing Self Test appears. Submitting Selection, Enabling Menus, and Panel Menus appear briefly. 6 Press until Restore Now appears, and then press . Administrative support...
...6 Press until Exit Config Menu appears, and then press . Quick Start mode is on by default. You can restore the original printer settings, often referred to normal operating temperature. This reduces the overall time required to print a job from a standby mode. Restoring ... indicate the active settings. Submitting Selection appears, followed by a clock, and then Ready appears. 3 Release both buttons when Performing Self Test appears. Submitting Selection, Enabling Menus, and Panel Menus appear briefly. 6 Press until Restore Now appears, and then press . Administrative support...

User's Guide
Page 77
...For more information, see the Technical Reference available on . 3 Release both buttons when Performing Self Test appears. The printer performs its power-on the printer hard disk will be affected. 1 Make sure the printer is installed and working properly. Administrative support 77 This includes fonts, macros, and symbol sets.... disk is turned off. 2 From the control panel, press and hold and while turning the printer on the Lexmark Web site at www.lexmark.com/publications. The following factory default settings are deleted. Note: Power Saver settings can also be lost. Warning:...
...For more information, see the Technical Reference available on . 3 Release both buttons when Performing Self Test appears. The printer performs its power-on the printer hard disk will be affected. 1 Make sure the printer is installed and working properly. Administrative support 77 This includes fonts, macros, and symbol sets.... disk is turned off. 2 From the control panel, press and hold and while turning the printer on the Lexmark Web site at www.lexmark.com/publications. The following factory default settings are deleted. Note: Power Saver settings can also be lost. Warning:...

User's Guide
Page 78
... the user will be lost. Each time a locked menu is turned off. 2 From the control panel, press and hold and while turning the printer on sequence, and then CONFIG MENU appears. 4 Press until Disk Encryption appears, and then press . 5 Press until Exit Config Menu appears, and ... lock. 7 When the process is finished, press . 8 Press until Disable appears, and then press . The printer performs its power-on . 3 Release both buttons when Performing Self Test appears. Locking the control panel menus using the Embedded Web Server You can use the control panel lockout functionality to ...
... the user will be lost. Each time a locked menu is turned off. 2 From the control panel, press and hold and while turning the printer on sequence, and then CONFIG MENU appears. 4 Press until Disk Encryption appears, and then press . 5 Press until Exit Config Menu appears, and ... lock. 7 When the process is finished, press . 8 Press until Disable appears, and then press . The printer performs its power-on . 3 Release both buttons when Performing Self Test appears. Locking the control panel menus using the Embedded Web Server You can use the control panel lockout functionality to ...

User's Guide
Page 82
...appear, turn the printer back on. Error message about 10 seconds, and then turn the printer off , wait about reading USB drive appears USB device may not be supported. For information regarding tested and approved USB flash memory devices, see the Lexmark Web site at www.lexmark.com. Once ...you want to the printer and the host computer, print server...
...appear, turn the printer back on. Error message about 10 seconds, and then turn the printer off , wait about reading USB drive appears USB device may not be supported. For information regarding tested and approved USB flash memory devices, see the Lexmark Web site at www.lexmark.com. Once ...you want to the printer and the host computer, print server...
User's Guide
Page 87
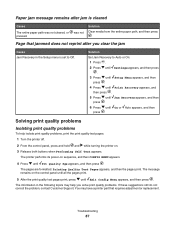
.... Solution Set Jam Recovery to Off. Troubleshooting 87 The printer performs its power-on . 3 Release both buttons when Performing Self Test appears. You may help isolate print quality problems, print the print quality test pages: 1 Turn the printer off. 2 From the control panel, press and hold... and while turning the printer on sequence, and then CONFIG MENU appears. 4 Press...
.... Solution Set Jam Recovery to Off. Troubleshooting 87 The printer performs its power-on . 3 Release both buttons when Performing Self Test appears. You may help isolate print quality problems, print the print quality test pages: 1 Turn the printer off. 2 From the control panel, press and hold... and while turning the printer on sequence, and then CONFIG MENU appears. 4 Press...
User's Guide
Page 88
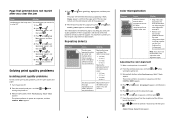
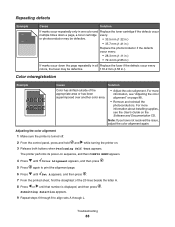
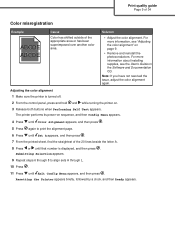
...4 Press until Color Alignment appears, and then press . 5 Press again to align sets A through L. The printer performs its power...color area. • Adjust the color alignment. Repeating defects ) ) Example Cause Solution If marks occur repeatedly only in one color...every colors, the fuser may be defective. 116.2 mm ... adjust the color alignment again. Troubleshooting 88 Color misregistration Example ABCDE ABCDE Cause Solution Color has shifted ...printer on page 88. • Remove and reinstall the photoconductors. Adjusting the color alignment 1 Make sure the printer...
...4 Press until Color Alignment appears, and then press . 5 Press again to align sets A through L. The printer performs its power...color area. • Adjust the color alignment. Repeating defects ) ) Example Cause Solution If marks occur repeatedly only in one color...every colors, the fuser may be defective. 116.2 mm ... adjust the color alignment again. Troubleshooting 88 Color misregistration Example ABCDE ABCDE Cause Solution Color has shifted ...printer on page 88. • Remove and reinstall the photoconductors. Adjusting the color alignment 1 Make sure the printer...

User's Guide
Page 103
... pouvant causer des interférences NMB-003. This equipment generates, uses, and can be directed to: Director of Lexmark Technology & Services Lexmark International, Inc. 740 West New Circle Road Lexington, KY 40550 (859) 232-3000 Industry Canada compliance statement This Class...: To assure compliance with the limits for USB attach. Federal Communications Commission (FCC) compliance information statement This product has been tested and found to comply with FCC regulations on electromagnetic interference for a Class B computing device, use within certain voltage limits. ...
... pouvant causer des interférences NMB-003. This equipment generates, uses, and can be directed to: Director of Lexmark Technology & Services Lexmark International, Inc. 740 West New Circle Road Lexington, KY 40550 (859) 232-3000 Industry Canada compliance statement This Class...: To assure compliance with the limits for USB attach. Federal Communications Commission (FCC) compliance information statement This product has been tested and found to comply with FCC regulations on electromagnetic interference for a Class B computing device, use within certain voltage limits. ...
User's Guide
Page 109
... 89 poor transparency quality 91 print irregularities 91 print is too dark 91 print is too light 90 print quality test pages 87 repeating defects 88 skewed print 93 solid color pages 93 streaked horizontal lines 89 streaked vertical lines 90 toner fog or background shading 91 toner rubs off 94 ... manually 50 font sample list 49 from Macintosh 45 from USB flash memory device 47 from Windows 45 installing printer software 45 menu settings page 48 network setup page 49 print quality test pages 50 printing confidential and other held jobs from Macintosh 46 from Windows 46 Q Quality menu 95 Quick ...
... 89 poor transparency quality 91 print irregularities 91 print is too dark 91 print is too light 90 print quality test pages 87 repeating defects 88 skewed print 93 solid color pages 93 streaked horizontal lines 89 streaked vertical lines 90 toner fog or background shading 91 toner rubs off 94 ... manually 50 font sample list 49 from Macintosh 45 from USB flash memory device 47 from Windows 45 installing printer software 45 menu settings page 48 network setup page 49 print quality test pages 50 printing confidential and other held jobs from Macintosh 46 from Windows 46 Q Quality menu 95 Quick ...
User's Guide
Page 110
...51 transfer belt ordering 72 transparencies guidelines 39 loading 30 tray linking 36 troubleshooting checking an unresponsive printer 82 contacting Customer Support 100 error reading USB drive 82 FAQ about color printing 97 hard disk with adapter 86 troubleshooting, display display is blank 82 display shows only ... transparency quality 91 print irregularities 91 print is too dark 91 print is too light 90 print quality test pages 87 repeating defects 88 skewed print 93 solid color pages 93 streaked horizontal lines 89 streaked vertical lines 90 toner fog or background shading 91 toner rubs...
...51 transfer belt ordering 72 transparencies guidelines 39 loading 30 tray linking 36 troubleshooting checking an unresponsive printer 82 contacting Customer Support 100 error reading USB drive 82 FAQ about color printing 97 hard disk with adapter 86 troubleshooting, display display is blank 82 display shows only ... transparency quality 91 print irregularities 91 print is too dark 91 print is too light 90 print quality test pages 87 repeating defects 88 skewed print 93 solid color pages 93 streaked horizontal lines 89 streaked vertical lines 90 toner fog or background shading 91 toner rubs...
Help Menu Pages
Page 8
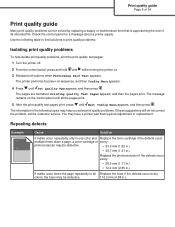
...in all the pages print. 5 After the print quality test pages print, press until all Replace the fuser if the defects occur every colors, the fuser may help isolate print quality problems, print the print quality test pages: 1 Turn the printer off. 2 From the control panel, press and hold ...and while turning the printer on sequence, and then Config Menu appears. 4 Press ...
...in all the pages print. 5 After the print quality test pages print, press until all Replace the fuser if the defects occur every colors, the fuser may help isolate print quality problems, print the print quality test pages: 1 Turn the printer off. 2 From the control panel, press and hold ...and while turning the printer on sequence, and then Config Menu appears. 4 Press ...
Help Menu Pages
Page 9
... area or has been superimposed over another color area. For more information about installing supplies, see "Adjusting the color alignment" on . 3 Release both buttons when Performing Self Test appears. Adjusting the color alignment 1 Make sure the printer is displayed, and then press . Print... quality guide Page 9 of 34 Color misregistration Example ABCDE ABCDE Cause Color has shifted outside of...
... area or has been superimposed over another color area. For more information about installing supplies, see "Adjusting the color alignment" on . 3 Release both buttons when Performing Self Test appears. Adjusting the color alignment 1 Make sure the printer is displayed, and then press . Print... quality guide Page 9 of 34 Color misregistration Example ABCDE ABCDE Cause Color has shifted outside of...
Help Menu Pages
Page 30
... may be prompted for all print jobs, including those routed from other network b Click Add Printer to the printer. The shared printer name is complete, print a test page. f Click OK. The computer attached to the printer. e Connect the USB or parallel cable, and then turn on the Internet or an intranet... lets other network computers. The path looks similar to the shared printer. • Using the point-and-print method Note: For more information, see the Lexmark Web site at www.lexmark.com. If files are on the printer. The server host name is copied to -peer method a Open...
... may be prompted for all print jobs, including those routed from other network b Click Add Printer to the printer. The shared printer name is complete, print a test page. f Click OK. The computer attached to the printer. e Connect the USB or parallel cable, and then turn on the Internet or an intranet... lets other network computers. The path looks similar to the shared printer. • Using the point-and-print method Note: For more information, see the Lexmark Web site at www.lexmark.com. If files are on the printer. The server host name is copied to -peer method a Open...


