Lexmark T654 Support Question
Lexmark T654 Support Question
Find answers below for this question about Lexmark T654.Need a Lexmark T654 manual? We have 8 online manuals for this item!
Question posted by cdperdanan on February 1st, 2014
How To Print Test Page On Lexmark T654
The person who posted this question about this Lexmark product did not include a detailed explanation. Please use the "Request More Information" button to the right if more details would help you to answer this question.
Current Answers
Related Lexmark T654 Manual Pages
User's Guide - Page 66
...testing) • Paper weighing less than ± 2.3 mm (± 0.9 in.),
such as cotton can be able to withstand temperatures up to successfully print...Lexmark, visit www.lexmark.com. Use papers printed with chemicals that may contaminate the paper • Preprinted papers that can be affected by the temperature in the printer...information on paper with laser printers:
• Chemically ...
User's Guide - Page 168
...print cartridges
Part name For the US and Canada Print Cartridge
Lexmark Return Program Cartridge Regular cartridge
T650A11A
T650A21A
High Yield Print Cartridge
T650H11A
T650H21A
Extra High Yield Print Cartridge*
T654X11A
High Yield Print... applicable
Extra High Yield Print Cartridge for Label Applications*
T654X04L
Not applicable
* Available for the T654 models. Ordering a maintenance...
Service Manual - Page 4
... the printer control panel (models T650, T652, and T654 3-1 Accessing service menus (models T650, T652, and T654 3-2 Diagnostics mode (models T650, T652, and T654 3-3
Entering Diagnostics mode (models T650, T652, and T654 3-3 Available tests 3-3 Exiting Diagnostics mode (models T650, T652, and T654 3-5 REGISTRATION 3-5
Quick Test 3-6 PRINT TESTS 3-7
Input source tests 3-7 Print quality...
Service Manual - Page 6

... T652, and T654 3-29 Understanding the printer control panel (model T656 3-29 Accessing service menus (model T656 3-30 Diagnostics Menu (model T656 3-31 Entering Diagnostics Menu (model T656 3-31 Available tests 3-31 Registration (printer 3-33
Quick Test 3-34 PRINT TESTS 3-35
Input source tests 3-35 Printing Quality Pages 3-35 HARDWARE TESTS 3-36 Panel Test 3-36 Button Test 3-36 DRAM...
Service Manual - Page 37
... responding.
Error code 31 displays when the top front cover is closed and an unsupported print cartridge is too short to "Print cartridge ID connector assembly removal (T650, T652, T654)" on page 4-74. 4. Go to print the formatted data. The printer determines the paper length is detected. Make sure the Paper Size setting is properly...
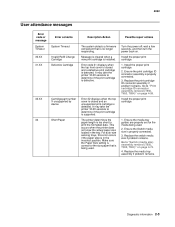
Service Manual - Page 164
... and contamination?
7 Perform a MPF print test and check the MPF pick solenoid Go to step 2.
Replace the MPF pick solenoid.
Did the media originate from obstructions?
10 Check the sensor (duplex input) for proper operation. Does the above sensor connected properly? Go to "Sensor (duplex input) removal (T652, T654)" on page 4-38. Go...
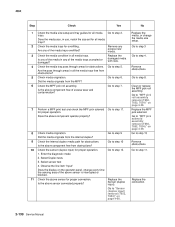
Service Manual - Page 165
...print test and check the duplex drive motor assembly for proper operation. 1.
Did the media originate from . Observe the line item "input"
Does the display on page 4-71. Enter the diagnostic mode 2. Replace the external duplex assembly.
3. Select sensor test...mode 2. Select sensor test
3. Select Duplex tests
Go to "Duplex drive motor assembly removal (T652, T654)" on the operator ...
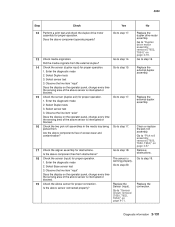
Service Manual - Page 166
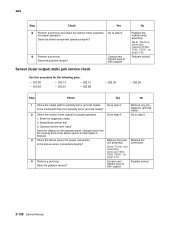
..., T652, T654)" on page 4-49. Sensor (input) lingering jam service check. Go to step 5.
2-132 Service Manual
Go to step 4. Remove obstructions.
3 Check the fuser unit assembly for proper operation. Problem solved.
Observe the line item "input"
Does the display on page 4-23. 4062
Step
Check
Yes
20 Perform a print test and check...
Service Manual - Page 167
... connection.
Enter the diagnostic mode 2.
Does the display on page 4-54.
Remove obstructions.
10 Perform a print test.
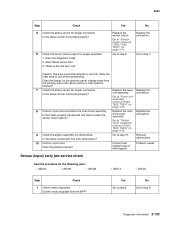
Sensor (input) early jam service check
Use this procedure for obstructions. Yes Go to "Output cover assembly removal (T650, T652, T654)" on the operator panel, change every time the sensing area of tech support. No Go...
Service Manual - Page 168
... the MPF lift plate assembly.
fed media. Is the above component free of tech support.
Go to "MPF lift plate assembly removal (T650, T652, T654)" on page 4-71.
9 Perform a print test.
Go to step 8.
Go to step 4. Remove and properly re-install the media.
Replace the Sensor (input).
Go to step 3.
3 Perform a MPF...
Service Manual - Page 169
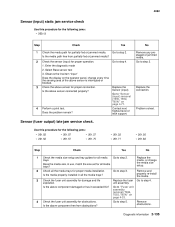
...jammed media?
2 Check the sensor (input) for damage and life expiration. Go to "Sensor (input) removal (T650, T652, T654)" on page 4-23.
4 Check the fuser unit assembly for proper media installation.
Remove obstructions. 4062
Sensor (input) static jam ... jammed media. Go to step 5. Go to "Fuser unit assembly removal (T650, T652, T654)" on page 4-71.
4 Perform a print test.
Service Manual - Page 170
... roll assembly. Replace the main drive motor assembly.
Is the above sensor for proper operation. Go to "Fuser unit assembly removal (T650, T652, T654)" on page 4-78.
9 Perform a print test and check the main motor assembly. Does the problem remain?
Go to step 9.
Is the above component free from obstructions? Contact next highest...
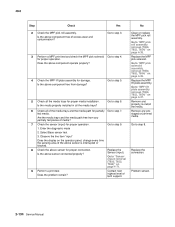
Service Manual - Page 172
...2 Check the sensor (fuser output) for proper connection. Replace the connection.
4 Perform a print test.
Sensor (fuser output) static jam service check
Contact next highest level of tech support. Problem... Select Base sensor test
3. Go to "Fuser unit assembly removal (T650, T652, T654)" on page 4-62. Go to "Redrive assembly removal (T650, T652, T654)" on page 4-23...
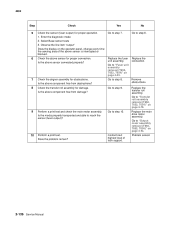
Service Manual - Page 189

...this procedure is not followed, the printer will be used as the machine...print test using the output option. Go to the manufacturer.
It must be returned to "Sensor (toner empty) removal (T650, T652, T654)" on the operator panel, change every time the sensing area of the following components:
• Operator panel assembly
• System card assembly
Only replace one or the printer...
Service Manual - Page 192

...print cartridge properly installed? Is the laser beam route free of debris and the glass window, in the media path. HVPS card assembly. Load new, dry, recommended media, and perform a print test...assembly
removal (T650,
T652, T654)" on page 4-78.
4
Check the print cartridge for proper installation. Problem solved. Go to "Transfer roll assembly removal (T650, T652, T654)" on
page 4-24.
2-158...
Service Manual - Page 207

...print test.
Re-print the defective image. Go to step 4.
4
Check the transfer roll assembly for irregularities. Is the above component free of the media. Remove obstructions.
Step
Check
Yes
1
Check printer...2
Properly load media into the printer. ensure all guides are set correctly.
Go to "Transfer roll assembly removal (T650, T652, T654)" on page 4-78.
No
...
Service Manual - Page 208

....
Re-print the defective image.
No Correct the installation placement. Trailing edge
Step
Check
1
Check printer installation placement.
Properly load media in the printer.
Yes Go to "Output cover assembly removal (T650, T652, T654)" on page... assembly. Does the problem remain?
6
Perform a print test.
Properly install the media tray assembly in the media tray assembly.
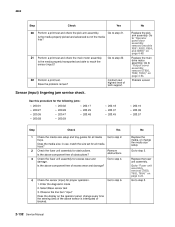
Service Manual - Page 211
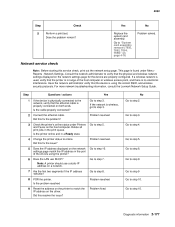
... step 3. Diagnostic information 2-177
Go to step 9. Did this service check, print out the network setup page. Problem solved. Go to step 8. For more network troubleshooting information, consult the Lexmark Network Setup Guide. Go to step 10. Go to step 4. Network Settings.
4062
Step
Check
Yes
No
5
Perform a print test. Does the problem remain?
Service Manual - Page 215

.... 1. Release the buttons after 10 seconds. Turn the printer on page 3-10
Diagnostic aids 3-3 Available tests
The tests display on the operator panel in the order shown:
REGISTRATION Top Margin Bottom Margin Left Margin Right Margin Quick Test
PRINT TESTS Tray 1 Tray 2 (if installed) Tray 3 (if installed) Tray 4 (if installed) Tray 5 (if installed) MP Feeder Env...
Service Manual - Page 569
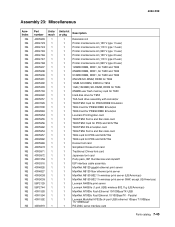
..., ISP thumbscrew and standoff ISP interface cable assembly MarkNet N8120 gigabit ethernet print server MarkNet N8130 fiber ethernet print server MarkNet N8150 802.11n wireless print server (US/Americas) MarkNet N8150 802.11n wireless print server (WW, except US/Americas) Lexmark N4000e print server Lexmark N4050e (1 port USB) wireless 802.11g (US/Americas) MarkNet N7000e Fash Ethernet...
Similar Questions


