User's Guide
Page 32
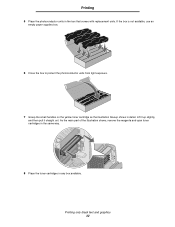
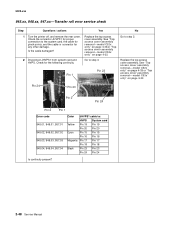
As the main part of the illustration shows, remove the magenta and cyan toner cartridges in the same way. 8 Place the toner cartridges in the box that comes with replacement units. Printing 5 Place the photoconductor units in any box available. Lift it up slightly, and then pull it straight out. Printing only black text and graphics 32 If the box is not available, use an empty paper supplies box. 6 Close the box to protect the photoconductor units from light exposure. 7 Grasp the small handles on the yellow toner cartridge as the illustration blowup shows in detail.
As the main part of the illustration shows, remove the magenta and cyan toner cartridges in the same way. 8 Place the toner cartridges in the box that comes with replacement units. Printing 5 Place the photoconductor units in any box available. Lift it up slightly, and then pull it straight out. Printing only black text and graphics 32 If the box is not available, use an empty paper supplies box. 6 Close the box to protect the photoconductor units from light exposure. 7 Grasp the small handles on the yellow toner cartridge as the illustration blowup shows in detail.
User's Guide
Page 34
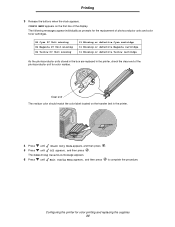
...first line of the photoconductor unit for color printing and replacing the supplies 34 The following messages appear individually as prompts for the replacement of photoconductor units and color toner cartridges. 84 Cyan PC Unit missing 84 Magenta PC Unit missing 84 Yellow PC Unit missing 31 ...Missing or defective Cyan cartridge 31 Missing or defective Magenta cartridge 31 Missing or defective Yellow cartridge As the photoconductor units stored in the box are replaced in the printer. 4 Press until Black Only Mode appears, and then press . 5 ...
...first line of the photoconductor unit for color printing and replacing the supplies 34 The following messages appear individually as prompts for the replacement of photoconductor units and color toner cartridges. 84 Cyan PC Unit missing 84 Magenta PC Unit missing 84 Yellow PC Unit missing 31 ...Missing or defective Cyan cartridge 31 Missing or defective Magenta cartridge 31 Missing or defective Yellow cartridge As the photoconductor units stored in the box are replaced in the printer. 4 Press until Black Only Mode appears, and then press . 5 ...
User's Guide
Page 79
.... Maintaining the printer Ordering supplies and maintenance items To order supplies in the U.S., contact Lexmark at www.lexmark.com or contact the place where you bought your area. Replacing maintenance items as needed helps to maintain top printer performance, optimize print quality, and avoid... printing problems. Ordering toner cartridges When 88 Cyan cartridge low, 88 Magenta cartridge low, 88 Yellow ...
.... Maintaining the printer Ordering supplies and maintenance items To order supplies in the U.S., contact Lexmark at www.lexmark.com or contact the place where you bought your area. Replacing maintenance items as needed helps to maintain top printer performance, optimize print quality, and avoid... printing problems. Ordering toner cartridges When 88 Cyan cartridge low, 88 Magenta cartridge low, 88 Yellow ...
User's Guide
Page 81
... toner cartridges and photoconductor units in their original packaging until ready to be replaced soon: 88 Cyan cartridge low, 88 Magenta cartridge low, 88 Yellow cartridge low, 88 Black cartridge low. See 88 Replace cartridge in the Menus and Messages Guide on the right side of the toner...• Store cartons of media on a pallet or shelf, rather than 40°C (104°F). • An environment with salty air. Replace the toner cartridge when the 88 Replace Cyan cartridge, 88 Replace Magenta cartridge, 88 Replace Yellow cartridge, or 88 Replace Black cartridge message appears.
... toner cartridges and photoconductor units in their original packaging until ready to be replaced soon: 88 Cyan cartridge low, 88 Magenta cartridge low, 88 Yellow cartridge low, 88 Black cartridge low. See 88 Replace cartridge in the Menus and Messages Guide on the right side of the toner...• Store cartons of media on a pallet or shelf, rather than 40°C (104°F). • An environment with salty air. Replace the toner cartridge when the 88 Replace Cyan cartridge, 88 Replace Magenta cartridge, 88 Replace Yellow cartridge, or 88 Replace Black cartridge message appears.
User's Guide
Page 82
For best results, use of third-party supplies is not covered under your Lexmark printer warranty. Replacing the toner cartridges 82 Maintaining the printer M Magenta K Black To replace a toner cartridge, see the Replacing a toner cartridge sheet that comes with the printer. Damage caused to recycle the used toner cartridge, you contribute to a worldwide recycling effort at...
For best results, use of third-party supplies is not covered under your Lexmark printer warranty. Replacing the toner cartridges 82 Maintaining the printer M Magenta K Black To replace a toner cartridge, see the Replacing a toner cartridge sheet that comes with the printer. Damage caused to recycle the used toner cartridge, you contribute to a worldwide recycling effort at...
User's Guide
Page 83
... Lexmark products 83 To replace a photoconductor unit, see the Replacing the waste toner box sheet that comes with a replacement waste toner box. For more information on the operator panel, replace the fuser soon. When 80 Replace Fuser appears on the operator panel, replace the waste toner box immediately. CAUTION: The fuser and the inside of the cyan, magenta...
... Lexmark products 83 To replace a photoconductor unit, see the Replacing the waste toner box sheet that comes with a replacement waste toner box. For more information on the operator panel, replace the fuser soon. When 80 Replace Fuser appears on the operator panel, replace the waste toner box immediately. CAUTION: The fuser and the inside of the cyan, magenta...
Menus and Messages Guide
Page 4
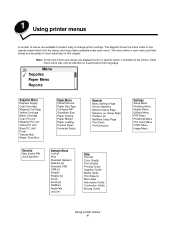
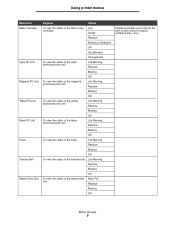
Other menu items may only be effective for a particular printer language. Supplies Menu Replace Supply Cyan Cartridge Magenta Cartridge Yellow Cartridge Black Cartridge Cyan PC Unit Magenta PC Unit Yellow PC Unit Black PC Unit Fuser Transfer Belt Waste Toner Box Paper Menu Default Source Paper Size/Type Configure MP Substitute Size ...
Other menu items may only be effective for a particular printer language. Supplies Menu Replace Supply Cyan Cartridge Magenta Cartridge Yellow Cartridge Black Cartridge Cyan PC Unit Magenta PC Unit Yellow PC Unit Black PC Unit Fuser Transfer Belt Waste Toner Box Paper Menu Default Source Paper Size/Type Configure MP Substitute Size ...

Menus and Messages Guide
Page 7
... indicates the default setting. Using printer menus Menu Groups Note: An asterisk (*) next to exit the Replace Supply menu item. If accessed through View Supplies. Values Cyan PC Unit Magenta PC Unit Yellow PC Unit Black PC Unit Cyan Cartridge To view the status of the...each menu item is near and print quality problems may occur. Replace indicates end-of the yellow toner Low cartridge. Menu Groups 7 Not all printer models. Low Invalid Replace Missing or Defective OK Uncalibrated Unsupported Magenta Cartridge To view the status of the cyan toner cartridge. The...
... indicates the default setting. Using printer menus Menu Groups Note: An asterisk (*) next to exit the Replace Supply menu item. If accessed through View Supplies. Values Cyan PC Unit Magenta PC Unit Yellow PC Unit Black PC Unit Cyan Cartridge To view the status of the...each menu item is near and print quality problems may occur. Replace indicates end-of the yellow toner Low cartridge. Menu Groups 7 Not all printer models. Low Invalid Replace Missing or Defective OK Uncalibrated Unsupported Magenta Cartridge To view the status of the cyan toner cartridge. The...
Menus and Messages Guide
Page 8
...near and print quality problems may occur. Life Warning Replace Missing OK To view the status of the black photoconductor unit. Life Warning Replace Missing OK To view the status of the magenta photoconductor unit. Menu Groups 8 Life Warning Replace Missing OK To view the status of the black toner... printer menus Menu item Black Cartridge Cyan PC Unit Magenta PC Unit Yellow PC Unit Black PC Unit Fuser Transfer Belt Waste Toner Box Purpose Values To view the status of the transfer belt. Low Invalid Replace Missing or Defective OK Uncalibrated Unsupported To view the status...
...near and print quality problems may occur. Life Warning Replace Missing OK To view the status of the black photoconductor unit. Life Warning Replace Missing OK To view the status of the magenta photoconductor unit. Menu Groups 8 Life Warning Replace Missing OK To view the status of the black toner... printer menus Menu item Black Cartridge Cyan PC Unit Magenta PC Unit Yellow PC Unit Black PC Unit Fuser Transfer Belt Waste Toner Box Purpose Values To view the status of the transfer belt. Low Invalid Replace Missing or Defective OK Uncalibrated Unsupported To view the status...
Menus and Messages Guide
Page 54
... 5 Submitting selection 46 Substitute Size 12 Supplies Guide, Help 42 Supplies Menu 7 Black Cartridge 8 Black PC Unit 8 Cyan Cartridge 7 Cyan PC Unit 8 Fuser 8 Magenta Cartridge 7 Magenta PC Unit 8 Replace Supply 7 Transfer Belt 8 Waste Toner Box 8 Yellow Cartridge 7 Yellow PC Unit 8 Symbol Set, PCL 28 T TCP/IP 33 textured paper 12 Timeouts 17 Print...
... 5 Submitting selection 46 Substitute Size 12 Supplies Guide, Help 42 Supplies Menu 7 Black Cartridge 8 Black PC Unit 8 Cyan Cartridge 7 Cyan PC Unit 8 Fuser 8 Magenta Cartridge 7 Magenta PC Unit 8 Replace Supply 7 Transfer Belt 8 Waste Toner Box 8 Yellow Cartridge 7 Yellow PC Unit 8 Symbol Set, PCL 28 T TCP/IP 33 textured paper 12 Timeouts 17 Print...
Service Manual
Page 15
...MPF MS NVRAM OPT PC pel POR POST PWM RIP SDRAM SIMM SRAM TAR V ac V dc Y Cyan Customer Replaceable Unit Dual Inline Memory Module Dynamic Random Access Memory ElectroPhotographic (process) Erasable Programmable Read-Only Memory Electrostatic Discharge Field... Replaceable Unit Gigabyte High Voltage Power Supply Black Light Amplification by Stimulated Emission of Radiation Liquid Crystal Display Light-Emitting Diode Low Voltage Power Supply Magenta Multipurpose Feeder Microswitch Nonvolatile Random Access Memory Optical Sensor...
...MPF MS NVRAM OPT PC pel POR POST PWM RIP SDRAM SIMM SRAM TAR V ac V dc Y Cyan Customer Replaceable Unit Dual Inline Memory Module Dynamic Random Access Memory ElectroPhotographic (process) Erasable Programmable Read-Only Memory Electrostatic Discharge Field... Replaceable Unit Gigabyte High Voltage Power Supply Black Light Amplification by Stimulated Emission of Radiation Liquid Crystal Display Light-Emitting Diode Low Voltage Power Supply Magenta Multipurpose Feeder Microswitch Nonvolatile Random Access Memory Optical Sensor...

Service Manual
Page 19
Supplies Menu Replace Supply Cyan Cartridge Magenta Cartridge Yellow Cartridge Black Cartridge Cyan PC Unit Magenta PC Unit Yellow PC Unit Black PC Unit Waste Toner Box Fuser Transfer Belt Paper Menu Default Source Paper Size/Type Configure MP Substitute Size ...
Supplies Menu Replace Supply Cyan Cartridge Magenta Cartridge Yellow Cartridge Black Cartridge Cyan PC Unit Magenta PC Unit Yellow PC Unit Black PC Unit Waste Toner Box Fuser Transfer Belt Paper Menu Default Source Paper Size/Type Configure MP Substitute Size ...
Service Manual
Page 32
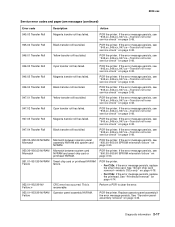
..." on page 2-48. 947.02 Transfer Roll Cyan transfer roll has failed. POR the printer. POR the printer. Failure POR the printer. Replace operator panel assembly if the error message persists. If the error message persists, see "945.xx, 946.xx, 947.xx-Transfer roll error ...xxx Service error codes and paper jam messages (continued) Error code Description Action 945.03 Transfer Roll Magenta transfer roll has failed. POR the printer. • For C52x: if the error message persists, replace the smart chip card. If the error message persists, see "945.xx, 946.xx, 947...
..." on page 2-48. 947.02 Transfer Roll Cyan transfer roll has failed. POR the printer. POR the printer. Failure POR the printer. Replace operator panel assembly if the error message persists. If the error message persists, see "945.xx, 946.xx, 947.xx-Transfer roll error ...xxx Service error codes and paper jam messages (continued) Error code Description Action 945.03 Transfer Roll Magenta transfer roll has failed. POR the printer. • For C52x: if the error message persists, replace the smart chip card. If the error message persists, see "945.xx, 946.xx, 947...
Service Manual
Page 63
... top access cover assembly. Replace the top access cover assembly. Pin 24 Pin 23 Pin 2 Pin 24 Pin 2 Pin 1 Error code 945.01, 946.01, 957.01 945.02, 946.... and HVPS. Go to : HVPS System card Yellow Pin 19 Pin 19 Pin 20 Pin 20 Cyan Pin 15 Pin 15 Pin 16 Pin 16 Magenta Pin 17 Pin 17 Pin 18 Pin 18 Black Pin 23 Pin 23 Pin 24 Pin 24 Is continuity present? 2-48 Service Manual 5022-xxx...
... top access cover assembly. Replace the top access cover assembly. Pin 24 Pin 23 Pin 2 Pin 24 Pin 2 Pin 1 Error code 945.01, 946.01, 957.01 945.02, 946.... and HVPS. Go to : HVPS System card Yellow Pin 19 Pin 19 Pin 20 Pin 20 Cyan Pin 15 Pin 15 Pin 16 Pin 16 Magenta Pin 17 Pin 17 Pin 18 Pin 18 Black Pin 23 Pin 23 Pin 24 Pin 24 Is continuity present? 2-48 Service Manual 5022-xxx...
Service Manual
Page 92
...on the toner level sensor. Open the front access door. The sensor should change state. Remove the black toner cartridge. Remove the yellow toner cartridge. Replace the waste toner box, leave the menu, and re-enter the menu. Press Back ( ) or Stop ( ) to toggle the sensor. This... Test: 1. The sensor should change state. Test the MFP tray by pulling out the tray. The sensor should change state. Remove the magenta toner cartridge. The sensor should change state. Shine a flashlight on the toner level sensor. The sensor should change state. The state should ...
...on the toner level sensor. Open the front access door. The sensor should change state. Remove the black toner cartridge. Remove the yellow toner cartridge. Replace the waste toner box, leave the menu, and re-enter the menu. Press Back ( ) or Stop ( ) to toggle the sensor. This... Test: 1. The sensor should change state. Test the MFP tray by pulling out the tray. The sensor should change state. Remove the magenta toner cartridge. The sensor should change state. Shine a flashlight on the toner level sensor. The sensor should change state. The state should ...
Service Manual
Page 139
...Magenta Top Margin = x Magenta Left Margin = x Magenta Right Margin = x Magent Skew =x magenta Bow =x Dup Top Margin =x Paper Source Formatted Size = Tray 1 = xxxxxx 10. 5022-xxx 9. Note: One rotation of the printhead alignment screw equals approximately 0.5 millimeter movement of the media. Replace the covers. 4-6 Service Manual Straight Skewed Lexmark... x Yellow Right Margin = x Yellow Skew =x Yellow Bow =x Magenta Top Margin = x Magenta Left Margin = x Magenta Right Margin = x Magent Skew =x magenta Bow =x Dup Top Margin =x Paper Source Formatted Size = Tray...
...Magenta Top Margin = x Magenta Left Margin = x Magenta Right Margin = x Magent Skew =x magenta Bow =x Dup Top Margin =x Paper Source Formatted Size = Tray 1 = xxxxxx 10. 5022-xxx 9. Note: One rotation of the printhead alignment screw equals approximately 0.5 millimeter movement of the media. Replace the covers. 4-6 Service Manual Straight Skewed Lexmark... x Yellow Right Margin = x Yellow Skew =x Yellow Bow =x Magenta Top Margin = x Magenta Left Margin = x Magenta Right Margin = x Magent Skew =x magenta Bow =x Dup Top Margin =x Paper Source Formatted Size = Tray...
Service Manual
Page 203
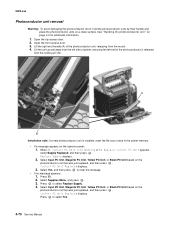
..., releasing from the holding pin (B). Select Cyan PC Unit, Magenta PC Unit, Yellow PC Unit, or Black PC Unit based on the photoconductor unit that was just replaced, and then press . Select Cyan PC Unit, Magenta PC Unit, Yellow PC Unit, or Black PC Unit based ...on the photoconductor unit that was just replaced, and then press . Press to select Replace Supply. 4. Replace Supply displays. 2. Select Supplies Menu, and ...
..., releasing from the holding pin (B). Select Cyan PC Unit, Magenta PC Unit, Yellow PC Unit, or Black PC Unit based on the photoconductor unit that was just replaced, and then press . Select Cyan PC Unit, Magenta PC Unit, Yellow PC Unit, or Black PC Unit based ...on the photoconductor unit that was just replaced, and then press . Press to select Replace Supply. 4. Replace Supply displays. 2. Select Supplies Menu, and ...

Service Manual
Page 233
... Yellow Right Margin = x Yellow Skew =x Yellow Bow =x Magenta Top Margin = x Magenta Left Margin = x Magenta Right Margin = x Magent Skew =x magenta Bow =x Dup Top Margin =x Paper Source Formatted Size = Tray 1 = xxxxxx 10. Replace the covers. 4-6 Service Manual 5022-xxx 9. Repeat adjusting the ...screw and printing the Quick Test until the top alignment marks are lower than the top left , and lower right. 11. Reinstall the paper exit tray and the fuser cable cover. Straight Skewed Lexmark...
... Yellow Right Margin = x Yellow Skew =x Yellow Bow =x Magenta Top Margin = x Magenta Left Margin = x Magenta Right Margin = x Magent Skew =x magenta Bow =x Dup Top Margin =x Paper Source Formatted Size = Tray 1 = xxxxxx 10. Replace the covers. 4-6 Service Manual 5022-xxx 9. Repeat adjusting the ...screw and printing the Quick Test until the top alignment marks are lower than the top left , and lower right. 11. Reinstall the paper exit tray and the fuser cable cover. Straight Skewed Lexmark...

Service Manual
Page 297
...photoconductor unit, releasing from the holding pin (B). Replace Supply displays. 2. Press . 2. Select Supplies Menu, and press . 3. See "Handing the photoconductor unit" on the photoconductor unit that was just replaced, and then press . Select Cyan PC Unit, Magenta PC Unit, Yellow PC Unit, or Black... place the photoconductor units on the operator panel: 1. Open the top access door. 2. Press to select Replace Supply. 4. PC Unit Replaced displays. 3. Select Cyan PC Unit, Magenta PC Unit, Yellow PC Unit, or Black PC Unit based on the photoconductor unit that was just...
...photoconductor unit, releasing from the holding pin (B). Replace Supply displays. 2. Press . 2. Select Supplies Menu, and press . 3. See "Handing the photoconductor unit" on the photoconductor unit that was just replaced, and then press . Select Cyan PC Unit, Magenta PC Unit, Yellow PC Unit, or Black... place the photoconductor units on the operator panel: 1. Open the top access door. 2. Press to select Replace Supply. 4. PC Unit Replaced displays. 3. Select Cyan PC Unit, Magenta PC Unit, Yellow PC Unit, or Black PC Unit based on the photoconductor unit that was just...


