User's Guide
Page 81
... Storing supplies 81 they are stored, make sure they rest on a flat surface so the edges do not touch the shiny photoconductor drum. Notice the labels on the right side of the original carton are not interchangeable in the slots. Do not store toner cartridges ...shelf, rather than 40°C (104°F). • An environment with salty air. Storing the toner cartridges and photoconductor units Store toner cartridges and photoconductor units in their installation. Storing media These help avoid media feeding problems and uneven print quality: • For best results, store media in...
... Storing supplies 81 they are stored, make sure they rest on a flat surface so the edges do not touch the shiny photoconductor drum. Notice the labels on the right side of the original carton are not interchangeable in the slots. Do not store toner cartridges ...shelf, rather than 40°C (104°F). • An environment with salty air. Storing the toner cartridges and photoconductor units Store toner cartridges and photoconductor units in their installation. Storing media These help avoid media feeding problems and uneven print quality: • For best results, store media in...

User's Guide
Page 84
...comes with the inner door. 3 Remove all four toner cartridges. Warning: Do not touch the printhead lenses or they may be damaged. 6 Install the four toner cartridges. 7 Close the doors. 8 Turn the printer on page 32. 4 Locate the four printhead lenses as mentioned in ...Solving print quality problems in the Troubleshooting chapter. Warning: To avoid overexposing the photoconductor units to clean a camera lens). Maintaining the printer To replace the transfer belt, see the illustration on . Cleaning the printhead lenses Clean...
...comes with the inner door. 3 Remove all four toner cartridges. Warning: Do not touch the printhead lenses or they may be damaged. 6 Install the four toner cartridges. 7 Close the doors. 8 Turn the printer on page 32. 4 Locate the four printhead lenses as mentioned in ...Solving print quality problems in the Troubleshooting chapter. Warning: To avoid overexposing the photoconductor units to clean a camera lens). Maintaining the printer To replace the transfer belt, see the illustration on . Cleaning the printhead lenses Clean...

User's Guide
Page 85
... on the first line of the 20 lines beside the letter A. 8 Press to the new one, the alignment of the toner cartridges and photoconductor units may have changed. Examine each page for the letters A through L. 10 Press . 11 Press until Color Alignment appears, and then press...the buttons when the clock appears. Maintaining the printer Aligning the toner cartridges for color registration When the new transfer belt was installed and all the photoconductor units were moved from the used transfer belt to decrease the number, or press the chosen number, and then press . Aligning...
... on the first line of the 20 lines beside the letter A. 8 Press to the new one, the alignment of the toner cartridges and photoconductor units may have changed. Examine each page for the letters A through L. 10 Press . 11 Press until Color Alignment appears, and then press...the buttons when the clock appears. Maintaining the printer Aligning the toner cartridges for color registration When the new transfer belt was installed and all the photoconductor units were moved from the used transfer belt to decrease the number, or press the chosen number, and then press . Aligning...
User's Guide
Page 144
... 119, 120 options 500-sheet drawer 119, 120 firmware card 127 flash memory 127 memory card 124 verifying installation with menu settings page 28 ordering maintenance items 79 fuser 80 photoconductor units 80 toner cartridges 79 transfer belt 80 waste toner box 80 supplies 79 fuser 80... paper loading multipurpose feeder 55 Paper Size, setting 62 Paper Type, setting 62 parallel 133 personal identification number (PIN) 112 photoconductor units storing 81 photoconductor units, replacing 83 PIN 112 entering at the printer 26 entering from the driver 25 for confidential jobs 25 Power Saver adjusting...
... 119, 120 options 500-sheet drawer 119, 120 firmware card 127 flash memory 127 memory card 124 verifying installation with menu settings page 28 ordering maintenance items 79 fuser 80 photoconductor units 80 toner cartridges 79 transfer belt 80 waste toner box 80 supplies 79 fuser 80... paper loading multipurpose feeder 55 Paper Size, setting 62 Paper Type, setting 62 parallel 133 personal identification number (PIN) 112 photoconductor units storing 81 photoconductor units, replacing 83 PIN 112 entering at the printer 26 entering from the driver 25 for confidential jobs 25 Power Saver adjusting...
Menus and Messages Guide
Page 46
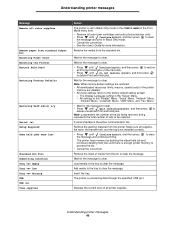
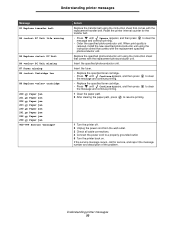
...enough printer memory to process the job. • Cancel the current job. Displays the current level of all color toner cartridges and color photoconductor units. • Press until Continue appears, and then press to clear the message. Wait for more information. to clear the message. ... tray. Note: When factory default settings are restored: • All downloaded resources (fonts, macros, symbol sets) in the printer memory are installed correctly. • Press until Do not restore appears, and then press to be restored. Remove the media from the bin to clear the ...
...enough printer memory to process the job. • Cancel the current job. Displays the current level of all color toner cartridges and color photoconductor units. • Press until Continue appears, and then press to clear the message. Wait for more information. to clear the message. ... tray. Note: When factory default settings are restored: • All downloaded resources (fonts, macros, symbol sets) in the printer memory are installed correctly. • Press until Do not restore appears, and then press to be restored. Remove the media from the bin to clear the ...
Menus and Messages Guide
Page 50
...install the new specified photoconductor unit using the instruction sheet that comes with the replacement photoconductor unit. Insert the fuser. • Replace the specified toner cartridge. • Press until Continue appears, and then press the message and continue printing. Insert the specified photoconductor... Ignore appears, and then press to clear the message and continue printing. • Order the specified photoconductor unit. Replace the specified photoconductor unit using the instruction sheet that comes with the replacement transfer belt. to a properly grounded outlet. ...
...install the new specified photoconductor unit using the instruction sheet that comes with the replacement photoconductor unit. Insert the fuser. • Replace the specified toner cartridge. • Press until Continue appears, and then press the message and continue printing. Insert the specified photoconductor... Ignore appears, and then press to clear the message and continue printing. • Order the specified photoconductor unit. Replace the specified photoconductor unit using the instruction sheet that comes with the replacement transfer belt. to a properly grounded outlet. ...
Service Manual
Page 39
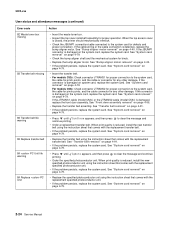
...Continue appears, and then press to clear the message and continue printing. • Order the specified photoconductor unit. When print quality is reduced, install the new specified photoconductor unit using the instruction sheet that comes with the replacement transfer belt. If the cable wiring or..." on page 4-91. • If the problem persists, replace the system card. When print quality is reduced, install the new transfer belt using the instruction sheet that comes with the replacement specified photoconductor unit. • If the problem persists, replace the system card.
...Continue appears, and then press to clear the message and continue printing. • Order the specified photoconductor unit. When print quality is reduced, install the new specified photoconductor unit using the instruction sheet that comes with the replacement transfer belt. If the cable wiring or..." on page 4-91. • If the problem persists, replace the system card. When print quality is reduced, install the new transfer belt using the instruction sheet that comes with the replacement specified photoconductor unit. • If the problem persists, replace the system card.
Service Manual
Page 70
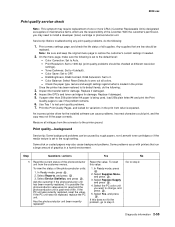
... In Ready mode, press . 2. Diagnostic information 2-55 Inspect the OPCs and toner cartridges for damage. To view the status of the photoconductor Reset the value. In Ready mode, press . 2. Color Balance: Select Reset Defaults to see if the problem remains. 6. Inspect the...page to install a developer (toner) cartridge or photoconductor unit. It is possible the photoconductor value was not reset and the photoconductor unit is set to 0. - Print the Print Quality Pages, and looked for the installed software can be caused by rough papers, non-Lexmark toner ...
... In Ready mode, press . 2. Diagnostic information 2-55 Inspect the OPCs and toner cartridges for damage. To view the status of the photoconductor Reset the value. In Ready mode, press . 2. Color Balance: Select Reset Defaults to see if the problem remains. 6. Inspect the...page to install a developer (toner) cartridge or photoconductor unit. It is possible the photoconductor value was not reset and the photoconductor unit is set to 0. - Print the Print Quality Pages, and looked for the installed software can be caused by rough papers, non-Lexmark toner ...

Service Manual
Page 73
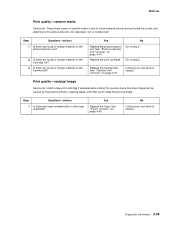
.... Yes Replace the print cartridge. Print quality-horizontal line The photoconductor unit is not properly seated. No Install the fuser properly. Print quality-narrow vertical line Step Questions / actions 1 Replace the photoconductor unit. See "Photoconductor unit removal" on page 4-60. Print quality-horizontal banding Step Questions / actions 1 Measure the distance between bands either 27...
.... Yes Replace the print cartridge. Print quality-horizontal line The photoconductor unit is not properly seated. No Install the fuser properly. Print quality-narrow vertical line Step Questions / actions 1 Replace the photoconductor unit. See "Photoconductor unit removal" on page 4-60. Print quality-horizontal banding Step Questions / actions 1 Measure the distance between bands either 27...
Service Manual
Page 74
.... Print quality-residual image Service tip: Install a new print cartridge if available before doing this service check. Residual image can be caused by the photoconductor, cleaning blade, and other parts inside the printer and attaching to the photoconductor unit, developer roll, or transfer belt.... 3. No Contact your next level of support. Diagnostic information 2-59 Yes No Replace the photoconductor unit. See "Transfer belt removal" on the fuser assembly? See "Photoconductor unit removal" on page 4-60. Yes Replace the fuser. Replace the transfer belt. Contact...
.... Print quality-residual image Service tip: Install a new print cartridge if available before doing this service check. Residual image can be caused by the photoconductor, cleaning blade, and other parts inside the printer and attaching to the photoconductor unit, developer roll, or transfer belt.... 3. No Contact your next level of support. Diagnostic information 2-59 Yes No Replace the photoconductor unit. See "Transfer belt removal" on the fuser assembly? See "Photoconductor unit removal" on page 4-60. Yes Replace the fuser. Replace the transfer belt. Contact...
Service Manual
Page 98
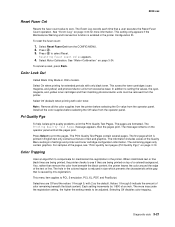
... Reset Fuser Count operation. Color Trapping Uses an algorithm to setting the values, the cyan, magenta, and, yellow toner cartridges and their matching photoconductor units must be adjusted. This menu item applies to print the pages. Values 1 through 5, with color toner. Each setting increments by mis-... (default) when printing with 2 as the default. The more information. Color Lock Out Called Black Only Mode in the printer. Install all the color supplies from the printer before selecting the Off value from the operator panel. The message remains on page 3-24. Prt...
... Reset Fuser Count operation. Color Trapping Uses an algorithm to setting the values, the cyan, magenta, and, yellow toner cartridges and their matching photoconductor units must be adjusted. This menu item applies to print the pages. Values 1 through 5, with color toner. Each setting increments by mis-... (default) when printing with 2 as the default. The more information. Color Lock Out Called Black Only Mode in the printer. Install all the color supplies from the printer before selecting the Off value from the operator panel. The message remains on page 3-24. Prt...
Service Manual
Page 203
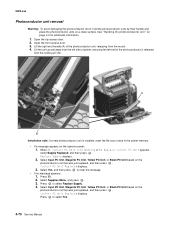
A B Installation note: If a new photoconductor unit is released from the holding pin (B). When 84 PC Unit... appears: 1. Select Cyan PC Unit, Magenta PC Unit, Yellow PC Unit, or Black PC Unit based on the photoconductor unit that was just replaced, and then press . Open the front access door. 3. Select Yes, and then press... "Handing the photoconductor unit" on a clean surface. Open the top access door. 2. Lift the right end handle (A) of the photoconductor unit, releasing from the left side of printer, ensuring the left end of the photoconductor is installed, reset the life...
A B Installation note: If a new photoconductor unit is released from the holding pin (B). When 84 PC Unit... appears: 1. Select Cyan PC Unit, Magenta PC Unit, Yellow PC Unit, or Black PC Unit based on the photoconductor unit that was just replaced, and then press . Open the front access door. 3. Select Yes, and then press... "Handing the photoconductor unit" on a clean surface. Open the top access door. 2. Lift the right end handle (A) of the photoconductor unit, releasing from the left side of printer, ensuring the left end of the photoconductor is installed, reset the life...
Service Manual
Page 224
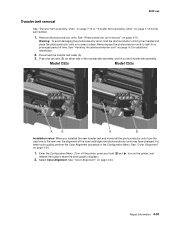
..., hold release the buttons when the clock graphic displays.) 2. Model C52x Model C53x A B A B Installation notes: When you installed the new transfer belt and moved all photoconductor units. See "Color Alignment" on page 4-2 for a prolonged period of the toner cartridges and photoconductor units may have changed. For better color quality, perform the Color Alignment procedure...
..., hold release the buttons when the clock graphic displays.) 2. Model C52x Model C53x A B A B Installation notes: When you installed the new transfer belt and moved all photoconductor units. See "Color Alignment" on page 4-2 for a prolonged period of the toner cartridges and photoconductor units may have changed. For better color quality, perform the Color Alignment procedure...

Service Manual
Page 297
... or Black PC Unit based on the photoconductor unit that was just replaced, and then press . Lift the right end handle (A) of the photoconductor unit, releasing from the left side of printer, ensuring the left end of the photoconductor is installed, reset the life count value in the... printer memory. • If a message appears on the photoconductor unit that was just replaced, and then press . A B Installation note: If a new photoconductor unit is released from the holding pin (B). ...
... or Black PC Unit based on the photoconductor unit that was just replaced, and then press . Lift the right end handle (A) of the photoconductor unit, releasing from the left side of printer, ensuring the left end of the photoconductor is installed, reset the life count value in the... printer memory. • If a message appears on the photoconductor unit that was just replaced, and then press . A B Installation note: If a new photoconductor unit is released from the holding pin (B). ...

Service Manual
Page 318
.... (Turn off the printer, press and hold the photoconductor units by their handle and place the photoconductor units on page 7-15 for additional information. 2. See "Color Alignment" on page 4-70. Model C52x Model C53x A B A B Installation notes: When you installed the new transfer belt and moved all photoconductor units. and , turn on page 3-24. 1. See "Color...
.... (Turn off the printer, press and hold the photoconductor units by their handle and place the photoconductor units on page 7-15 for additional information. 2. See "Color Alignment" on page 4-70. Model C52x Model C53x A B A B Installation notes: When you installed the new transfer belt and moved all photoconductor units. and , turn on page 3-24. 1. See "Color...
Service Manual
Page 371
... 7-18 contact springs 7-16 CRUs 7-14 front 7-4 left 7-10 miscellaneous 7-20 rear 7-8 right 7-6 top 7-12 Perm Page Count 3-16 photoconductor unit 4-2 handling 4-2 installation 4-70 locations 5-7 parts not to be touched 4-2 removal 4-70 transportation/storage 4-2 Pick roll tires, replacement 4-71 power cords 7-15 power-on...(LVPS) 4-65 multipurpose feeder (MPF) swing arm assembly-C52x only 4-67 paper pick mechanism assembly 4-68 paper tray dust cover 4-24 photoconductor unit 4-70 pick roll rubber tires 4-71 precautions 4-13 printer pad 4-73 printhead 4-74 right bellcrank 4-77 smart chip card-C52x ...
... 7-18 contact springs 7-16 CRUs 7-14 front 7-4 left 7-10 miscellaneous 7-20 rear 7-8 right 7-6 top 7-12 Perm Page Count 3-16 photoconductor unit 4-2 handling 4-2 installation 4-70 locations 5-7 parts not to be touched 4-2 removal 4-70 transportation/storage 4-2 Pick roll tires, replacement 4-71 power cords 7-15 power-on...(LVPS) 4-65 multipurpose feeder (MPF) swing arm assembly-C52x only 4-67 paper pick mechanism assembly 4-68 paper tray dust cover 4-24 photoconductor unit 4-70 pick roll rubber tires 4-71 precautions 4-13 printer pad 4-73 printhead 4-74 right bellcrank 4-77 smart chip card-C52x ...


