
Lexmark E360d Support Question
Lexmark E360d Support Question
Find answers below for this question about Lexmark E360d.Need a Lexmark E360d manual? We have 5 online manuals for this item!
Question posted by suemiller on June 28th, 2011
How Do I Install A New Photoconductor Kit?
I am having difficulty removing the old one.
Current Answers
Answer #1: Posted by p33mp33ui on June 28th, 2011 8:01 AM
p33mp33ui

Member since:
June 10th, 2011 Points: 107,580

Member since:
June 10th, 2011 Points: 107,580
Answer #2: Posted by LexmarkListens on July 1st, 2011 9:16 AM
LexmarkListens

Member since:
July 1st, 2011 Points: 1,410,540
Member since:
July 1st, 2011 Points: 1,410,540
Please click on the link below. This will provide you steps on how to remove/replace your photoconductor kit.
Lexmark Listens
Phone:
USA: 1-800-539-6275
Canada: (877) 856-5540
UK: 0800 121 4726
South Africa: 0800 981 435
Related Lexmark E360d Manual Pages
Clearing Jams Guide - Page 2
... 251
To access the jam
Try one or more of the printer, and remove any jammed sheets.
3 If you see it here. Remove the jam from the printer.
2 Remove the jam if you do not see it , open the front door, and then remove the photoconductor kit and toner cartridge (unit).
5 Align and insert the unit. 6 Close the...
Troubleshooting Guide - Page 4
... the tray.
Try one or more of the following : • Remove and reinstall the toner cartridge. • Remove and reinstall the photoconductor kit.
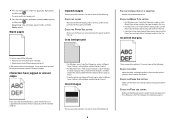
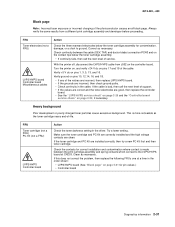
Gray background
THE PHOTOCONDUCTOR KIT IS DEFECTIVE
Replace the photoconductor kit. For more of the following :
4
Ghost images
These are supported by the printer, the host computer, and the software program.
• For Windows...
Troubleshooting Guide - Page 6

...BE DEFECTIVE
Replace the toner cartridge. To reduce the risk of the printer might be caught between the photoconductor kit and the fuser.
THERE IS TONER IN THE PAPER PATH
Contact Customer... Paper Type setting is poor CHECK THE TRANSPARENCIES
Use only transparencies recommended by the printer manufacturer. THE TONER CARTRIDGE MAY BE DEFECTIVE
Replace the toner cartridge. Streaked vertical ...
Troubleshooting Guide - Page 7
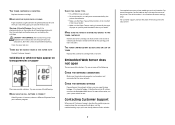
...new one or more of paper or specialty media loaded in the tray or feeder. Try one or more of the printer. For more information, see the label on and connected to extend the life of the photoconductor kit...THE
TONER CARTRIDGE Remove the toner cartridge and shake it from a hot component, allow the surface to cool before the printer IP address to know your printer. Contacting Customer ...
Quick Reference - Page 6

... display. A list of the printer as needed in the Page Setup dialog.
1 With a document open , choose File > Page Setup. 2 From the Paper pop-up menu, choose a paper
type. 5 Click Print. Press the arrow buttons until Cancel appears. 7 Press the arrow buttons until the job you should immediately order a new photoconductor kit.
c From the Form...
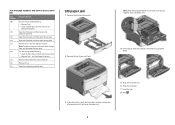
Quick Reference - Page 7

... cartridge. 4 Unpack the new photoconductor kit.
Warning-Potential Damage: Resetting the photoconductor counter without replacing the photoconductor may damage your printer and void your cartridge by aligning the rollers on the base of the unit with the new photoconductor kit. Push the unit as far as it clicks into place.
7 After you experience faded print, remove the toner cartridge...
Quick Reference - Page 8

...5 Install the new toner cartridge by pressing the button on the left side of
the printer and lowering the door.
2 Press the button on the base of the photoconductor kit, ...and then pull the toner cartridge out using the handle.
4 Rotate the cartridge in as far as they may cause damage to your printer. 5 Make sure all areas of the printer are dry before proceeding. 2 Remove...
Service Manual - Page 17

... on page 2-1 for single users or small workgroups. See "Repair information" on E360d and E360dn. After completing the repair, perform tests as needed to determine the symptom...-420, -430
1. General information
The Lexmark™ E360d and E360dn are monochrome laser printers designed for more information. Maintenance approach
The diagnostic information in this manual leads to ...
Service Manual - Page 21
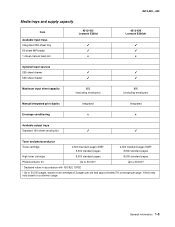
...Item
Available input trays Integrated 250-sheet tray 50-sheet MP feeder 1-sheet manual feed slot
4513-420 Lexmark E360d
x
4513-420, -430
4513-430 Lexmark E360dn
x
Optional...pages SWE¹ 3,500 standard pages
High toner cartridge
9,000 standard pages
9,000 standard pages
Photoconductor kit
Up to 30,000 ²
Up to 30,000 ²
¹ Declared value in...
Service Manual - Page 32

... for the message to clear the messages. Download valid engine code to clear.
Wait for the message to the printer. Remove the indicated print cartridge, and install a new one of the input sources, press . If the printer cannot find a tray with
Action
Wait for the message to clear the message. 4513-420, -430
Messages and...
Service Manual - Page 34
...
USB Menu
The standard bin is programming new system code.
The printer is displayed. Warning: Do not turn the printer off while this message is processing data ...the tray into the printer. 4513-420, -430
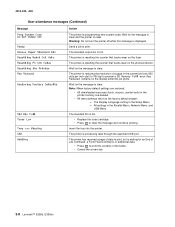
User attendance messages (Continued)
Message Prog System Code DO NOT POWER OFF Ready Remove Paper Standard Bin Resetting...8482; E360d, E360dn Res Reduced remains on the photoconductor.
Service Manual - Page 57
... Kit are correctly installed and the high voltage contacts are installed correctly, then try a new PC Kit ....
• If any of the photoconductor causes an all black page.
Verify...on page 2-22, if necessary. With the printer off, disconnect the LVPS/HVPS cable from a...and 15.
4513-420, -430
Black page
Note: Incorrect laser exposure or incorrect charging of the values are incorrect, then...
Service Manual - Page 58

... . Try a new PC Kit. Try changing the...photoconductor) drum. Check the media settings in the printer driver.
2-32 Lexmark™ E360d..., E360dn A heavier media may require higher heat to the PC drum. Note: Do not touch the transfer roll except at the proper temperature to fuse the toner to make sure that the laser light path is low, then try a new...
Service Manual - Page 59
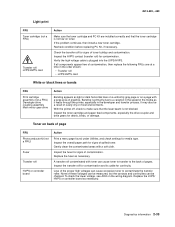
...lines on a uniformly gray page or on back of page
FRU Photoconductor kit (not a FRU)
Fuser
Transfer roll
HVPS or controller board
... fuser for signs of toner buildup and contamination. With the printer off, check to make sure that the toner cartridge is ... Kit are installed correctly and that the laser beam is primarily due to the back of pages. If the problem continues, then install a new ...
Service Manual - Page 63

...printing, and an error message is displayed.
Printhead service check
FRU
Printhead Note: New printhead must be aligned.
Replace the transfer roll assembly if the springs or bearings show... for an appropriate command. • Make sure the print cartridge assembly is installed properly. • Make sure the printer front cover is closed . Replace as necessary. Verify grounds on pins 2, ...
Service Manual - Page 67
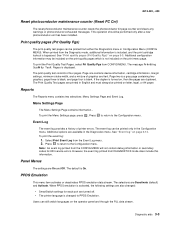
...photoconductor maintenance counter (Reset PC Cnt)
The reset photoconductor maintenance counter resets the photoconductor kit page counter and clears any warnings or photoconductor ...printer language is not included on , then the pages are also changed to PPDS Emulation.
Users can be printed only in English and must always be performed only after a new photoconductor unit has been installed...
Service Manual - Page 88

...card contains the printer
settings. 4513-420, -430
Controller board removal
CAUTION This product ...Remove the three screws (A) from the other card.
Discard used batteries according to the battery manufacturer's instructions and local regulations. A
4-6 Lexmark™ E360d, E360dn Critical factory settings are lost when both cards are new and are replaced at the same time. Remove...
Service Manual - Page 107

... then from the right and left hinge. Note: The picture below shows the E260d, E260dn printer. Flex the lower front cover, and disconnect it first from its left sides of the lower...
See "Front access door removal" on page 4-17 and "Door mount removal" on page 4-9. Repair information 4-25 The lower front cover removal is to remove the front access door, and remove the three screws from the ...
Service Manual - Page 115

D
Repair information 4-33 Use a screwdriver to remove the e-clip (C) from the manual feed clutch. C 7.
4513-420, -430
6. The manual feed clutch removal is the same for all models. Note: The picture below shows the E260d, E260dn printer.
Remove the manual feed clutch (D).
Service Manual - Page 116
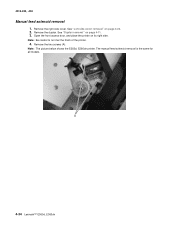
Open the front access door, and place the printer on page 4-11. 3. Remove the two screws (A).
See "Duplex removal" on its right side.
Note: The picture below shows the E260d, E260dn printer. See "Left side cover removal" on page 4-23. 2. Remove the right side cover. Remove the duplex. A
4-34 Lexmark™ E360d, E360dn
Note: Be careful to not mar...
Similar Questions


On My Wifes Printer At Work It Says It Needs A Pc Kit.its A Lexmark E360d. Help
(Posted by rcssawdust 11 years ago)

Resetting Printer After New Photoconductors Have Been Installed
How do I reset the "counter" after installing new photoconductors? Ros
How do I reset the "counter" after installing new photoconductors? Ros
(Posted by rwindechrunik 12 years ago)