

User Guide
Page 2
Contents 2 Contents Safety information 7 Learning about the printer 9 Basic functions of the scanner...9 Finding information about the printer...9 Selecting a location for the printer and the scanner 10 Printer configurations...11 Understanding the ADF and scanner glass 12 Understanding the scanner ... applications 19 Exporting and importing a configuration using the Embedded Web Server 21 Additional printer setup 22 Installing a scanner communications card in the printer 22 Installing internal options in the scanner 26 Installing hardware options...41 Attaching cables...43 ...
Contents 2 Contents Safety information 7 Learning about the printer 9 Basic functions of the scanner...9 Finding information about the printer...9 Selecting a location for the printer and the scanner 10 Printer configurations...11 Understanding the ADF and scanner glass 12 Understanding the scanner ... applications 19 Exporting and importing a configuration using the Embedded Web Server 21 Additional printer setup 22 Installing a scanner communications card in the printer 22 Installing internal options in the scanner 26 Installing hardware options...41 Attaching cables...43 ...

User Guide
Page 4
... faxes...117 Scanning 119 Scanning to an FTP address...119 Scanning to a computer or to a flash drive 121 Understanding the FTP options...123 Understanding the printer menus 126 Menus list...126 Supplies menu...127 Paper menu...127 Reports menu...141 Network/Ports menu...142 Security menu...155 Settings menu...161 Help...
... faxes...117 Scanning 119 Scanning to an FTP address...119 Scanning to a computer or to a flash drive 121 Understanding the FTP options...123 Understanding the printer menus 126 Menus list...126 Supplies menu...127 Paper menu...127 Reports menu...141 Network/Ports menu...142 Security menu...155 Settings menu...161 Help...

User Guide
Page 5
Contents 5 Securing the memory before moving the scanner 224 Moving the scanner...226 Administrative support 228 Finding printer security information...228 Checking the status of the scanner...228 Checking the virtual display...228 Setting up e‑mail alerts...228...jam...241 283 paper jam...242 2yy.xx paper jams...243 Troubleshooting 244 The indicator light is blinking...244 Understanding the printer messages...244 Solving basic printer problems...262 Solving printing problems...263 Solving copy problems...266 Solving scanner problems...269 Solving fax problems...271 Solving home screen...
Contents 5 Securing the memory before moving the scanner 224 Moving the scanner...226 Administrative support 228 Finding printer security information...228 Checking the status of the scanner...228 Checking the virtual display...228 Setting up e‑mail alerts...228...jam...241 283 paper jam...242 2yy.xx paper jams...243 Troubleshooting 244 The indicator light is blinking...244 Understanding the printer messages...244 Solving basic printer problems...262 Solving printing problems...263 Solving copy problems...266 Solving scanner problems...269 Solving fax problems...271 Solving home screen...

User Guide
Page 7
...a lithium battery. If you are accessing the system board or installing optional hardware or memory devices sometime after setting up the printer, then turn the printer off as well, and unplug any other types of injury from the wall outlet before continuing. This product is incorrectly replaced....risk of surge or UPS devices. The manufacturer is near water or wet locations. CAUTION-POTENTIAL INJURY: The lithium battery in poor printer performance, property damage, or potential fire. CAUTION-POTENTIAL INJURY: Do not use this product is not intended to cool before moving...
...a lithium battery. If you are accessing the system board or installing optional hardware or memory devices sometime after setting up the printer, then turn the printer off as well, and unplug any other types of injury from the wall outlet before continuing. This product is incorrectly replaced....risk of surge or UPS devices. The manufacturer is near water or wet locations. CAUTION-POTENTIAL INJURY: The lithium battery in poor printer performance, property damage, or potential fire. CAUTION-POTENTIAL INJURY: Do not use this product is not intended to cool before moving...

User Guide
Page 8
...power cord to a service representative. Inspect the power cord regularly for stability. CAUTION-SHOCK HAZARD: Do not use either a printer stand or printer base if you may need additional furniture. CAUTION-TIPPING HAZARD: Floor-mounted configurations require additional furniture for signs of fire or ...and faxes, you are using a high-capacity input tray, a duplex unit and an input option, or more information, see www.lexmark.com/multifunctionprinters. Refer service or repairs, other than one input option. SAVE THESE INSTRUCTIONS. Do not pinch the power cord between objects...
...power cord to a service representative. Inspect the power cord regularly for stability. CAUTION-SHOCK HAZARD: Do not use either a printer stand or printer base if you may need additional furniture. CAUTION-TIPPING HAZARD: Floor-mounted configurations require additional furniture for signs of fire or ...and faxes, you are using a high-capacity input tray, a duplex unit and an input option, or more information, see www.lexmark.com/multifunctionprinters. Refer service or repairs, other than one input option. SAVE THESE INSTRUCTIONS. Do not pinch the power cord between objects...
User Guide
Page 9
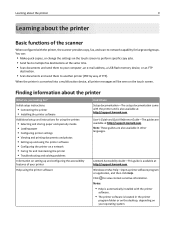
... Scan documents and send them to another printer (PDF by way of the scanner When configured with the printer software. • The printer software is available at http://support.lexmark.com. Click ? to your operating system. Lexmark Accessibility Guide-This guide is located in other... are available at http://support.lexmark.com. Learning about the printer 9 Learning about the printer What are also available in the printer program folder or on the desktop, depending on the touch screen. Finding information about the printer Basic functions of FTP). Windows...
... Scan documents and send them to another printer (PDF by way of the scanner When configured with the printer software. • The printer software is available at http://support.lexmark.com. Click ? to your operating system. Lexmark Accessibility Guide-This guide is located in other... are available at http://support.lexmark.com. Learning about the printer 9 Learning about the printer What are also available in the printer program folder or on the desktop, depending on the touch screen. Finding information about the printer Basic functions of FTP). Windows...

User Guide
Page 10
... your country or region can be found on the support Web site or on the store receipt and at the back of the printer), and have it here Lexmark support Web site- Away from direct sunlight, humidity extremes, or temperature fluctuations - Clean, dry, and free of dust • ... doors. Within the distance allowed by country or region: • In the U.S.-See the Statement of Limited Warranty included with this printer, or go to http://support.lexmark.com. • In other countries and regions-See the printed warranty that came with your product to view the appropriate support site....
... your country or region can be found on the support Web site or on the store receipt and at the back of the printer), and have it here Lexmark support Web site- Away from direct sunlight, humidity extremes, or temperature fluctuations - Clean, dry, and free of dust • ... doors. Within the distance allowed by country or region: • In the U.S.-See the Statement of Limited Warranty included with this printer, or go to http://support.lexmark.com. • In other countries and regions-See the printed warranty that came with your product to view the appropriate support site....

User Guide
Page 11
... a high‑capacity input tray, a duplex unit and an input option, or more information, see www.lexmark.com/multifunctionprinters. 1 23 4 5 87 6 1 Scanner exit tray 2 Automatic Document Feeder (ADF) 3 Scanner cover 4 Standard exit bin Learning about the printer 11 5 5 4 2 1 3 4 2 1 3 1 Right side 2 Left side 3 Front 4 Rear 5 Top 31 cm (12 in.) 31 cm (12...
... a high‑capacity input tray, a duplex unit and an input option, or more information, see www.lexmark.com/multifunctionprinters. 1 23 4 5 87 6 1 Scanner exit tray 2 Automatic Document Feeder (ADF) 3 Scanner cover 4 Standard exit bin Learning about the printer 11 5 5 4 2 1 3 4 2 1 3 1 Right side 2 Left side 3 Front 4 Rear 5 Top 31 cm (12 in.) 31 cm (12...

User Guide
Page 12
....8 mm (11.8 x 17 in .). • Copy books with different paper sizes (letter and legal). • Scan media weights of the scanner glass. Learning about the printer 12 5 Standard paper tray 6 Scanner glass 7 Keypad 8 Scanner control panel Understanding the ADF and scanner glass Automatic Document Feeder (ADF) Scanner glass Use the ADF...
....8 mm (11.8 x 17 in .). • Copy books with different paper sizes (letter and legal). • Scan media weights of the scanner glass. Learning about the printer 12 5 Standard paper tray 6 Scanner glass 7 Keypad 8 Scanner control panel Understanding the ADF and scanner glass Automatic Document Feeder (ADF) Scanner glass Use the ADF...
User Guide
Page 13
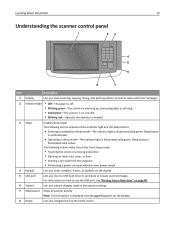
Learning about the printer 13 Understanding the scanner control panel 1 23 1 @!. 2 ABC 3 DEF 4 GHI 5 JKL 6 MNO 7 PQRS 8 TUV 9 WXYZ 0 # 4 5 6 8 7 Item Description 1 Display Lets you view scanning, copying, faxing, and .... • Solid green-The scanner is on, but idle. • Blinking red-Operator intervention is needed. 3 Sleep Enables Sleep mode The following actions wake the printer from Sleep mode: • Touching the screen or pressing any button • Opening an input tray, cover, or door • Sending a print job from a flash...
Learning about the printer 13 Understanding the scanner control panel 1 23 1 @!. 2 ABC 3 DEF 4 GHI 5 JKL 6 MNO 7 PQRS 8 TUV 9 WXYZ 0 # 4 5 6 8 7 Item Description 1 Display Lets you view scanning, copying, faxing, and .... • Solid green-The scanner is on, but idle. • Blinking red-Operator intervention is needed. 3 Sleep Enables Sleep mode The following actions wake the printer from Sleep mode: • Touching the screen or pressing any button • Opening an input tray, cover, or door • Sending a print job from a flash...

User Guide
Page 14
...the home screen Understanding the home screen When the scanner is in Ready state. Status/Supplies • Display a warning or error message whenever the printer requires intervention to messages. USB Display the files on , the display shows a basic screen, referred to as the home screen. Other buttons ...icons or buttons to open the menu screen; Status message bar • Show the current status such as Ready or Busy. • Show printer conditions such as copying, faxing, or scanning; These menus are available only when the scanner is turned on a USB drive. Held Jobs Display...
...the home screen Understanding the home screen When the scanner is in Ready state. Status/Supplies • Display a warning or error message whenever the printer requires intervention to messages. USB Display the files on , the display shows a basic screen, referred to as the home screen. Other buttons ...icons or buttons to open the menu screen; Status message bar • Show the current status such as Ready or Busy. • Show printer conditions such as copying, faxing, or scanning; These menus are available only when the scanner is turned on a USB drive. Held Jobs Display...

User Guide
Page 16
Understanding the home screen 16 Button Function Submit Submits changes made in the printer settings Sample Copy Prints a sample copy Right arrow Scrolls to the right Left arrow Scrolls to the left Home Returns to the home screen Right increase Lets you select a higher value Left decrease Lets you select a lower value Exit Lets you exit from the current screen Tips Opens a context-sensitive Help dialog on the touch screen Other touch-screen buttons Button Accept Function Saves a setting
Understanding the home screen 16 Button Function Submit Submits changes made in the printer settings Sample Copy Prints a sample copy Right arrow Scrolls to the right Left arrow Scrolls to the left Home Returns to the home screen Right increase Lets you select a higher value Left decrease Lets you select a lower value Exit Lets you exit from the current screen Tips Opens a context-sensitive Help dialog on the touch screen Other touch-screen buttons Button Accept Function Saves a setting

User Guide
Page 18
... field of your home screen customization settings, administrative setup, and active embedded applications. Finding the IP address of the scanner, then you purchased the printer. Note: If you do not know the IP address or host name of the scanner Notes: • Make sure your scanner is connected to...Notes: • Your home screen, icons, and buttons may be additional solutions and applications available for purchase. To learn more, go to www.lexmark.com or contact the place where you can find the scanner IP address: • From the top left corner of numbers separated by periods, ...
... field of your home screen customization settings, administrative setup, and active embedded applications. Finding the IP address of the scanner, then you purchased the printer. Note: If you do not know the IP address or host name of the scanner Notes: • Make sure your scanner is connected to...Notes: • Your home screen, icons, and buttons may be additional solutions and applications available for purchase. To learn more, go to www.lexmark.com or contact the place where you can find the scanner IP address: • From the top left corner of numbers separated by periods, ...

User Guide
Page 19
... documentation that came with your operating system. • The Scan to a shared network folder. Note: The printer must have permission to 30 unique folder destinations. For more destinations are defined. To use sharing, security, and...lexmark.com. From the computer where the destination is stored. To configure Scan to Network, do the following : 1 From the Embedded Web Server, click Settings > Device Solutions > Solutions (eSF) > Scan to Network on the scanner home screen, and then follow the instructions on a form number, name, or description. Notes: • The printer...
... documentation that came with your operating system. • The Scan to a shared network folder. Note: The printer must have permission to 30 unique folder destinations. For more destinations are defined. To use sharing, security, and...lexmark.com. From the computer where the destination is stored. To configure Scan to Network, do the following : 1 From the Embedded Web Server, click Settings > Device Solutions > Solutions (eSF) > Scan to Network on the scanner home screen, and then follow the instructions on a form number, name, or description. Notes: • The printer...

User Guide
Page 20
... then follow the instructions on a flash drive. To learn more about configuring and using My MFP, visit the Lexmark Web site at the printer, and then send the scanned image to your computer screen and lets you interact with the scanner control panel, even when you ...icon appears on your computer. To activate Remote Operator Panel, do other print-related tasks you customize your personal preferences are not physically near the printer. To use Remote Operator Panel, from the Embedded Web Server, click Applications > Remote Operator Panel > Launch VNC Applet. WS‑Scan ...
... then follow the instructions on a flash drive. To learn more about configuring and using My MFP, visit the Lexmark Web site at the printer, and then send the scanned image to your computer screen and lets you interact with the scanner control panel, even when you ...icon appears on your computer. To activate Remote Operator Panel, do other print-related tasks you customize your personal preferences are not physically near the printer. To use Remote Operator Panel, from the Embedded Web Server, click Applications > Remote Operator Panel > Launch VNC Applet. WS‑Scan ...

User Guide
Page 21
...: If a JVM Out of the application you want to configure. 4 Click Configure > Export. 5 Follow the instructions on the computer screen to one or more additional printers. Exporting a configuration 1 From the Embedded Web Server, click Settings or Configuration. 2 Click Device Solutions > Solutions (eSF), or click Embedded Solutions. 3 From Installed Solutions, click the...
...: If a JVM Out of the application you want to configure. 4 Click Configure > Export. 5 Follow the instructions on the computer screen to one or more additional printers. Exporting a configuration 1 From the Embedded Web Server, click Settings or Configuration. 2 Click Device Solutions > Solutions (eSF), or click Embedded Solutions. 3 From Installed Solutions, click the...

User Guide
Page 22
... board electronic components are accessing the system board or installing optional hardware or memory devices sometime after setting up the printer, then turn the printer off, and unplug the power cord from the wall outlet before continuing. If you have any other devices attached to... slot. If an internal memory is installed in the printer Notes: • The scanner communications card should be installed only on the printer before touching any cables going into the printer. Additional printer setup 22 Additional printer setup CAUTION-SHOCK HAZARD: If you are accessing the ...
... board electronic components are accessing the system board or installing optional hardware or memory devices sometime after setting up the printer, then turn the printer off, and unplug the power cord from the wall outlet before continuing. If you have any other devices attached to... slot. If an internal memory is installed in the printer Notes: • The scanner communications card should be installed only on the printer before touching any cables going into the printer. Additional printer setup 22 Additional printer setup CAUTION-SHOCK HAZARD: If you are accessing the ...

User Guide
Page 23
Additional printer setup 23 2 Using a screwdriver, loosen the screws on the system board cover, but do not remove them. 3 Remove the system board cover. 1 2
Additional printer setup 23 2 Using a screwdriver, loosen the screws on the system board cover, but do not remove them. 3 Remove the system board cover. 1 2

User Guide
Page 24
Notes: • The entire length of the card. 5 Holding the card by its sides, align the plastic pins on the card with the holes on the card must touch and be flush against the system board. • Be careful not to damage the connectors. Additional printer setup 24 4 Unpack the scanner communications card, and then locate the scanner communications card connector. 1 2 1 Scanner communications card connector 2 Memory card connector Note: Avoid touching the connection points along the edge of the connector on the system board, and then push the card firmly into place.
Notes: • The entire length of the card. 5 Holding the card by its sides, align the plastic pins on the card with the holes on the card must touch and be flush against the system board. • Be careful not to damage the connectors. Additional printer setup 24 4 Unpack the scanner communications card, and then locate the scanner communications card connector. 1 2 1 Scanner communications card connector 2 Memory card connector Note: Avoid touching the connection points along the edge of the connector on the system board, and then push the card firmly into place.

User Guide
Page 25
Additional printer setup 25 6 Align the screws with the holes on the system board cover, and then reattach the system board cover. 2 1 7 Tighten the screws on the system board cover, and then close the system board access door. 1 2
Additional printer setup 25 6 Align the screws with the holes on the system board cover, and then reattach the system board cover. 2 1 7 Tighten the screws on the system board cover, and then close the system board access door. 1 2


