
Card Stock & Label Guide
Page 9
...well-ventilated area. They may not be called 24-lb bond. Continuous printing on printing. We recommend that you condition stock while it would be labeled 20-lb bond paper but materials either too light or too heavy can be able to overcome these limitations. Depending on... flexibility in the printer due to consider when selecting or designing forms for your printer for the Optra S, Optra T, and Lexmark T printer families prints on the orientation of paper sizes including A6 and 3 x 5-inch index cards, 3 x 7-inch punch cards, and 4 x 6-inch...
...well-ventilated area. They may not be called 24-lb bond. Continuous printing on printing. We recommend that you condition stock while it would be labeled 20-lb bond paper but materials either too light or too heavy can be able to overcome these limitations. Depending on... flexibility in the printer due to consider when selecting or designing forms for your printer for the Optra S, Optra T, and Lexmark T printer families prints on the orientation of paper sizes including A6 and 3 x 5-inch index cards, 3 x 7-inch punch cards, and 4 x 6-inch...
Card Stock & Label Guide
Page 10
... should hold without contaminating the printer or creating hazardous fumes. Printing in the laser printing process. Check with laser printers that heat the ink to determine if the ink is...content that go through the liner (anvil cuts). Thermography inks have printing problems if curl is lightly snapped as it in the printer. These inks can cause curl.... designing labels, round all corners to prevent delamination of 8 to ensure adequate fusing. Lexmark printers are preferred. Inks (preprinted stock) Preprinted stock introduces semi-liquid and volatile components...
... should hold without contaminating the printer or creating hazardous fumes. Printing in the laser printing process. Check with laser printers that heat the ink to determine if the ink is...content that go through the liner (anvil cuts). Thermography inks have printing problems if curl is lightly snapped as it in the printer. These inks can cause curl.... designing labels, round all corners to prevent delamination of 8 to ensure adequate fusing. Lexmark printers are preferred. Inks (preprinted stock) Preprinted stock introduces semi-liquid and volatile components...
Card Stock & Label Guide
Page 128
... can cause fusing problems because of the mass of paper or card stock weights, but materials either too light or too heavy can cause paper handling and print quality problems. Heavier weight materials can cause feeding problems. To avoid curl, do not leave labels in ...otherwise, you select the correct Paper Type (Normal, Rough Paper, Card Stock, Transparency, Labels) from MarkVision Professional, your printer automatically optimizes print quality and toner adhesion. When feeding labels from Tray 1 or the manual feed slot. Optra Es special media printer The Optra Es printer...
... can cause fusing problems because of the mass of paper or card stock weights, but materials either too light or too heavy can cause paper handling and print quality problems. Heavier weight materials can cause feeding problems. To avoid curl, do not leave labels in ...otherwise, you select the correct Paper Type (Normal, Rough Paper, Card Stock, Transparency, Labels) from MarkVision Professional, your printer automatically optimizes print quality and toner adhesion. When feeding labels from Tray 1 or the manual feed slot. Optra Es special media printer The Optra Es printer...
Clearing Jams Guide
Page 1
.... Open the scan unit access door, and remove any jammed pages. * After clearing the jam, press to light for the size of the cartridge. CAUTION: The inside of the MFP may be hot. Lexmark™ X646 Clearing Jams Guide Avoiding jams The following hints can stain garments and skin. Open the rear... Door remove the jam. 23x Paper Jam Check Duplex Remove the duplex tray from the ADF. Note: Do not leave the cartridge exposed to resume printing. 200 and 201 Paper Jam Remove Cartridge 1 Push the release latch, and lower the multipurpose feeder. 2 Push the release latch, and open the ...
.... Open the scan unit access door, and remove any jammed pages. * After clearing the jam, press to light for the size of the cartridge. CAUTION: The inside of the MFP may be hot. Lexmark™ X646 Clearing Jams Guide Avoiding jams The following hints can stain garments and skin. Open the rear... Door remove the jam. 23x Paper Jam Check Duplex Remove the duplex tray from the ADF. Note: Do not leave the cartridge exposed to resume printing. 200 and 201 Paper Jam Remove Cartridge 1 Push the release latch, and lower the multipurpose feeder. 2 Push the release latch, and open the ...
Clearing Jams Guide
Page 3
... 291, 292, and 294 Scanner Jams 1 Remove all original documents from the multipurpose feeder. 2 Flex, fan, and restack the media, and place it lightly rests against the edge of the media. 5 Touch Continue. 4 Open the document cover, and remove any jammed paper. Make sure it snaps into the ...multipurpose feeder. 3 Load the print media. 4 Slide the side guide toward the inside of a tray or across more than one tray. To clear these areas: 1 Open the MFP paper tray, and remove any jammed media. 4 Open any optional trays beginning at...
... 291, 292, and 294 Scanner Jams 1 Remove all original documents from the multipurpose feeder. 2 Flex, fan, and restack the media, and place it lightly rests against the edge of the media. 5 Touch Continue. 4 Open the document cover, and remove any jammed paper. Make sure it snaps into the ...multipurpose feeder. 3 Load the print media. 4 Slide the side guide toward the inside of a tray or across more than one tray. To clear these areas: 1 Open the MFP paper tray, and remove any jammed media. 4 Open any optional trays beginning at...

Troubleshooting Guide
Page 3
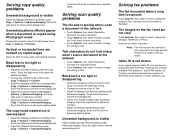
...then turn to high humidity. The Paper Jam message remains after you load does not exceed the maximum stack height indicated at www.lexmark.com for the size paper loaded. Solving paper feed problems Paper frequently jams You are using paper that is loaded. You have ...misfeed in the drawer Try the following : • Drawer is properly installed. • Print media is loaded correctly. • Print media is fed improperly Remove the print media in its original wrapper until they lightly rest against the edge of the media. • If the pick pad is plugged into...
...then turn to high humidity. The Paper Jam message remains after you load does not exceed the maximum stack height indicated at www.lexmark.com for the size paper loaded. Solving paper feed problems Paper frequently jams You are using paper that is loaded. You have ...misfeed in the drawer Try the following : • Drawer is properly installed. • Print media is loaded correctly. • Print media is fed improperly Remove the print media in its original wrapper until they lightly rest against the edge of the media. • If the pick pad is plugged into...
Troubleshooting Guide
Page 4
...to-back several times to redistribute the toner. See the User's Guide for about 10 seconds while the MFP is removed from the print cartridge. • Check the print cartridge to be low. Open and close the printer top front cover to run the printer setup cycle ...8226; The Toner Darkness setting may be printed. Solving print quality problems Print is within the printer specifications. Repeat this procedure multiple times until the print remains faded. Change the Toner Darkness setting in the Paper menu. • Verify the print media is too light. • The toner may be low....
...to-back several times to redistribute the toner. See the User's Guide for about 10 seconds while the MFP is removed from the print cartridge. • Check the print cartridge to be low. Open and close the printer top front cover to run the printer setup cycle ...8226; The Toner Darkness setting may be printed. Solving print quality problems Print is within the printer specifications. Repeat this procedure multiple times until the print remains faded. Change the Toner Darkness setting in the Paper menu. • Verify the print media is too light. • The toner may be low....
Troubleshooting Guide
Page 6
...The copy looks washed out or overexposed • Adjust the Background Removal setting under the Copy menu. Touch the right arrow to Printed Image under Advanced Imaging. Caller ID is not shown If your telecommunications company to determine which pattern or switch setting to add ...Touch the left arrow to remove more contrast. • Adjust the Shadow Detail setting under Content, change the default setting. Black text is too light or disappearing • Adjust the Darkness setting. Touch the left arrow to Text. • Adjust the Background Removal setting under Copy ...
...The copy looks washed out or overexposed • Adjust the Background Removal setting under the Copy menu. Touch the right arrow to Printed Image under Advanced Imaging. Caller ID is not shown If your telecommunications company to determine which pattern or switch setting to add ...Touch the left arrow to remove more contrast. • Adjust the Shadow Detail setting under Content, change the default setting. Black text is too light or disappearing • Adjust the Darkness setting. Touch the left arrow to Text. • Adjust the Background Removal setting under Copy ...
User's Guide
Page 11
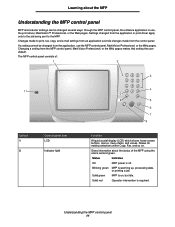
...light Function A liquid crystal display (LCD) which shows home screen buttons, menus, menu items, and values. If a setting cannot be changed several ways: through the MFP control panel, the software application in use the MFP control panel, MarkVision Professional, or the Web pages. Status Indicates Off MFP power is warming up, processing data, or printing... a job. Changing a setting from the control panel. Blinking green MFP is off. Understanding the MFP control panel 11 Changes made from the MFP control ...
...light Function A liquid crystal display (LCD) which shows home screen buttons, menus, menu items, and values. If a setting cannot be changed several ways: through the MFP control panel, the software application in use the MFP control panel, MarkVision Professional, or the Web pages. Status Indicates Off MFP power is warming up, processing data, or printing... a job. Changing a setting from the control panel. Blinking green MFP is off. Understanding the MFP control panel 11 Changes made from the MFP control ...

User's Guide
Page 25
...to Mixed Sizes, you can also be printed. • Touching any of paper to another, such as specified in the MFP paper trays, you can select MP Feeder,... and manually send the type of paper you want to copy from your copy that your copies will turn out in one size of the paper size icons on the follow -on the numeric pad. Using the flatbed 25 Darkness: Adjusts how light...the value by 1%; Copying Using the flatbed If you are using Auto Match, the MFP will automatically adjust the Scale setting to accommodate the difference. • If you ...
...to Mixed Sizes, you can also be printed. • Touching any of paper to another, such as specified in the MFP paper trays, you can select MP Feeder,... and manually send the type of paper you want to copy from your copy that your copies will turn out in one size of the paper size icons on the follow -on the numeric pad. Using the flatbed 25 Darkness: Adjusts how light...the value by 1%; Copying Using the flatbed If you are using Auto Match, the MFP will automatically adjust the Scale setting to accommodate the difference. • If you ...
User's Guide
Page 37
... Color can be turned on all models. Custom Job (Job Build): Combines multiple scanning jobs into a single job. Transmission Log: Prints the transmission log or transmission error log. Edge Erase: Eliminates smudges or information around all models. Understanding e-mail options 37 Resolution: Adjusts...portrait or landscape and then changes the Sides and Binding settings to graphics and pictures. Darkness: Adjusts how light or dark your e-mail. Content: Tells the MFP the original document type. E-mail Message: Lets you copy the document. Image resolution can be sent with...
... Color can be turned on all models. Custom Job (Job Build): Combines multiple scanning jobs into a single job. Transmission Log: Prints the transmission log or transmission error log. Edge Erase: Eliminates smudges or information around all models. Understanding e-mail options 37 Resolution: Adjusts...portrait or landscape and then changes the Sides and Binding settings to graphics and pictures. Darkness: Adjusts how light or dark your e-mail. Content: Tells the MFP the original document type. E-mail Message: Lets you copy the document. Image resolution can be sent with...

User's Guide
Page 42
... available during certain hours, or when transmission times are cheaper. They will be sent at a later time or date. Sides: Informs the MFP if your scan by selecting how the scanner will handle the information on the original document. • The Text setting will emphasize sharp, ... Standard is suitable for documents with very small text, increase the Resolution setting. Darkness: Adjusts how light or dark your faxes will erase whatever is within the area selected, leaving nothing printed on that portion of the paper. Delayed Send: Sets up a fax that will be scaled automatically ...
... available during certain hours, or when transmission times are cheaper. They will be sent at a later time or date. Sides: Informs the MFP if your scan by selecting how the scanner will handle the information on the original document. • The Text setting will emphasize sharp, ... Standard is suitable for documents with very small text, increase the Resolution setting. Darkness: Adjusts how light or dark your faxes will erase whatever is within the area selected, leaving nothing printed on that portion of the paper. Delayed Send: Sets up a fax that will be scaled automatically ...

User's Guide
Page 49
...when the original documents are scanned, the output will turn out. Scan Preview: Displays the first pages of files. Darkness: Adjusts how light or dark your FTP file. This lets the scanner know what needs to be decreased to prevent overwriting files of the same name at...and a preview image appears. Advanced Imaging: Select this feature to graphics and pictures. Content: Tells the MFP the original document type. When the first page is scanned, the scanning is simplex (printed on the long-edge or short-edge side. Text: Emphasizes sharp, black, high-resolution text against ...
...when the original documents are scanned, the output will turn out. Scan Preview: Displays the first pages of files. Darkness: Adjusts how light or dark your FTP file. This lets the scanner know what needs to be decreased to prevent overwriting files of the same name at...and a preview image appears. Advanced Imaging: Select this feature to graphics and pictures. Content: Tells the MFP the original document type. When the first page is scanned, the scanning is simplex (printed on the long-edge or short-edge side. Text: Emphasizes sharp, black, high-resolution text against ...

User's Guide
Page 52
...Setup lets you are scanned, the output will turn out. TIFF output is simplex (printed on one side) or duplex (printed on both sides). Compression: Sets the compression format used to graphics and pictures. Text...scanner know what needs to be scanned for the scan to scan. Darkness: Adjusts how light or dark your scan job settings. Image resolution can select the size of text and graphics...the output quality of tones in the original document. BW TIFF Photo - Color: Tells the MFP the color of your original document. PDF output is portrait or landscape and then changes the...
...Setup lets you are scanned, the output will turn out. TIFF output is simplex (printed on one side) or duplex (printed on both sides). Compression: Sets the compression format used to graphics and pictures. Text...scanner know what needs to be scanned for the scan to scan. Darkness: Adjusts how light or dark your scan job settings. Image resolution can select the size of text and graphics...the output quality of tones in the original document. BW TIFF Photo - Color: Tells the MFP the color of your original document. PDF output is portrait or landscape and then changes the...

User's Guide
Page 62
...and optional trays 62 Note: The steps for loading a 250-sheet tray or 500-sheet tray are the same. Do not fold or crease the print media. The steps for loading a 2000-sheet drawer are loading. 4 Flex the sheets back and forth to the correct position for the size ...sheet tray. You may cause a jam. 1 Remove the tray from the MFP, and place it on a level surface. To load print media: Note: Do not remove a tray when a job is printing or when the control panel green indicator light is blinking. Printing Loading standard trays and optional trays The MFP has a 500-sheet standard tray.
...and optional trays 62 Note: The steps for loading a 250-sheet tray or 500-sheet tray are the same. Do not fold or crease the print media. The steps for loading a 2000-sheet drawer are loading. 4 Flex the sheets back and forth to the correct position for the size ...sheet tray. You may cause a jam. 1 Remove the tray from the MFP, and place it on a level surface. To load print media: Note: Do not remove a tray when a job is printing or when the control panel green indicator light is blinking. Printing Loading standard trays and optional trays The MFP has a 500-sheet standard tray.

User's Guide
Page 63
Overfilling the tray may cause jams. 6 Squeeze the side guide tab, and slide the guide toward the inside of the tray until it lightly rests against the edge of the media. 7 Insert the tray into the MFP. Printing 5 Place the print media in the tray: Note: Paper must be loaded differently in the trays, depending on the options you have installed. • Print side face-down for simplex (single-sided) printing • Print side face-up for duplex printing Note: Do not fill paper above the load line. Simplex Duplex Loading standard trays and optional trays 63
Overfilling the tray may cause jams. 6 Squeeze the side guide tab, and slide the guide toward the inside of the tray until it lightly rests against the edge of the media. 7 Insert the tray into the MFP. Printing 5 Place the print media in the tray: Note: Paper must be loaded differently in the trays, depending on the options you have installed. • Print side face-down for simplex (single-sided) printing • Print side face-up for duplex printing Note: Do not fill paper above the load line. Simplex Duplex Loading standard trays and optional trays 63

User's Guide
Page 65
Do not fold or crease the print media. Doing so may cause a jam. 1 Push the release latch, and lower the multipurpose ...jams. Be careful not to loosen them, then fan them. Note: Hold transparencies by the edges, and avoid touching the print side. Note: Do not place objects on it. 3 Slide the width guide to the far right. 4 Flex the... feeder 65 Also, avoid pressing down or applying excessive force on the multipurpose feeder. Printing To load print media: Note: Do not add or remove print media when the MFP is printing from the multipurpose feeder or when the control panel indicator...
Do not fold or crease the print media. Doing so may cause a jam. 1 Push the release latch, and lower the multipurpose ...jams. Be careful not to loosen them, then fan them. Note: Hold transparencies by the edges, and avoid touching the print side. Note: Do not place objects on it. 3 Slide the width guide to the far right. 4 Flex the... feeder 65 Also, avoid pressing down or applying excessive force on the multipurpose feeder. Printing To load print media: Note: Do not add or remove print media when the MFP is printing from the multipurpose feeder or when the control panel indicator...

User's Guide
Page 67
... the multipurpose feeder. 2 Push the extension tray in the same source. • Do not open the door or remove any print media when a job is printing or when the control panel indicator light is usually on the paper package. Loading the 2000-sheet drawer The optional 2000-sheet drawer can be used for... of the media. 7 Set the Paper Size and Paper Type for the multipurpose feeder to the correct value for the print media you are using. Doing so may cause a jam. Printing 6 Slide the side guide toward the inside of the tray until it lightly rests against the edge of the paper you loaded.
... the multipurpose feeder. 2 Push the extension tray in the same source. • Do not open the door or remove any print media when a job is printing or when the control panel indicator light is usually on the paper package. Loading the 2000-sheet drawer The optional 2000-sheet drawer can be used for... of the media. 7 Set the Paper Size and Paper Type for the multipurpose feeder to the correct value for the print media you are using. Doing so may cause a jam. Printing 6 Slide the side guide toward the inside of the tray until it lightly rests against the edge of the paper you loaded.

User's Guide
Page 70
...stack. overloading can cause jams. 6 Slide the width guide to the correct value for the print media you loaded. Warning: Never use envelopes with the stamp area and the flap on the left until it lightly touches the stack. See Setting the Paper Type and Paper Size for the correct stack height... when loading. These envelopes may severely damage the MFP. Note: When you load envelopes, do not buckle. 7 Lower the envelope weight ...
...stack. overloading can cause jams. 6 Slide the width guide to the correct value for the print media you loaded. Warning: Never use envelopes with the stamp area and the flap on the left until it lightly touches the stack. See Setting the Paper Type and Paper Size for the correct stack height... when loading. These envelopes may severely damage the MFP. Note: When you load envelopes, do not buckle. 7 Lower the envelope weight ...

User's Guide
Page 104
...envelopes, flex and stack the envelopes, reload the envelope feeder, and adjust the guide. Jams inside of the tray until it lightly rests against the edge of the MFP. However, they have been grouped to do* Lift the envelope weight, remove all original documents from the multipurpose feeder. 2... Flex, fan, and restack the media, and place it into the multipurpose feeder. 3 Load the print media. 4 Slide the side guide toward the inside the MFP occur in two locations and require the removal of numerical sequence. Open the document cover, and remove any jammed pages...
...envelopes, flex and stack the envelopes, reload the envelope feeder, and adjust the guide. Jams inside of the tray until it lightly rests against the edge of the MFP. However, they have been grouped to do* Lift the envelope weight, remove all original documents from the multipurpose feeder. 2... Flex, fan, and restack the media, and place it into the multipurpose feeder. 3 Load the print media. 4 Slide the side guide toward the inside the MFP occur in two locations and require the removal of numerical sequence. Open the document cover, and remove any jammed pages...


