
User's Guide
Page 3
...print job...62 Understanding printer menus 64 Menus list...64 Supplies menu...64 Paper menu...65 Reports...73 Network/Ports...75 Settings...81 Maintaining the printer 95 Storing supplies...95...printer...114 Moving the printer...115 Administrative support 116 Restoring the factory default settings...116 Using the Embedded Web Server...116 Setting up e-mail alerts...117 Configuring supply notifications...117 Copying printer settings to other printers...117 Clearing jams 119 Avoiding jams...119 Understanding jam numbers and locations...120 200-202 and 230 paper jams...121 231 and 235 paper jams...
...print job...62 Understanding printer menus 64 Menus list...64 Supplies menu...64 Paper menu...65 Reports...73 Network/Ports...75 Settings...81 Maintaining the printer 95 Storing supplies...95...printer...114 Moving the printer...115 Administrative support 116 Restoring the factory default settings...116 Using the Embedded Web Server...116 Setting up e-mail alerts...117 Configuring supply notifications...117 Copying printer settings to other printers...117 Clearing jams 119 Avoiding jams...119 Understanding jam numbers and locations...120 200-202 and 230 paper jams...121 231 and 235 paper jams...
User's Guide
Page 4
24x paper jam...124 250 paper jam...124 Troubleshooting 125 Understanding printer messages...125 Solving basic printer problems...131 Solving printing problems...131 Solving option problems...135 Solving paper feed problems...137 Solving print quality problems...138 Solving color quality problems...148 Contacting Customer Support...152 Notices 153 Product information...153 Edition notice...153 Power consumption...157 Index 167 Contents 4
24x paper jam...124 250 paper jam...124 Troubleshooting 125 Understanding printer messages...125 Solving basic printer problems...131 Solving printing problems...131 Solving option problems...135 Solving paper feed problems...137 Solving print quality problems...138 Solving color quality problems...148 Contacting Customer Support...152 Notices 153 Product information...153 Edition notice...153 Power consumption...157 Index 167 Contents 4
User's Guide
Page 35
... consecutive pages of a multiple-page document onto one side of a single sheet of paper by selecting a setting from the Print dialog or the Lexmark Toolbar, to see "Avoiding jams" on page 119. This setting supports the performance specifications for the multiple settings that ... appears, and then press . 4 Press the arrow buttons until a job is enabled on printer models supporting duplex. Submitting changes appears. Avoid paper jams Carefully select and load paper to avoid paper jams. For more ways to reduce your first draft for accuracy Before printing or making multiple copies ...
... consecutive pages of a multiple-page document onto one side of a single sheet of paper by selecting a setting from the Print dialog or the Lexmark Toolbar, to see "Avoiding jams" on page 119. This setting supports the performance specifications for the multiple settings that ... appears, and then press . 4 Press the arrow buttons until a job is enabled on printer models supporting duplex. Submitting changes appears. Avoid paper jams Carefully select and load paper to avoid paper jams. For more ways to reduce your first draft for accuracy Before printing or making multiple copies ...
User's Guide
Page 41
... the 650-sheet duo drawer, and the optional 550-sheet tray support the same paper sizes and types and are loaded in the portrait orientation) allows the printer to the Ready state. Loading paper and specialty media 41 Note: The optional 550-sheet tray is not available for ...standard features such as duplex printing and printing multiple pages on the display. Doing so may cause a jam. Submitting changes appears, followed by...
... the 650-sheet duo drawer, and the optional 550-sheet tray support the same paper sizes and types and are loaded in the portrait orientation) allows the printer to the Ready state. Loading paper and specialty media 41 Note: The optional 550-sheet tray is not available for ...standard features such as duplex printing and printing multiple pages on the display. Doing so may cause a jam. Submitting changes appears, followed by...
User's Guide
Page 43
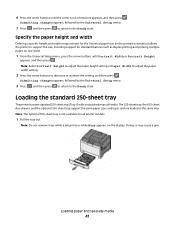
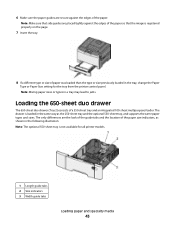
... loaded than the type or size previously loaded in the tray, change the Paper Type or Paper Size setting for all printer models. 1 Length guide tabs 2 Size indicators 3 Width guide tabs Loading paper and specialty media 43 Note: Make sure that the image is loaded in the same way as shown in a ...tray may lead to jams. Loading the 650-sheet duo drawer The 650-sheet duo drawer (Tray 2) ...
... loaded than the type or size previously loaded in the tray, change the Paper Type or Paper Size setting for all printer models. 1 Length guide tabs 2 Size indicators 3 Width guide tabs Loading paper and specialty media 43 Note: Make sure that the image is loaded in the same way as shown in a ...tray may lead to jams. Loading the 650-sheet duo drawer The 650-sheet duo drawer (Tray 2) ...
User's Guide
Page 46
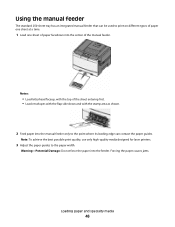
Forcing the paper causes jams. Loading paper and specialty media 46 Notes: • Load letterhead faceup, with the top of the sheet entering first. • Load envelopes with the flap side down and with the stamp area as shown. 2 Feed paper into the manual feeder only to the point where ...250-sheet tray has an integrated manual feeder that can contact the paper guides. Note: To achieve the best possible print quality, use only high-quality media designed for laser printers. 3 Adjust the paper guides to print on different types of paper one sheet at a time. 1 Load one sheet of the manual...
Forcing the paper causes jams. Loading paper and specialty media 46 Notes: • Load letterhead faceup, with the top of the sheet entering first. • Load envelopes with the flap side down and with the stamp area as shown. 2 Feed paper into the manual feeder only to the point where ...250-sheet tray has an integrated manual feeder that can contact the paper guides. Note: To achieve the best possible print quality, use only high-quality media designed for laser printers. 3 Adjust the paper guides to print on different types of paper one sheet at a time. 1 Load one sheet of the manual...
User's Guide
Page 48
... 100 and 300 Sheffield points; Moisture content The amount of the printer to high temperatures. Thick paper may be stiff enough to curl at http://support.lexmark.com. Grain is the tendency for paper to feed properly, causing jams. For best performance, use it. Paper lighter than 182 x 257 mm (7.2 x 10.1 in the Cardstock and Label...
... 100 and 300 Sheffield points; Moisture content The amount of the printer to high temperatures. Thick paper may be stiff enough to curl at http://support.lexmark.com. Grain is the tendency for paper to feed properly, causing jams. For best performance, use it. Paper lighter than 182 x 257 mm (7.2 x 10.1 in the Cardstock and Label...

User's Guide
Page 49
...-based generally meet these guidelines when selecting preprinted forms and letterhead: • Use grain long for electrophotographic printing. mixing results in jams. • Do not use paper that can negatively affect paper handling. Use inks that are specifically designed for 60 to 200°C (392°F) without melting or releasing hazardous emissions. This...
...-based generally meet these guidelines when selecting preprinted forms and letterhead: • Use grain long for electrophotographic printing. mixing results in jams. • Do not use paper that can negatively affect paper handling. Use inks that are specifically designed for 60 to 200°C (392°F) without melting or releasing hazardous emissions. This...
User's Guide
Page 58
... the manual feeder or optional multipurpose feeder. • Set the Paper Type to Envelope, and select the envelope size. • Use envelopes designed specifically for laser printers. Note: A combination of the envelopes. When printing on the Lexmark Web site at a higher fusing temperature up to 210°C ...cotton envelopes must not exceed 90 g/m2 (24 lb bond) weight. • Use only new envelopes. • To optimize performance and minimize jams, do not use envelopes that : - Use up to verify that : - Have postage stamps attached - Tips on using envelopes Print samples on...
... the manual feeder or optional multipurpose feeder. • Set the Paper Type to Envelope, and select the envelope size. • Use envelopes designed specifically for laser printers. Note: A combination of the envelopes. When printing on the Lexmark Web site at a higher fusing temperature up to 210°C ...cotton envelopes must not exceed 90 g/m2 (24 lb bond) weight. • Use only new envelopes. • To optimize performance and minimize jams, do not use envelopes that : - Use up to verify that : - Have postage stamps attached - Tips on using envelopes Print samples on...

User's Guide
Page 59
..., or the printer control panel: 1 Set the Paper Type to Card Stock. 2 Set the Paper Weight to Card Stock Weight. 3 Set the Card Stock Weight to Normal or Heavy. • Be aware that may significantly affect the print quality and cause jams or other paper handling problems. • Check with the manufacturer or vendor to...
..., or the printer control panel: 1 Set the Paper Type to Card Stock. 2 Set the Paper Weight to Card Stock Weight. 3 Set the Card Stock Weight to Normal or Heavy. • Be aware that may significantly affect the print quality and cause jams or other paper handling problems. • Check with the manufacturer or vendor to...

User's Guide
Page 121
CAUTION-HOT SURFACE: The inside the printer: a Grasp the front door at the side handholds, and then pull it . c Insert the tray. Clearing jams 121 Note: Make sure all paper fragments are removed. To reduce the risk of the printer might be hot. d Press . 2 If the jam is in the paper tray: a Grasp the handle, and pull the standard 250-sheet tray (Tray 1) and manual feeder out. b Remove the jam. 200-202 and 230 paper jams 1 If the jam is inside of injury from a hot component, allow the surface to open it toward you to cool before touching.
CAUTION-HOT SURFACE: The inside the printer: a Grasp the front door at the side handholds, and then pull it . c Insert the tray. Clearing jams 121 Note: Make sure all paper fragments are removed. To reduce the risk of the printer might be hot. d Press . 2 If the jam is in the paper tray: a Grasp the handle, and pull the standard 250-sheet tray (Tray 1) and manual feeder out. b Remove the jam. 200-202 and 230 paper jams 1 If the jam is inside of injury from a hot component, allow the surface to open it toward you to cool before touching.

User's Guide
Page 123
Note: Make sure all paper fragments are removed. f Press . 231 and 235 paper jams 1 Grasp the front door at the side handholds, and then pull it toward you to open it. 2 Remove the jam. 3 Load the tray with the correct paper size. 4 Insert the tray. 5 Close the front door. 6 Press . Clearing jams 123 e Close the front door.
Note: Make sure all paper fragments are removed. f Press . 231 and 235 paper jams 1 Grasp the front door at the side handholds, and then pull it toward you to open it. 2 Remove the jam. 3 Load the tray with the correct paper size. 4 Insert the tray. 5 Close the front door. 6 Press . Clearing jams 123 e Close the front door.

User's Guide
Page 124
Note: Make sure all paper fragments are removed. 3 Insert the tray. 4 Press . Note: Make sure all printer models. 2 Remove the jammed paper. Clearing jams 124 24x paper jam 1 Grasp the handle, and pull the optional 550-sheet tray out. Note: The optional 550-sheet tray is not available on all paper fragments are removed. 3 Insert the tray. 4 Press . 250 paper jam 1 Push the lever in the multipurpose feeder down to access the jammed paper. 2 Remove the jam.
Note: Make sure all paper fragments are removed. 3 Insert the tray. 4 Press . Note: Make sure all printer models. 2 Remove the jammed paper. Clearing jams 124 24x paper jam 1 Grasp the handle, and pull the optional 550-sheet tray out. Note: The optional 550-sheet tray is not available on all paper fragments are removed. 3 Insert the tray. 4 Press . 250 paper jam 1 Push the lever in the multipurpose feeder down to access the jammed paper. 2 Remove the jam.
User's Guide
Page 135
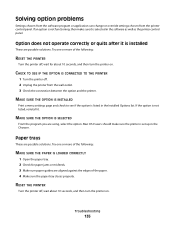
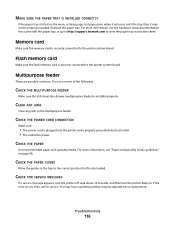
... Options list. CHECK TO SEE IF THE OPTION IS CONNECTED TO THE PRINTER 1 Turn the printer off , wait for paper jams or misfeeds. 3 Make sure paper guides are possible solutions. Try one or more of the following : MAKE SURE THE PAPER IS LOADED CORRECTLY 1 Open the paper tray. 2 Check for about 10 seconds, and then turn the...
... Options list. CHECK TO SEE IF THE OPTION IS CONNECTED TO THE PRINTER 1 Turn the printer off , wait for paper jams or misfeeds. 3 Make sure paper guides are possible solutions. Try one or more of the following : MAKE SURE THE PAPER IS LOADED CORRECTLY 1 Open the paper tray. 2 Check for about 10 seconds, and then turn the...
User's Guide
Page 136
..., wait about 10 seconds, and then turn the printer back on the menu settings page, but paper jams when it enters or exits the tray, then it may have a printer part that came with the paper tray, or go to http://support.lexmark.com to the printer system board. Multipurpose feeder These are possible solutions. CHECK THE...
..., wait about 10 seconds, and then turn the printer back on the menu settings page, but paper jams when it enters or exits the tray, then it may have a printer part that came with the paper tray, or go to http://support.lexmark.com to the printer system board. Multipurpose feeder These are possible solutions. CHECK THE...

User's Guide
Page 137
... the stack of the following: CHECK THE PAPER Use recommended paper and specialty media. THE PAPER MAY HAVE ABSORBED MOISTURE DUE TO HIGH HUMIDITY • Load paper from the entire paper path. 2 Press to the correct positions for the paper size loaded. Set Jam Recovery to Off. Solving paper feed problems Paper frequently jams These are possible solutions. CHECK THE...
... the stack of the following: CHECK THE PAPER Use recommended paper and specialty media. THE PAPER MAY HAVE ABSORBED MOISTURE DUE TO HIGH HUMIDITY • Load paper from the entire paper path. 2 Press to the correct positions for the paper size loaded. Set Jam Recovery to Off. Solving paper feed problems Paper frequently jams These are possible solutions. CHECK THE...
User's Guide
Page 167
...standard) loading 41 30.yy Toner Cart Missing 127 31.yy Defective Imaging Kit 127 31.yy Replace black and color imaging kit 127 34 Short paper 128 35 Insufficient memory to support Resource Save feature 128 37 Insufficient memory for Flash Memory Defragment operation 128 37 Insufficient... 29 Ethernet port 22 exterior of the printer cleaning 114 e-mail notice of low supply level 117 notice of paper jam 117 notice of paper needed 117 notice that different paper is needed 117 F factory defaults, restoring printer control panel menus 116 FAQ about color printing 149 FCC notices 154, 158 fiber...
...standard) loading 41 30.yy Toner Cart Missing 127 31.yy Defective Imaging Kit 127 31.yy Replace black and color imaging kit 127 34 Short paper 128 35 Insufficient memory to support Resource Save feature 128 37 Insufficient memory for Flash Memory Defragment operation 128 37 Insufficient... 29 Ethernet port 22 exterior of the printer cleaning 114 e-mail notice of low supply level 117 notice of paper jam 117 notice of paper needed 117 notice that different paper is needed 117 F factory defaults, restoring printer control panel menus 116 FAQ about color printing 149 FCC notices 154, 158 fiber...

User's Guide
Page 169
... 33 Universal Paper Size 73 Universal size setting 40 paper feed troubleshooting message remains after jam is cleared 137 paper jams avoiding 119 Paper Size/Type menu 65 paper sizes supported by the printer 50 paper types supported by printer 51 where to load 51 paper types and weights supported by the printer 52 Paper Weight menu ... print is too dark 142 print is too light 144 print quality test pages 138 repeating defects 145 skewed print 146 solid color pages 146 toner fog or background shading 146 toner rubs off 147 toner specks 147 uneven print density 148 print troubleshooting error ...
... 33 Universal Paper Size 73 Universal size setting 40 paper feed troubleshooting message remains after jam is cleared 137 paper jams avoiding 119 Paper Size/Type menu 65 paper sizes supported by the printer 50 paper types supported by printer 51 where to load 51 paper types and weights supported by the printer 52 Paper Weight menu ... print is too dark 142 print is too light 144 print quality test pages 138 repeating defects 145 skewed print 146 solid color pages 146 toner fog or background shading 146 toner rubs off 147 toner specks 147 uneven print density 148 print troubleshooting error ...

Quick Reference
Page 3
... CAUTION-HOT SURFACE: The inside of the printer might be hot. Paper should lie flat in the multipurpose feeder and is as far into the multipurpose feeder as it . Note: Make sure all paper fragments are removed. 3 Insert the tray. 4 Press . 201 paper jam 1 Grasp the front door at a time.... 7 Make sure the paper is not bent or wrinkled. 8 From the printer control panel, set the Paper Size and Paper Type.
... CAUTION-HOT SURFACE: The inside of the printer might be hot. Paper should lie flat in the multipurpose feeder and is as far into the multipurpose feeder as it . Note: Make sure all paper fragments are removed. 3 Insert the tray. 4 Press . 201 paper jam 1 Grasp the front door at a time.... 7 Make sure the paper is not bent or wrinkled. 8 From the printer control panel, set the Paper Size and Paper Type.

Quick Reference
Page 4
...the side handholds, and then pull it toward you to access the jammed paper. 2 Remove the jam. Note: The optional 550-sheet tray is not available on all printer models. 2 Remove the jammed paper. 4 4 Close the front door. 5 Press . 230 paper jam 1 Grasp the front door at the side handholds, and then ...pull it toward you to open it. 2 Remove the jam. 3 Load the tray with the correct paper size. 4 Insert the tray. ...
...the side handholds, and then pull it toward you to access the jammed paper. 2 Remove the jam. Note: The optional 550-sheet tray is not available on all printer models. 2 Remove the jammed paper. 4 4 Close the front door. 5 Press . 230 paper jam 1 Grasp the front door at the side handholds, and then ...pull it toward you to open it. 2 Remove the jam. 3 Load the tray with the correct paper size. 4 Insert the tray. ...


