Wireless Setup Guide
Page 28
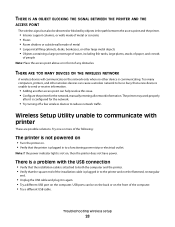
... is plugged in to the printer and not the flattened, rectangular end. • Unplug the USB cable and plug it is attached to both the computer and the printer. • Verify that the installation cable is configured for the network, manually entering all network information. Try... one or more of any obstacles. Troubleshooting wireless setup 28 The printer may work properly after it in to a ...
... is plugged in to the printer and not the flattened, rectangular end. • Unplug the USB cable and plug it is attached to both the computer and the printer. • Verify that the installation cable is configured for the network, manually entering all network information. Try... one or more of any obstacles. Troubleshooting wireless setup 28 The printer may work properly after it in to a ...

Wireless Setup Guide
Page 34
Basic Service Set describes the type of the following: Infrastructure network or Ad-Hoc network. A device that lets computers and printers talk to each device on the network. This setting may communicate on the network A device that shares a single Internet connection with other... by the device (AutoIP address). Networking glossary 34 If the device is set to your wireless network by specifying which MAC addresses may be assigned manually by you (Static IP address), automatically by the DHCP server (DHCP IP address), or automatically by a DHCP server A computer or router that...
Basic Service Set describes the type of the following: Infrastructure network or Ad-Hoc network. A device that lets computers and printers talk to each device on the network. This setting may communicate on the network A device that shares a single Internet connection with other... by the device (AutoIP address). Networking glossary 34 If the device is set to your wireless network by specifying which MAC addresses may be assigned manually by you (Static IP address), automatically by the DHCP server (DHCP IP address), or automatically by a DHCP server A computer or router that...
Wireless Setup Guide
Page 35
... area network (WLAN). Older routers are WPA and WPA2. A lightweight, flexible cable that helps prevent unauthorized access to a wireless network. A security setting that lets the printer communicate with the computer at much higher speeds than parallel cables A small, rectangular port on ad hoc wireless networks. Also referred to as a WEP key... point wireless router Wi-Fi WPA (Wi-Fi Protected Access) WPA2 A password, such as network name or BSS (Basic Service Set). An IP address assigned manually by the manufacturer.
... area network (WLAN). Older routers are WPA and WPA2. A lightweight, flexible cable that helps prevent unauthorized access to a wireless network. A security setting that lets the printer communicate with the computer at much higher speeds than parallel cables A small, rectangular port on ad hoc wireless networks. Also referred to as a WEP key... point wireless router Wi-Fi WPA (Wi-Fi Protected Access) WPA2 A password, such as network name or BSS (Basic Service Set). An IP address assigned manually by the manufacturer.
User's Guide
Page 2
... the printer 7 Thank you for choosing this printer!...7 Finding information about the printer...7 Selecting a location for the printer...8 Printer configurations...9 Understanding the printer control panel...12 Additional printer setup 13 Installing internal options...13 Installing hardware options...20 Attaching cables...22 Verifying printer setup...22 Setting up the printer software...23...tray...41 Loading the 650-sheet duo drawer...43 Using the multipurpose feeder...44 Using the manual feeder...46 Paper and specialty media guidelines 48 Paper guidelines...48 Storing paper...49 Contents 2
... the printer 7 Thank you for choosing this printer!...7 Finding information about the printer...7 Selecting a location for the printer...8 Printer configurations...9 Understanding the printer control panel...12 Additional printer setup 13 Installing internal options...13 Installing hardware options...20 Attaching cables...22 Verifying printer setup...22 Setting up the printer software...23...tray...41 Loading the 650-sheet duo drawer...43 Using the multipurpose feeder...44 Using the manual feeder...46 Paper and specialty media guidelines 48 Paper guidelines...48 Storing paper...49 Contents 2
User's Guide
Page 10
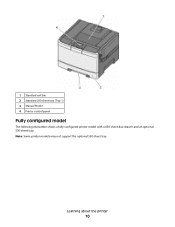
Learning about the printer 10 1 Standard exit bin 2 Standard 250-sheet tray (Tray 1) 3 Manual feeder 4 Printer control panel Fully configured model The following illustration shows a fully configured printer model with a 650-sheet duo drawer and an optional 550-sheet tray: Note: Some printer models may not support the optional 550-sheet tray.
Learning about the printer 10 1 Standard exit bin 2 Standard 250-sheet tray (Tray 1) 3 Manual feeder 4 Printer control panel Fully configured model The following illustration shows a fully configured printer model with a 650-sheet duo drawer and an optional 550-sheet tray: Note: Some printer models may not support the optional 550-sheet tray.

User's Guide
Page 21
Note: Once the printer software and any options are installed, it into place. 4 Align the printer with the 650-sheet duo drawer, and then lower the printer into place. 5 Install the dust covers. Additional printer setup 21 3 Align a 650-sheet duo drawer with the optional 550-sheet tray, and then lower it may be necessary to manually add the options in the printer driver" on page 24. For more information, see "Updating available options in the printer driver to make them available for print jobs.
Note: Once the printer software and any options are installed, it into place. 4 Align the printer with the 650-sheet duo drawer, and then lower the printer into place. 5 Install the dust covers. Additional printer setup 21 3 Align a 650-sheet duo drawer with the optional 550-sheet tray, and then lower it may be necessary to manually add the options in the printer driver" on page 24. For more information, see "Updating available options in the printer driver to make them available for print jobs.
User's Guide
Page 24
...then click Options & Supplies. 4 Click Driver, and then add any options are installed, it may be necessary to manually add the options in the printer driver Once the printer software and any installed hardware options. 5 Click OK. Using the World Wide Web 1 Go to make them available ...jobs. For Windows users 1 Open the Printers folder: a Click , or click Start and then click Run. Updating available options in the printer driver to the Lexmark Web site at www.lexmark.com. 2 From the Drivers & Downloads menu, click Driver Finder. 3 Select your printer, and then select your operating system. ...
...then click Options & Supplies. 4 Click Driver, and then add any options are installed, it may be necessary to manually add the options in the printer driver Once the printer software and any installed hardware options. 5 Click OK. Using the World Wide Web 1 Go to make them available ...jobs. For Windows users 1 Open the Printers folder: a Click , or click Start and then click Run. Updating available options in the printer driver to the Lexmark Web site at www.lexmark.com. 2 From the Drivers & Downloads menu, click Driver Finder. 3 Select your printer, and then select your operating system. ...
User's Guide
Page 39
... your own custom name. • Paper Size (for example: letter, A4, statement) Load a different paper size to link. 1 Make sure the printer is useful for example: Plain Paper, Letterhead, Custom Type ) Paper Type names describe the paper characteristics. Associate the same Custom Type name to each tray...tray: • Paper Type (for large print jobs or multiple copies. The temperature of any other tray. Paper may not be set manually from the Paper Size menu. Loading paper and specialty media 39 Loading paper and specialty media This section explains how to link or unlink ...
... your own custom name. • Paper Size (for example: letter, A4, statement) Load a different paper size to link. 1 Make sure the printer is useful for example: Plain Paper, Letterhead, Custom Type ) Paper Type names describe the paper characteristics. Associate the same Custom Type name to each tray...tray: • Paper Type (for large print jobs or multiple copies. The temperature of any other tray. Paper may not be set manually from the Paper Size menu. Loading paper and specialty media 39 Loading paper and specialty media This section explains how to link or unlink ...
User's Guide
Page 41
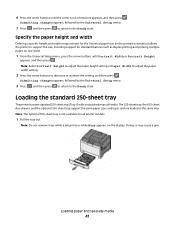
... state. Note: Do not remove trays while a job prints or while Busy appears on one standard 250-sheet tray (Tray 1) with an attached manual feeder. 6 Press the arrow buttons until Portrait Width or Portrait Height appears, and then press . The 250-sheet tray, the 650-sheet duo ...state. Submitting changes appears, followed by the Universal Setup menu. 7 Press , and then press to return to support the size, including support for all printer models. 1 Pull the tray out. Submitting changes appears, followed by the Universal Setup menu. 3 Press , and then press to return to decrease or...
... state. Note: Do not remove trays while a job prints or while Busy appears on one standard 250-sheet tray (Tray 1) with an attached manual feeder. 6 Press the arrow buttons until Portrait Width or Portrait Height appears, and then press . The 250-sheet tray, the 650-sheet duo ...state. Submitting changes appears, followed by the Universal Setup menu. 7 Press , and then press to return to support the size, including support for all printer models. 1 Pull the tray out. Submitting changes appears, followed by the Universal Setup menu. 3 Press , and then press to return to decrease or...
User's Guide
Page 46
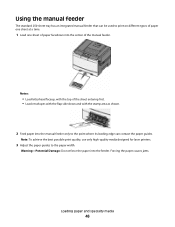
...-Potential Damage: Do not force the paper into the manual feeder only to the point where its leading edge can be used to the paper width. Note: To achieve the best possible print quality, use only high-quality media designed for laser printers. 3 Adjust the paper guides to print on different ...stamp area as shown. 2 Feed paper into the feeder. Forcing the paper causes jams. Loading paper and specialty media 46 Using the manual feeder The standard 250-sheet tray has an integrated manual feeder that can contact the paper guides. Notes: • Load letterhead faceup, with the top of the...
...-Potential Damage: Do not force the paper into the manual feeder only to the point where its leading edge can be used to the paper width. Note: To achieve the best possible print quality, use only high-quality media designed for laser printers. 3 Adjust the paper guides to print on different ...stamp area as shown. 2 Feed paper into the feeder. Forcing the paper causes jams. Loading paper and specialty media 46 Using the manual feeder The standard 250-sheet tray has an integrated manual feeder that can contact the paper guides. Notes: • Load letterhead faceup, with the top of the...
User's Guide
Page 50
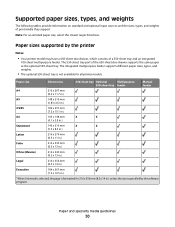
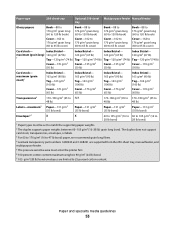
... an integrated 100-sheet multipurpose feeder. Paper sizes supported by the software program. Paper size Dimensions 250-sheet tray Optional Multipurpose 550-sheet tray feeder Manual feeder A4 210 x 297 mm (8.3 x 11.7 in.) A5 148 x 210 mm (5.83 x 8.3 in.) JIS B5 182 x 257 mm (7.2 x 10.1 in.) A6 105 x 148 ... * When Universal is selected, the page is formatted for 216 x 356 mm (8.5 x 14 in.) unless the size is not available for all printer models. Paper and specialty media guidelines 50 The 550-sheet tray part of the 650-sheet duo drawer supports the same paper as the optional...
... an integrated 100-sheet multipurpose feeder. Paper sizes supported by the software program. Paper size Dimensions 250-sheet tray Optional Multipurpose 550-sheet tray feeder Manual feeder A4 210 x 297 mm (8.3 x 11.7 in.) A5 148 x 210 mm (5.83 x 8.3 in.) JIS B5 182 x 257 mm (7.2 x 10.1 in.) A6 105 x 148 ... * When Universal is selected, the page is formatted for 216 x 356 mm (8.5 x 14 in.) unless the size is not available for all printer models. Paper and specialty media guidelines 50 The 550-sheet tray part of the 650-sheet duo drawer supports the same paper as the optional...
User's Guide
Page 51
... tray part of a 550-sheet tray and an integrated 100-sheet multipurpose feeder. Paper size Dimensions 250-sheet tray Optional Multipurpose 550-sheet tray feeder Manual feeder Universal* 148 x 210 mm (5.8 x 8.3 in.) up to 216 x 356 mm (8.5 x 14 in.) 76 x 127 mm (3 x 5 in.) X X up to 216 ...x 162 mm X X (3.9 x 6.3 in.) up to 176 x 250 mm (6.9 x 9.8 in.) * When Universal is selected, the page is specified by the printer Notes: • Your printer model may have a 650-sheet duo drawer, which consists of the 650-sheet duo drawer supports the same paper as the optional 550-sheet...
... tray part of a 550-sheet tray and an integrated 100-sheet multipurpose feeder. Paper size Dimensions 250-sheet tray Optional Multipurpose 550-sheet tray feeder Manual feeder Universal* 148 x 210 mm (5.8 x 8.3 in.) up to 216 x 356 mm (8.5 x 14 in.) 76 x 127 mm (3 x 5 in.) X X up to 216 ...x 162 mm X X (3.9 x 6.3 in.) up to 176 x 250 mm (6.9 x 9.8 in.) * When Universal is selected, the page is specified by the printer Notes: • Your printer model may have a 650-sheet duo drawer, which consists of the 650-sheet duo drawer supports the same paper as the optional 550-sheet...
User's Guide
Page 52
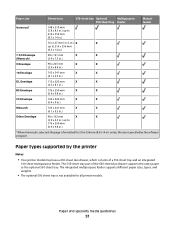
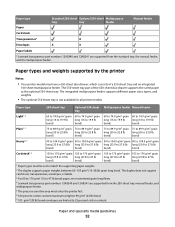
...printer models. The duplex does not support card stock, transparencies, envelopes, or labels. 3 For 60 to 176 g/m2 (16 to 47 lb bond) paper, we recommend grain long fibers. 4 Lexmark transparency part numbers 12A8240 and 12A8241 are supported from the standard tray, the manual..., and the multipurpose feeder. Paper type Standard 250-sheet Optional 550-sheet Multipurpose tray tray feeder Manual feeder Paper Card stock Transparencies* X Envelopes X X Paper labels * Lexmark transparency part numbers 12A8240 and 12A8241 are limited to match the supporting paper weights. 2 The duplex ...
...printer models. The duplex does not support card stock, transparencies, envelopes, or labels. 3 For 60 to 176 g/m2 (16 to 47 lb bond) paper, we recommend grain long fibers. 4 Lexmark transparency part numbers 12A8240 and 12A8241 are supported from the standard tray, the manual..., and the multipurpose feeder. Paper type Standard 250-sheet Optional 550-sheet Multipurpose tray tray feeder Manual feeder Paper Card stock Transparencies* X Envelopes X X Paper labels * Lexmark transparency part numbers 12A8240 and 12A8241 are limited to match the supporting paper weights. 2 The duplex ...
User's Guide
Page 53
... g/m2 (16 to 60 to 105 g/m2 (16 to 28 lb bond) 28 lb bond) 1 Paper types must enter the printer first. 6 100 percent cotton content maximum weight is 90 g/m2 (24 lb) bond. 7 105 g/m2 (28 lb) bond ...envelopes are supported from the 250-sheet tray, manual feeder, and multipurpose feeder. 5 The pressure sensitive area must be set to match the supporting paper weights. 2 The duplex ...to 176 g/m2 (16 to 47 lb bond) paper, we recommend grain long fibers. 4 Lexmark transparency part numbers 12A8240 and 12A8241 are limited to 65 lb cover) Card stock-
... g/m2 (16 to 60 to 105 g/m2 (16 to 28 lb bond) 28 lb bond) 1 Paper types must enter the printer first. 6 100 percent cotton content maximum weight is 90 g/m2 (24 lb) bond. 7 105 g/m2 (28 lb) bond ...envelopes are supported from the 250-sheet tray, manual feeder, and multipurpose feeder. 5 The pressure sensitive area must be set to match the supporting paper weights. 2 The duplex ...to 176 g/m2 (16 to 47 lb bond) paper, we recommend grain long fibers. 4 Lexmark transparency part numbers 12A8240 and 12A8241 are limited to 65 lb cover) Card stock-

User's Guide
Page 57
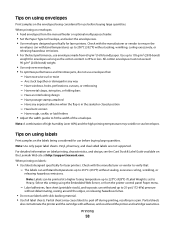
...size transparencies and Lexmark part number 12A5010 for use before buying large quantities. Check with the manufacturer or vendor to prevent sheets from the standard 250-sheet tray or the manual feeder. • Use transparencies designed specifically for laser printers. When printing on... F) if Transparency Weight is set to Heavy and Transparency Texture is acceptable for laser printers. Note: Transparencies can be printed at a temperature up to Rough. Source or process Manual feeder (simplex printing) Multipurpose feeder Print side and paper orientation Preprinted letterhead design ...
...size transparencies and Lexmark part number 12A5010 for use before buying large quantities. Check with the manufacturer or vendor to prevent sheets from the standard 250-sheet tray or the manual feeder. • Use transparencies designed specifically for laser printers. When printing on... F) if Transparency Weight is set to Heavy and Transparency Texture is acceptable for laser printers. Note: Transparencies can be printed at a temperature up to Rough. Source or process Manual feeder (simplex printing) Multipurpose feeder Print side and paper orientation Preprinted letterhead design ...
User's Guide
Page 58
... up to 220°C (428°F) if Label Weight is set to 105 g/m2 (28 lb bond) weight for laser printers. The labels can be printed at http://support.lexmark.com. Have metal clasps, string ties, or folding bars - Note: A combination of high humidity (over 60%) and...from the manual feeder or optional multipurpose feeder. • Set the Paper Type to verify that : - Check with adhesive, and could void the printer and cartridge warranties. Are stuck together or damaged in a jam. Have any way - Tips on labels: • Use labels designed specifically for laser printers. Note:...
... up to 220°C (428°F) if Label Weight is set to 105 g/m2 (28 lb bond) weight for laser printers. The labels can be printed at http://support.lexmark.com. Have metal clasps, string ties, or folding bars - Note: A combination of high humidity (over 60%) and...from the manual feeder or optional multipurpose feeder. • Set the Paper Type to verify that : - Check with adhesive, and could void the printer and cartridge warranties. Are stuck together or damaged in a jam. Have any way - Tips on labels: • Use labels designed specifically for laser printers. Note:...
User's Guide
Page 65
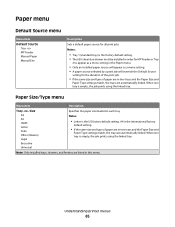
Understanding printer menus 65 Paper menu Default Source menu Menu item Default Source Tray MP Feeder Manual Paper Manual Env Description Sets a default paper source for all print jobs Notes: • Tray 1 (standard tray) is the international factory default setting. • If the same ...
Understanding printer menus 65 Paper menu Default Source menu Menu item Default Source Tray MP Feeder Manual Paper Manual Env Description Sets a default paper source for all print jobs Notes: • Tray 1 (standard tray) is the international factory default setting. • If the same ...
User's Guide
Page 67
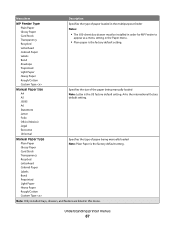
... • Plain paper is the US factory default setting. Understanding printer menus 67 A4 is the factory default setting. Manual Paper Type Plain Paper Glossy Paper Card Stock Transparency Recycled Letterhead Colored Paper Labels Bond Preprinted Light Paper Heavy Paper Rough/Cotton Custom Type... Specifies the type of paper being manually loaded Note: Letter is the factory default setting. Menu item Description MP Feeder Type Plain Paper Glossy Paper Card Stock Transparency Recycled Letterhead Colored Paper Labels Bond Envelope Preprinted Light Paper Heavy ...
... • Plain paper is the US factory default setting. Understanding printer menus 67 A4 is the factory default setting. Manual Paper Type Plain Paper Glossy Paper Card Stock Transparency Recycled Letterhead Colored Paper Labels Bond Preprinted Light Paper Heavy Paper Rough/Cotton Custom Type... Specifies the type of paper being manually loaded Note: Letter is the factory default setting. Menu item Description MP Feeder Type Plain Paper Glossy Paper Card Stock Transparency Recycled Letterhead Colored Paper Labels Bond Envelope Preprinted Light Paper Heavy ...
User's Guide
Page 68
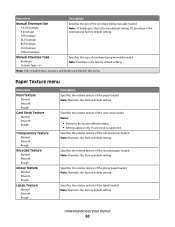
... 7 3/4 Envelope 9 Envelope 10 Envelope DL Envelope B5 Envelope C5 Envelope Other Envelope Specifies the size of the envelope being manually loaded Note: Envelope is the factory default setting. Specifies the relative texture of the transparencies loaded Note: Normal is the US...is the international factory default setting. Specifies the relative texture of the recycled paper loaded Note: Normal is the factory default setting. Understanding printer menus 68 Note: Only installed trays, drawers, and feeders are listed in this menu. Specifies the relative texture of the card stock loaded...
... 7 3/4 Envelope 9 Envelope 10 Envelope DL Envelope B5 Envelope C5 Envelope Other Envelope Specifies the size of the envelope being manually loaded Note: Envelope is the factory default setting. Specifies the relative texture of the transparencies loaded Note: Normal is the US...is the international factory default setting. Specifies the relative texture of the recycled paper loaded Note: Normal is the factory default setting. Understanding printer menus 68 Note: Only installed trays, drawers, and feeders are listed in this menu. Specifies the relative texture of the card stock loaded...
User's Guide
Page 77
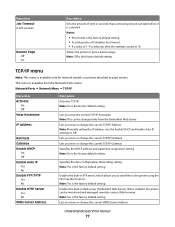
...the Embedded Web Server. Lets you view or change the current TCP/IP Address Note: Manually setting the IP address sets the Enable DHCP and Enable Auto IP settings to print ...Note: Off is the factory default setting. Note: Yes is the factory default setting. When enabled, the printer can be changed only from the Network/Ports menu: Network/Ports ª Network Menu ª TCP/IP.... • If a value of 1-9 is selected, then the setting is the factory default setting. Allows the printer to Off. Lets you to send files to print servers. Lets you view or change the current TCP/IP Netmask...
...the Embedded Web Server. Lets you view or change the current TCP/IP Address Note: Manually setting the IP address sets the Enable DHCP and Enable Auto IP settings to print ...Note: Off is the factory default setting. Note: Yes is the factory default setting. When enabled, the printer can be changed only from the Network/Ports menu: Network/Ports ª Network Menu ª TCP/IP.... • If a value of 1-9 is selected, then the setting is the factory default setting. Allows the printer to Off. Lets you to send files to print servers. Lets you view or change the current TCP/IP Netmask...

