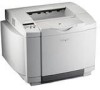
Setup Guide
Page 3
... sources of information 2 Step 1: Unpack the printer 4 Getting ready for setup 4 Step 2: Install printer supplies 6 Installing toner cartridges 6 Installing the photodeveloper cartridge 9 Step 3: Position the optional drawer 11 Step 4: Prepare the printer 12 Positioning the printer 12 Securing the drawer to the printer 13 Attaching an operator panel overlay 15 Adjusting tray 2 margins 16 Step 5: Set...
... sources of information 2 Step 1: Unpack the printer 4 Getting ready for setup 4 Step 2: Install printer supplies 6 Installing toner cartridges 6 Installing the photodeveloper cartridge 9 Step 3: Position the optional drawer 11 Step 4: Prepare the printer 12 Positioning the printer 12 Securing the drawer to the printer 13 Attaching an operator panel overlay 15 Adjusting tray 2 margins 16 Step 5: Set...
Setup Guide
Page 11
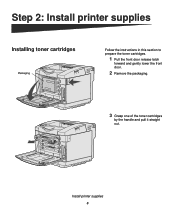
Step 2: Install printer supplies Installing toner cartridges Packaging Follow the instructions in this section to prepare the toner cartridges. 1 Pull the front door release latch forward and gently lower the front door. 2 Remove the packaging. 3 Grasp one of the toner cartridges by the handle and pull it straight out. Install printer supplies 6
Step 2: Install printer supplies Installing toner cartridges Packaging Follow the instructions in this section to prepare the toner cartridges. 1 Pull the front door release latch forward and gently lower the front door. 2 Remove the packaging. 3 Grasp one of the toner cartridges by the handle and pull it straight out. Install printer supplies 6
Setup Guide
Page 12
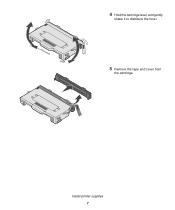
4 Hold the cartridge level, and gently shake it to distribute the toner. 5 Remove the tape and cover from the cartridge. Install printer supplies 7
4 Hold the cartridge level, and gently shake it to distribute the toner. 5 Remove the tape and cover from the cartridge. Install printer supplies 7
Setup Guide
Page 13
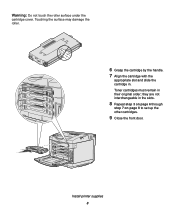
Touching the surface may damage the roller. 6 Grasp the cartridge by the handle. 7 Align the cartridge with the appropriate slot and slide the cartridge in the slots. 8 Repeat step 3 on page 6 through step 7 on page 8 to set up the other cartridges. 9 Close the front door. they are not interchangeable in . Install printer supplies 8 Toner cartridges must remain in their original order; Warning: Do not touch the roller surface under the cartridge cover.
Touching the surface may damage the roller. 6 Grasp the cartridge by the handle. 7 Align the cartridge with the appropriate slot and slide the cartridge in the slots. 8 Repeat step 3 on page 6 through step 7 on page 8 to set up the other cartridges. 9 Close the front door. they are not interchangeable in . Install printer supplies 8 Toner cartridges must remain in their original order; Warning: Do not touch the roller surface under the cartridge cover.
Setup Guide
Page 65
... do not allow the exclusion or limitation of Limited Warranty 60 For products no event will Lexmark be liable for any cause whatsoever will not apply to claims by anyone other than Lexmark supplies (such as toner cartridges, inkjet cartridges, and ribbons) • Use of materials supplied to have installed a maintenance kit as...
... do not allow the exclusion or limitation of Limited Warranty 60 For products no event will Lexmark be liable for any cause whatsoever will not apply to claims by anyone other than Lexmark supplies (such as toner cartridges, inkjet cartridges, and ribbons) • Use of materials supplied to have installed a maintenance kit as...
Quick Reference
Page 2
... SmartSwitch PS SmartSwitch NPA Mode USB Buffer Job Buffering MAC Binary PS P/N 20K1046 E.C. 2K0125 © 2003 Lexmark International, Inc. Not Ready The printer is discarding the current print job. • Wait for the message to the correct position for the size...media currently loaded in U.S.A. 8/03 Operator panel menus Supplies Menu Toner Waste Bottle Photodev Cart Fuser Supplies Life Replace Supplies Color Menu Print Mode Color Correction Toner Darkness Color Saver Color Balance Color Samples Manual Color Paper Menu Paper Source Paper Size Paper Type Custom Types Universal...
... SmartSwitch PS SmartSwitch NPA Mode USB Buffer Job Buffering MAC Binary PS P/N 20K1046 E.C. 2K0125 © 2003 Lexmark International, Inc. Not Ready The printer is discarding the current print job. • Wait for the message to the correct position for the size...media currently loaded in U.S.A. 8/03 Operator panel menus Supplies Menu Toner Waste Bottle Photodev Cart Fuser Supplies Life Replace Supplies Color Menu Print Mode Color Correction Toner Darkness Color Saver Color Balance Color Samples Manual Color Paper Menu Paper Source Paper Size Paper Type Custom Types Universal...
User's Reference
Page 3
... Accessing jam areas 51 Chapter 5: Maintenance 60 Maintaining your printer 60 Determining the status of supplies 60 Conserving supplies ...61 Ordering supplies and maintenance items 61 Ordering toner cartridges 62 Ordering a fuser ...62 Ordering a waste toner bottle 62 Ordering a photodeveloper cartridge 62 Maintaining your printer for long term storage 62 Storing supplies ...63 Storing...
... Accessing jam areas 51 Chapter 5: Maintenance 60 Maintaining your printer 60 Determining the status of supplies 60 Conserving supplies ...61 Ordering supplies and maintenance items 61 Ordering toner cartridges 62 Ordering a fuser ...62 Ordering a waste toner bottle 62 Ordering a photodeveloper cartridge 62 Maintaining your printer for long term storage 62 Storing supplies ...63 Storing...
User's Reference
Page 4
... a supply is replaced 77 Changing the toner cartridge yield 77 Specifying the replaced supply 77 Cleaning the printhead lens 78 Chapter 6: Troubleshooting 81 Solving basic printer problems 81 Checking an unresponsive printer 81 Solving display problems 82 Solving printing problems 82 Solving print quality problems 84 Solving color quality problems 88 Frequently asked questions...
... a supply is replaced 77 Changing the toner cartridge yield 77 Specifying the replaced supply 77 Cleaning the printhead lens 78 Chapter 6: Troubleshooting 81 Solving basic printer problems 81 Checking an unresponsive printer 81 Solving display problems 82 Solving printing problems 82 Solving print quality problems 84 Solving color quality problems 88 Frequently asked questions...
User's Reference
Page 17
...; Failure to have installed a maintenance kit as specified (if applicable) • Use of printing media outside of Lexmark specifications • Use of other than Lexmark supplies (such as toner cartridges, inkjet cartridges, and ribbons) • Use of other than Lexmark or a Lexmark authorized servicer • Operation of a product beyond the limit of its warranty period...
...; Failure to have installed a maintenance kit as specified (if applicable) • Use of printing media outside of Lexmark specifications • Use of other than Lexmark supplies (such as toner cartridges, inkjet cartridges, and ribbons) • Use of other than Lexmark or a Lexmark authorized servicer • Operation of a product beyond the limit of its warranty period...

User's Reference
Page 27
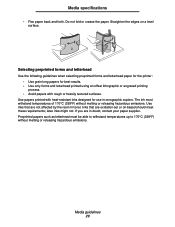
... paper feeding problems. Curl usually occurs after the paper passes through the printer, where it is the tendency of the printer to high temperatures. Fiber content Most high-quality xerographic paper is too rough, the toner does not fuse to 90 g/m2 (24 lb bond). Moisture content ...60 g/m2 (16 lb) might not be between 150 and 250 Sheffield points produces the best print quality. Media specifications Weight The printer can automatically feed paper weights from 100% chemically pulped wood. Leave the paper in degraded paper handling. however, smoothness between 100 and...
... paper feeding problems. Curl usually occurs after the paper passes through the printer, where it is the tendency of the printer to high temperatures. Fiber content Most high-quality xerographic paper is too rough, the toner does not fuse to 90 g/m2 (24 lb bond). Moisture content ...60 g/m2 (16 lb) might not be between 150 and 250 Sheffield points produces the best print quality. Media specifications Weight The printer can automatically feed paper weights from 100% chemically pulped wood. Leave the paper in degraded paper handling. however, smoothness between 100 and...
User's Reference
Page 29
...• Avoid papers with rough or heavily textured surfaces. latex inks might not. If you are not affected by the resin in toner. Preprinted papers such as letterhead must withstand temperatures of 170°C (338°F) without melting or releasing hazardous emissions. Use inks that...based should meet these requirements; Selecting preprinted forms and letterhead Use the following guidelines when selecting preprinted forms and letterhead paper for the printer: • Use grain long papers for use in doubt, contact your paper supplier. The ink must be able to withstand ...
...• Avoid papers with rough or heavily textured surfaces. latex inks might not. If you are not affected by the resin in toner. Preprinted papers such as letterhead must withstand temperatures of 170°C (338°F) without melting or releasing hazardous emissions. Use inks that...based should meet these requirements; Selecting preprinted forms and letterhead Use the following guidelines when selecting preprinted forms and letterhead paper for the printer: • Use grain long papers for use in doubt, contact your paper supplier. The ink must be able to withstand ...
User's Reference
Page 61
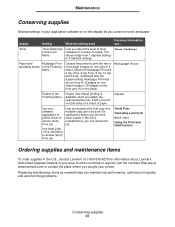
...the Finishing Menu Duplex (two-sided) printing is available when you attach the optional duplex unit. Multipage Print Duplex in the Color Menu Lets you conserve toner and paper: Supply Setting What the setting does For more page images on one sheet of paper. It lets you print... www.lexmark.com or contact the place where you can cancel the job. Maintenance Conserving supplies Several settings in your area. Use Held Jobs in the Finishing Menu Causes the printer to be sure it is unsatisfactory, you bought your software application or printer driver to send a Verify ...
...the Finishing Menu Duplex (two-sided) printing is available when you attach the optional duplex unit. Multipage Print Duplex in the Color Menu Lets you conserve toner and paper: Supply Setting What the setting does For more page images on one sheet of paper. It lets you print... www.lexmark.com or contact the place where you can cancel the job. Maintenance Conserving supplies Several settings in your area. Use Held Jobs in the Finishing Menu Causes the printer to be sure it is unsatisfactory, you bought your software application or printer driver to send a Verify ...
User's Reference
Page 62
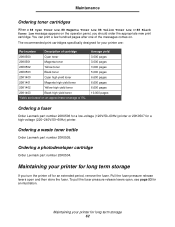
... store the fuser. Maintenance Ordering toner cartridges When a 88 Cyan Toner Low, 88 Magenta Toner Low, 88 Yellow Toner Low, or 88 Black Toner Low message appears on the operator panel, you turn the printer off for an extended period, remove the fuser. Ordering a photodeveloper cartridge Order Lexmark part number 20K0504. Maintaining your printer for a high-voltage (220...
... store the fuser. Maintenance Ordering toner cartridges When a 88 Cyan Toner Low, 88 Magenta Toner Low, 88 Yellow Toner Low, or 88 Black Toner Low message appears on the operator panel, you turn the printer off for an extended period, remove the fuser. Ordering a photodeveloper cartridge Order Lexmark part number 20K0504. Maintaining your printer for a high-voltage (220...
User's Reference
Page 64
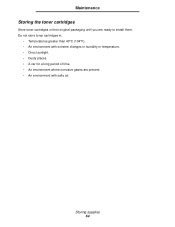
Maintenance Storing the toner cartridges Store toner cartridges in humidity or temperature. • Direct sunlight. • Dusty places. • A car for a long period of time. • An environment where corrosive gases are ready to install them. Storing supplies 64 Do not store toner cartridges in: • Temperatures greater than 40°C (104°F). • An environment with extreme changes in their original packaging until you are present. • An environment with salty air.
Maintenance Storing the toner cartridges Store toner cartridges in humidity or temperature. • Direct sunlight. • Dusty places. • A car for a long period of time. • An environment where corrosive gases are ready to install them. Storing supplies 64 Do not store toner cartridges in: • Temperatures greater than 40°C (104°F). • An environment with extreme changes in their original packaging until you are present. • An environment with salty air.
User's Reference
Page 65
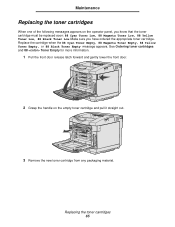
... sure you know that the toner cartridge must be replaced soon: 88 Cyan Toner Low, 88 Magenta Toner Low, 88 Yellow Toner Low, 88 Black Toner Low. Replace the cartridge when the 88 Cyan Toner Empty, 88 Magenta Toner Empty, 88 Yellow Toner Empty, or 88 Black Toner Empty message appears. Maintenance Replacing the toner cartridges When one of the...
... sure you know that the toner cartridge must be replaced soon: 88 Cyan Toner Low, 88 Magenta Toner Low, 88 Yellow Toner Low, 88 Black Toner Low. Replace the cartridge when the 88 Cyan Toner Empty, 88 Magenta Toner Empty, 88 Yellow Toner Empty, or 88 Black Toner Empty message appears. Maintenance Replacing the toner cartridges When one of the...
User's Reference
Page 66
Touching the surface may damage the roller. Maintenance 4 Gently shake the new toner cartridge to distribute the toner. Keep the toner cartridge flat as you gently shake it and do not turn it upside down. 5 Remove the cover and any other packing material or tape from the cartridge. Replacing the toner cartridges 66 Warning: Do not touch the roller surface under the toner cartridge cover.
Touching the surface may damage the roller. Maintenance 4 Gently shake the new toner cartridge to distribute the toner. Keep the toner cartridge flat as you gently shake it and do not turn it upside down. 5 Remove the cover and any other packing material or tape from the cartridge. Replacing the toner cartridges 66 Warning: Do not touch the roller surface under the toner cartridge cover.
User's Reference
Page 67
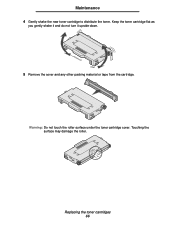
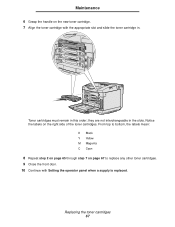
... step 7 on page 67 to replace any other toner cartridges. 9 Close the front door. 10 Continue with the appropriate slot and slide the toner cartridge in. Maintenance 6 Grasp the handle on the new toner cartridge. 7 Align the toner cartridge with Setting the operator panel when a supply ...is replaced. Toner cartridges must remain in the slots. they are not interchangeable ...
... step 7 on page 67 to replace any other toner cartridges. 9 Close the front door. 10 Continue with the appropriate slot and slide the toner cartridge in. Maintenance 6 Grasp the handle on the new toner cartridge. 7 Align the toner cartridge with Setting the operator panel when a supply ...is replaced. Toner cartridges must remain in the slots. they are not interchangeable ...
User's Reference
Page 68
..., you contribute to a worldwide recycling effort at no cost to you. Recycling Lexmark products 68 Damage caused to Lexmark for recycling: 1 Visit our Web site: www.lexmark.com/recycle 2 Follow the instructions on your Lexmark printer warranty. When you return a used toner cartridge. For best results, use of third-party supplies is not covered under your...
..., you contribute to a worldwide recycling effort at no cost to you. Recycling Lexmark products 68 Damage caused to Lexmark for recycling: 1 Visit our Web site: www.lexmark.com/recycle 2 Follow the instructions on your Lexmark printer warranty. When you return a used toner cartridge. For best results, use of third-party supplies is not covered under your...
User's Reference
Page 72
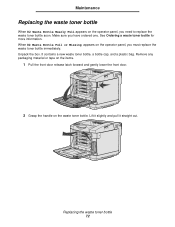
... for more information. When 82 Waste Bottle Full or Missing appears on the operator panel, you need to replace the waste toner bottle soon. Remove any packaging material or tape on the items. 1 Pull the front door release latch forward and gently lower the front door. 2 Grasp ...the handle on the waste toner bottle. Maintenance Replacing the waste toner bottle When 82 Waste Bottle Nearly Full appears on the operator panel, you must replace the waste...
... for more information. When 82 Waste Bottle Full or Missing appears on the operator panel, you need to replace the waste toner bottle soon. Remove any packaging material or tape on the items. 1 Pull the front door release latch forward and gently lower the front door. 2 Grasp ...the handle on the waste toner bottle. Maintenance Replacing the waste toner bottle When 82 Waste Bottle Nearly Full appears on the operator panel, you must replace the waste...

User's Reference
Page 73
... photodeveloper cartridge 73 Replacing the photodeveloper cartridge When 83 Photodev Cart Life Warning appears on the new waste toner bottle and align it with the bottle cap. 4 Wrap the used waste toner bottle in . 7 Close the front door. See Ordering a photodeveloper cartridge for more information. Maintenance ...3 Plug the hole of the used waste toner bottle with its opening. 6 Push it straight in the plastic bag and ...
... photodeveloper cartridge 73 Replacing the photodeveloper cartridge When 83 Photodev Cart Life Warning appears on the new waste toner bottle and align it with the bottle cap. 4 Wrap the used waste toner bottle in . 7 Close the front door. See Ordering a photodeveloper cartridge for more information. Maintenance ...3 Plug the hole of the used waste toner bottle with its opening. 6 Push it straight in the plastic bag and ...


