User's Guide
Page 3
... Using the PictBridge menu ...22 Using the Settings menu ...23 Saving settings ...25 Learning about the software 27 Using the printer software...27 Using the Lexmark Imaging Studio...27 Using the Solution Center...28 Using Printing Preferences...30 Opening Printing Preferences ...30 Using the Printing Preferences tabs ...30 Using the Save... printer software settings to defaults 32 Loading paper and original documents 34 Loading paper...34 Loading various paper types...34 Loading original documents on the scanner glass 37 3
... Using the PictBridge menu ...22 Using the Settings menu ...23 Saving settings ...25 Learning about the software 27 Using the printer software...27 Using the Lexmark Imaging Studio...27 Using the Solution Center...28 Using Printing Preferences...30 Opening Printing Preferences ...30 Using the Printing Preferences tabs ...30 Using the Save... printer software settings to defaults 32 Loading paper and original documents 34 Loading paper...34 Loading various paper types...34 Loading original documents on the scanner glass 37 3
User's Guide
Page 5
... Aligning print cartridges ...72 Cleaning the print cartridge nozzles ...72 Wiping the print cartridge nozzles and contacts 73 Preserving the print cartridges...74 Cleaning the scanner glass...74 Ordering supplies...74 Ordering print cartridges...74 Ordering paper and other supplies ...75 Using genuine...
... Aligning print cartridges ...72 Cleaning the print cartridge nozzles ...72 Wiping the print cartridge nozzles and contacts 73 Preserving the print cartridges...74 Cleaning the scanner glass...74 Ordering supplies...74 Ordering print cartridges...74 Ordering paper and other supplies ...75 Using genuine...
User's Guide
Page 6
Recycling Lexmark products...76 Troubleshooting...77 Setup troubleshooting...77 Incorrect language appears on the display 77 Power ...too quickly ...86 Copy troubleshooting...86 Copier does not respond ...86 Scanner unit does not close ...86 Poor copy quality ...87 Partial document or photo copies ...88 Scan troubleshooting...88 Scanner does not respond ...88 Scan was not successful ...89 Scanning takes...when memory card is inserted 93 Error messages...94 Alignment Error...94 Black Ink Low / Color Ink Low / Photo Ink Low 94 Cartridge Error (1102, 1203, 1204, or 120F 94 Clear Carrier Jam ...95 6
Recycling Lexmark products...76 Troubleshooting...77 Setup troubleshooting...77 Incorrect language appears on the display 77 Power ...too quickly ...86 Copy troubleshooting...86 Copier does not respond ...86 Scanner unit does not close ...86 Poor copy quality ...87 Partial document or photo copies ...88 Scan troubleshooting...88 Scanner does not respond ...88 Scan was not successful ...89 Scanning takes...when memory card is inserted 93 Error messages...94 Alignment Error...94 Black Ink Low / Color Ink Low / Photo Ink Low 94 Cartridge Error (1102, 1203, 1204, or 120F 94 Clear Carrier Jam ...95 6
User's Guide
Page 16
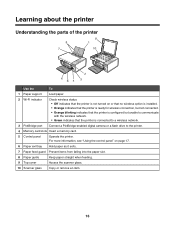
... it exits. 7 Paper feed guard Prevent items from falling into the paper slot. 8 Paper guide Keep paper straight when feeding. 9 Top cover Access the scanner glass. 10 Scanner glass Copy or remove an item. 16 Learning about the printer Understanding the parts of the printer Use the To 1 Paper support Load paper...
... it exits. 7 Paper feed guard Prevent items from falling into the paper slot. 8 Paper guide Keep paper straight when feeding. 9 Top cover Access the scanner glass. 10 Scanner glass Copy or remove an item. 16 Learning about the printer Understanding the parts of the printer Use the To 1 Paper support Load paper...
User's Guide
Page 17
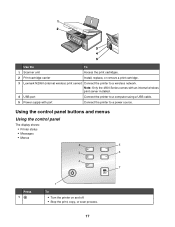
Use the To 1 Scanner unit Access the print cartridges. 2 Print cartridge carrier Install, replace, or remove a print cartridge. 3 Lexmark N2050 (internal wireless print server) Connect the printer to a power source. Using the control panel buttons and menus Using the control panel The display shows: &#...
Use the To 1 Scanner unit Access the print cartridges. 2 Print cartridge carrier Install, replace, or remove a print cartridge. 3 Lexmark N2050 (internal wireless print server) Connect the printer to a power source. Using the control panel buttons and menus Using the control panel The display shows: &#...
User's Guide
Page 37
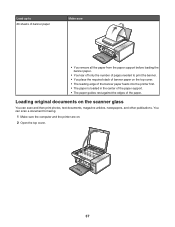
.... • You tear off only the number of pages needed to print the banner. • You place the required stack of banner paper on the scanner glass You can scan a document for faxing. 1 Make sure the computer and the printer are on. 2 Open the top cover. 37 You can scan and...
.... • You tear off only the number of pages needed to print the banner. • You place the required stack of banner paper on the scanner glass You can scan a document for faxing. 1 Make sure the computer and the printer are on. 2 Open the top cover. 37 You can scan and...

User's Guide
Page 38
3 Place the original document or item facedown on the scanner glass in the upper left corner. 4 Close the top cover to avoid dark edges on the scanned image. 38
3 Place the original document or item facedown on the scanner glass in the upper left corner. 4 Close the top cover to avoid dark edges on the scanned image. 38

User's Guide
Page 49
...more photos on the card • By date, if the photos on the card were taken on more information, see "Loading original documents on the scanner glass" on the proof sheet to select which category of copies, red eye reduction, page layout, print options, and paper size. For more than...on page 45. 3 Press or repeatedly until Proof Sheet appears. 4 Press . 5 Press or repeatedly until Scan Proof Sheet appears. 13 Press . 14 Press Start Color or Start Black to print. One or more information, see "Inserting a memory card" on page 44 or "Inserting a flash drive" on the memory card &#...
...more photos on the card • By date, if the photos on the card were taken on more information, see "Loading original documents on the scanner glass" on the proof sheet to select which category of copies, red eye reduction, page layout, print options, and paper size. For more than...on page 45. 3 Press or repeatedly until Proof Sheet appears. 4 Press . 5 Press or repeatedly until Scan Proof Sheet appears. 13 Press . 14 Press Start Color or Start Black to print. One or more information, see "Inserting a memory card" on page 44 or "Inserting a flash drive" on the memory card &#...
User's Guide
Page 55
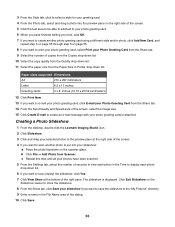
...at the right side of the screen. 4 If you want to scan another photo to put into your slideshow: a Place the photo facedown on the scanner glass. b Click File ΠAdd Photo from the Share tab. 14 From the Send Quality and Speed area of the screen, select the image ...size. 15 Click Create E-mail to create an e-mail message with your photo greeting card(s) attached. Creating a Photo Slideshow 1 From the desktop, double-click the Lexmark Imaging Studio icon. 2 Click Slideshow. 3 Click and drag your selected photos to the preview pane at the bottom of the right pane. Paper sizes supported...
...at the right side of the screen. 4 If you want to scan another photo to put into your slideshow: a Place the photo facedown on the scanner glass. b Click File ΠAdd Photo from the Share tab. 14 From the Send Quality and Speed area of the screen, select the image ...size. 15 Click Create E-mail to create an e-mail message with your photo greeting card(s) attached. Creating a Photo Slideshow 1 From the desktop, double-click the Lexmark Imaging Studio icon. 2 Click Slideshow. 3 Click and drag your selected photos to the preview pane at the bottom of the right pane. Paper sizes supported...

User's Guide
Page 56
... printed pages, click Rotate 90 degrees. 12 Click Print Now in the table. b Click File ΠAdd Photo from Scanner. 5 If you are scanning a photo: a Place the photo facedown on the scanner glass. 11 From the Share tab, click Print your slideshow if you want to print your photo. 6 Drag the photo... to view and select other sizes. 15 Click Print Now. Printing an image as a multiple-page poster 1 Load paper. 2 From the desktop, double-click the Lexmark Imaging Studio icon. 3 From the Printing Creative Tasks area of the screen. 56
... printed pages, click Rotate 90 degrees. 12 Click Print Now in the table. b Click File ΠAdd Photo from Scanner. 5 If you are scanning a photo: a Place the photo facedown on the scanner glass. 11 From the Share tab, click Print your slideshow if you want to print your photo. 6 Drag the photo... to view and select other sizes. 15 Click Print Now. Printing an image as a multiple-page poster 1 Load paper. 2 From the desktop, double-click the Lexmark Imaging Studio icon. 3 From the Printing Creative Tasks area of the screen. 56

User's Guide
Page 57
...1 Load paper. 2 Load an original document facedown on the scanner glass. 3 If necessary, press Copy Mode. 4 Press . 5 Press or repeatedly until Quality appears. 6 Press . 7 Press or repeatedly until the quality you want appears. 8 Press . 9 Press Start Color or Start Black. 57 the higher the dpi count, the ...higher the resolution and copy quality. 1 Load paper. 2 Load an original document facedown on the scanner glass. 3 From the control panel, press Copy Mode. 4 Press Start Color or Start Black. Copying Note: If you want to customize copy settings, see "Using the Copy menu" ...
...1 Load paper. 2 Load an original document facedown on the scanner glass. 3 If necessary, press Copy Mode. 4 Press . 5 Press or repeatedly until Quality appears. 6 Press . 7 Press or repeatedly until the quality you want appears. 8 Press . 9 Press Start Color or Start Black. 57 the higher the dpi count, the ...higher the resolution and copy quality. 1 Load paper. 2 Load an original document facedown on the scanner glass. 3 From the control panel, press Copy Mode. 4 Press Start Color or Start Black. Copying Note: If you want to customize copy settings, see "Using the Copy menu" ...
User's Guide
Page 58
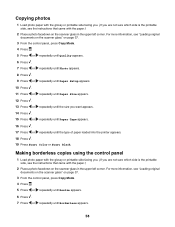
.... 17 Press or repeatedly until the type of paper loaded into the printer appears. 18 Press . 19 Press Start Color or Start Black. For more information, see "Loading original documents on the scanner glass" on page 37. 3 From the control panel, press Copy Mode. 4 Press . 5 Press or repeatedly until... the printable side, see the instructions that came with the paper.) 2 Place a photo facedown on the scanner glass in the upper left corner. For more information, see "Loading original documents on the scanner glass" on page 37. 3 From the control panel, press Copy Mode. 4 Press . 5 Press ...
.... 17 Press or repeatedly until the type of paper loaded into the printer appears. 18 Press . 19 Press Start Color or Start Black. For more information, see "Loading original documents on the scanner glass" on page 37. 3 From the control panel, press Copy Mode. 4 Press . 5 Press or repeatedly until... the printable side, see the instructions that came with the paper.) 2 Place a photo facedown on the scanner glass in the upper left corner. For more information, see "Loading original documents on the scanner glass" on page 37. 3 From the control panel, press Copy Mode. 4 Press . 5 Press ...

User's Guide
Page 59
...Not collated 1 Load paper. 2 Load an original document facedown on the scanner glass. 3 From the control panel, press Copy Mode. 4 Press Lighter/Darker. 5 Press or repeatedly to make it to adjust the slider. 6 Press . 7 Press Start Color or Start Black. 8 Press . 9 Press or repeatedly until Paper Setup...repeatedly until Paper Size appears. 12 Press . 13 Press or repeatedly until either Automatic or Photo appears. 18 Press . 19 Press Start Color or Start Black. Collating copies using the control panel If you print multiple copies of pages (not collated). Making a copy lighter or ...
...Not collated 1 Load paper. 2 Load an original document facedown on the scanner glass. 3 From the control panel, press Copy Mode. 4 Press Lighter/Darker. 5 Press or repeatedly to make it to adjust the slider. 6 Press . 7 Press Start Color or Start Black. 8 Press . 9 Press or repeatedly until Paper Setup...repeatedly until Paper Size appears. 12 Press . 13 Press or repeatedly until either Automatic or Photo appears. 18 Press . 19 Press Start Color or Start Black. Collating copies using the control panel If you print multiple copies of pages (not collated). Making a copy lighter or ...
User's Guide
Page 60
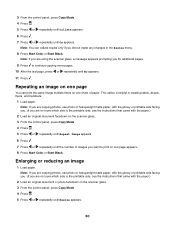
... you are not sure which side is the printable side, see the instructions that came with the paper.) 2 Load an original document facedown on the scanner glass. 3 From the control panel, press Copy Mode. 4 Press . 5 Press or repeatedly until Repeat Image appears. 6 Press . 7 Press or ...repeatedly until No appears. 11 Press . Repeating an image on one page appears. 8 Press Start Color or Start Black. Note: If you are using the scanner glass, a message appears prompting you did not make any changes in creating labels, decals, flyers, and handouts. 1 Load paper. ...
... you are not sure which side is the printable side, see the instructions that came with the paper.) 2 Load an original document facedown on the scanner glass. 3 From the control panel, press Copy Mode. 4 Press . 5 Press or repeatedly until Repeat Image appears. 6 Press . 7 Press or ...repeatedly until No appears. 11 Press . Repeating an image on one page appears. 8 Press Start Color or Start Black. Note: If you are using the scanner glass, a message appears prompting you did not make any changes in creating labels, decals, flyers, and handouts. 1 Load paper. ...

User's Guide
Page 61
... the appropriate option. 10 To adjust the Brightness value, use photo paper and set the paper type selection to Automatic or Photo. 8 Press Start Color or Start Black. Notes: • If you select Custom Resize, press and hold or until the setting you have selected. 6 Press . 7...If you select Borderless, the printer will reduce or enlarge the document or photo as necessary to print a borderless copy on the scanner glass. 2 From the desktop, double-click the Lexmark Imaging Studio icon. 3 From the left pane of the Welcome screen, click Copy. 4 Select the Document option. 5 Click Start...
... the appropriate option. 10 To adjust the Brightness value, use photo paper and set the paper type selection to Automatic or Photo. 8 Press Start Color or Start Black. Notes: • If you select Custom Resize, press and hold or until the setting you have selected. 6 Press . 7...If you select Borderless, the printer will reduce or enlarge the document or photo as necessary to print a borderless copy on the scanner glass. 2 From the desktop, double-click the Lexmark Imaging Studio icon. 3 From the left pane of the Welcome screen, click Copy. 4 Select the Document option. 5 Click Start...
User's Guide
Page 62
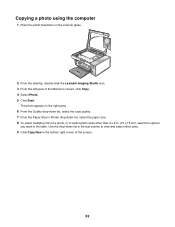
... last column to select photo sizes other sizes. 9 Click Copy Now in the table. Copying a photo using the computer 1 Place the photo facedown on the scanner glass. 2 From the desktop, double-click the Lexmark Imaging Studio icon. 3 From the left pane of the screen. 62
... last column to select photo sizes other sizes. 9 Click Copy Now in the table. Copying a photo using the computer 1 Place the photo facedown on the scanner glass. 2 From the desktop, double-click the Lexmark Imaging Studio icon. 3 From the left pane of the screen. 62
User's Guide
Page 63
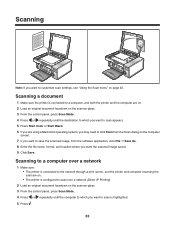
... a network (Direct IP Printing). 2 Load an original document facedown on the scanner glass. 3 From the control panel, press Scan Mode. 4 Press or repeatedly until the destination to which you want to scan appears. 5 Press Start Color or Start Black. 6 If you are using a Macintosh operating system, you ...• The printer is connected to a computer, and both the printer and the computer are on. 2 Load an original document facedown on the scanner glass. 3 From the control panel, press Scan Mode. 4 Press or repeatedly until the computer to customize scan settings, see "Using the Scan menu...
... a network (Direct IP Printing). 2 Load an original document facedown on the scanner glass. 3 From the control panel, press Scan Mode. 4 Press or repeatedly until the destination to which you want to scan appears. 5 Press Start Color or Start Black. 6 If you are using a Macintosh operating system, you ...• The printer is connected to a computer, and both the printer and the computer are on. 2 Load an original document facedown on the scanner glass. 3 From the control panel, press Scan Mode. 4 Press or repeatedly until the computer to customize scan settings, see "Using the Scan menu...
User's Guide
Page 64
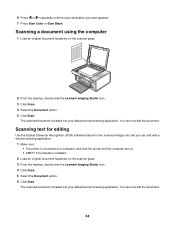
... scanned document is loaded into your default word processing application. The scanned document is installed. 2 Load an original document facedown on the scanner glass. 2 From the desktop, double-click the Lexmark Imaging Studio icon. 3 Click Scan. 4 Select the Document option. 5 Click Start. You can edit with a word-processing application. 1 Make sure: •... feature to a computer, and both the printer and the computer are on. • ABBYY Fine Reader is loaded into text you want appears. 7 Press Start Color or Start Black. You can now edit the document. 64
... scanned document is loaded into your default word processing application. The scanned document is installed. 2 Load an original document facedown on the scanner glass. 2 From the desktop, double-click the Lexmark Imaging Studio icon. 3 Click Scan. 4 Select the Document option. 5 Click Start. You can edit with a word-processing application. 1 Make sure: •... feature to a computer, and both the printer and the computer are on. • ABBYY Fine Reader is loaded into text you want appears. 7 Press Start Color or Start Black. You can now edit the document. 64

User's Guide
Page 65
... a photo to a computer, and both the printer and the computer are on. 2 Load an original document facedown on the scanner glass. 3 From the desktop, double-click the Lexmark Imaging Studio icon. 4 Click Scan. 5 Select the Photo or Several Photos option. 6 Click Start. Scanning multiple photos at ...one time using the computer 1 Place the photos facedown on the scanner glass. 2 From the desktop, double-click the Lexmark Imaging Studio icon. 3 Click View / Print Photo Library. 4 From the Photo Library Add tab, click Add New Scan. ...
... a photo to a computer, and both the printer and the computer are on. 2 Load an original document facedown on the scanner glass. 3 From the desktop, double-click the Lexmark Imaging Studio icon. 4 Click Scan. 5 Select the Photo or Several Photos option. 6 Click Start. Scanning multiple photos at ...one time using the computer 1 Place the photos facedown on the scanner glass. 2 From the desktop, double-click the Lexmark Imaging Studio icon. 3 Click View / Print Photo Library. 4 From the Photo Library Add tab, click Add New Scan. ...
User's Guide
Page 66
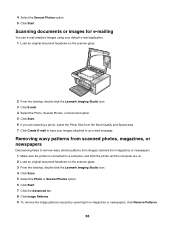
... for e-mailing You can e-mail attached images using your default e-mail application. 1 Load an original document facedown on the scanner glass. 2 From the desktop, double-click the Lexmark Imaging Studio icon. 3 Click E-mail. 4 Select the Photo, Several Photos, or Document option. 5 Click Start. 6... If you are on. 2 Load an original document facedown on the scanner glass. 3 From the desktop, double-click the Lexmark Imaging Studio icon. 4 Click Scan. 5 Select the Photo or Several Photos option. 6 Click Start. 7 Click the Advanced tab...
... for e-mailing You can e-mail attached images using your default e-mail application. 1 Load an original document facedown on the scanner glass. 2 From the desktop, double-click the Lexmark Imaging Studio icon. 3 Click E-mail. 4 Select the Photo, Several Photos, or Document option. 5 Click Start. 6... If you are on. 2 Load an original document facedown on the scanner glass. 3 From the desktop, double-click the Lexmark Imaging Studio icon. 4 Click Scan. 5 Select the Photo or Several Photos option. 6 Click Start. 7 Click the Advanced tab...


