
User's Guide
Page 4
Using card stock...40 Storing media...41 Supported paper sizes, types, and weights 41 Supported paper sizes...41 Support for paper types ...43 Paper types and weights ...43 Paper capacities ...44 Printing...45 Installing printer software...45 Printing a document from Windows 45 Printing a document ...
Using card stock...40 Storing media...41 Supported paper sizes, types, and weights 41 Supported paper sizes...41 Support for paper types ...43 Paper types and weights ...43 Paper capacities ...44 Printing...45 Installing printer software...45 Printing a document from Windows 45 Printing a document ...
User's Guide
Page 5
... Ordering a fuser...73 Ordering photoconductors ...73 Moving the printer...73 Before moving the printer ...73 Moving the printer to another location ...74 Administrative support 75 Adjusting the brightness or contrast of the display 75 Disabling control panel menus...75 Enabling control panel menus...75 Disabling Quick Start mode...76... 78 Locking the control panel menus using the Embedded Web Server 78 Locking the entire printer...78 Modifying confidential print settings 79 Supporting IPSec...79 Supporting SNMPv3...80 Using 802.1x authentication...80 Using Secure mode...81 Contents 5
... Ordering a fuser...73 Ordering photoconductors ...73 Moving the printer...73 Before moving the printer ...73 Moving the printer to another location ...74 Administrative support 75 Adjusting the brightness or contrast of the display 75 Disabling control panel menus...75 Enabling control panel menus...75 Disabling Quick Start mode...76... 78 Locking the control panel menus using the Embedded Web Server 78 Locking the entire printer...78 Modifying confidential print settings 79 Supporting IPSec...79 Supporting SNMPv3...80 Using 802.1x authentication...80 Using Secure mode...81 Contents 5

User's Guide
Page 7
Incorrect margins...93 Skewed print...93 Blank pages...93 Solid color pages ...93 Paper curl ...94 Toner specks ...94 Toner rubs off ...94 Solving color quality problems...95 Quality menu ...95 Frequently Asked Questions (FAQ) about color printing 97 Contacting Customer Support...100 Notices...102 Power consumption...105 Index...108 Contents 7
Incorrect margins...93 Skewed print...93 Blank pages...93 Solid color pages ...93 Paper curl ...94 Toner specks ...94 Toner rubs off ...94 Solving color quality problems...95 Quality menu ...95 Frequently Asked Questions (FAQ) about color printing 97 Contacting Customer Support...100 Notices...102 Power consumption...105 Index...108 Contents 7

User's Guide
Page 14
.... g Click OK. CAUTION: If you are not under the printer when you set it down. a Click Start ΠSettings ΠPrinters. f Click Add. The printer supports one optional drawer which allows an additional 550 sheets of the printer to recognize the 550-sheet tray. d Click the Install Options tab. Installing options...
.... g Click OK. CAUTION: If you are not under the printer when you set it down. a Click Start ΠSettings ΠPrinters. f Click Add. The printer supports one optional drawer which allows an additional 550 sheets of the printer to recognize the 550-sheet tray. d Click the Install Options tab. Installing options...
User's Guide
Page 29
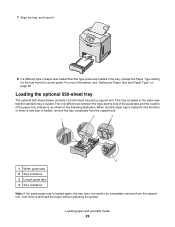
... drawer consists of the paper size indicators, as shown in the following illustration. When the 550-sheet tray is loaded for the tray from the support unit. 7 Align the tray, and insert it. 8 If a different type of paper was loaded than the type previously loaded in the tray, change ...the Paper Type setting for the first time or when a new size is loaded, remove the tray completely from the support unit. 2 3 1 4 1 Width guide tabs 2 Size indicators 3 Length guide tabs 4 Size indicators Note: If the same paper size is loaded. For more information, see "...
... drawer consists of the paper size indicators, as shown in the following illustration. When the 550-sheet tray is loaded for the tray from the support unit. 7 Align the tray, and insert it. 8 If a different type of paper was loaded than the type previously loaded in the tray, change ...the Paper Type setting for the first time or when a new size is loaded, remove the tray completely from the support unit. 2 3 1 4 1 Width guide tabs 2 Size indicators 3 Length guide tabs 4 Size indicators Note: If the same paper size is loaded. For more information, see "...
User's Guide
Page 32
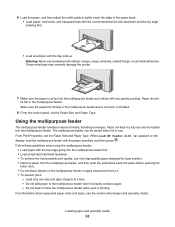
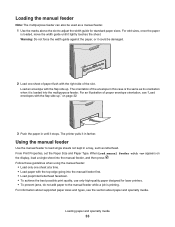
... multipurpose feeder can also be closed when not in the multipurpose feeder. From Print Properties, set the Paper Size and Paper Type. For information about supported paper sizes and types, see the section about paper and specialty media. Paper should lie flat in use envelopes with the top edge going into...
... multipurpose feeder can also be closed when not in the multipurpose feeder. From Print Properties, set the Paper Size and Paper Type. For information about supported paper sizes and types, see the section about paper and specialty media. Paper should lie flat in use envelopes with the top edge going into...
User's Guide
Page 33
... feeder. Loading paper and specialty media 33 Load an envelope with the right side of paper flush with the flap side up ." For information about supported paper sizes and types, see "Load envelopes with the flap side up . For odd sizes, once the paper is printing. Warning: Do not force the...
... feeder. Loading paper and specialty media 33 Load an envelope with the right side of paper flush with the flap side up ." For information about supported paper sizes and types, see "Load envelopes with the flap side up . For odd sizes, once the paper is printing. Warning: Do not force the...
User's Guide
Page 34
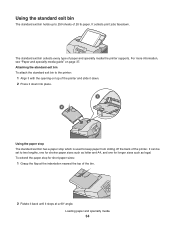
... to 250 sheets of 20 lb paper. For more information, see "Paper and specialty media guide" on top of paper and specialty media the printer supports. It collects print jobs facedown. The standard exit bin collects every type of the printer and slide it down. 2 Press it stops at a 90°...
... to 250 sheets of 20 lb paper. For more information, see "Paper and specialty media guide" on top of paper and specialty media the printer supports. It collects print jobs facedown. The standard exit bin collects every type of the printer and slide it down. 2 Press it stops at a 90°...

User's Guide
Page 40
...problems. Paper and specialty media guide 40 Note: Vinyl labels are not supported on the card stock being considered for laser printers. Check with exposed adhesive. Zone coating of the adhesive at www.lexmark.com/publications. Print samples on this product. Have an interlocking design -...8226; Use labels designed specifically for use before buying large quantities. Have postage stamps attached - - Using labels Print samples on the Lexmark Web site at least 1 mm (0.04 in the sealed or closed position - Adhesive material contaminates the printer and could void the ...
...problems. Paper and specialty media guide 40 Note: Vinyl labels are not supported on the card stock being considered for laser printers. Check with exposed adhesive. Zone coating of the adhesive at www.lexmark.com/publications. Print samples on this product. Have an interlocking design -...8226; Use labels designed specifically for use before buying large quantities. Have postage stamps attached - - Using labels Print samples on the Lexmark Web site at least 1 mm (0.04 in the sealed or closed position - Adhesive material contaminates the printer and could void the ...

User's Guide
Page 41
..., types, and weights The following tables provide information on card stock and labels, see the Card Stock & Label Guide Supported paper sizes -supported X-unsupported Paper size Dimensions Standard 250-sheet Optional 550-sheet Multipurpose tray (Tray 1) tray (Tray 2) feeder or manual feeder Letter ...the floor. • Store individual packages of media on a flat surface. • Do not store anything on top of paper they support. Measurements apply to 180°C (356° F) without releasing hazardous emissions. • Do not use preprinted card stock manufactured with chemicals...
..., types, and weights The following tables provide information on card stock and labels, see the Card Stock & Label Guide Supported paper sizes -supported X-unsupported Paper size Dimensions Standard 250-sheet Optional 550-sheet Multipurpose tray (Tray 1) tray (Tray 2) feeder or manual feeder Letter ...the floor. • Store individual packages of media on a flat surface. • Do not store anything on top of paper they support. Measurements apply to 180°C (356° F) without releasing hazardous emissions. • Do not use preprinted card stock manufactured with chemicals...

User's Guide
Page 43
... 47 lb bond) paper, we recommend grain short. 3 The label area (pressure-sensitive area) must enter the printer first. 4 Vinyl labels are not supported. 5 Use sulfite, wood-free, or up to 100% cotton envelopes. 6 Maximum weight for paper types Paper type Paper Standard 250-sheet tray (Tray ...1) Card stock Transparencies Paper labels* Envelopes X Glossy paper * Vinyl labels are not supported. Paper and specialty media guide 43 Support for 100% cotton envelopes is limited to simplex printing only at less than 176 g/m2 (47 lb bond), we recommend ...
... 47 lb bond) paper, we recommend grain short. 3 The label area (pressure-sensitive area) must enter the printer first. 4 Vinyl labels are not supported. 5 Use sulfite, wood-free, or up to 100% cotton envelopes. 6 Maximum weight for paper types Paper type Paper Standard 250-sheet tray (Tray ...1) Card stock Transparencies Paper labels* Envelopes X Glossy paper * Vinyl labels are not supported. Paper and specialty media guide 43 Support for 100% cotton envelopes is limited to simplex printing only at less than 176 g/m2 (47 lb bond), we recommend ...

User's Guide
Page 44
... less than 75 g/m2 (20 lb bond) is 90 g/m2. 7 105 g/m2 (28 lb bond) envelopes must enter the printer first. 4 Vinyl labels are not supported. 5 Use sulfite, wood-free, or up to 47 lb bond) paper, we recommend grain short. 3 The label area (pressure-sensitive area) must not exceed 25...
... less than 75 g/m2 (20 lb bond) is 90 g/m2. 7 105 g/m2 (28 lb bond) envelopes must enter the printer first. 4 Vinyl labels are not supported. 5 Use sulfite, wood-free, or up to 47 lb bond) paper, we recommend grain short. 3 The label area (pressure-sensitive area) must not exceed 25...

User's Guide
Page 47
..., and then press . 7 Press until appears next to your job, and then press . 8 For confidential jobs, use with the printer. Devices only supporting USB low-speed capabilities are not supported. • You cannot print encrypted files or files without printing permissions. • A USB Direct interface is on the control panel so you... job you choose to enter your job type (Confidential, Reserve, Repeat, or Verify), and then assign a user name. Printing 47 For more information, see the Lexmark Web site at www...
..., and then press . 7 Press until appears next to your job, and then press . 8 For confidential jobs, use with the printer. Devices only supporting USB low-speed capabilities are not supported. • You cannot print encrypted files or files without printing permissions. • A USB Direct interface is on the control panel so you... job you choose to enter your job type (Confidential, Reserve, Repeat, or Verify), and then assign a user name. Printing 47 For more information, see the Lexmark Web site at www...
User's Guide
Page 49
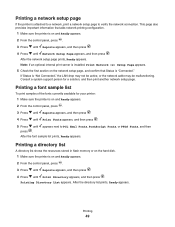
Printing a font sample list To print samples of the fonts currently available for a solution, and then print another network setup page. Consult a system support person for your printer: 1 Make sure the printer is on and Ready appears. 2 From the control panel, press . 3 Press until Reports appears, and then press . 4 ...
Printing a font sample list To print samples of the fonts currently available for a solution, and then print another network setup page. Consult a system support person for your printer: 1 Make sure the printer is on and Ready appears. 2 From the control panel, press . 3 Press until Reports appears, and then press . 4 ...

User's Guide
Page 74
Moving the printer to another location The printer and options can be safely moved to another location by following these precautions: • Remove all printer options before moving the printer. • Any cart used to move the printer must have a surface able to support the dimensions of the printer. Any cart used to move the options must have a surface able to support the full footprint of the options. • Keep the printer in an upright position. • Avoid severe jarring movements. Maintaining the printer 74
Moving the printer to another location The printer and options can be safely moved to another location by following these precautions: • Remove all printer options before moving the printer. • Any cart used to move the printer must have a surface able to support the dimensions of the printer. Any cart used to move the options must have a surface able to support the full footprint of the options. • Keep the printer in an upright position. • Avoid severe jarring movements. Maintaining the printer 74

User's Guide
Page 75
...appears. Press 6 Press until Disable appears, and then press . Disabling control panel menus Since many people could be using the printer, a support person may choose to lock the control panel menus to decrease the setting. 7 When the adjustment is on . Enabling control panel menus ...appears on some models. To adjust the brightness or contrast settings: 1 Make sure the printer is complete, press . Administrative support 75 Administrative support Adjusting the brightness or contrast of the display Note: These options are disabled. to increase the setting or to keep menu ...
...appears. Press 6 Press until Disable appears, and then press . Disabling control panel menus Since many people could be using the printer, a support person may choose to lock the control panel menus to decrease the setting. 7 When the adjustment is on . Enabling control panel menus ...appears on some models. To adjust the brightness or contrast settings: 1 Make sure the printer is complete, press . Administrative support 75 Administrative support Adjusting the brightness or contrast of the display Note: These options are disabled. to increase the setting or to keep menu ...

User's Guide
Page 76
.... 4 Press until Panel Menus appears, and then press . 5 Press until Restore Now appears, and then press . Restoring Factory Defaults appears briefly, then Ready appears. Administrative support 76 When Activating Menu Changes appears, the menus are enabled. You can restore the original printer settings, often referred to as the printer warms up...
.... 4 Press until Panel Menus appears, and then press . 5 Press until Restore Now appears, and then press . Restoring Factory Defaults appears briefly, then Ready appears. Administrative support 76 When Activating Menu Changes appears, the menus are enabled. You can restore the original printer settings, often referred to as the printer warms up...

User's Guide
Page 77
... menus. Warning: All files and resources on the printer hard disk will be lost. Contents will not be adjusted by Ready. Administrative support 77 The following factory default settings are restored: • All downloaded resources in the printer flash memory or RAM will be deleted. ...1 Make sure the printer is on . 3 Release both buttons when Performing Self Test appears. The printer performs its power-on the Lexmark Web site at www.lexmark.com/publications. A progress bar appears. For more information, see the Technical Reference available on sequence, and then CONFIG MENU appears. ...
... menus. Warning: All files and resources on the printer hard disk will be lost. Contents will not be adjusted by Ready. Administrative support 77 The following factory default settings are restored: • All downloaded resources in the printer flash memory or RAM will be deleted. ...1 Make sure the printer is on . 3 Release both buttons when Performing Self Test appears. The printer performs its power-on the Lexmark Web site at www.lexmark.com/publications. A progress bar appears. For more information, see the Technical Reference available on sequence, and then CONFIG MENU appears. ...

User's Guide
Page 78
... buttons when Performing Self Test appears. In the address line, enter the IP address of the printer or print server to use the printer. Administrative support 78 The printer performs its power-on the printer hard disk will be protected using the control panel. A progress bar shows the amount completed. 7 When...
... buttons when Performing Self Test appears. In the address line, enter the IP address of the printer or print server to use the printer. Administrative support 78 The printer performs its power-on the printer hard disk will be protected using the control panel. A progress bar shows the amount completed. 7 When...

User's Guide
Page 79
... using the Embedded Web Server: 1 Open a Web browser. You can modify confidential print settings using both IPv4 and IPv6. Supporting IPSec Internet Protocol Security (IPSec) provides authentication and encryption at the network layer allowing all of the jobs for that user are deleted.... Administrative support 79 To modify the confidential print settings: 1 Open a Web browser. In the address line, enter the IP address of PIN...
... using the Embedded Web Server: 1 Open a Web browser. You can modify confidential print settings using both IPv4 and IPv6. Supporting IPSec Internet Protocol Security (IPSec) provides authentication and encryption at the network layer allowing all of the jobs for that user are deleted.... Administrative support 79 To modify the confidential print settings: 1 Open a Web browser. In the address line, enter the IP address of PIN...

