User's Guide
Page 15
... content is in any exposed adhesive when the flap is 25% or less. Partial sheets also contaminate the printer and the cartridge with adhesive, and could void the printer and cartridge warranties. • Use labels that are designed for use envelopes made from MarkVision Professional. • Do not load labels together with...
... content is in any exposed adhesive when the flap is 25% or less. Partial sheets also contaminate the printer and the cartridge with adhesive, and could void the printer and cartridge warranties. • Use labels that are designed for use envelopes made from MarkVision Professional. • Do not load labels together with...
User's Guide
Page 36
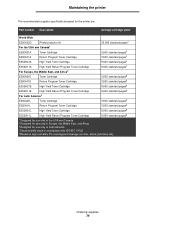
... E250X22G Photoconductor kit 30,000 standard pages† For the USA and Canada1 E250A21A Toner Cartridge 3,500 standard pages1 E250A11A Return Program Toner Cartridge 3,500 standard pages1 E352H21A High Yield Toner Cartridge 9,000 standard pages1 E352H11A High Yield Return Program Toner Cartridge 9,000 standard pages1 For Europe, the Middle East, and Africa2 E250A21E Toner...
... E250X22G Photoconductor kit 30,000 standard pages† For the USA and Canada1 E250A21A Toner Cartridge 3,500 standard pages1 E250A11A Return Program Toner Cartridge 3,500 standard pages1 E352H21A High Yield Toner Cartridge 9,000 standard pages1 E352H11A High Yield Return Program Toner Cartridge 9,000 standard pages1 For Europe, the Middle East, and Africa2 E250A21E Toner...

User's Guide
Page 37
Maintaining the printer Ordering a toner cartridge When the 88 Toner low message appears, you should order a new toner cartridge. Changing a toner cartridge 1 Turn the printer off. 2 Press the button on the left side of the printer to have a new toner cartridge available when the current one no longer prints satisfactorily. You can print a few hundred pages after the 88 Toner low message appears. You need to release and lower the front door. Ordering supplies 37
Maintaining the printer Ordering a toner cartridge When the 88 Toner low message appears, you should order a new toner cartridge. Changing a toner cartridge 1 Turn the printer off. 2 Press the button on the left side of the printer to have a new toner cartridge available when the current one no longer prints satisfactorily. You can print a few hundred pages after the 88 Toner low message appears. You need to release and lower the front door. Ordering supplies 37

User's Guide
Page 38
For more information, see Recycling Lexmark products on the base of the print cartridge assembly. Note: You can use the packing material from the new toner cartridge to ship the old toner cartridge back to distribute the toner. Maintaining the printer 3 Remove the toner cartridge. a Press the release button on page42. 5 Firmly shake the toner cartridge in all directions to Lexmark for recycling. Ordering supplies 38 b Grasp the handle, pulling up and out to remove the toner cartridge. 4 Unpack the new toner cartridge.
For more information, see Recycling Lexmark products on the base of the print cartridge assembly. Note: You can use the packing material from the new toner cartridge to ship the old toner cartridge back to distribute the toner. Maintaining the printer 3 Remove the toner cartridge. a Press the release button on page42. 5 Firmly shake the toner cartridge in all directions to Lexmark for recycling. Ordering supplies 38 b Grasp the handle, pulling up and out to remove the toner cartridge. 4 Unpack the new toner cartridge.
User's Guide
Page 39
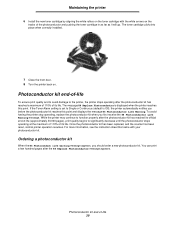
... information, see the instruction sheet that came with the white arrows on . Photoconductor kit end-of the photoconductor and pushing the toner cartridge in as far as it will go. Ordering a photoconductor kit When the 84 Photoconduct life warning message appears, you first receive the...84 Photoconductor Life Warning. Once the photoconductor kit has been replaced, and the counter has been reset, normal printer operation resumes. The toner cartridge clicks into place when correctly installed. 7 Close the front door. 8 Turn the printer back on the tracks of -life 39 Maintaining the...
... information, see the instruction sheet that came with the white arrows on . Photoconductor kit end-of the photoconductor and pushing the toner cartridge in as far as it will go. Ordering a photoconductor kit When the 84 Photoconduct life warning message appears, you first receive the...84 Photoconductor Life Warning. Once the photoconductor kit has been replaced, and the counter has been reset, normal printer operation resumes. The toner cartridge clicks into place when correctly installed. 7 Close the front door. 8 Turn the printer back on the tracks of -life 39 Maintaining the...

User's Guide
Page 40
... new photoconductor kit. Note: Do not press the button on the print cartridge assembly Place the print cartridge assembly on a flat, clean surface. 3 Remove the toner cartridge: a Press the button on the left side of time. Photoconductor kit end-of the print cartridge assembly. b Lower the front door. Maintaining the printer Changing a photoconductor kit...
... new photoconductor kit. Note: Do not press the button on the print cartridge assembly Place the print cartridge assembly on a flat, clean surface. 3 Remove the toner cartridge: a Press the button on the left side of time. Photoconductor kit end-of the print cartridge assembly. b Lower the front door. Maintaining the printer Changing a photoconductor kit...

User's Guide
Page 41
... is listed under Warnings, the photoconductor counter has not been properly reset. Photoconductor kit end-of the print cartridge assembly with the green arrows on the tracks in the printer and pushing the print cartridge assembly in as far as it will go . 7 Close the front door. 8 Turn the printer back ... on page26. For more information, see the instruction sheet that shipped with the white arrows on the tracks of the photoconductor and pushing the toner cartridge in as far as it will go . Note: Print your printer menu settings pages. Maintaining the printer 5 Install the toner...
... is listed under Warnings, the photoconductor counter has not been properly reset. Photoconductor kit end-of the print cartridge assembly with the green arrows on the tracks in the printer and pushing the print cartridge assembly in as far as it will go . 7 Close the front door. 8 Turn the printer back ... on page26. For more information, see the instruction sheet that shipped with the white arrows on the tracks of the photoconductor and pushing the toner cartridge in as far as it will go . Note: Print your printer menu settings pages. Maintaining the printer 5 Install the toner...

User's Guide
Page 43
... and the action necessary to clear the message. To resolve the paper jam messages, you have cleared all possible jams. Message 200 Paper Jam - Remove Cartridge 201 Paper Jam - Open Rear Door 23x Paper Jam - Open Rear Door 234 Paper Jam - Identifying jams When the printer jams, the appropriate jam message... set to On or Auto; The jam message indicates the area where the jam occurred. Open Rear Door 24x Paper Jam - Clearing jams 43 Remove Cartridge 202 Paper Jam -
... and the action necessary to clear the message. To resolve the paper jam messages, you have cleared all possible jams. Message 200 Paper Jam - Remove Cartridge 201 Paper Jam - Open Rear Door 23x Paper Jam - Open Rear Door 234 Paper Jam - Identifying jams When the printer jams, the appropriate jam message... set to On or Auto; The jam message indicates the area where the jam occurred. Open Rear Door 24x Paper Jam - Clearing jams 43 Remove Cartridge 202 Paper Jam -

User's Guide
Page 46
Clearing a jam 46 CAUTION: The fuser or fuser area may be hot. 6 Lift the green flap at the front of the printer, and then remove the jammed pages beneath it. Clearing jams 5 Open the front door, and remove the print cartridge assembly.
Clearing a jam 46 CAUTION: The fuser or fuser area may be hot. 6 Lift the green flap at the front of the printer, and then remove the jammed pages beneath it. Clearing jams 5 Open the front door, and remove the print cartridge assembly.

User's Guide
Page 47
Therefore, a jammed page may or may not be reused after the page is printed but before it has successfully exited the printer if that holds the image of a page may be reprinted, depending on the overall memory usage in the printer. Note: Jam recovery is needed for another use. When jam recovery is set to Auto, the memory that memory is set to Auto by default. Clearing a jam 47 Clearing jams 7 Open the rear exit, and remove the jammed pages. 8 After you have cleared the jams, reinstall the print cartridge assembly, and make sure all printer doors are closed. 9 Press .
Therefore, a jammed page may or may not be reused after the page is printed but before it has successfully exited the printer if that holds the image of a page may be reprinted, depending on the overall memory usage in the printer. Note: Jam recovery is needed for another use. When jam recovery is set to Auto, the memory that memory is set to Auto by default. Clearing a jam 47 Clearing jams 7 Open the rear exit, and remove the jammed pages. 8 After you have cleared the jams, reinstall the print cartridge assembly, and make sure all printer doors are closed. 9 Press .

User's Guide
Page 48
Clearing a jam 48 Clearing jams Clearing a jam in the manual feeder 1 Remove the paper from the manual feeder. 2 Open the front door, and remove the print cartridge assembly.
Clearing a jam 48 Clearing jams Clearing a jam in the manual feeder 1 Remove the paper from the manual feeder. 2 Open the front door, and remove the print cartridge assembly.

User's Guide
Page 49
... inside of a page may be hot. 4 Open the rear exit door, and remove the jammed pages. 5 After you have cleared the jams, reinstall the print cartridge assembly, and make sure all printer doors are closed. 6 Press . Clearing a jam 49 Note: Jam recovery is needed for another use. Therefore, a jammed page may...
... inside of a page may be hot. 4 Open the rear exit door, and remove the jammed pages. 5 After you have cleared the jams, reinstall the print cartridge assembly, and make sure all printer doors are closed. 6 Press . Clearing a jam 49 Note: Jam recovery is needed for another use. Therefore, a jammed page may...
User's Guide
Page 55
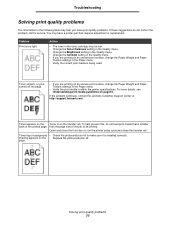
Problem Print is being used. If the problem continues, contact the Lexmark Customer Support Center at http://support.lexmark.com . Toner fog or background • Check the photoconductor kit to be low. • Change the Toner Darkness setting in the Quality menu. • Change ... the page size of the printed page. shading appears on an uneven print surface, change the Paper Weight and Paper Texture settings in the toner cartridge may have a printer part that is smaller back of the job to make sure it is installed correctly. Open and close the front door to...
Problem Print is being used. If the problem continues, contact the Lexmark Customer Support Center at http://support.lexmark.com . Toner fog or background • Check the photoconductor kit to be low. • Change the Toner Darkness setting in the Quality menu. • Change ... the page size of the printed page. shading appears on an uneven print surface, change the Paper Weight and Paper Texture settings in the toner cartridge may have a printer part that is smaller back of the job to make sure it is installed correctly. Open and close the front door to...
User's Guide
Page 56
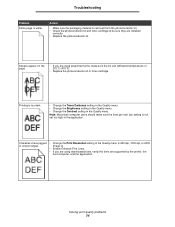
... page is not set too high in the Quality menu. Printing is removed from the photoconductor kit. • Check the photoconductor kit and toner cartridge to 600 dpi, 1200 dpi, or 2400 Image Q. • Enable Enhance Fine Lines. • If you are installed correctly. • ...: Macintosh computer users should make sure the ink can withstand temperatures of 210°C (410°F). • Replace the photoconductor kit or toner cartridge. Action • Make sure the packaging material is too dark. • Change the Toner Darkness setting in the Quality menu. • Change...
... page is not set too high in the Quality menu. Printing is removed from the photoconductor kit. • Check the photoconductor kit and toner cartridge to 600 dpi, 1200 dpi, or 2400 Image Q. • Enable Enhance Fine Lines. • If you are installed correctly. • ...: Macintosh computer users should make sure the ink can withstand temperatures of 210°C (410°F). • Replace the photoconductor kit or toner cartridge. Action • Make sure the packaging material is too dark. • Change the Toner Darkness setting in the Quality menu. • Change...

User's Guide
Page 59
Place the print cartridge assembly on the toner cartridge handle. Cleaning the printhead lens 59 Troubleshooting Cleaning the printhead lens Some print quality problems can be solved by cleaning the printhead lens. 1 Turn the printer off. 2 Press the button on the left side of the printer to release and lower the front door. 3 Remove the print cartridge assembly by pulling on a flat, clean surface. 4 Locate the glass printhead lens within the recessed area in the top of the printer. Note: Do not press the button on the print cartridge assembly.
Place the print cartridge assembly on the toner cartridge handle. Cleaning the printhead lens 59 Troubleshooting Cleaning the printhead lens Some print quality problems can be solved by cleaning the printhead lens. 1 Turn the printer off. 2 Press the button on the left side of the printer to release and lower the front door. 3 Remove the print cartridge assembly by pulling on a flat, clean surface. 4 Locate the glass printhead lens within the recessed area in the top of the printer. Note: Do not press the button on the print cartridge assembly.

User's Guide
Page 60
Troubleshooting 5 Gently wipe the printhead lens with the arrows on the tracks in the printer and pushing the print cartridge assembly in as far as it will go. 7 Close the front door. 8 Turn the printer on. Warning: Not using a clean, dry, lint-free cloth may result in damage to the printhead lens. 6 Install the print cartridge assembly into the printer by aligning the arrows on the guides of the print cartridge assembly with a clean, dry, lint-free cloth. Cleaning the printhead lens 60
Troubleshooting 5 Gently wipe the printhead lens with the arrows on the tracks in the printer and pushing the print cartridge assembly in as far as it will go. 7 Close the front door. 8 Turn the printer on. Warning: Not using a clean, dry, lint-free cloth may result in damage to the printhead lens. 6 Install the print cartridge assembly into the printer by aligning the arrows on the guides of the print cartridge assembly with a clean, dry, lint-free cloth. Cleaning the printhead lens 60
User's Guide
Page 69
... on the date of original purchase and this product throughout its Suppliers' and Remarketers' limitations of remedies are intended beneficiaries of all print cartridges, programs, data, and removable storage media (unless directed otherwise by a third party of products, supplies or parts • Products, ...not cumulative. The replacement item assumes the remaining warranty period of Limited Warranty for this statement to the Remarketer or the Lexmark designated location. Remote technical support is not free of this limited warranty is used up to the limit set forth ...
... on the date of original purchase and this product throughout its Suppliers' and Remarketers' limitations of remedies are intended beneficiaries of all print cartridges, programs, data, and removable storage media (unless directed otherwise by a third party of products, supplies or parts • Products, ...not cumulative. The replacement item assumes the remaining warranty period of Limited Warranty for this statement to the Remarketer or the Lexmark designated location. Remote technical support is not free of this limited warranty is used up to the limit set forth ...

User's Guide
Page 72
... 5 paper tray adjustment 19 photoconductor kit changing 40 end-of-life 39 ordering 39 recycling 42 preprinted forms 13 print cartridge See toner cartridge print media jams avoiding 17 print media specifications 11 printer settings 7 printhead lens, cleaning 59 printing 18 problems control panel... 63 supplies conserving 35 recycling 42 storing 35 supplies ordering maintenance kit 42 photoconductor kit 39 toner cartridge 37 system board accessing 28 system password setting 63 T toner cartridge changing 37 ordering 37 recycling 42 translated label 8 transparencies 14 tray linking 24 W warranty 68,...
... 5 paper tray adjustment 19 photoconductor kit changing 40 end-of-life 39 ordering 39 recycling 42 preprinted forms 13 print cartridge See toner cartridge print media jams avoiding 17 print media specifications 11 printer settings 7 printhead lens, cleaning 59 printing 18 problems control panel... 63 supplies conserving 35 recycling 42 storing 35 supplies ordering maintenance kit 42 photoconductor kit 39 toner cartridge 37 system board accessing 28 system password setting 63 T toner cartridge changing 37 ordering 37 recycling 42 translated label 8 transparencies 14 tray linking 24 W warranty 68,...


