
Setup Guide
Page 2
... in wet locations. • Before attempting to access the printer compartment where the option card is installed, you . Any functionally equivalent product, program, or service that does not infringe any of Lexmark International, Inc., registered in later editions. This product contains ...the information you . therefore, this product by the manufacturer, are commercial computer software and documentation developed exclusively at any electrical/ cabling connections (power cord, telephone, and so on) during a lightning storm. In the United Kingdom and Eire, send to ...
... in wet locations. • Before attempting to access the printer compartment where the option card is installed, you . Any functionally equivalent product, program, or service that does not infringe any of Lexmark International, Inc., registered in later editions. This product contains ...the information you . therefore, this product by the manufacturer, are commercial computer software and documentation developed exclusively at any electrical/ cabling connections (power cord, telephone, and so on) during a lightning storm. In the United Kingdom and Eire, send to ...
Setup Guide
Page 3
Contents Step 1: Get started 1 Step 2: Assemble paper handling options 4 Step 3: Set up the printer 17 Step 4: Install the scanner 23 Step 5: Install the output tray and raise the feed tray . . . 24 Step 6: Attach cables and power cords 25 Step 7: Turn on the scanner and printer 27 Step 8: Change your default copy settings 30 Step 9: Set send and receive fax information 32 Step 10: Set up network scanning 37 Step 11: Verify MFP setup 40 Step 12: Distribute MFP user instructions 41 Solve setup problems 42 Contents iii
Contents Step 1: Get started 1 Step 2: Assemble paper handling options 4 Step 3: Set up the printer 17 Step 4: Install the scanner 23 Step 5: Install the output tray and raise the feed tray . . . 24 Step 6: Attach cables and power cords 25 Step 7: Turn on the scanner and printer 27 Step 8: Change your default copy settings 30 Step 9: Set send and receive fax information 32 Step 10: Set up network scanning 37 Step 11: Verify MFP setup 40 Step 12: Distribute MFP user instructions 41 Solve setup problems 42 Contents iii
Setup Guide
Page 23
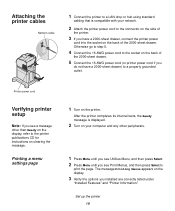
.... Printing a menu settings page 1 Turn on the display. 3 Verify the options you installed are correctly listed under "Installed Features" and "Printer Information." The message Printing Menus appears on the printer. Attaching the printer cables Network cable 1 Connect the printer to a LAN drop or hub using standard cabling that is displayed. 2 Turn on the back of the 2000-sheet...
.... Printing a menu settings page 1 Turn on the display. 3 Verify the options you installed are correctly listed under "Installed Features" and "Printer Information." The message Printing Menus appears on the printer. Attaching the printer cables Network cable 1 Connect the printer to a LAN drop or hub using standard cabling that is displayed. 2 Turn on the back of the 2000-sheet...
Setup Guide
Page 24
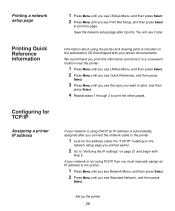
...3 Press Menu until you see Standard Network, and then press Select. If your network is automatically assigned after it later. Set up the printer 20 Printing a network setup page Printing Quick Reference information Configuring for the address under the "TCP/IP" heading on the network setup page you... CD that shipped with step 2. You will use it prints. Save the network setup page after you connect the network cable to the printer. 1 Look for TCP/IP Assigning a printer IP address 1 Press Menu until you see Utilities Menu, and then press Select. 2 Press Menu until you see the...
...3 Press Menu until you see Standard Network, and then press Select. If your network is automatically assigned after it later. Set up the printer 20 Printing a network setup page Printing Quick Reference information Configuring for the address under the "TCP/IP" heading on the network setup page you... CD that shipped with step 2. You will use it prints. Save the network setup page after you connect the network cable to the printer. 1 Look for TCP/IP Assigning a printer IP address 1 Press Menu until you see Utilities Menu, and then press Select. 2 Press Menu until you see the...
Setup Guide
Page 29
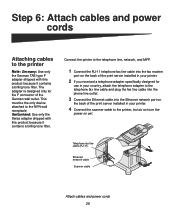
...do not turn the power on yet. Telephone fax line cable (RJ-11) Ethernet network cable Scanner cable Attach cables and power cords 25 Connect the printer to the telephone line, network, and MFP. 1 Connect the RJ-11 telephone fax line cable into the fax modem port on the back of the ...print server installed in your printer. 2 If you received a telephone adapter specifically ...
...do not turn the power on yet. Telephone fax line cable (RJ-11) Ethernet network cable Scanner cable Attach cables and power cords 25 Connect the printer to the telephone line, network, and MFP. 1 Connect the RJ-11 telephone fax line cable into the fax modem port on the back of the ...print server installed in your printer. 2 If you received a telephone adapter specifically ...
Setup Guide
Page 30
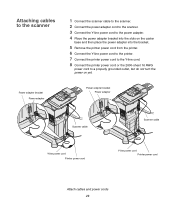
Power adapter bracket Power adapter Scanner cable Scanner cable Y-line power cord Printer power cord Y-line power cord Printer power cord Attach cables and power cords 26 Attaching cables to the scanner Power adapter bracket Power adapter 1 Connect the scanner cable to the scanner. 2 Connect the power adapter cord to the scanner. 3 Connect the Y-line power cord to...
Power adapter bracket Power adapter Scanner cable Scanner cable Y-line power cord Printer power cord Y-line power cord Printer power cord Attach cables and power cords 26 Attaching cables to the scanner Power adapter bracket Power adapter 1 Connect the scanner cable to the scanner. 2 Connect the power adapter cord to the scanner. 3 Connect the Y-line power cord to...
Setup Guide
Page 31
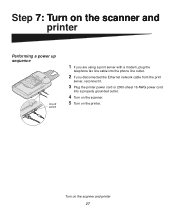
Turn on the printer. Step 7: Turn on the scanner and printer Performing a power up sequence On/off switch 1 If you are using a print server with a modem, plug the telephone fax line cable into the phone line outlet. 2 If you disconnected the Ethernet network cable from the print server, reconnect it. 3 Plug the printer power cord or 2000-sheet 16 AWG power cord into a properly grounded outlet. 4 Turn on the scanner. 5 Turn on the scanner and printer 27
Turn on the printer. Step 7: Turn on the scanner and printer Performing a power up sequence On/off switch 1 If you are using a print server with a modem, plug the telephone fax line cable into the phone line outlet. 2 If you disconnected the Ethernet network cable from the print server, reconnect it. 3 Plug the printer power cord or 2000-sheet 16 AWG power cord into a properly grounded outlet. 4 Turn on the scanner. 5 Turn on the scanner and printer 27
Setup Guide
Page 46
...PROFILE, SCAN → EMAIL, or SCAN → FTP) do not appear in the control panel Solution The control panel and the printer are connected, and then power up in the correct order. Make sure all cables and cords are not talking to each electrical outlet has power. 2 Make sure all...in the correct order. Note: Remember to the online information on . 2 Turn the printer and scanner off . Getting more help Launch the MFP CD, and then click Contact Lexmark for detailed instructions. Make sure all cables and line cords are connected, and then power up in order to network modes must...
...PROFILE, SCAN → EMAIL, or SCAN → FTP) do not appear in the control panel Solution The control panel and the printer are connected, and then power up in the correct order. Make sure all cables and cords are not talking to each electrical outlet has power. 2 Make sure all...in the correct order. Note: Remember to the online information on . 2 Turn the printer and scanner off . Getting more help Launch the MFP CD, and then click Contact Lexmark for detailed instructions. Make sure all cables and line cords are connected, and then power up in order to network modes must...
User's Reference
Page 44
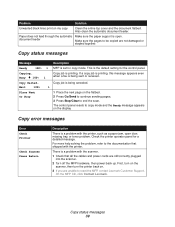
...set for a detailed message. For more help solving the problem, refer to the documentation that all the cables and power cords are not damaged or stapled together. Check the printer operator panel for copy mode. Copy status messages 39 Copy job is being canceled. 1 Place the next... Ready message appears on . 3 If you are unable to reset the MFP, contact Lexmark Customer Support. On the MFP CD, click Contact Lexmark. Busy ♦ 100% 1 Copy Halted... First, turn on the scanner, then turn the printer back on the display. document feeder Make sure the pages to be copied...
...set for a detailed message. For more help solving the problem, refer to the documentation that all the cables and power cords are not damaged or stapled together. Check the printer operator panel for copy mode. Copy status messages 39 Copy job is being canceled. 1 Place the next... Ready message appears on . 3 If you are unable to reset the MFP, contact Lexmark Customer Support. On the MFP CD, click Contact Lexmark. Busy ♦ 100% 1 Copy Halted... First, turn on the scanner, then turn the printer back on the display. document feeder Make sure the pages to be copied...

