
User Manual
Page 4
... letterhead...67 Using recycled paper and other office papers ...68 Storing paper...68 Supported paper sizes, types, and weights...69 Paper sizes supported by the printer ...69 Paper types and weights supported by the printer ...71 Paper types and weights supported by the output bins 71 Printing 73 Printing a document...73 Printing on specialty...
... letterhead...67 Using recycled paper and other office papers ...68 Storing paper...68 Supported paper sizes, types, and weights...69 Paper sizes supported by the printer ...69 Paper types and weights supported by the printer ...71 Paper types and weights supported by the output bins 71 Printing 73 Printing a document...73 Printing on specialty...

User Manual
Page 7
... Ordering pick rollers ...173 Ordering staple cartridges...173 Ordering a transfer roller...173 Recycling Lexmark products...173 Moving the printer...173 Before moving the printer...173 Moving the printer to another location...174 Shipping the printer ...174 Administrative support 175 Finding advanced networking and administrator information 175 Using the Embedded Web Server...175...
... Ordering pick rollers ...173 Ordering staple cartridges...173 Ordering a transfer roller...173 Recycling Lexmark products...173 Moving the printer...173 Before moving the printer...173 Moving the printer to another location...174 Shipping the printer ...174 Administrative support 175 Finding advanced networking and administrator information 175 Using the Embedded Web Server...175...

User Manual
Page 8
... Toner fog or background shading appears on the page 195 Toner rubs off...195 Toner specks...196 Transparency print quality is poor...196 Contacting Customer Support...196 Notices 198 Product information...198 Edition notice...198 Power consumption...205 Index 212 Contents 8
... Toner fog or background shading appears on the page 195 Toner rubs off...195 Toner specks...196 Transparency print quality is poor...196 Contacting Customer Support...196 Notices 198 Product information...198 Edition notice...198 Power consumption...205 Index 212 Contents 8
User Manual
Page 11
... You can find the Setup information on the side of instructions box or on the Lexmark Web site at www.lexmark.com. Monday-Friday (8:00 AM-11:00 PM Visit our Web site at Telephone numbers and support hours • US: 1-800-332-4120 vary by country or region. For the most recent...
... You can find the Setup information on the side of instructions box or on the Lexmark Web site at www.lexmark.com. Monday-Friday (8:00 AM-11:00 PM Visit our Web site at Telephone numbers and support hours • US: 1-800-332-4120 vary by country or region. For the most recent...

User Manual
Page 12
... configured model CAUTION-TIPPING HAZARD: Floor-mounted configurations require additional furniture for stability. Learning about contacting Lexmark, see www.lexmark.com/multifunctionprinters. E-mail support varies by country or region, and may need additional furniture. Note: For additional information about the... not be available in some instances. Description E-mail support Where to find (North America) Where to find (rest of world) For e-mail support, visit our Web site: www.lexmark.com. 1 Click SUPPORT. 2 Click Technical Support. 3 Select your printer type. 4 Select your ...
... configured model CAUTION-TIPPING HAZARD: Floor-mounted configurations require additional furniture for stability. Learning about contacting Lexmark, see www.lexmark.com/multifunctionprinters. E-mail support varies by country or region, and may need additional furniture. Note: For additional information about the... not be available in some instances. Description E-mail support Where to find (North America) Where to find (rest of world) For e-mail support, visit our Web site: www.lexmark.com. 1 Click SUPPORT. 2 Click Technical Support. 3 Select your printer type. 4 Select your ...

User Manual
Page 13
... 2000-sheet tray (Tray 4) 2000 sheets 9 Caster base Not applicable 1 Based on 75 g/m2 (20 lb.) paper. 2 Up to two 5-bin mailbox units are supported. 3 The printer supports up to three output expander units, or one output expander combined with one 5-bin mailbox, one high capacity output expander (not depicted), or one...
... 2000-sheet tray (Tray 4) 2000 sheets 9 Caster base Not applicable 1 Based on 75 g/m2 (20 lb.) paper. 2 Up to two 5-bin mailbox units are supported. 3 The printer supports up to three output expander units, or one output expander combined with one 5-bin mailbox, one high capacity output expander (not depicted), or one...

User Manual
Page 16
Insert a flash drive into the front of the printer to print saved files. Note: Only the front USB port supports flash drives. Item 8 Menu 9 USB port Description Opens the menu index Note: The menus are available only when the printer is in the Ready state. Learning about the printer 16
Insert a flash drive into the front of the printer to print saved files. Note: Only the front USB port supports flash drives. Item 8 Menu 9 USB port Description Opens the menu index Note: The menus are available only when the printer is in the Ready state. Learning about the printer 16

User Manual
Page 24
... system board electronic components or connectors. 1 Access the system board. 3 2 1 2 Unpack the ISP and plastic tee. Installing an Internal Solutions Port The system board supports one optional Lexmark Internal Solutions Port (ISP). Install an ISP for additional connectivity options. Touch something metal on the system board. CAUTION-SHOCK HAZARD: If you have...
... system board electronic components or connectors. 1 Access the system board. 3 2 1 2 Unpack the ISP and plastic tee. Installing an Internal Solutions Port The system board supports one optional Lexmark Internal Solutions Port (ISP). Install an ISP for additional connectivity options. Touch something metal on the system board. CAUTION-SHOCK HAZARD: If you have...

User Manual
Page 34
... off , and unplug the power cord from the wall outlet before continuing. Installing hardware options Order of a tray and a support unit. If you are accessing the system board or installing optional hardware or memory devices sometime after setting up to move it ...safely. All drawers are using a high-capacity input tray, a duplex unit and an input option, or more information, see www.lexmark.com/publications/furniture_safety. A drawer consists of installation CAUTION-TIPPING HAZARD: Floor-mounted configurations require additional furniture for the printer. Note: If...
... off , and unplug the power cord from the wall outlet before continuing. Installing hardware options Order of a tray and a support unit. If you are accessing the system board or installing optional hardware or memory devices sometime after setting up to move it ...safely. All drawers are using a high-capacity input tray, a duplex unit and an input option, or more information, see www.lexmark.com/publications/furniture_safety. A drawer consists of installation CAUTION-TIPPING HAZARD: Floor-mounted configurations require additional furniture for the printer. Note: If...

User Manual
Page 35
... the printer, then turn them off , and unplug the power cord from a drawer without pushing in the printer. • T652n and T654n models do not support an optional duplex unit. Notes: • T652dn and T654dn models have any other devices attached to the printer, then turn the printer off as well...
... the printer, then turn them off , and unplug the power cord from a drawer without pushing in the printer. • T652n and T654n models do not support an optional duplex unit. Notes: • T652dn and T654dn models have any other devices attached to the printer, then turn the printer off as well...

User Manual
Page 38
...printer setup 38 This page also provides important information that Status is attached to a network, then print a network setup page to the Lexmark Web site at www.lexmark.com. 2 From the Drivers & Downloads menu, click Driver Finder. 3 Select your printer, and then select your operating system. ...may not be active, or the network cable may be malfunctioning. Printing a network setup page If the printer is "Connected." Consult a system support person for a solution, and then print another network setup page. Note: If an optional internal print server is installed, Print Network Setup ...
...printer setup 38 This page also provides important information that Status is attached to a network, then print a network setup page to the Lexmark Web site at www.lexmark.com. 2 From the Drivers & Downloads menu, click Driver Finder. 3 Select your printer, and then select your operating system. ...may not be active, or the network cable may be malfunctioning. Printing a network setup page If the printer is "Connected." Consult a system support person for a solution, and then print another network setup page. Note: If an optional internal print server is installed, Print Network Setup ...

User Manual
Page 40
... sure that: • Your wireless network is set up and working properly. • The computer you are AES or TKIP. WEP key If your system support person if you will be set for infrastructure networks. The choices are using the Advanced method, then you want to do so by selecting the...
... sure that: • Your wireless network is set up and working properly. • The computer you are AES or TKIP. WEP key If your system support person if you will be set for infrastructure networks. The choices are using the Advanced method, then you want to do so by selecting the...
User Manual
Page 47
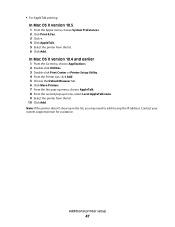
Additional printer setup 47 Contact your system support person for assistance. Note: If the printer doesn't show up menu, select Local AppleTalk zone. 9 Select the printer from the list. 6 Click Add. In Mac ...
Additional printer setup 47 Contact your system support person for assistance. Note: If the printer doesn't show up menu, select Local AppleTalk zone. 9 Select the printer from the list. 6 Click Add. In Mac ...

User Manual
Page 52
... multipurpose feeder must be set manually for all of measure (millimeters or inches) • Portrait Width • Portrait Height • Feed Direction Note: The smallest supported Universal size is on and Ready appears. 2 From the printer control panel, press . 3 Press the arrow buttons until Paper Menu appears, and then press . 4 Press...
... multipurpose feeder must be set manually for all of measure (millimeters or inches) • Portrait Width • Portrait Height • Feed Direction Note: The smallest supported Universal size is on and Ready appears. 2 From the printer control panel, press . 3 Press the arrow buttons until Paper Menu appears, and then press . 4 Press...

User Manual
Page 53
... the paper height and width Defining a specific height and width measurement for the Universal paper size (in the portrait orientation) allows the printer to support the size, including support for standard features such as duplex printing and printing multiple pages on the display. Doing so may cause a jam. Loading the standard or...
... the paper height and width Defining a specific height and width measurement for the Universal paper size (in the portrait orientation) allows the printer to support the size, including support for standard features such as duplex printing and printing multiple pages on the display. Doing so may cause a jam. Loading the standard or...

User Manual
Page 62
... the maximum stack height by forcing paper under the stack height limiter. • Do not load or close the envelope support. • Medium-length envelopes-Extend the envelope support to the left as shown on the tray. Warning-Potential Damage: Never use envelopes with the flap side down and to... the middle position. • Long envelopes-Fully open the envelope support. 2 Lift the envelope weight back toward the printer. Loading paper and specialty media 62 Loading the envelope feeder 1 Adjust the envelope...
... the maximum stack height by forcing paper under the stack height limiter. • Do not load or close the envelope support. • Medium-length envelopes-Extend the envelope support to the left as shown on the tray. Warning-Potential Damage: Never use envelopes with the flap side down and to... the middle position. • Long envelopes-Fully open the envelope support. 2 Lift the envelope weight back toward the printer. Loading paper and specialty media 62 Loading the envelope feeder 1 Adjust the envelope...
User Manual
Page 64
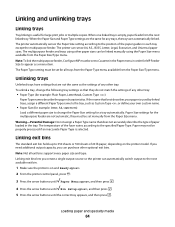
The Paper Type setting must be set for all exit bins support every paper size and type. If the name that best describes your paper is used by linked trays, assign a different Paper Type name to the ...
The Paper Type setting must be set for all exit bins support every paper size and type. If the name that best describes your paper is used by linked trays, assign a different Paper Type name to the ...

User Manual
Page 68
... printers, despite surface texture. Using recycled paper and other office papers As an environmentally conscious company, Lexmark supports the use of lower weight ( In 1998, Lexmark presented to discourage the use in the direction of feed Recycled paper, paper of recycled office paper ...different temperature and humidity conditions. However, no reason to the US government a study demonstrating that all recycled paper will feed well. Lexmark has found no blanket statement can be able to withstand temperatures up to -sheet coefficient of friction (0.4-0.6) • Sufficient bending ...
... printers, despite surface texture. Using recycled paper and other office papers As an environmentally conscious company, Lexmark supports the use of lower weight ( In 1998, Lexmark presented to discourage the use in the direction of feed Recycled paper, paper of recycled office paper ...different temperature and humidity conditions. However, no reason to the US government a study demonstrating that all recycled paper will feed well. Lexmark has found no blanket statement can be able to withstand temperatures up to -sheet coefficient of friction (0.4-0.6) • Sufficient bending ...
User Manual
Page 69
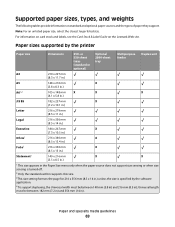
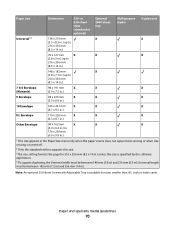
...tables provide information on the Lexmark Web site. Paper sizes supported by the software application. 4 To support duplexing, the Universal width must be between 182 mm (7.2 in) and 356 mm (14 in .) unless the size is turned off. 2 Only the standard exit bin supports this size. 3This size ...on card stock and labels, see the Card Stock & Label Guide on standard and optional paper sources and the types of paper they support. Paper and specialty media guidelines 69 or 550-sheet trays (standard or optional) Optional 2000-sheet tray Multipurpose Duplex unit feeder A4 210...
...tables provide information on the Lexmark Web site. Paper sizes supported by the software application. 4 To support duplexing, the Universal width must be between 182 mm (7.2 in) and 356 mm (14 in .) unless the size is turned off. 2 Only the standard exit bin supports this size. 3This size ...on card stock and labels, see the Card Stock & Label Guide on standard and optional paper sources and the types of paper they support. Paper and specialty media guidelines 69 or 550-sheet trays (standard or optional) Optional 2000-sheet tray Multipurpose Duplex unit feeder A4 210...
User Manual
Page 70
...250 mm (6.9 x 9.8 in.) 1 This size appears in the Paper Size menu only when the paper source does not support size sensing or when size sensing is turned off. 2 Only the standard exit bin supports this size. 3This size setting formats the page for 216 x 356 mm (8.5 x 14 in ). Note: An optional ...250-sheet Universally Adjustable Tray is specified by the software application. 4 To support duplexing, the Universal width must be between 182 mm (7.2 in) and 356 mm (14 in .) unless the size is available for sizes smaller than A5...
...250 mm (6.9 x 9.8 in.) 1 This size appears in the Paper Size menu only when the paper source does not support size sensing or when size sensing is turned off. 2 Only the standard exit bin supports this size. 3This size setting formats the page for 216 x 356 mm (8.5 x 14 in ). Note: An optional ...250-sheet Universally Adjustable Tray is specified by the software application. 4 To support duplexing, the Universal width must be between 182 mm (7.2 in) and 356 mm (14 in .) unless the size is available for sizes smaller than A5...

