
User's Guide
Page 7
...-POTENTIAL INJURY: Do not twist, bind, crush, or place heavy objects on the power cord. Inspect the power cord regularly for the use of specific Lexmark components. The safety features of some parts may not always be obvious. Connect the power supply cord to meet strict global safety standards with this product or make any electrical or...
...-POTENTIAL INJURY: Do not twist, bind, crush, or place heavy objects on the power cord. Inspect the power cord regularly for the use of specific Lexmark components. The safety features of some parts may not always be obvious. Connect the power supply cord to meet strict global safety standards with this product or make any electrical or...
User's Guide
Page 10
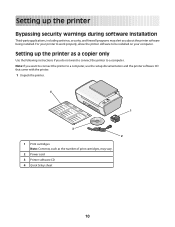
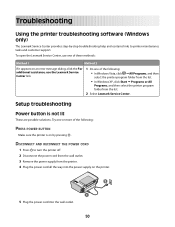
... printer software being installed. Setting up the printer Bypassing security warnings during software installation Third-party applications, including antivirus, security, and firewall programs may vary. 2 Power cord 3 Printer software CD 4 Quick Setup sheet 10 Setting up the printer as the number of print cartridges, may alert you do not want to connect...
... printer software being installed. Setting up the printer Bypassing security warnings during software installation Third-party applications, including antivirus, security, and firewall programs may vary. 2 Power cord 3 Printer software CD 4 Quick Setup sheet 10 Setting up the printer as the number of print cartridges, may alert you do not want to connect...
User's Guide
Page 11
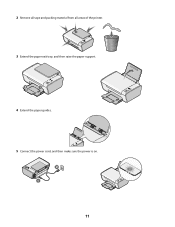
2 Remove all tape and packing material from all areas of the printer. 3 Extend the paper exit tray, and then raise the paper support. 2 1 4 Extend the paper guides. 5 Connect the power cord, and then make sure the power is on. 2 1 11
2 Remove all tape and packing material from all areas of the printer. 3 Extend the paper exit tray, and then raise the paper support. 2 1 4 Extend the paper guides. 5 Connect the power cord, and then make sure the power is on. 2 1 11
User's Guide
Page 48
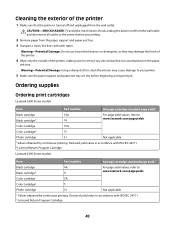
...the paper support and paper exit tray. 3 Dampen a clean, lint-free cloth with ISO/IEC 24711 2Licensed Return Program Cartridge Lexmark 2690 Series models Item Part number Average cartridge standard page yield 1 Black cartridge 4A Black cartridge2 4 For page yield values, refer...Program Cartridge 48 Color cartridge 15A Color cartridge2 15 Photo cartridge 31 Not applicable 1Values obtained by continuous printing. CAUTION-SHOCK HAZARD: To avoid the risk of electric shock, unplug the power cord from the wall outlet and disconnect all cables to www.lexmark.com/pageyields. ...
...the paper support and paper exit tray. 3 Dampen a clean, lint-free cloth with ISO/IEC 24711 2Licensed Return Program Cartridge Lexmark 2690 Series models Item Part number Average cartridge standard page yield 1 Black cartridge 4A Black cartridge2 4 For page yield values, refer...Program Cartridge 48 Color cartridge 15A Color cartridge2 15 Photo cartridge 31 Not applicable 1Values obtained by continuous printing. CAUTION-SHOCK HAZARD: To avoid the risk of electric shock, unplug the power cord from the wall outlet and disconnect all cables to www.lexmark.com/pageyields. ...
User's Guide
Page 50
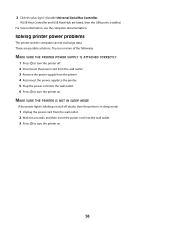
... of these methods: Method 1 Method 2 If it appears on the printer. 2 1 5 Plug the power cord into the power supply on an error message dialog, click the For additional assistance, use the Lexmark Service Center link. 1 Do one or more of the following : • In Windows Vista, click ... the printer program folder from the list. 2 Select Lexmark Service Center. DISCONNECT AND RECONNECT THE POWER CORD 1 Press to printer maintenance tasks and customer support. To open the Lexmark Service Center, use one of the following : PRESS POWER BUTTON Make sure the printer is not lit These are...
... of these methods: Method 1 Method 2 If it appears on the printer. 2 1 5 Plug the power cord into the power supply on an error message dialog, click the For additional assistance, use the Lexmark Service Center link. 1 Do one or more of the following : • In Windows Vista, click ... the printer program folder from the list. 2 Select Lexmark Service Center. DISCONNECT AND RECONNECT THE POWER CORD 1 Press to printer maintenance tasks and customer support. To open the Lexmark Service Center, use one of the following : PRESS POWER BUTTON Make sure the printer is not lit These are...

User's Guide
Page 51
.... 7 Press to turn the printer on . RECONNECT THE POWER SUPPLY 1 Press to turn the printer off. 2 Disconnect the power cord from the wall outlet. 3 Gently remove the power supply from the printer. 4 Reconnect the power supply to the printer. 5 Plug the power cord into the wall outlet. 6 Press to turn the printer... XP and earlier, click Start. 4 Click Computer or My Computer. 5 Double-click the CD or DVD drive icon. 51 6 Plug the power cord into an electrical outlet that other possible solutions. These are supported: Windows Vista, Windows XP, Windows 2000 with the USB symbol.
.... 7 Press to turn the printer on . RECONNECT THE POWER SUPPLY 1 Press to turn the printer off. 2 Disconnect the power cord from the wall outlet. 3 Gently remove the power supply from the printer. 4 Reconnect the power supply to the printer. 5 Plug the power cord into the wall outlet. 6 Press to turn the printer... XP and earlier, click Start. 4 Click Computer or My Computer. 5 Double-click the CD or DVD drive icon. 51 6 Plug the power cord into an electrical outlet that other possible solutions. These are supported: Windows Vista, Windows XP, Windows 2000 with the USB symbol.
User's Guide
Page 52
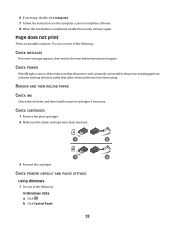
CHECK POWER If the light is not on the computer screen to install the software. 8 When the installation is properly connected to print again. Try one of ... ink levels, and then install new print cartridges if necessary. 6 If necessary, double-click setup.exe. 7 Follow the instructions on , then make sure that the power cord is completed, enable the security software again. CHECK PRINTER DEFAULT AND PAUSE SETTINGS Using Windows 1 Do one or more of the following : CHECK MESSAGES If...
CHECK POWER If the light is not on the computer screen to install the software. 8 When the installation is properly connected to print again. Try one of ... ink levels, and then install new print cartridges if necessary. 6 If necessary, double-click setup.exe. 7 Follow the instructions on , then make sure that the power cord is completed, enable the security software again. CHECK PRINTER DEFAULT AND PAUSE SETTINGS Using Windows 1 Do one or more of the following : CHECK MESSAGES If...
User's Guide
Page 54
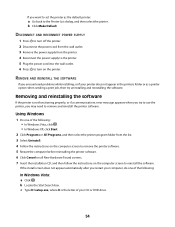
... Start. 2 Click Programs or All Programs, and then select the printer program folder from the printer. 4 Reconnect the power supply to the printer. 5 Plug the power cord into the wall outlet. 6 Press to turn on the computer screen to reinstall the software. If the install screen does... Windows 1 Do one of the following : In Windows Vista: a Click . DISCONNECT AND RECONNECT POWER SUPPLY 1 Press to turn off the printer. 2 Disconnect the power cord from the wall outlet. 3 Remove the power supply from the list. 3 Select Uninstall. 4 Follow the instructions on the computer screen to remove...
... Start. 2 Click Programs or All Programs, and then select the printer program folder from the printer. 4 Reconnect the power supply to the printer. 5 Plug the power cord into the wall outlet. 6 Press to turn on the computer screen to reinstall the software. If the install screen does... Windows 1 Do one of the following : In Windows Vista: a Click . DISCONNECT AND RECONNECT POWER SUPPLY 1 Press to turn off the printer. 2 Disconnect the power cord from the wall outlet. 3 Remove the power supply from the list. 3 Select Uninstall. 4 Follow the instructions on the computer screen to remove...
User's Guide
Page 56
...beside Universal Serial Bus Controller. These are listed, then the USB port is in sleep mode. 1 Unplug the power cord from the printer. 4 Reconnect the power supply to the printer. 5 Plug the power cord into the wall outlet. 3 Press to turn the printer on . Try one or more information, see the ...MAKE SURE THE PRINTER IS NOT IN SLEEP MODE If the power light is blinking on and off . 2 Disconnect the power cord from the wall outlet. 3 Remove the power supply from the wall outlet. 2 Wait ten seconds, and then insert the power cord into the wall outlet. 6 Press to turn the printer ...
...beside Universal Serial Bus Controller. These are listed, then the USB port is in sleep mode. 1 Unplug the power cord from the printer. 4 Reconnect the power supply to the printer. 5 Plug the power cord into the wall outlet. 3 Press to turn the printer on . Try one or more information, see the ...MAKE SURE THE PRINTER IS NOT IN SLEEP MODE If the power light is blinking on and off . 2 Disconnect the power cord from the wall outlet. 3 Remove the power supply from the wall outlet. 2 Wait ten seconds, and then insert the power cord into the wall outlet. 6 Press to turn the printer ...

User's Guide
Page 63
... subject to calculate energy usage. See www.lexmark.com for a specified period of Watts, the power consumption should be substantially higher than the average. Instantaneous power draws may not apply to completely stop product power consumption, disconnect the power supply cord from hard-copy original 13.79 documents. Factory default Power Saver Timeout for a print job. 5.80...
... subject to calculate energy usage. See www.lexmark.com for a specified period of Watts, the power consumption should be substantially higher than the average. Instantaneous power draws may not apply to completely stop product power consumption, disconnect the power supply cord from hard-copy original 13.79 documents. Factory default Power Saver Timeout for a print job. 5.80...

