User's Guide
Page 2
... printer on a wired network...32 Minimizing your printer's environmental impact 35 Saving paper and toner...35 Saving energy...36 Recycling...37 Reducing printer noise...38 Loading paper and specialty media 40 Setting the Paper Size and Paper Type...40 Configuring Universal paper settings...40 Avoiding jams...41 Loading trays...42 Using a multipurpose or manual feeder...46...
... printer on a wired network...32 Minimizing your printer's environmental impact 35 Saving paper and toner...35 Saving energy...36 Recycling...37 Reducing printer noise...38 Loading paper and specialty media 40 Setting the Paper Size and Paper Type...40 Configuring Universal paper settings...40 Avoiding jams...41 Loading trays...42 Using a multipurpose or manual feeder...46...
User's Guide
Page 5
Clearing jams 161 Clearing jams...161 Troubleshooting 176 Solving basic printer problems...176 Printer control panel display is blank or displays only diamonds 176 Understanding printer messages...176 Solving printing problems...186 Solving copy problems...189 Solving scanner problems...192 Solving fax problems...194 Solving option problems...197 Solving paper feed problems...198 Solving...
Clearing jams 161 Clearing jams...161 Troubleshooting 176 Solving basic printer problems...176 Printer control panel display is blank or displays only diamonds 176 Understanding printer messages...176 Solving printing problems...186 Solving copy problems...189 Solving scanner problems...192 Solving fax problems...194 Solving option problems...197 Solving paper feed problems...198 Solving...
User's Guide
Page 36
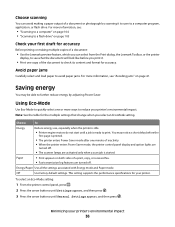
... printer's environmental impact 36 Saving energy You may notice a short delay before you print it to save to print. You may be able to avoid paper jams. For more information, see: • "Scanning to a computer" on page 104 • "Scanning to a flash drive" on both sides of a print,...or making multiple copies of a document: • Use the Lexmark preview feature, which you can avoid making a paper output of a document or photograph by adjusting Power Saver. Choose scanning You can select from the Print dialog, the Lexmark Toolbar, or the printer display, to see what the document ...
... printer's environmental impact 36 Saving energy You may notice a short delay before you print it to save to print. You may be able to avoid paper jams. For more information, see: • "Scanning to a computer" on page 104 • "Scanning to a flash drive" on both sides of a print,...or making multiple copies of a document: • Use the Lexmark preview feature, which you can avoid making a paper output of a document or photograph by adjusting Power Saver. Choose scanning You can select from the Print dialog, the Lexmark Toolbar, or the printer display, to see what the document ...

User's Guide
Page 41
.... Submitting Changes appears, followed by the Universal Setup menu. Avoiding jams The following hints can help you avoid jams: Paper tray recommendations • Make sure the paper lies flat in firmly after loading paper. Note: Select Portrait Height to adjust the paper height setting or Paper Width to load it prior to increase the setting, and then...
.... Submitting Changes appears, followed by the Universal Setup menu. Avoiding jams The following hints can help you avoid jams: Paper tray recommendations • Make sure the paper lies flat in firmly after loading paper. Note: Select Portrait Height to adjust the paper height setting or Paper Width to load it prior to increase the setting, and then...
User's Guide
Page 162
Note: For alternative access to the jam, open the front door, and then open the rear door. To reduce the risk of injury from a hot component, allow the surface to cool before removing paper from the standard exit bin. Open the front door, and then open the rear door. Open the multipurpose feeder... or more of the following: • Open the ADF cover, and then remove the separator roll. • Open the scanner cover. • Remove the ADF paper tray. 200-201 paper jams CAUTION-HOT SURFACE: The fuser and the inside of the printer near the fuser may be hot. Remove Tray 2. Clearing...
Note: For alternative access to the jam, open the front door, and then open the rear door. To reduce the risk of injury from a hot component, allow the surface to cool before removing paper from the standard exit bin. Open the front door, and then open the rear door. Open the multipurpose feeder... or more of the following: • Open the ADF cover, and then remove the separator roll. • Open the scanner cover. • Remove the ADF paper tray. 200-201 paper jams CAUTION-HOT SURFACE: The fuser and the inside of the printer near the fuser may be hot. Remove Tray 2. Clearing...
User's Guide
Page 164
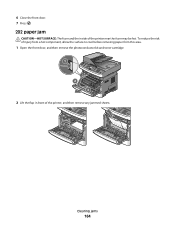
6 Close the front door. 7 Press . 202 paper jam CAUTION-HOT SURFACE: The fuser and the inside of the printer, and then remove any jammed sheets. To reduce the risk of injury from a hot component, allow the surface to cool before removing paper from this area. 1 Open the front door, and then remove the photoconductor kit and toner cartridge. 1 2 3 2 Lift the flap in front of the printer near the fuser may be hot. Clearing jams 164
6 Close the front door. 7 Press . 202 paper jam CAUTION-HOT SURFACE: The fuser and the inside of the printer, and then remove any jammed sheets. To reduce the risk of injury from a hot component, allow the surface to cool before removing paper from this area. 1 Open the front door, and then remove the photoconductor kit and toner cartridge. 1 2 3 2 Lift the flap in front of the printer near the fuser may be hot. Clearing jams 164
User's Guide
Page 166
Clearing jams 166 To reduce the risk of the printer near the fuser may be hot. 231 paper jam CAUTION-HOT SURFACE: The fuser and the inside of injury from a hot component, allow the surface to cool before removing paper from this area. 1 Open the front door. 1 2 2 Open the rear door. 3 Remove the jam.
Clearing jams 166 To reduce the risk of the printer near the fuser may be hot. 231 paper jam CAUTION-HOT SURFACE: The fuser and the inside of injury from a hot component, allow the surface to cool before removing paper from this area. 1 Open the front door. 1 2 2 Open the rear door. 3 Remove the jam.
User's Guide
Page 167
Clearing jams 167 4 Close the rear door. 5 Close the front door. 6 Press . 233 paper jam 1 Remove the tray from the printer.
Clearing jams 167 4 Close the rear door. 5 Close the front door. 6 Press . 233 paper jam 1 Remove the tray from the printer.
User's Guide
Page 168
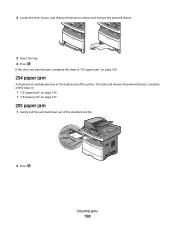
To locate and remove the jammed sheets, complete all the steps in the duplex area of the standard exit bin. 2 Press . 2 Locate the lever shown, and then pull it down to release and remove the jammed sheets. 3 Insert the tray. 4 Press . If this does not clear the jam, complete the steps in "231 paper jam" on page 166. 234 paper jam A single jam or multiple jams are in : • "231 paper jam" on page 166 • "233 paper jam" on page 167 235 paper jam 1 Gently pull the jammed sheet out of the printer. Clearing jams 168
To locate and remove the jammed sheets, complete all the steps in the duplex area of the standard exit bin. 2 Press . 2 Locate the lever shown, and then pull it down to release and remove the jammed sheets. 3 Insert the tray. 4 Press . If this does not clear the jam, complete the steps in "231 paper jam" on page 166. 234 paper jam A single jam or multiple jams are in : • "231 paper jam" on page 166 • "233 paper jam" on page 167 235 paper jam 1 Gently pull the jammed sheet out of the printer. Clearing jams 168
User's Guide
Page 169
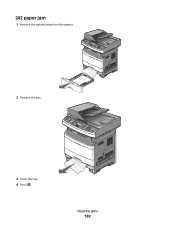
Clearing jams 169 242 paper jam 1 Remove the optional tray from the printer. 2 Remove the jam. 3 Insert the tray. 4 Press .
Clearing jams 169 242 paper jam 1 Remove the optional tray from the printer. 2 Remove the jam. 3 Insert the tray. 4 Press .
User's Guide
Page 170
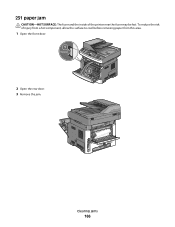
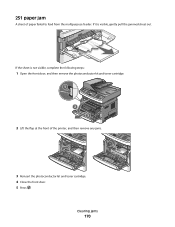
If the sheet is visible, gently pull the jammed sheet out. Clearing jams 170 251 paper jam A sheet of the printer, and then remove any jams. 3 Reinsert the photoconductor kit and toner cartridge. 4 Close the front door. 5 Press . If it is not visible, complete the following steps: 1 Open the front door, and then remove the photoconductor kit and toner cartridge. 1 2 3 2 Lift the flap at the front of paper failed to feed from the multipurpose feeder.
If the sheet is visible, gently pull the jammed sheet out. Clearing jams 170 251 paper jam A sheet of the printer, and then remove any jams. 3 Reinsert the photoconductor kit and toner cartridge. 4 Close the front door. 5 Press . If it is not visible, complete the following steps: 1 Open the front door, and then remove the photoconductor kit and toner cartridge. 1 2 3 2 Lift the flap at the front of paper failed to feed from the multipurpose feeder.

User's Guide
Page 171
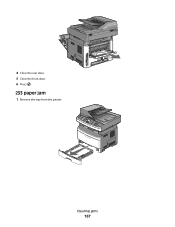
290-294 paper jams Clearing jams under the ADF cover 1 Remove all original documents from the ADF. 2 Open the ADF cover. 3 Unlock the separator roll. Clearing jams 171
290-294 paper jams Clearing jams under the ADF cover 1 Remove all original documents from the ADF. 2 Open the ADF cover. 3 Unlock the separator roll. Clearing jams 171
User's Guide
Page 183
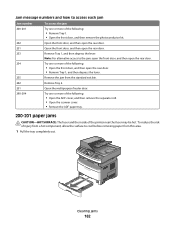
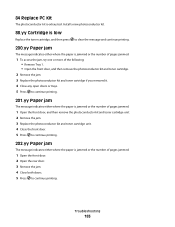
... low Replace the toner cartridge, and then press to clear the message and continue printing. 200.yy Paper jam The message indicates either where the paper is jammed or the number of pages jammed. 1 To access the jam, try one or more of the following: • Remove Tray 1. • Open the front ... toner cartridge if you removed it. 4 Close any open doors or trays. 5 Press to continue printing. 201.yy Paper jam The message indicates either where the paper is jammed or the number of pages jammed. 1 Open the front door, and then remove the photoconductor kit and toner cartridge unit. 2 Remove the...
... low Replace the toner cartridge, and then press to clear the message and continue printing. 200.yy Paper jam The message indicates either where the paper is jammed or the number of pages jammed. 1 To access the jam, try one or more of the following: • Remove Tray 1. • Open the front ... toner cartridge if you removed it. 4 Close any open doors or trays. 5 Press to continue printing. 201.yy Paper jam The message indicates either where the paper is jammed or the number of pages jammed. 1 Open the front door, and then remove the photoconductor kit and toner cartridge unit. 2 Remove the...

User's Guide
Page 184
...Paper jam The message indicates either where the paper is jammed or the number of pages jammed. 1 Open the front door. 2 Open the rear door. 3 Remove the jam. 4 Close both doors. 5 Press to continue printing. 233.yy Paper jam The message indicates either where the paper is jammed or the number of pages jammed. 1 To access the jam... then open the rear door. 2 Remove the jam. 3 Close any open doors or trays. 4 Press to continue printing. 234.yy Paper jam The message indicates either where the paper is jammed or the number of pages jammed. 1 To access the jam, try one or more of the following: &#...
...Paper jam The message indicates either where the paper is jammed or the number of pages jammed. 1 Open the front door. 2 Open the rear door. 3 Remove the jam. 4 Close both doors. 5 Press to continue printing. 233.yy Paper jam The message indicates either where the paper is jammed or the number of pages jammed. 1 To access the jam... then open the rear door. 2 Remove the jam. 3 Close any open doors or trays. 4 Press to continue printing. 234.yy Paper jam The message indicates either where the paper is jammed or the number of pages jammed. 1 To access the jam, try one or more of the following: &#...
User's Guide
Page 185
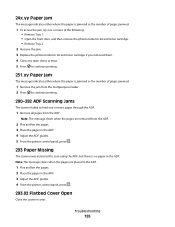
... in the ADF. 1 Flex and fan the pages. 2 Place the pages in the ADF. 24x.yy Paper jam The message indicates either where the paper is jammed or the number of pages jammed. 1 To access the jam, try one or more of the following: • Remove Tray 1. • Open the front door, ... open doors or trays. 5 Press to continue printing. 251.yy Paper jam The message indicates either where the paper is jammed or the number of pages jammed. 1 Remove the jam from the multipurpose feeder. 2 Press to continue printing. 290-292 ADF Scanning Jams The scanner failed to feed one or more pages through the ADF...
... in the ADF. 1 Flex and fan the pages. 2 Place the pages in the ADF. 24x.yy Paper jam The message indicates either where the paper is jammed or the number of pages jammed. 1 To access the jam, try one or more of the following: • Remove Tray 1. • Open the front door, ... open doors or trays. 5 Press to continue printing. 251.yy Paper jam The message indicates either where the paper is jammed or the number of pages jammed. 1 Remove the jam from the multipurpose feeder. 2 Press to continue printing. 290-292 ADF Scanning Jams The scanner failed to feed one or more pages through the ADF...
User's Guide
Page 198
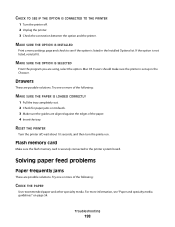
... option and the printer. Try one or more of the paper. 4 Insert the tray. MAKE SURE THE OPTION IS INSTALLED Print a menu settings page and check to the printer system board. Solving paper feed problems Paper frequently jams These are using, select the option. Troubleshooting 198 Mac OS... should make sure the printer is securely connected to see "Paper and specialty media guidelines" on . Try one or more of the following: MAKE SURE THE PAPER IS LOADED CORRECTLY 1 Pull the tray completely out. 2 Check for paper jams or misfeeds. 3 Make sure the guides are possible solutions....
... option and the printer. Try one or more of the paper. 4 Insert the tray. MAKE SURE THE OPTION IS INSTALLED Print a menu settings page and check to the printer system board. Solving paper feed problems Paper frequently jams These are using, select the option. Troubleshooting 198 Mac OS... should make sure the printer is securely connected to see "Paper and specialty media guidelines" on . Try one or more of the following: MAKE SURE THE PAPER IS LOADED CORRECTLY 1 Pull the tray completely out. 2 Check for paper jams or misfeeds. 3 Make sure the guides are possible solutions....

User's Guide
Page 199
... the arrow buttons until Jam Recovery appears, and then press . 6 Press the arrow buttons until you use it. Page that requires adjustment or replacement. Paper jam message remains after you clear the jam In the Settings menu, Jam Recovery is not clear. Set Jam Recovery to the correct ...positions for the paper size loaded. Troubleshooting 199 MAKE SURE THERE IS NOT TOO MUCH...
... the arrow buttons until Jam Recovery appears, and then press . 6 Press the arrow buttons until you use it. Page that requires adjustment or replacement. Paper jam message remains after you clear the jam In the Settings menu, Jam Recovery is not clear. Set Jam Recovery to the correct ...positions for the paper size loaded. Troubleshooting 199 MAKE SURE THERE IS NOT TOO MUCH...
User's Guide
Page 228
... 200.yy Paper jam 183 201.yy Paper jam 183 202.yy Paper jam 183 231.yy Paper jam 184 233.yy Paper jam 184 234.yy Paper jam 184 235.yy Paper jam 184 24x.yy Paper jam 185 250-sheet drawer installing 22 251.yy Paper jam 185 290-292 ADF Scanning Jams 185 293 Paper Missing 185 293.02 Flatbed Cover Open 185 294 ADF Jam 186 31...
... 200.yy Paper jam 183 201.yy Paper jam 183 202.yy Paper jam 183 231.yy Paper jam 184 233.yy Paper jam 184 234.yy Paper jam 184 235.yy Paper jam 184 24x.yy Paper jam 185 250-sheet drawer installing 22 251.yy Paper jam 185 290-292 ADF Scanning Jams 185 293 Paper Missing 185 293.02 Flatbed Cover Open 185 294 ADF Jam 186 31...

User's Guide
Page 229
...Ethernet port 23 exterior of the printer cleaning 146 e-mail canceling 81 notice of low supply level 159 notice of paper jam 159 notice of paper needed 159 notice that different paper is needed 159 e-mail function setting up 78 e-mailing creating shortcuts using the Embedded Web Server 79 setting up ...not receive faxes 196 cannot send or receive a fax 194 received fax has poor print quality 197 faxes printed on both sides of the paper 99 faxing changing resolution 99 choosing a fax connection 83 creating shortcuts using the Embedded Web Server 97 creating shortcuts using the printer control ...
...Ethernet port 23 exterior of the printer cleaning 146 e-mail canceling 81 notice of low supply level 159 notice of paper jam 159 notice of paper needed 159 notice that different paper is needed 159 e-mail function setting up 78 e-mailing creating shortcuts using the Embedded Web Server 79 setting up ...not receive faxes 196 cannot send or receive a fax 194 received fax has poor print quality 197 faxes printed on both sides of the paper 99 faxing changing resolution 99 choosing a fax connection 83 creating shortcuts using the Embedded Web Server 97 creating shortcuts using the printer control ...
User's Guide
Page 231
... panel factory defaults, restoring 157 printer messages 200.yy Paper jam 183 201.yy Paper jam 183 202.yy Paper jam 183 231.yy Paper jam 184 233.yy Paper jam 184 234.yy Paper jam 184 235.yy Paper jam 184 24x.yy Paper jam 185 251.yy Paper jam 185 290-292 ADF Scanning Jams 185 293 Paper Missing 185 293.02 Flatbed Cover Open 185 294 ADF...
... panel factory defaults, restoring 157 printer messages 200.yy Paper jam 183 201.yy Paper jam 183 202.yy Paper jam 183 231.yy Paper jam 184 233.yy Paper jam 184 234.yy Paper jam 184 235.yy Paper jam 184 24x.yy Paper jam 185 251.yy Paper jam 185 290-292 ADF Scanning Jams 185 293 Paper Missing 185 293.02 Flatbed Cover Open 185 294 ADF...

