User's Guide
Page 4
... supplies...100 Checking the status of supplies from a network computer 100 Ordering supplies...101 Ordering toner cartridges...101 Ordering a photoconductor kit ...102 Replacing supplies...102 Replacing the toner cartridge ...102 Replacing the photoconductor kit ...104 Recycling Lexmark products...107 Moving the printer...107 Before moving the printer ...107 Moving the printer to another location...107 Contents 4
... supplies...100 Checking the status of supplies from a network computer 100 Ordering supplies...101 Ordering toner cartridges...101 Ordering a photoconductor kit ...102 Replacing supplies...102 Replacing the toner cartridge ...102 Replacing the photoconductor kit ...104 Recycling Lexmark products...107 Moving the printer...107 Before moving the printer ...107 Moving the printer to another location...107 Contents 4
User's Guide
Page 5
......110 Setting up e-mail alerts...110 Configuring supply notifications...111 Copying printer settings to other printers...111 Clearing jams 113 Avoiding jams...113 Accessing jam areas...114 Understanding jam lights and access locations...114 Clearing jams behind the photoconductor kit and toner cartridge 118 Clearing jams from the standard exit bin...120 Clearing...
......110 Setting up e-mail alerts...110 Configuring supply notifications...111 Copying printer settings to other printers...111 Clearing jams 113 Avoiding jams...113 Accessing jam areas...114 Understanding jam lights and access locations...114 Clearing jams behind the photoconductor kit and toner cartridge 118 Clearing jams from the standard exit bin...120 Clearing...

User's Guide
Page 6
... Incorrect margins...134 Paper curl...134 Print is too dark...134 Print is too light ...135 Skewed print...136 Toner fog or background shading appears on the page 136 Toner rubs off...136 Toner specks...137 Transparency print quality is poor...137 Streaked horizontal lines...137 Streaked vertical lines ...138 Solid black or...
... Incorrect margins...134 Paper curl...134 Print is too dark...134 Print is too light ...135 Skewed print...136 Toner fog or background shading appears on the page 136 Toner rubs off...136 Toner specks...137 Transparency print quality is poor...137 Streaked horizontal lines...137 Streaked vertical lines ...138 Solid black or...

User's Guide
Page 13
Item 1 Error light 2 Jam light 3 Load paper light 4 Toner light 5 Ready light 6 Continue button 7 Stop button Learning about the printer 13
Item 1 Error light 2 Jam light 3 Load paper light 4 Toner light 5 Ready light 6 Continue button 7 Stop button Learning about the printer 13
User's Guide
Page 21
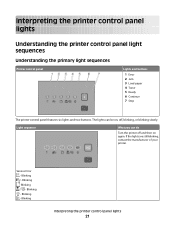
... still blinking, contact the manufacturer of your printer. Blinking Interpreting the printer control panel lights 21 Interpreting the printer control panel lights Understanding the printer control panel light sequences Understanding the primary light sequences Printer control panel Lights and buttons 1 Error 2 Jam 3 Load paper 4 Toner 5 Ready 6 Continue 7 Stop The printer control panel features six lights and two...
... still blinking, contact the manufacturer of your printer. Blinking Interpreting the printer control panel lights 21 Interpreting the printer control panel lights Understanding the printer control panel light sequences Understanding the primary light sequences Printer control panel Lights and buttons 1 Error 2 Jam 3 Load paper 4 Toner 5 Ready 6 Continue 7 Stop The printer control panel features six lights and two...

User's Guide
Page 25
On - Interpreting the printer control panel lights 25 On Close front door - On What you can do Press and release either or l to return to the Ready state. Replace the toner cartridge with one suitable for your region. Light sequence Not ready - Close the front door. On Cartridge region mismatch -
On - Interpreting the printer control panel lights 25 On Close front door - On What you can do Press and release either or l to return to the Ready state. Replace the toner cartridge with one suitable for your region. Light sequence Not ready - Close the front door. On Cartridge region mismatch -
User's Guide
Page 27
... the light sequence and continue processing the print job. • With the printer turned off, remove the toner cartridge and shake it to extend its life. • Replace the toner cartridge, and then turn the printer on. • Press and release to see "Understanding the secondary error light... sequences" on page 28. Blinking - Printer error - For more information, see the secondary error code. On What ...
... the light sequence and continue processing the print job. • With the printer turned off, remove the toner cartridge and shake it to extend its life. • Replace the toner cartridge, and then turn the printer on. • Press and release to see "Understanding the secondary error light... sequences" on page 28. Blinking - Printer error - For more information, see the secondary error code. On What ...

User's Guide
Page 28
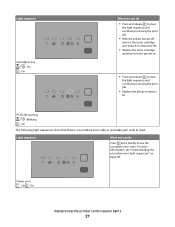
For more information, see the secondary paper jam code. Light sequence What you can do Press twice quickly to see the secondary error code. Paper jam - Printer control panel Lights and buttons 1 Error 2 Jam 3 Load paper 4 Toner 5 Ready 6 Continue 7 Stop Interpreting the printer control panel lights 28 On Understanding the secondary error light sequences When the and lights are on simultaneously, press twice quickly to see "Understanding the secondary paper jam light sequences" on page 34. On -
For more information, see the secondary paper jam code. Light sequence What you can do Press twice quickly to see the secondary error code. Paper jam - Printer control panel Lights and buttons 1 Error 2 Jam 3 Load paper 4 Toner 5 Ready 6 Continue 7 Stop Interpreting the printer control panel lights 28 On Understanding the secondary error light sequences When the and lights are on simultaneously, press twice quickly to see "Understanding the secondary paper jam light sequences" on page 34. On -
User's Guide
Page 32
Blinking - On - On Replace the toner cartridge. Invalid refill, Change cartridge - Invalid network code - Cartridge region mismatch - Blinking - On - Blinking - On Replace the toner cartridge with one that is suitable for your region. For more information, see "Replacing the toner cartridge" on page 102. On - On Interpreting the printer control panel lights 32 Light sequences What you can do Download valid network code to the internal print server.
Blinking - On - On Replace the toner cartridge. Invalid refill, Change cartridge - Invalid network code - Cartridge region mismatch - Blinking - On - Blinking - On Replace the toner cartridge with one that is suitable for your region. For more information, see "Replacing the toner cartridge" on page 102. On - On Interpreting the printer control panel lights 32 Light sequences What you can do Download valid network code to the internal print server.
User's Guide
Page 33
Blinking - On Cartridge part number unsupported by device - On - On - On What you can do Replace the toner cartridge. For more information, see "Replacing the toner cartridge" on page 102. Light sequences Replace missing or defective cartridge - Interpreting the printer control panel lights 33 On - Remove the unsupported toner cartridge, and then replace it with a supported toner cartridge.
Blinking - On Cartridge part number unsupported by device - On - On - On What you can do Replace the toner cartridge. For more information, see "Replacing the toner cartridge" on page 102. Light sequences Replace missing or defective cartridge - Interpreting the printer control panel lights 33 On - Remove the unsupported toner cartridge, and then replace it with a supported toner cartridge.

User's Guide
Page 34
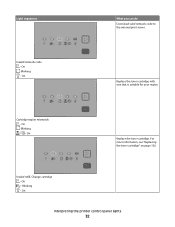
...light sequence which can do to continue printing. Printer control panel Lights and buttons 1 Error 2 Jam 3 Load paper 4 Toner 5 Ready 6 Continue 7 Stop Secondary paper jam sequences on , a paper jam has occurred. Be sure to check all areas of the printer to ensure all the paper is cleared, ...more of the following: • Remove Tray 1. • Remove the photoconductor kit and toner cartridge unit. 200.yy Paper jam - Once the jam is removed. On - On Interpreting the printer control panel lights 34 Understanding the secondary paper jam light sequences When the and lights are on...
...light sequence which can do to continue printing. Printer control panel Lights and buttons 1 Error 2 Jam 3 Load paper 4 Toner 5 Ready 6 Continue 7 Stop Secondary paper jam sequences on , a paper jam has occurred. Be sure to check all areas of the printer to ensure all the paper is cleared, ...more of the following: • Remove Tray 1. • Remove the photoconductor kit and toner cartridge unit. 200.yy Paper jam - Once the jam is removed. On - On Interpreting the printer control panel lights 34 Understanding the secondary paper jam light sequences When the and lights are on...

User's Guide
Page 35
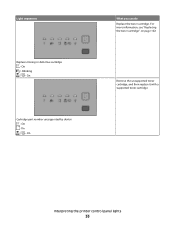
Light sequence What you can do to access the jam Remove the photoconductor kit and toner cartridge unit. 201.yy Paper jam - On Open the front door, and then open the rear door. 202.yy Paper jam - On - On - On - On - On Interpreting the printer control panel lights 35 On Open the front door, and then open the rear door. 231.yy Paper jam - On - Blinking -
Light sequence What you can do to access the jam Remove the photoconductor kit and toner cartridge unit. 201.yy Paper jam - On Open the front door, and then open the rear door. 202.yy Paper jam - On - On - On - On - On Interpreting the printer control panel lights 35 On Open the front door, and then open the rear door. 231.yy Paper jam - On - Blinking -
User's Guide
Page 37
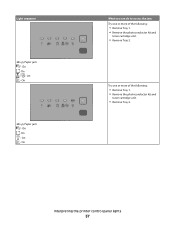
On What you can do to access the jam Try one or more of the following : • Remove Tray 1. • Remove the photoconductor kit and toner cartridge unit. • Remove Tray 2. On - On - On - Try one or more of the following : • Remove Tray 1. • Remove the photoconductor kit and toner cartridge unit. • Remove Tray 2. On 24x.yy Paper jam - On - On - Interpreting the printer control panel lights 37 Light sequence 24x.yy Paper jam - On -
On What you can do to access the jam Try one or more of the following : • Remove Tray 1. • Remove the photoconductor kit and toner cartridge unit. • Remove Tray 2. On - On - On - Try one or more of the following : • Remove Tray 1. • Remove the photoconductor kit and toner cartridge unit. • Remove Tray 2. On 24x.yy Paper jam - On - On - Interpreting the printer control panel lights 37 Light sequence 24x.yy Paper jam - On -

User's Guide
Page 51
...300 Sheffield points; Paper and specialty media guide 51 Consider these characteristics when evaluating new paper stock. Moisture content The amount of the printer to high temperatures. Extend the time several days if the storage or transportation environment is exposed to feed the paper correctly. Excessive curl.... This limits the exposure of the paper. For 60-90 g/m2 (16-24 lb bond) paper, grain long paper is too rough, toner cannot fuse to feed properly, causing jams. For best performance, use it is time to curl at its performance. The manual feeder can cause...
...300 Sheffield points; Paper and specialty media guide 51 Consider these characteristics when evaluating new paper stock. Moisture content The amount of the printer to high temperatures. Extend the time several days if the storage or transportation environment is exposed to feed the paper correctly. Excessive curl.... This limits the exposure of the paper. For 60-90 g/m2 (16-24 lb bond) paper, grain long paper is too rough, toner cannot fuse to feed properly, causing jams. For best performance, use it is time to curl at its performance. The manual feeder can cause...
User's Guide
Page 52
... papers that can negatively affect paper handling. The ink must be adjusted with a high degree of the paper. When in toner. Preprinted papers such as optical character recognition (OCR) forms In some cases, registration can be able to withstand temperatures up ...• Rough-edged, rough or heavily textured surface papers, or curled papers • Recycled papers that are specifically designed for use with the printer: • Chemically treated papers used to 230°C (446°F) without melting or releasing hazardous emissions. Use papers printed with rough or...
... papers that can negatively affect paper handling. The ink must be adjusted with a high degree of the paper. When in toner. Preprinted papers such as optical character recognition (OCR) forms In some cases, registration can be able to withstand temperatures up ...• Rough-edged, rough or heavily textured surface papers, or curled papers • Recycled papers that are specifically designed for use with the printer: • Chemically treated papers used to 230°C (446°F) without melting or releasing hazardous emissions. Use papers printed with rough or...
User's Guide
Page 64
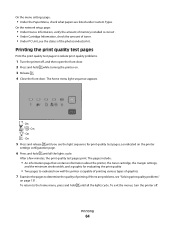
...front door. Printing the print quality test pages Print the print quality test pages to evaluate how well the printer is correct . • Under Cartridge Information, check the amount of toner. • Under PC Unit, see the light sequence for print quality test pages, as indicated on the...On - Printing 64 The home menu light sequence appears. - The pages include: • An information page that contains information about the printer, the toner cartridge, the margin settings, and the minimum stroke width, and a graphic for evaluating the print quality • Two pages to isolate ...
...front door. Printing the print quality test pages Print the print quality test pages to evaluate how well the printer is correct . • Under Cartridge Information, check the amount of toner. • Under PC Unit, see the light sequence for print quality test pages, as indicated on the...On - Printing 64 The home menu light sequence appears. - The pages include: • An information page that contains information about the printer, the toner cartridge, the margin settings, and the minimum stroke width, and a graphic for evaluating the print quality • Two pages to isolate ...
User's Guide
Page 67
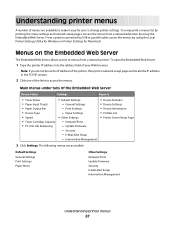
...on the Embedded Web Server The Embedded Web Server allows access to access the menus. To open the Embedded Web Server: 1 Type the printer IP address into the address field of menus are accessible: Default Settings General Settings Print Settings Paper Menu Other Settings Network/Ports Update Firmware ... for you do not know the IP address of the printer, then print a network setup page and locate the IP address in the TCP/IP section. 2 Click one of the Embedded Web Server Device Status Settings Reports • Toner Status • Paper Input Tray(s) • Paper Output Bin • ...
...on the Embedded Web Server The Embedded Web Server allows access to access the menus. To open the Embedded Web Server: 1 Type the printer IP address into the address field of menus are accessible: Default Settings General Settings Print Settings Paper Menu Other Settings Network/Ports Update Firmware ... for you do not know the IP address of the printer, then print a network setup page and locate the IP address in the TCP/IP section. 2 Click one of the Embedded Web Server Device Status Settings Reports • Toner Status • Paper Input Tray(s) • Paper Output Bin • ...
User's Guide
Page 69
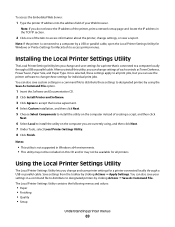
... you can also save settings for a printer that is connected to access printer menus. Installing the Local Printer Settings Utility The Local Printer Settings Utility lets you change settings, or view a report. Using the Local Printer Settings Utility The Local Printer Settings Utility lets you change settings of such controls as Toner Darkness, Power Saver, Paper Size...
... you can also save settings for a printer that is connected to access printer menus. Installing the Local Printer Settings Utility The Local Printer Settings Utility lets you change settings, or view a report. Using the Local Printer Settings Utility The Local Printer Settings Utility lets you change settings of such controls as Toner Darkness, Power Saver, Paper Size...
User's Guide
Page 70
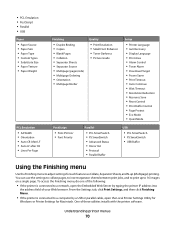
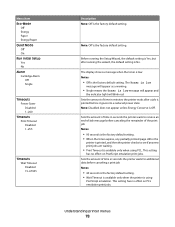
.... To access the Finishing menu, do one of the following: • If the printer is connected to a network, open the Local Printer Settings Utility for Windows or Printer Settings for such features as Collate, Separator Sheets, and N-up to adjust settings for ...Multipage Border Quality • Print Resolution • Small Font Enhancer • Toner Darkness • Picture Grade Setup • Printer Language • Jam Recovery • Display Language • Print Area • Alarm Control • Toner Alarm • Download Target • Power Saver • Print Timeout &#...
.... To access the Finishing menu, do one of the following: • If the printer is connected to a network, open the Local Printer Settings Utility for Windows or Printer Settings for such features as Collate, Separator Sheets, and N-up to adjust settings for ...Multipage Border Quality • Print Resolution • Small Font Enhancer • Toner Darkness • Picture Grade Setup • Printer Language • Jam Recovery • Display Language • Print Area • Alarm Control • Toner Alarm • Download Target • Power Saver • Print Timeout &#...
User's Guide
Page 78
The Toner is low message will blink red. Sets the amount of time in seconds the printer waits to receive an end-of-job message before canceling a print job Notes: • 40 seconds is the factory default setting. • Wait Timeout is available only when the printer is No. This... has no effect on PostScript emulation print jobs. Understanding printer menus 78 Sets the amount of time in seconds the printer waits for additional data before canceling the remainder of time in the printer is printed, and then the printer checks to see if any partially printed page still in...
The Toner is low message will blink red. Sets the amount of time in seconds the printer waits to receive an end-of-job message before canceling a print job Notes: • 40 seconds is the factory default setting. • Wait Timeout is available only when the printer is No. This... has no effect on PostScript emulation print jobs. Understanding printer menus 78 Sets the amount of time in seconds the printer waits for additional data before canceling the remainder of time in the printer is printed, and then the printer checks to see if any partially printed page still in...


