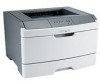
Lexmark 260dn Support Question
Lexmark 260dn Support Question
Find answers below for this question about Lexmark 260dn - E B/W Laser Printer.Need a Lexmark 260dn manual? We have 3 online manuals for this item!
Question posted by RebeccaSavage on May 27th, 2011
Blinking Light
I have a lexmark 260d, the toner light. (second from the green light) is blinking and i can't get it off. I have cleared away any jam's, but it won't stop. can you help??
Current Answers
Answer #1: Posted by LexmarkListens on July 5th, 2011 3:43 AM
LexmarkListens

Member since:
July 1st, 2011 Points: 1,410,540

Member since:
July 1st, 2011 Points: 1,410,540
The Toner Light blinking means that the Photoconductor is almost full and should be replaced soon. You need to press and release Continue button to clear the light sequence and continue printing. If its not working replace the Photoconductor kit.
Lexmark Listens
Phone:
USA: 1-800-539-6275
Canada: (877) 856-5540
UK: 0800 121 4726
South Africa: 0800 981 435
Related Lexmark 260dn Manual Pages
User's Guide - Page 7
... ports. Safety information
7 Do not subject the power cord to the printer.
Lexmark is misused, a risk of misuse. CAUTION-SHOCK HAZARD: To avoid the risk of electric shock...electrical or cabling connections, such as furniture and walls. CAUTION-POTENTIAL INJURY: This product uses a laser. This product uses a printing process that heats the print media, and the heat may be ...
User's Guide - Page 21
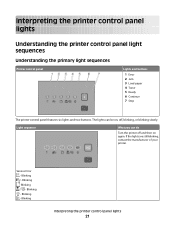
... blinking slowly.
Blinking
Interpreting the printer control panel lights
21 Blinking - Light sequence
What you can be on again. Blinking - Interpreting the printer control panel lights
Understanding the printer control panel light sequences
Understanding the primary light sequences
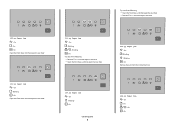
Printer control panel
Lights and buttons
1 Error 2 Jam 3 Load paper 4 Toner 5 Ready 6 Continue 7 Stop...
User's Guide - Page 22

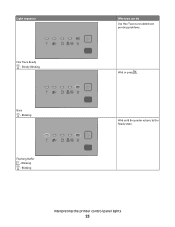
Blinking -
On (yellow)
Interpreting the printer control panel lights
22
Light sequence
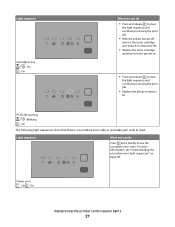
What you can do Replace the photoconductor kit. On
Send a job to print. Power Saver - On (green)
Send a job to print.
Ready - Blinking - Replace PC Kit -
User's Guide - Page 23
Slowly Blinking
Busy -
Blinking - Interpreting the printer control panel lights
23 Blinking
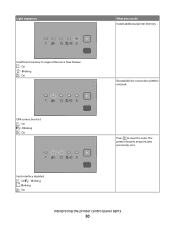
What you can do Use Hex Trace to the Ready state. Wait until the printer returns to troubleshoot printing problems.
Wait or press . Blinking
Flushing Buffer - Light sequence
Hex Trace Ready -
User's Guide - Page 24

... Code or Invalid Network Code - On
Wait for the light sequence to clear. On - On -
Canceling job - On - On
Interpreting the printer control panel lights
24 To avoid this light sequence in the future, make sure you can do Wait for the light sequence to clear. On - On -
Light sequence
What you use valid code when programming the...
User's Guide - Page 26
Blinking
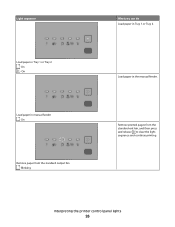
What you can do Load paper in manual feeder -
On
Load paper in Tray 1 or Tray 2. Interpreting the printer control panel lights
26 Remove printed pages from the standard output bin - On - On
Remove paper from the standard exit bin, and then press and release to clear the light sequence and continue printing. Load paper...
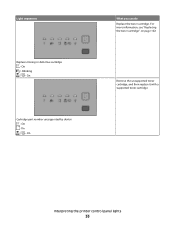
User's Guide - Page 27
...
Cartridge is a secondary error code or secondary jam code to read:
Light sequence
What you can do
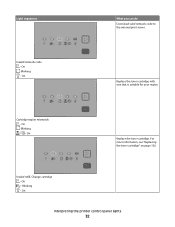
• Press and release to clear
the light sequence and continue processing the print job.
• With the printer turned off,
remove the toner cartridge and shake it to clear
the light sequence and continue processing the print job.
• Replace...
User's Guide - Page 30
Insufficient memory to clear the code. On - On
Press to support Resource Save feature - Blinking - On
Reestablish the connection with the network. Blinking - Blinking - On
Interpreting the printer control panel lights
30 Host interface disabled -
On - Light sequences
What you can do Install additional printer memory. Blinking - ENA connection lost - The printer discards any print...
User's Guide - Page 32
...Invalid refill, Change cartridge - Invalid network code - On
Replace the toner cartridge with one that is suitable for your region. For more information, see "Replacing the toner cartridge" on page 102. Blinking - On -
Cartridge region mismatch - On
Interpreting the printer control panel lights
32 On - Blinking - Light sequences
What you can do
Download valid network code to...
User's Guide - Page 33
... the printer control panel lights
33
On - On - Remove the unsupported toner cartridge, and then replace it with a supported toner cartridge. On
Cartridge part number unsupported by device - On
What you can do Replace the toner cartridge. For more information, see "Replacing the toner cartridge" on page 102. Light sequences
Replace missing or defective cartridge - Blinking -
User's Guide - Page 34

On
Interpreting the printer control panel lights
34 Printer control panel
Lights and buttons
1 Error 2 Jam 3 Load paper 4 Toner 5 Ready 6 Continue 7 Stop
Secondary paper jam sequences on , a paper jam has occurred. Once the jam is removed. Be sure to check all areas of the printer to ensure all the paper is cleared, press to access the jam
Try one or more of the jam. Press...
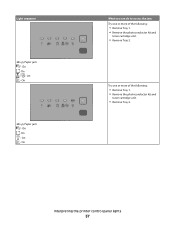
User's Guide - Page 35

On - On
Open the front door, and then open the rear door.
231.yy Paper jam - On - On - Light sequence
What you can do to access the jam
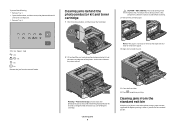
Remove the photoconductor kit and toner cartridge unit.
201.yy Paper jam - On
Interpreting the printer control panel lights
35 On
Open the front door, and then open the rear door.
202.yy Paper jam - On - Blinking - On -
User's Guide - Page 36
...
Try one or more of the following:
• Clear the jam at the standard exit bin.
• Load paper supported by the printer" on page 55.
235.yy Paper jam - On - Blinking - On - On
Try one or more of the following:
• Remove Tray 1. • Open the front door, and then open the
rear door...
User's Guide - Page 37
...
24x.yy Paper jam - On -
Light sequence
24x.yy Paper jam -
On - Interpreting the printer control panel lights
37 On - On - On - Try one or more of the following :
• Remove Tray 1. • Remove the photoconductor kit and
toner cartridge unit.
• Remove Tray 2. On
What you can do to access the jam Try one or more...
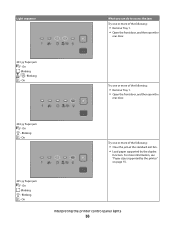
User's Guide - Page 113

...not load too much paper. Clearing jams
113 Clearing jams
Avoiding jams
The following hints can help you avoid jams:
• Use only recommended paper or specialty media. The
light sequence for loading paper also ...sure the guides in an appropriate environment. • Do not remove trays while the printer is printing. Make sure the stack height does not exceed the indicated maximum height. ...
User's Guide - Page 117

... then depress the lever.
235.yy Paper jam - Clearing jams
117 On Try one of the following :
• Remove Tray 1. • Open the front door, and then remove the photoconductor kit and toner cartridge unit. • Remove Tray 2. On - On - On - On
Remove the jam from the standard exit bin.
24x.yy Paper jam - - On - On - Blinking -
Blinking - Blinking -
User's Guide - Page 154
H
Hex Trace 93
I
installing printer software 19
installing software Local Printer Settings Utility 69
Invalid Engine Code 93 Invalid Network Code 93 IPv6 menu 88
J
jam light sequences 114 messages 114
jam recovery setting 65
jams accessing jam areas 114 avoiding 113
jams, clearing 200 118, 120 201 118, 120 233 122 behind photoconductor kit and toner cartridge unit 118 behind...
Quick Reference - Page 5

....
• Make sure all printer cables are attached correctly. More detailed instructions follow. On - On
Open the front door, and then remove the photoconductor kit and toner cartridge unit. Wait for
the light to access jam areas. On
Try one of the Embedded Web Server.
200.yy Paper jam
Clearing jams
5
200.yy Paper jam - The following : •...
Quick Reference - Page 6
... the front door, and then open the rear door. • Remove Tray 1, and then depress the lever.
202.yy Paper jam - Blinking - On
Clearing jams
6
24x.yy Paper jam - On - On
Remove the jam from the standard exit bin.
234.yy Paper jam - On
Open the front door, and then open the rear door.
233.yy Paper...
Quick Reference - Page 7
... a paper size not supported for duplex printing. Set the unit aside on the underside of the printer. On -
Clearing jams from the manual feeder.
2 Lift and pull the unit containing the photoconductor kit and the toner cartridge out of the photoconductor kit. Use the cartridge handle whenever you are holding the cartridge. Warning-Potential...
Similar Questions

I Have Changed The Toner In My Printer And The Toner Light Keeps Flashing.
(Posted by pennymorrison 10 years ago)

Print Error
Went to print, page stated to advance when the print error light came on. Clear from jams, opened al...
Went to print, page stated to advance when the print error light came on. Clear from jams, opened al...
(Posted by peyetim 12 years ago)

Toner Light
My toner is relatively new. The toner light is continually blinking. Why?
My toner is relatively new. The toner light is continually blinking. Why?
(Posted by judyd 12 years ago)
Busy Light On Lexmark 260dn
busy light flashes on a lexmark 260dn...won't print....reinstalled drivers, unplugged from computer,...
busy light flashes on a lexmark 260dn...won't print....reinstalled drivers, unplugged from computer,...
(Posted by bamorgan 12 years ago)

Manual For Laser 260dn
I wnat to purchase a manual for a Lexmark laser printer model 260dn
I wnat to purchase a manual for a Lexmark laser printer model 260dn
(Posted by nlafitte 12 years ago)