
User's Guide
Page 2
... set up this publication may be made to compatibility are included in certain transactions; Edition: July 2005 The following paragraph does not apply to any obligation to you. Improvements or changes in ports, such as the power cord or telephone, during a lightning storm. • Refer service or repairs, other replacement parts. Lexmark may not always be used . UNITED STATES GOVERNMENT RIGHTS This software...
... set up this publication may be made to compatibility are included in certain transactions; Edition: July 2005 The following paragraph does not apply to any obligation to you. Improvements or changes in ports, such as the power cord or telephone, during a lightning storm. • Refer service or repairs, other replacement parts. Lexmark may not always be used . UNITED STATES GOVERNMENT RIGHTS This software...

User's Guide
Page 3
... the Lexmark E120n operator panel lights 26 Operator panel codes for the Lexmark E120n 28 Using the printer resident Web page ...43 Printing the menu settings and network setup page 44 Restoring factory defaults ...44 Chapter 3: Print media tasks and tips 45 Types of print media ...46 Choosing appropriate print media ...46 Paper ...46 Preprinted forms and letterhead ...47 Transparencies ...47 Envelopes ...47 Labels ...47 Card stock ...48 Storing print media ...48 Loading print media into Tray 1 ...48 Loading print media into the priority feeder 51 Preventing jams ...52 Clearing jams ...53...
... the Lexmark E120n operator panel lights 26 Operator panel codes for the Lexmark E120n 28 Using the printer resident Web page ...43 Printing the menu settings and network setup page 44 Restoring factory defaults ...44 Chapter 3: Print media tasks and tips 45 Types of print media ...46 Choosing appropriate print media ...46 Paper ...46 Preprinted forms and letterhead ...47 Transparencies ...47 Envelopes ...47 Labels ...47 Card stock ...48 Storing print media ...48 Loading print media into Tray 1 ...48 Loading print media into the priority feeder 51 Preventing jams ...52 Clearing jams ...53...

User's Guide
Page 10
... Data light blinks once) Printing font list or menu settings page Programming engine code or system code Restoring factory defaults Cartridge region mismatch (Ready / Data light blinks four times) Missing cartridge / Defective cartridge detected (Ready / Data light blinks three times) Open door (Ready / Data light blinks once) Complex page (Ready / Data light blinks three times) ENA connection lost (Ready / Data light blinks five times) Insufficient collation area (Ready / Data light blinks three times) Overview of the Lexmark E120 operator panel 10 Using the operator panels Understanding...
... Data light blinks once) Printing font list or menu settings page Programming engine code or system code Restoring factory defaults Cartridge region mismatch (Ready / Data light blinks four times) Missing cartridge / Defective cartridge detected (Ready / Data light blinks three times) Open door (Ready / Data light blinks once) Complex page (Ready / Data light blinks three times) ENA connection lost (Ready / Data light blinks five times) Insufficient collation area (Ready / Data light blinks three times) Overview of the Lexmark E120 operator panel 10 Using the operator panels Understanding...
User's Guide
Page 13
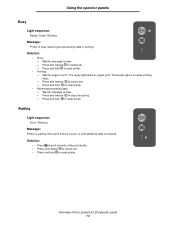
... to reset printer. Wait for message to clear. - Wait for pages to cancel job. - The ready light blinks as pages print. Using the operator panels Busy Light sequence: Ready / Data-Blinking Message: Printer is on when printing stops. - Press and release to reset printer. • Printing: - Press and hold to stop processing. - Solution: • Press to print contents of the Lexmark E120 operator panel 13 Press and hold to reset printer. Wait for message to clear. - Waiting Light sequence: Error-Blinking Message: Printer is waiting until a print timeout...
... to reset printer. Wait for message to clear. - Wait for pages to cancel job. - The ready light blinks as pages print. Using the operator panels Busy Light sequence: Ready / Data-Blinking Message: Printer is on when printing stops. - Press and release to reset printer. • Printing: - Press and hold to stop processing. - Solution: • Press to print contents of the Lexmark E120 operator panel 13 Press and hold to reset printer. Wait for message to clear. - Waiting Light sequence: Error-Blinking Message: Printer is waiting until a print timeout...
User's Guide
Page 20
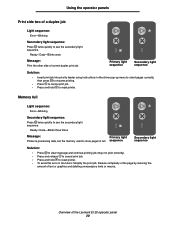
... Message: Print the other side of current duplex print job. Primary light sequence Secondary light sequence Solution: • Insert print job into priority feeder using instructions in the driver pop-up menu to orient pages correctly, then press to resume printing. • Press to cancel print job. • Press and hold to reset printer. • To avoid this error in the future: Simplify the print job. Using the operator panels Print side two of a duplex job Light sequence: Error-Blinking Secondary light sequence: Press twice quickly...
... Message: Print the other side of current duplex print job. Primary light sequence Secondary light sequence Solution: • Insert print job into priority feeder using instructions in the driver pop-up menu to orient pages correctly, then press to resume printing. • Press to cancel print job. • Press and hold to reset printer. • To avoid this error in the future: Simplify the print job. Using the operator panels Print side two of a duplex job Light sequence: Error-Blinking Secondary light sequence: Press twice quickly...

User's Guide
Page 23
.... Using the operator panels Short paper Light sequence: Error-Blinking Secondary light sequence: Press twice quickly to see the secondary light sequence. Ready / Data-Blinks three times Message: Paper length is set correctly in the toner cartridge is getting low. In addition, toner in the Local Printer Setup Utility paper size menu (see Software and Documentation CD). • Press to clear message and continue the job. • Press to cancel print job. If the print remains faded, replace the toner cartridge. Overview of the Lexmark E120 operator panel 23...
.... Using the operator panels Short paper Light sequence: Error-Blinking Secondary light sequence: Press twice quickly to see the secondary light sequence. Ready / Data-Blinks three times Message: Paper length is set correctly in the toner cartridge is getting low. In addition, toner in the Local Printer Setup Utility paper size menu (see Software and Documentation CD). • Press to clear message and continue the job. • Press to cancel print job. If the print remains faded, replace the toner cartridge. Overview of the Lexmark E120 operator panel 23...

User's Guide
Page 26
... / Data Blinking= Other panel lights On= Ready / Data Blinking= Primary light sequence Secondary light sequence Continue Ready / Data Toner Low/Replace PC Kit Load / Remove Paper Paper Jam Error Continue Ready / Data Toner Low/Replace PC Kit Load / Remove Paper Paper Jam Error Message Ready / Power Saver Busy Resolution reduced Waiting Cancel job / Reset printer Flushing buffer Invalid engine code Not ready Printing font list or menu settings page Programming engine code or system code Restoring factory defaults Cartridge region mismatch Overview of the Lexmark E120n operator panel 26...
... / Data Blinking= Other panel lights On= Ready / Data Blinking= Primary light sequence Secondary light sequence Continue Ready / Data Toner Low/Replace PC Kit Load / Remove Paper Paper Jam Error Continue Ready / Data Toner Low/Replace PC Kit Load / Remove Paper Paper Jam Error Message Ready / Power Saver Busy Resolution reduced Waiting Cancel job / Reset printer Flushing buffer Invalid engine code Not ready Printing font list or menu settings page Programming engine code or system code Restoring factory defaults Cartridge region mismatch Overview of the Lexmark E120n operator panel 26...

User's Guide
Page 28
... done to receive and process data. • Printer is functioning properly. Primary light sequence Using the operator panels Secondary light sequence Continue Ready / Data Toner Low/Replace PC Kit Load / Remove Paper Paper Jam Error Continue Ready / Data Toner Low/Replace PC Kit Load / Remove Paper Paper Jam Error Message Unsupported toner cartridge Service error Operator panel codes for the Lexmark E120n Following are explanations of the Lexmark E120n operator panel 28 Note: To change the Power Saver setting, use the Local Printer Setup Utility (see Software and Documentation CD).
... done to receive and process data. • Printer is functioning properly. Primary light sequence Using the operator panels Secondary light sequence Continue Ready / Data Toner Low/Replace PC Kit Load / Remove Paper Paper Jam Error Continue Ready / Data Toner Low/Replace PC Kit Load / Remove Paper Paper Jam Error Message Unsupported toner cartridge Service error Operator panel codes for the Lexmark E120n Following are explanations of the Lexmark E120n operator panel 28 Note: To change the Power Saver setting, use the Local Printer Setup Utility (see Software and Documentation CD).

User's Guide
Page 32
... factory default settings. Restoring factory defaults Light sequence: • Continue-On • Ready / Data-On • Toner Low/Replace PC Kit-On • Load / Remove Paper-On • Paper Jam-On • Error-On Message: Printer is resetting to clear. Solution: Wait for a label with your printer. Solution: Remove the toner cartridge, and install a new toner cartridge that is programmed for message to ready. Overview of the Lexmark E120n operator panel 32 Using the operator panels Programming engine code or system code Light sequence: • Ready / Data-On • Error...
... factory default settings. Restoring factory defaults Light sequence: • Continue-On • Ready / Data-On • Toner Low/Replace PC Kit-On • Load / Remove Paper-On • Paper Jam-On • Error-On Message: Printer is resetting to clear. Solution: Wait for a label with your printer. Solution: Remove the toner cartridge, and install a new toner cartridge that is programmed for message to ready. Overview of the Lexmark E120n operator panel 32 Using the operator panels Programming engine code or system code Light sequence: • Ready / Data-On • Error...

User's Guide
Page 37
.... • Continue-On • Ready / Data-On • Toner Low/Replace PC Kit-On • Error-On Primary light sequence Secondary light sequence Message: Printer is full. Overview of text or graphics and deleting unnecessary fonts or macros. Using the operator panels Print side two of a duplex job Light sequence: • Continue-Blinking • Load / Remove Paper-On Message: Print the other side of current duplex print job. Solution: • Insert print job into priority feeder using instructions in the future: Simplify...
.... • Continue-On • Ready / Data-On • Toner Low/Replace PC Kit-On • Error-On Primary light sequence Secondary light sequence Message: Printer is full. Overview of text or graphics and deleting unnecessary fonts or macros. Using the operator panels Print side two of a duplex job Light sequence: • Continue-Blinking • Load / Remove Paper-On Message: Print the other side of current duplex print job. Solution: • Insert print job into priority feeder using instructions in the future: Simplify...

User's Guide
Page 44
... code levels. Printing the menu settings and network setup page 44 A list of the printer settings and the current default values are marked with an asterisk. To restore the printer to the factory defaults. Some resident Web page features include a real-time status window of the printer and details of the settings back to the printer. See Printing the menu settings and network setup page. The network setup page confirms the network Status is "Connected" and lists the current network settings. Using the operator panels The Lexmark E120n (network model), has a resident Web...
... code levels. Printing the menu settings and network setup page 44 A list of the printer settings and the current default values are marked with an asterisk. To restore the printer to the factory defaults. Some resident Web page features include a real-time status window of the printer and details of the settings back to the printer. See Printing the menu settings and network setup page. The network setup page confirms the network Status is "Connected" and lists the current network settings. Using the operator panels The Lexmark E120n (network model), has a resident Web...

User's Guide
Page 48
... jamming problems. • Avoid using card stock that may contaminate the printer. Storing print media Use the following guidelines to avoid print media feeding problems and uneven print quality. • Store all print media in the priority feeder will be picked first. After the supply of media has been used up, media will be picked from Tray 1 Top door Paper support 50-sheet output bin Operator panel Front door Priority feeder with adjustable guides Front door release button Tray 1 cover / Priority feeder paper path Tray...
... jamming problems. • Avoid using card stock that may contaminate the printer. Storing print media Use the following guidelines to avoid print media feeding problems and uneven print quality. • Store all print media in the priority feeder will be picked first. After the supply of media has been used up, media will be picked from Tray 1 Top door Paper support 50-sheet output bin Operator panel Front door Priority feeder with adjustable guides Front door release button Tray 1 cover / Priority feeder paper path Tray...

User's Guide
Page 59
... the printer driver settings. 3 Click the Paper tab. 4 Select Manual paper or Manual envelope from the Paper tray drop-down and return address first. Use the priority feeder to be printed facing up , top of sheet first. Oil from fingers can affect print quality. • Insert envelopes with print media, the printer will feed through last. • Load letterhead face up , at the front of print media types or sizes that are loaded with the flap side down list...
... the printer driver settings. 3 Click the Paper tab. 4 Select Manual paper or Manual envelope from the Paper tray drop-down and return address first. Use the priority feeder to be printed facing up , top of sheet first. Oil from fingers can affect print quality. • Insert envelopes with print media, the printer will feed through last. • Load letterhead face up , at the front of print media types or sizes that are loaded with the flap side down list...
User's Guide
Page 76
... blue photoconductor drum and cause print quality problems. 3 Open the front door by sliding along the guides into the computer. 2 Click Printer Software. 3 Click Agree. 4 Select Local Printer Install, then click Next. 5 Select the printer and port, and check Local Printer Setup Utility. 6 Click Finish. Pull door up ). 4 Choose Edit Printer List. 5 Select appropriate printer from the Paper Type menu. Check printer driver settings to envelopes Jam occurs Solution / Answer See Understanding the Lexmark E120 operator panel lights on the...
... blue photoconductor drum and cause print quality problems. 3 Open the front door by sliding along the guides into the computer. 2 Click Printer Software. 3 Click Agree. 4 Select Local Printer Install, then click Next. 5 Select the printer and port, and check Local Printer Setup Utility. 6 Click Finish. Pull door up ). 4 Choose Edit Printer List. 5 Select appropriate printer from the Paper Type menu. Check printer driver settings to envelopes Jam occurs Solution / Answer See Understanding the Lexmark E120 operator panel lights on the...

User's Guide
Page 78
... finishes. • Make sure the printer driver paper type setting matches the type of intended life. Print quality problems 78 Use the following table for additional information. Symptom White lines ABCDE ABCDE ABCDE Cause Either the toner cartridge or the fuser is defective. • Replace the toner cartridge. Solution Replace the toner cartridge or the fuser*, as needed . priority feeder. • The toner cartridge is defective. Replace the toner cartridge or the fuser*, as needed . See Software and Documentation CD for solutions.
... finishes. • Make sure the printer driver paper type setting matches the type of intended life. Print quality problems 78 Use the following table for additional information. Symptom White lines ABCDE ABCDE ABCDE Cause Either the toner cartridge or the fuser is defective. • Replace the toner cartridge. Solution Replace the toner cartridge or the fuser*, as needed . priority feeder. • The toner cartridge is defective. Replace the toner cartridge or the fuser*, as needed . See Software and Documentation CD for solutions.

User's Guide
Page 79
...; Use only transparencies recommended by the printer manufacturer (use care not to touch transparency surfaces with your fingers). • Make sure the Form Type setting is set to print. • First, remove and reset the toner cartridge. Print quality problems 79 If problem persists, replace the toner cartridge. • Replace the long-life photoconductor kit. * To replace the fuser, call a service technician. † This setting can be changed using the Local Printer Setup Utility (Windows), or through Printer Settings (Macintosh...
...; Use only transparencies recommended by the printer manufacturer (use care not to touch transparency surfaces with your fingers). • Make sure the Form Type setting is set to print. • First, remove and reset the toner cartridge. Print quality problems 79 If problem persists, replace the toner cartridge. • Replace the long-life photoconductor kit. * To replace the fuser, call a service technician. † This setting can be changed using the Local Printer Setup Utility (Windows), or through Printer Settings (Macintosh...

User's Guide
Page 80
... Software and Documentation CD for the paper or specialty media used. Symptom Uneven print density ABCDE ABCDE ABCDE Ghost Images Troubleshooting Cause The toner cartridge is correct for additional information. Replace the long-life photoconductor kit. Replace the long-life photoconductor kit. * To replace the fuser, call a service technician. † This setting can be changed using the Local Printer Setup Utility (Windows), or through Printer Settings (Macintosh). Solution First, remove and reset the toner cartridge. Specifically located ghost images The...
... Software and Documentation CD for the paper or specialty media used. Symptom Uneven print density ABCDE ABCDE ABCDE Ghost Images Troubleshooting Cause The toner cartridge is correct for additional information. Replace the long-life photoconductor kit. Replace the long-life photoconductor kit. * To replace the fuser, call a service technician. † This setting can be changed using the Local Printer Setup Utility (Windows), or through Printer Settings (Macintosh). Solution First, remove and reset the toner cartridge. Specifically located ghost images The...

User's Guide
Page 81
Skewed print (Print is inappropriately slanted.) • The tray guide is defective or empty. Change the Form Size setting to fit lightly against the print media. First, remove and reset the toner cartridge. See Software and Documentation CD for the paper size loaded in the tray. Print quality problems 81 Uneven printing DE DE DE The toner cartridge is defective. • First, remove and reset the toner cartridge. If problem persists, replace the toner cartridge. Solid black pages • The toner cartridge is defective. • The printer requires service....
Skewed print (Print is inappropriately slanted.) • The tray guide is defective or empty. Change the Form Size setting to fit lightly against the print media. First, remove and reset the toner cartridge. See Software and Documentation CD for the paper size loaded in the tray. Print quality problems 81 Uneven printing DE DE DE The toner cartridge is defective. • First, remove and reset the toner cartridge. If problem persists, replace the toner cartridge. Solid black pages • The toner cartridge is defective. • The printer requires service....

User's Guide
Page 84
... a Remarketer or Lexmark for repair or replacement (at http://support.lexmark.com. Lexington, KY This limited warranty applies to present the feature or option with Lexmark user's guides, manuals, instructions or guidance • Unsuitable physical or operating environment • Maintenance by a Lexmark warranty, technical support may be required to a Lexmark designated location. Limited warranty Lexmark warrants that this product: • Is manufactured from new parts, or new and serviceable used parts, which it...
... a Remarketer or Lexmark for repair or replacement (at http://support.lexmark.com. Lexington, KY This limited warranty applies to present the feature or option with Lexmark user's guides, manuals, instructions or guidance • Unsuitable physical or operating environment • Maintenance by a Lexmark warranty, technical support may be required to a Lexmark designated location. Limited warranty Lexmark warrants that this product: • Is manufactured from new parts, or new and serviceable used parts, which it...

User's Guide
Page 87
... printer input and exit sensor 39 power button 6 preprinted forms 47 print media 5 choosing 46 loading 46 sizes 46 storing 46 types 46 print quality problems 76, 78 printer models 5 printer resident Web page 43 printing duplex 61 letterhead 63 menu settings 44 multi-page (N-up) 62 network settings 44 Printing Font List or Menu Settings Page 15, 31 priority feeder 51 priority tray 5 problems print quality 78 R recycling supplies 74 resource save off 41 restore factory defaults 44 S safety information 2 secondary error codes Complex page...
... printer input and exit sensor 39 power button 6 preprinted forms 47 print media 5 choosing 46 loading 46 sizes 46 storing 46 types 46 print quality problems 76, 78 printer models 5 printer resident Web page 43 printing duplex 61 letterhead 63 menu settings 44 multi-page (N-up) 62 network settings 44 Printing Font List or Menu Settings Page 15, 31 priority feeder 51 priority tray 5 problems print quality 78 R recycling supplies 74 resource save off 41 restore factory defaults 44 S safety information 2 secondary error codes Complex page...


