User's Guide
Page 4
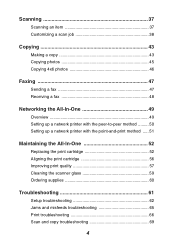
... printer with the peer-to-peer method ......... 50 Setting up a network printer with the point-and-print method ..... 51 Maintaining the All-In-One 52 Replacing the print cartridge 52 Aligning the print cartridge 56 Improving print quality 57 Cleaning the scanner glass 59 Ordering supplies 60 Troubleshooting 61 Setup troubleshooting 62 Jams and...
... printer with the peer-to-peer method ......... 50 Setting up a network printer with the point-and-print method ..... 51 Maintaining the All-In-One 52 Replacing the print cartridge 52 Aligning the print cartridge 56 Improving print quality 57 Cleaning the scanner glass 59 Ordering supplies 60 Troubleshooting 61 Setup troubleshooting 62 Jams and...
User's Guide
Page 7
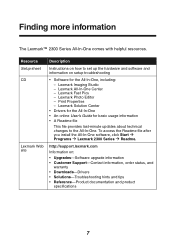
...; 2300 Series All-In-One comes with helpful resources. http://support.lexmark.com Information on setup troubleshooting • Software for basic usage information • A Readme file This file provides last-minute updates about technical changes to set ... Center • Drivers for the All-In-One • An online User's Guide for the All-In-One, including: - Lexmark Photo Editor - Lexmark Imaging Studio - Print Properties - Resource Setup sheet CD Lexmark Web site Description Instructions on how to the All-In-One. To access the Readme file after you install the All-In...
...; 2300 Series All-In-One comes with helpful resources. http://support.lexmark.com Information on setup troubleshooting • Software for basic usage information • A Readme file This file provides last-minute updates about technical changes to set ... Center • Drivers for the All-In-One • An online User's Guide for the All-In-One, including: - Lexmark Photo Editor - Lexmark Imaging Studio - Print Properties - Resource Setup sheet CD Lexmark Web site Description Instructions on how to the All-In-One. To access the Readme file after you install the All-In...

User's Guide
Page 8
If problems occur, see "Setup troubleshooting" on the Lexmark 2300 Series Setup sheet. Unpacking the All-In-One To set up the All-In-One, follow the instructions on page 62. Opening the box These items are in the box with the All-In-One: Note: A USB cable may or may not be included. 5 1 2 43 1 Power supply cord 2 USB cable 3 Print cartridge 4 Setup sheet 5 Software CD 8
If problems occur, see "Setup troubleshooting" on the Lexmark 2300 Series Setup sheet. Unpacking the All-In-One To set up the All-In-One, follow the instructions on page 62. Opening the box These items are in the box with the All-In-One: Note: A USB cable may or may not be included. 5 1 2 43 1 Power supply cord 2 USB cable 3 Print cartridge 4 Setup sheet 5 Software CD 8
User's Guide
Page 10
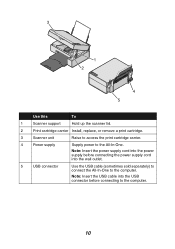
3 1 2 4 5 Use this To 1 Scanner support Hold up the scanner lid. 2 Print cartridge carrier Install, replace, or remove a print cartridge. 3 Scanner unit Raise to access the print cartridge carrier. 4 Power supply Supply power to the computer. Note: Insert the power supply cord into the wall outlet. 5 USB connector Use the USB cable (sometimes sold separately) to connect the All-In-One to the All-In-One. Note: Insert the USB cable into the USB connector before connecting the power supply cord into the power supply before connecting to the computer. 10
3 1 2 4 5 Use this To 1 Scanner support Hold up the scanner lid. 2 Print cartridge carrier Install, replace, or remove a print cartridge. 3 Scanner unit Raise to access the print cartridge carrier. 4 Power supply Supply power to the computer. Note: Insert the power supply cord into the wall outlet. 5 USB connector Use the USB cable (sometimes sold separately) to connect the All-In-One to the All-In-One. Note: Insert the USB cable into the USB connector before connecting the power supply cord into the power supply before connecting to the computer. 10
User's Guide
Page 11
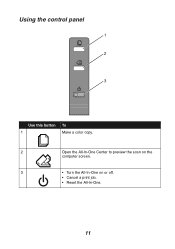
Using the control panel 1 2 3 Use this button 1 To Make a color copy. 2 Open the All-In-One Center to preview the scan on the computer screen. 3 • Turn the All-In-One on or off. • Cancel a print job. • Reset the All-In-One. 11
Using the control panel 1 2 3 Use this button 1 To Make a color copy. 2 Open the All-In-One Center to preview the scan on the computer screen. 3 • Turn the All-In-One on or off. • Cancel a print job. • Reset the All-In-One. 11
User's Guide
Page 12
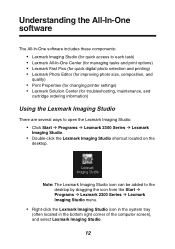
...-In-One software The All-In-One software includes these components: • Lexmark Imaging Studio (for quick access to each task) • Lexmark All-In-One Center (for managing tasks and print options) • Lexmark Fast Pics (for quick digital photo selection and printing) • Lexmark Photo Editor (for improving photo size, composition, and quality) •...
...-In-One software The All-In-One software includes these components: • Lexmark Imaging Studio (for quick access to each task) • Lexmark All-In-One Center (for managing tasks and print options) • Lexmark Fast Pics (for quick digital photo selection and printing) • Lexmark Photo Editor (for improving photo size, composition, and quality) •...
User's Guide
Page 13
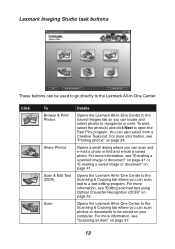
...on page 41 or "E-mailing a saved image or document" on page 42. Opens the Lexmark All-In-One Center to the Scanning & Copying tab where you can scan text to open the Fast Pics program. To print, select the photo(s) and click Next to a text-editing program. For more information, ... text using Optical Character Recognition (OCR)" on page 41. For more information, see "Printing photos" on page 37. 13 Click To Browse & Print Photos Share Photos Scan & Edit Text (OCR) Scan Details Opens the Lexmark All-In-One Center to the Saved Images tab so you can locate and select photos...
...on page 41 or "E-mailing a saved image or document" on page 42. Opens the Lexmark All-In-One Center to the Scanning & Copying tab where you can scan text to open the Fast Pics program. To print, select the photo(s) and click Next to a text-editing program. For more information, ... text using Optical Character Recognition (OCR)" on page 41. For more information, see "Printing photos" on page 37. 13 Click To Browse & Print Photos Share Photos Scan & Edit Text (OCR) Scan Details Opens the Lexmark All-In-One Center to the Saved Images tab so you can locate and select photos...
User's Guide
Page 16
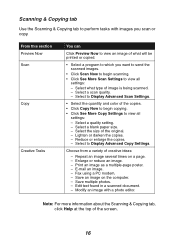
... Scan Copy Creative Tasks You can Click Preview Now to view an image of what type of image is being scanned. - Select what will be printed or copied. • Select a program to which you scan or copy. Select to Display Advanced Scan Settings. • Select the quantity and... color of creative ideas: - Select the size of the screen. 16 Select to view all settings: - Edit text found in a scanned document. - Modify an image with ...
... Scan Copy Creative Tasks You can Click Preview Now to view an image of what type of image is being scanned. - Select what will be printed or copied. • Select a program to which you scan or copy. Select to Display Advanced Scan Settings. • Select the quantity and... color of creative ideas: - Select the size of the screen. 16 Select to view all settings: - Edit text found in a scanned document. - Modify an image with ...
User's Guide
Page 17
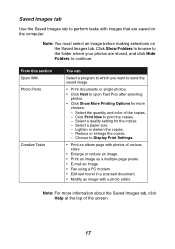
... browse to the folder where your photos are saved on the Saved Images tab. Select the quantity and color of the screen. 17 Reduce or enlarge the copies. - Choose to Display Print Settings. • Print an album page with photos of various sizes. • Enlarge or reduce an image. •... before making selections on the computer. Select a paper size. - From this section Open With Photo Prints Creative Tasks You can Select a program to which you want to send the saved image. • Print documents or single photos. • Click Next to open Fast Pics after selecting photos. • ...
... browse to the folder where your photos are saved on the Saved Images tab. Select the quantity and color of the screen. 17 Reduce or enlarge the copies. - Choose to Display Print Settings. • Print an album page with photos of various sizes. • Enlarge or reduce an image. •... before making selections on the computer. Select a paper size. - From this section Open With Photo Prints Creative Tasks You can Select a program to which you want to send the saved image. • Print documents or single photos. • Click Next to open Fast Pics after selecting photos. • ...
User's Guide
Page 18
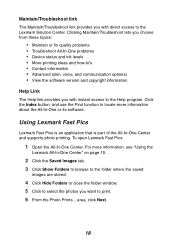
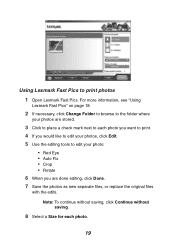
...saved images are stored. 4 Click Hide Folders to close the folder window. 5 Click to select the photos you with direct access to print. 6 From the Photo Prints... To open Lexmark Fast Pics: 1 Open the All-In-One Center. area, click Next. 18 For more information about the All-In-One or ...its software. Using Lexmark Fast Pics Lexmark Fast Pics is an application that is part of the All-In-One Center and supports photo printing. Clicking Maintain/Troubleshoot lets you choose from these topics: • Maintain or fix quality ...
...saved images are stored. 4 Click Hide Folders to close the folder window. 5 Click to select the photos you with direct access to print. 6 From the Photo Prints... To open Lexmark Fast Pics: 1 Open the All-In-One Center. area, click Next. 18 For more information about the All-In-One or ...its software. Using Lexmark Fast Pics Lexmark Fast Pics is an application that is part of the All-In-One Center and supports photo printing. Clicking Maintain/Troubleshoot lets you choose from these topics: • Maintain or fix quality ...
User's Guide
Page 19
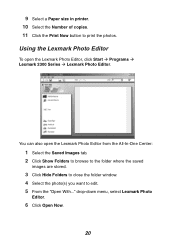
... continue without saving, click Continue without saving. 8 Select a Size for each photo you want to print. 4 If you would like to edit your photos, click Edit. 5 Use the editing tools to print photos 1 Open Lexmark Fast Pics. Using Lexmark Fast Pics to edit your photo: • Red Eye • Auto Fix • Crop •...
... continue without saving, click Continue without saving. 8 Select a Size for each photo you want to print. 4 If you would like to edit your photos, click Edit. 5 Use the editing tools to print photos 1 Open Lexmark Fast Pics. Using Lexmark Fast Pics to edit your photo: • Red Eye • Auto Fix • Crop •...
User's Guide
Page 20
.... 10 Select the Number of copies. 11 Click the Print Now button to edit. 5 From the "Open With..." You can also open the Lexmark Photo Editor, click Start Æ Programs Æ Lexmark 2300 Series Æ Lexmark Photo Editor. Using the Lexmark Photo Editor To open the Lexmark Photo Editor from the All-In-One Center: 1 Select...
.... 10 Select the Number of copies. 11 Click the Print Now button to edit. 5 From the "Open With..." You can also open the Lexmark Photo Editor, click Start Æ Programs Æ Lexmark 2300 Series Æ Lexmark Photo Editor. Using the Lexmark Photo Editor To open the Lexmark Photo Editor from the All-In-One Center: 1 Select...
User's Guide
Page 22
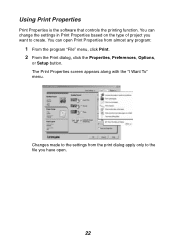
You can open . 22 Changes made to the settings from almost any program: 1 From the program "File" menu, click Print. 2 From the Print dialog, click the Properties, Preferences, Options, or Setup button. The Print Properties screen appears along with the "I Want To" menu. Using Print Properties Print Properties is the software that controls the printing function. You can change the settings in Print Properties based on the type of project you want to the file you have open Print Properties from the print dialog apply only to create.
You can open . 22 Changes made to the settings from almost any program: 1 From the program "File" menu, click Print. 2 From the Print dialog, click the Properties, Preferences, Options, or Setup button. The Print Properties screen appears along with the "I Want To" menu. Using Print Properties Print Properties is the software that controls the printing function. You can change the settings in Print Properties based on the type of project you want to the file you have open Print Properties from the print dialog apply only to create.
User's Guide
Page 23
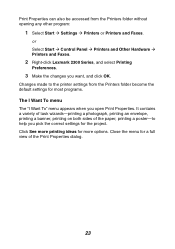
... can also be accessed from the Printers folder become the default settings for the project. Close the menu for more printing ideas for a full view of the paper, printing a poster-to the printer settings from the Printers folder without opening any other program: 1 Select Start Æ ... Printers and Faxes. or Select Start Æ Control Panel Æ Printers and Other Hardware Æ Printers and Faxes. 2 Right-click Lexmark 2300 Series, and select Printing Preferences. 3 Make the changes you pick the correct settings for most programs. The I Want To menu The "I Want To" menu appears...
... can also be accessed from the Printers folder become the default settings for the project. Close the menu for more printing ideas for a full view of the paper, printing a poster-to the printer settings from the Printers folder without opening any other program: 1 Select Start Æ ... Printers and Faxes. or Select Start Æ Control Panel Æ Printers and Other Hardware Æ Printers and Faxes. 2 Right-click Lexmark 2300 Series, and select Printing Preferences. 3 Make the changes you pick the correct settings for most programs. The I Want To menu The "I Want To" menu appears...
User's Guide
Page 24
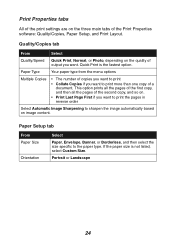
... the pages of the first copy, and then all the pages of the Print Properties software: Quality/Copies, Paper Setup, and Print Layout. Quality/Copies tab From Select Quality/Speed Quick Print, Normal, or Photo, depending on image content. Paper Setup tab From Paper Size Orientation Select Paper, ...Envelope, Banner, or Borderless, and then select the size specific to print more than one copy of output you want . Portrait or Landscape 24 Paper Type Your paper type from the menu options Multiple Copies &#...
... the pages of the first copy, and then all the pages of the Print Properties software: Quality/Copies, Paper Setup, and Print Layout. Quality/Copies tab From Select Quality/Speed Quick Print, Normal, or Photo, depending on image content. Paper Setup tab From Paper Size Orientation Select Paper, ...Envelope, Banner, or Borderless, and then select the size specific to print more than one copy of output you want . Portrait or Landscape 24 Paper Type Your paper type from the menu options Multiple Copies &#...
User's Guide
Page 25
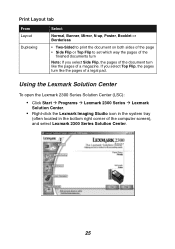
... Series Solution Center (LSC): • Click Start Æ Programs Æ Lexmark 2300 Series Æ Lexmark Solution Center. • Right-click the Lexmark Imaging Studio icon in the system tray (often located in the bottom right corner of a magazine. Print Layout tab From Layout Duplexing Select Normal, Banner, Mirror, N-up, Poster, Booklet or Borderless •...
... Series Solution Center (LSC): • Click Start Æ Programs Æ Lexmark 2300 Series Æ Lexmark Solution Center. • Right-click the Lexmark Imaging Studio icon in the system tray (often located in the bottom right corner of a magazine. Print Layout tab From Layout Duplexing Select Normal, Banner, Mirror, N-up, Poster, Booklet or Borderless •...
User's Guide
Page 26
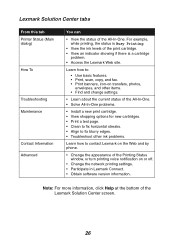
... Troubleshooting Maintenance Contact Information Advanced You can • View the status of the Printing Status window, or turn printing voice notification on or off. • Change the network printing settings. • Participate in Lexmark Connect. • Obtain software version information. Learn how to: • Use... of the All-In-One. For example, while printing, the status is Busy Printing. • View the ink levels of the Lexmark Solution Center screen. 26 Note: For more information, click Help at the bottom of the print cartridge. • View an indicator showing if there...
... Troubleshooting Maintenance Contact Information Advanced You can • View the status of the Printing Status window, or turn printing voice notification on or off. • Change the network printing settings. • Participate in Lexmark Connect. • Obtain software version information. Learn how to: • Use... of the All-In-One. For example, while printing, the status is Busy Printing. • View the ink levels of the Lexmark Solution Center screen. 26 Note: For more information, click Help at the bottom of the print cartridge. • View an indicator showing if there...

User's Guide
Page 28
...paper guide rests against the edge of the iron-on transfers. • You follow the loading instructions on the iron-on transfers • The print side (blank side) is facing you. glossy paper • You use photo paper that is facing you. Note: To prevent smudging, remove...before stacking. 28 Loading specialty media Follow these guidelines when loading specialty media: Load Make sure Up to 100 sheets of inkjet • The print side is made for inkjet printers. • If the paper came with instructions, you read them carefully. • You load the photo paper ...
...paper guide rests against the edge of the iron-on transfers. • You follow the loading instructions on the iron-on transfers • The print side (blank side) is facing you. glossy paper • You use photo paper that is facing you. Note: To prevent smudging, remove...before stacking. 28 Loading specialty media Follow these guidelines when loading specialty media: Load Make sure Up to 100 sheets of inkjet • The print side is made for inkjet printers. • If the paper came with instructions, you read them carefully. • You load the photo paper ...

User's Guide
Page 29
See "Changing print settings" on or behind the All-In-One, with instructions, you . • The cards are loaded vertically ...; You squeeze and slide the paper guide to the left edge of the cards. 29 postcards, or photo cards • The print side is facing you read them greeting card stock, carefully. Up to 25 sheets of • If the cards came with only... the number of sheets you need to print the banner. • You load the leading edge of the banner paper into the All-In-One. • You squeeze ...
See "Changing print settings" on or behind the All-In-One, with instructions, you . • The cards are loaded vertically ...; You squeeze and slide the paper guide to the left edge of the cards. 29 postcards, or photo cards • The print side is facing you read them greeting card stock, carefully. Up to 25 sheets of • If the cards came with only... the number of sheets you need to print the banner. • You load the leading edge of the banner paper into the All-In-One. • You squeeze ...

User's Guide
Page 31
Note: Do not load envelopes with: • Holes, perforations, or deep embossing • Metal clasps, string ties, or metal folding bars • Exposed flap adhesive 31 Load Up to 10 envelopes Make sure • The print side is facing you. • The envelopes are loaded vertically against the right side of the paper support. • The stamp location is in the upper left corner. • The paper guide rests against the edge of the envelopes.
Note: Do not load envelopes with: • Holes, perforations, or deep embossing • Metal clasps, string ties, or metal folding bars • Exposed flap adhesive 31 Load Up to 10 envelopes Make sure • The print side is facing you. • The envelopes are loaded vertically against the right side of the paper support. • The stamp location is in the upper left corner. • The paper guide rests against the edge of the envelopes.


