
User Guide
Page 2
......15 Available options ...15 Accessing the system board to install internal options 16 Installing a memory card ...17 Installing a flash memory or firmware card...18 Installing a printer hard disk ...20 Installing an internal print server or port interface card 21 Reinstalling the system board...23 Attaching cables...23 Loading paper and specialty...
......15 Available options ...15 Accessing the system board to install internal options 16 Installing a memory card ...17 Installing a flash memory or firmware card...18 Installing a printer hard disk ...20 Installing an internal print server or port interface card 21 Reinstalling the system board...23 Attaching cables...23 Loading paper and specialty...

User Guide
Page 3
...Using card stock...41 Storing paper...42 Supported paper sizes, types, and weights 42 Paper sizes supported by the printer...42 Paper types and weights supported by the printer 44 Paper types and weights supported by the finisher 44 Supported finishing features ...45 Printing...48 Installing... a document from Windows...48 Printing a document from a Macintosh computer 48 Printing confidential and other held jobs 48 Holding jobs in the printer ...48 Printing confidential and other held jobs from Windows 49 Printing confidential and other held jobs from a Macintosh computer 50 Printing from ...
...Using card stock...41 Storing paper...42 Supported paper sizes, types, and weights 42 Paper sizes supported by the printer...42 Paper types and weights supported by the printer 44 Paper types and weights supported by the finisher 44 Supported finishing features ...45 Printing...48 Installing... a document from Windows...48 Printing a document from a Macintosh computer 48 Printing confidential and other held jobs 48 Holding jobs in the printer ...48 Printing confidential and other held jobs from Windows 49 Printing confidential and other held jobs from a Macintosh computer 50 Printing from ...

User Guide
Page 4
... jam...64 280-282 paper jams...65 283-284 and 287-288 paper jams...66 284-286 paper jams...68 289 staple jam...69 Understanding printer menus 73 Menus list...73 Supplies menu...74 Paper menu...75 Default Source menu ...75 Paper Size/Type menu ...75 Configure MP menu...77 Substitute...
... jam...64 280-282 paper jams...65 283-284 and 287-288 paper jams...66 284-286 paper jams...68 289 staple jam...69 Understanding printer menus 73 Menus list...73 Supplies menu...74 Paper menu...75 Default Source menu ...75 Paper Size/Type menu ...75 Configure MP menu...77 Substitute...

User Guide
Page 5
...LexLink menu ...111 USB Direct menu...111 Help menu...111 Understanding printer messages 112 List of status and error messages...112 Maintaining the printer 129 Cleaning the exterior of the printer...129 Storing supplies...129 Conserving supplies...129 Checking the status of... photoconductor...141 Replacing a toner cartridge...144 Recycling Lexmark products...146 Moving the printer...146 Before moving the printer ...146 Moving the printer to another location...147 Setting the printer up in a new location ...147 Shipping the printer ...148 Administrative support 149 Adjusting the brightness or...
...LexLink menu ...111 USB Direct menu...111 Help menu...111 Understanding printer messages 112 List of status and error messages...112 Maintaining the printer 129 Cleaning the exterior of the printer...129 Storing supplies...129 Conserving supplies...129 Checking the status of... photoconductor...141 Replacing a toner cartridge...144 Recycling Lexmark products...146 Moving the printer...146 Before moving the printer ...146 Moving the printer to another location...147 Setting the printer up in a new location ...147 Shipping the printer ...148 Administrative support 149 Adjusting the brightness or...
User Guide
Page 6
... Supporting IPSec...152 Supporting SNMPv3...152 Using 802.1x authentication...153 Creating an administrative password...154 Using Secure mode...154 Troubleshooting 155 Checking an unresponsive printer...155 Door A will not shut properly...155 Solving printing problems...156 Multiple‑language PDFs do not print...156 Control panel display is blank or...
... Supporting IPSec...152 Supporting SNMPv3...152 Using 802.1x authentication...153 Creating an administrative password...154 Using Secure mode...154 Troubleshooting 155 Checking an unresponsive printer...155 Door A will not shut properly...155 Solving printing problems...156 Multiple‑language PDFs do not print...156 Control panel display is blank or...

User Guide
Page 8
...responsible for selecting print media to release emissions. CAUTION-POTENTIAL INJURY: If you have any cables going into the printer. To reduce the risk of specific Lexmark components. CAUTION-SHOCK HAZARD: Do not use of injury from the wall outlet before continuing. If you are installing...unplug the power cord from the wall outlet before touching it safely. This product uses a laser. This symbol indicates the presence of the printer might be obvious. CAUTION-POTENTIAL INJURY: Turn the printer off , and unplug the power cord from the wall outlet before continuing. If you ...
...responsible for selecting print media to release emissions. CAUTION-POTENTIAL INJURY: If you have any cables going into the printer. To reduce the risk of specific Lexmark components. CAUTION-SHOCK HAZARD: Do not use of injury from the wall outlet before continuing. If you are installing...unplug the power cord from the wall outlet before touching it safely. This product uses a laser. This symbol indicates the presence of the printer might be obvious. CAUTION-POTENTIAL INJURY: Turn the printer off , and unplug the power cord from the wall outlet before continuing. If you ...

User Guide
Page 9
Safety information 9 CAUTION-POTENTIAL INJURY: The printer weighs 91.2 kg (201 lb); therefore, it requires at least four people or a properly rated mechanical handling system to lift it, and make sure your fingers are not under the printer when you set it down. Disconnect all cords and cables from the printer before moving it safely. Use the handholds on the sides of the printer to lift it .
Safety information 9 CAUTION-POTENTIAL INJURY: The printer weighs 91.2 kg (201 lb); therefore, it requires at least four people or a properly rated mechanical handling system to lift it, and make sure your fingers are not under the printer when you set it down. Disconnect all cords and cables from the printer before moving it safely. Use the handholds on the sides of the printer to lift it .

User Guide
Page 10
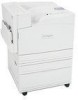
Learning about the printer 10 Learning about the printer Printer configurations All printer models have standard network capability. Basic model 1 Standard exit bin 2 Control panel 3 Standard 520‑sheet tray (Tray 1) 4 Multipurpose feeder 5 Duplex unit
Learning about the printer 10 Learning about the printer Printer configurations All printer models have standard network capability. Basic model 1 Standard exit bin 2 Control panel 3 Standard 520‑sheet tray (Tray 1) 4 Multipurpose feeder 5 Duplex unit

User Guide
Page 11
Learning about the printer 11 Configured models 1 Standard exit bin 2 Control panel 3 Standard 520‑sheet tray (Tray 1) 4-6 The High capacity feeder holds 2520 sheets and includes: • 4-520‑sheet tray (Tray 2) • 5-867‑sheet tray (Tray 3) • 6-1133‑sheet tray (Tray 4) 7 Multipurpose feeder 8 Duplex unit 1 Standard exit bin 2 Control panel
Learning about the printer 11 Configured models 1 Standard exit bin 2 Control panel 3 Standard 520‑sheet tray (Tray 1) 4-6 The High capacity feeder holds 2520 sheets and includes: • 4-520‑sheet tray (Tray 2) • 5-867‑sheet tray (Tray 3) • 6-1133‑sheet tray (Tray 4) 7 Multipurpose feeder 8 Duplex unit 1 Standard exit bin 2 Control panel

User Guide
Page 12
Learning about the printer 12 3 Standard 520‑sheet tray (Tray 1) 4‑6 The Tandem tray module (TTM) holds 1560 sheets and includes: • 4-520‑sheet tray (Tray 2) • 5-...
Learning about the printer 12 3 Standard 520‑sheet tray (Tray 1) 4‑6 The Tandem tray module (TTM) holds 1560 sheets and includes: • 4-520‑sheet tray (Tray 2) • 5-...

User Guide
Page 13
... to scroll through values or text that communicate the status of the printer 2 Indicator light Indicates the printer status: • Off-The power is off. • Blinking green-The printer is warming up, processing data, or printing. • Solid green-The printer is on, but idle. • Solid red-Operator intervention is .... 3 Keypad Enter numbers or symbols on the display. 4 Navigation buttons Press or to initiate action on a menu item. 6 Stop 7 Menu Stops all printer activity A list of options is not shown. The standard finisher is offered once Stopped appears on the display.
... to scroll through values or text that communicate the status of the printer 2 Indicator light Indicates the printer status: • Off-The power is off. • Blinking green-The printer is warming up, processing data, or printing. • Solid green-The printer is on, but idle. • Solid red-Operator intervention is .... 3 Keypad Enter numbers or symbols on the display. 4 Navigation buttons Press or to initiate action on a menu item. 6 Stop 7 Menu Stops all printer activity A list of options is not shown. The standard finisher is offered once Stopped appears on the display.

User Guide
Page 14
Learning about the printer 14 Control panel item Description 8 USB Direct interface Use this port to connect a USB flash memory device to the previous screen You can print from the connected device. 9 Back Returns the display to the printer.
Learning about the printer 14 Control panel item Description 8 USB Direct interface Use this port to connect a USB flash memory device to the previous screen You can print from the connected device. 9 Back Returns the display to the printer.

User Guide
Page 15
...; Fonts Firmware cards • Bar Code and Forms • IPDS and SCS/TNe • PrintCryptionTM • PRESCRIBE Other internal options • Printer hard disk • RS‑232 serial interface card • Parallel 1284‑B interface card • MarkNetTM N8000 Series Internal Print Servers Installing options...CAUTION-SHOCK HAZARD: If you are installing memory or option cards sometime after setting up the printer, turn the printer off as well and unplug any other devices attached to the printer, turn them to locate a card for removal. If you have any cables going to ...
...; Fonts Firmware cards • Bar Code and Forms • IPDS and SCS/TNe • PrintCryptionTM • PRESCRIBE Other internal options • Printer hard disk • RS‑232 serial interface card • Parallel 1284‑B interface card • MarkNetTM N8000 Series Internal Print Servers Installing options...CAUTION-SHOCK HAZARD: If you are installing memory or option cards sometime after setting up the printer, turn the printer off as well and unplug any other devices attached to the printer, turn them to locate a card for removal. If you have any cables going to ...

User Guide
Page 16
...components or connectors. Warning-Potential Damage: System board electrical components are easily damaged by static electricity. a Turn the screws on the printer before continuing. Touch something metal on the cover counterclockwise, and then remove them off , and unplug the power cord from the... then remove it. 2 Use the illustration below to locate the appropriate connector. If you have any other devices attached to the printer, turn them . Note: This operation requires a #2 Phillips screwdriver. 1 Remove the cover and system board. Installing options 16 Accessing the system ...
...components or connectors. Warning-Potential Damage: System board electrical components are easily damaged by static electricity. a Turn the screws on the printer before continuing. Touch something metal on the cover counterclockwise, and then remove them off , and unplug the power cord from the... then remove it. 2 Use the illustration below to locate the appropriate connector. If you have any other devices attached to the printer, turn them . Note: This operation requires a #2 Phillips screwdriver. 1 Remove the cover and system board. Installing options 16 Accessing the system ...

User Guide
Page 17
... card: 1 Access the system board. 2 Unpack the memory card. Warning-Potential Damage: System board electrical components are installing a memory card after setting up the printer, turn the printer off, and unplug the power cord from the wall outlet before touching any system board electronic components or connectors. An optional memory card can...
... card: 1 Access the system board. 2 Unpack the memory card. Warning-Potential Damage: System board electrical components are installing a memory card after setting up the printer, turn the printer off, and unplug the power cord from the wall outlet before touching any system board electronic components or connectors. An optional memory card can...

User Guide
Page 18
... interchangeable. Installing options 18 4 Align the notches on the memory card with the ridges on the printer before continuing. CAUTION-SHOCK HAZARD: If installing a flash memory or firmware card after setting up the printer, turn the printer off, and unplug the power cord from the wall outlet before touching any system board electronic...
... interchangeable. Installing options 18 4 Align the notches on the memory card with the ridges on the printer before continuing. CAUTION-SHOCK HAZARD: If installing a flash memory or firmware card after setting up the printer, turn the printer off, and unplug the power cord from the wall outlet before touching any system board electronic...

User Guide
Page 20
... disk CAUTION-SHOCK HAZARD: If installing a printer hard disk after setting up the printer, turn the printer off, and unplug the power cord from the package. 3 Attach the ribbon cable to the hard disk. 4 Attach the mounting plate to the mounting plate. 1 ... by static electricity. Note: A #2 Phillips screwdriver is needed to attach the hard disk to the hard disk with the screws. Touch something metal on the printer before continuing.
... disk CAUTION-SHOCK HAZARD: If installing a printer hard disk after setting up the printer, turn the printer off, and unplug the power cord from the package. 3 Attach the ribbon cable to the hard disk. 4 Attach the mounting plate to the mounting plate. 1 ... by static electricity. Note: A #2 Phillips screwdriver is needed to attach the hard disk to the hard disk with the screws. Touch something metal on the printer before continuing.

User Guide
Page 21
...card. Warning-Potential Damage: System board electrical components are easily damaged by static electricity. Note: A #2 Phillips screwdriver is needed to the printer, turn them off , and unplug the power cord from the wall outlet before touching any system board electronic components or connectors. Installing ...on the mounting plate into the holes on the printer before continuing. Installing an internal print server or port interface card CAUTION-SHOCK HAZARD: Turn the printer off as well and unplug any cables going into the printer. Touch something metal on the system board. ...
...card. Warning-Potential Damage: System board electrical components are easily damaged by static electricity. Note: A #2 Phillips screwdriver is needed to the printer, turn them off , and unplug the power cord from the wall outlet before touching any system board electronic components or connectors. Installing ...on the mounting plate into the holes on the printer before continuing. Installing an internal print server or port interface card CAUTION-SHOCK HAZARD: Turn the printer off as well and unplug any cables going into the printer. Touch something metal on the system board. ...

User Guide
Page 22
... side of the connector slot. Installing options 22 An internal print server allows connection from the printer to the system board tray. 7 Reinstall the system board. An optional port interface card expands the ways the printer can connect to a computer or external print server. 1 Access the system board. 2 Unpack the internal print...
... side of the connector slot. Installing options 22 An internal print server allows connection from the printer to the system board tray. 7 Reinstall the system board. An optional port interface card expands the ways the printer can connect to a computer or external print server. 1 Access the system board. 2 Unpack the internal print...

User Guide
Page 23
...port. A USB port requires a USB cable. Note: This operation requires a #2 Phillips screwdriver. 1 Gently insert the system board into the printer. 2 Replace the cover screws, and then turn them clockwise. 3 Tighten the screws firmly. Match the appropriate Ethernet cable to the computer using... sure to match the USB symbol on the cable with the USB symbol on the printer before touching any system board electronic components or connectors. Touch something metal on the printer. Installing options 23 Reinstalling the system board Warning-Potential Damage: System board electrical components ...
...port. A USB port requires a USB cable. Note: This operation requires a #2 Phillips screwdriver. 1 Gently insert the system board into the printer. 2 Replace the cover screws, and then turn them clockwise. 3 Tighten the screws firmly. Match the appropriate Ethernet cable to the computer using... sure to match the USB symbol on the cable with the USB symbol on the printer before touching any system board electronic components or connectors. Touch something metal on the printer. Installing options 23 Reinstalling the system board Warning-Potential Damage: System board electrical components ...

