User Guide
Page 10
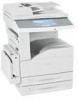
...be found on the Support Web site or on the store receipt and the back of the printer), and have it here Lexmark Support Web site-support.lexmark.com Note: Select your region, and then select your product to install any options, leave ...printer 10 If you plan to view the appropriate support site. Away from direct sunlight, humidity extremes, or temperature fluctuations - What are you looking for them also. The latest supplemental information, updates, and technical support: • Troubleshooting hints and tips • Frequently asked questions • Documentation • Driver...
...be found on the Support Web site or on the store receipt and the back of the printer), and have it here Lexmark Support Web site-support.lexmark.com Note: Select your region, and then select your product to install any options, leave ...printer 10 If you plan to view the appropriate support site. Away from direct sunlight, humidity extremes, or temperature fluctuations - What are you looking for them also. The latest supplemental information, updates, and technical support: • Troubleshooting hints and tips • Frequently asked questions • Documentation • Driver...
User Guide
Page 36
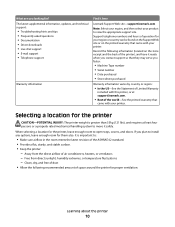
... information, see "Updating available options in the printer driver" on . 5 Set the printer software to recognize the optional input source. Remove stacked trays one at a time from the top down. 3 Align the printer with the USB symbol on the printer • The appropriate Ethernet cable to the computer... using a USB cable or Ethernet cable. Attaching cables Connect the printer to the Ethernet port Additional printer setup 36 Be sure to match the following:...
... information, see "Updating available options in the printer driver" on . 5 Set the printer software to recognize the optional input source. Remove stacked trays one at a time from the top down. 3 Align the printer with the USB symbol on the printer • The appropriate Ethernet cable to the computer... using a USB cable or Ethernet cable. Attaching cables Connect the printer to the Ethernet port Additional printer setup 36 Be sure to match the following:...
User Guide
Page 38
... to verify the network connection. The network setup page prints and the printer returns to the Lexmark Web site at www.lexmark.com. 2 From the Drivers & Downloads menu, click Driver Finder. 3 Select your printer, and then select your operating system. 4 Download the driver and install the printer software. This page also provides important information that aids network printing...
... to verify the network connection. The network setup page prints and the printer returns to the Lexmark Web site at www.lexmark.com. 2 From the Drivers & Downloads menu, click Driver Finder. 3 Select your printer, and then select your operating system. 4 Download the driver and install the printer software. This page also provides important information that aids network printing...
User Guide
Page 39
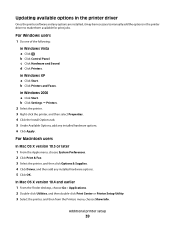
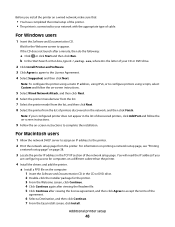
... Available Options, add any options are installed, it may be necessary to manually add the options in the printer driver to make them available for print jobs. c Click Hardware and Sound. b Click Printers and Faxes. Additional printer setup 39 For Macintosh users In Mac OS X version 10.5 or later 1 From the Apple menu, choose...
... Available Options, add any options are installed, it may be necessary to manually add the options in the printer driver to make them available for print jobs. c Click Hardware and Sound. b Click Printers and Faxes. Additional printer setup 39 For Macintosh users In Mac OS X version 10.5 or later 1 From the Apple menu, choose...
User Guide
Page 46
... Destination, and then click Continue. 7 From the Easy Install screen, click Install. For Windows users 1 Insert the Software and Documentation CD. Additional printer setup 46 If the CD does not launch after viewing the license agreement, and then click Agree to the License Agreement. 4 Select Suggested, and then... click Next. Before you are configuring access for computers on a different subnet than the printer. 4 Install the drivers and add the printer. Note: To configure the printer using a static IP address, using IPv6, or to appear.
... Destination, and then click Continue. 7 From the Easy Install screen, click Install. For Windows users 1 Insert the Software and Documentation CD. Additional printer setup 46 If the CD does not launch after viewing the license agreement, and then click Agree to the License Agreement. 4 Select Suggested, and then... click Next. Before you are configuring access for computers on a different subnet than the printer. 4 Install the drivers and add the printer. Note: To configure the printer using a static IP address, using IPv6, or to appear.
User Guide
Page 50
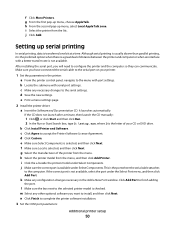
...up menu, choose AppleTalk. Make sure you will need to complete the printer software installation. 3 Set the COM port parameters: Additional printer setup 50 e Print a menu settings page. 2 Install the printer driver: a Insert the Software and Documentation CD. d Click Custom. g Select... the manufacturer of your printer. 1 Set the parameters in the Add a New Port window...
...up menu, choose AppleTalk. Make sure you will need to complete the printer software installation. 3 Set the COM port parameters: Additional printer setup 50 e Print a menu settings page. 2 Install the printer driver: a Insert the Software and Documentation CD. d Click Custom. g Select... the manufacturer of your printer. 1 Set the parameters in the Add a New Port window...
User Guide
Page 51
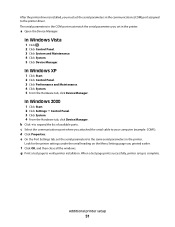
...parameters in the COM port must match the serial parameters you must set the serial parameters in the communications (COM) port assigned to the printer driver. In Windows XP 1 Click Start. 2 Click Control Panel. 3 Click Performance and Maintenance. 4 Click System. 5 From the Hardware tab,... Menu Settings page you attached the serial cable to the same serial parameters in the printer. After the printer driver is complete. When a test page prints successfully, printer setup is installed, you set in the printer. In Windows 2000 1 Click Start. 2 Click Settings ª Control Panel. 3...
...parameters in the COM port must match the serial parameters you must set the serial parameters in the communications (COM) port assigned to the printer driver. In Windows XP 1 Click Start. 2 Click Control Panel. 3 Click Performance and Maintenance. 4 Click System. 5 From the Hardware tab,... Menu Settings page you attached the serial cable to the same serial parameters in the printer. After the printer driver is complete. When a test page prints successfully, printer setup is installed, you set in the printer. In Windows 2000 1 Click Start. 2 Click Settings ª Control Panel. 3...
User Guide
Page 75
... Paper Texture setting. • Be aware that preprinting, perforation, and creasing may contaminate the printer. Tips on using labels Note: This printer is recommended. Print samples on the leading and driver edge, and use labels with adhesive, and could void the warranty. • If zone coating...°F) without sealing, excessive curling, wrinkling, or releasing hazardous emissions. • Use full label sheets. Tips on the Lexmark Web site at www.lexmark.com/publications. • Do not load labels together with paper or transparencies in .) away from edges is intended for use...
... Paper Texture setting. • Be aware that preprinting, perforation, and creasing may contaminate the printer. Tips on using labels Note: This printer is recommended. Print samples on the leading and driver edge, and use labels with adhesive, and could void the warranty. • If zone coating...°F) without sealing, excessive curling, wrinkling, or releasing hazardous emissions. • Use full label sheets. Tips on the Lexmark Web site at www.lexmark.com/publications. • Do not load labels together with paper or transparencies in .) away from edges is intended for use...
User Guide
Page 109
... Fax. 4 Click OK, and then click OK again. 5 On the Fax screen, type the name and number of a fax recipient on the printer control panel each fax number in the group with a semicolon (;). Note: If you do not have an ID and password, get one from your ...multiple-number shortcut, enter the fax numbers for your printer. 1 From your software program, click File ª Print. 2 From the Print window, select your Web browser. Use this function from your desk. Note: Separate each time you must use the PostScript printer driver for the group. Creating shortcuts Creating a fax destination...
... Fax. 4 Click OK, and then click OK again. 5 On the Fax screen, type the name and number of a fax recipient on the printer control panel each fax number in the group with a semicolon (;). Note: If you do not have an ID and password, get one from your ...multiple-number shortcut, enter the fax numbers for your printer. 1 From your software program, click File ª Print. 2 From the Print window, select your Web browser. Use this function from your desk. Note: Separate each time you must use the PostScript printer driver for the group. Creating shortcuts Creating a fax destination...

User Guide
Page 163
...used when the document is a high-quality photograph or inkjet print. Specifies the number of content that will be sent by scanning at the printer Allows driver to fax jobs to be scanned to fax Notes: • Text is used when the document is mostly text. • Text/Photo is... Redial 0-9 Redial Frequency 1-200 Behind a PABX Off On Enable ECM On Off Enable Fax Scans On Off Driver to fax On Off Allow Save as shortcuts in the printer Understanding printer menus 163 Specifies the type of minutes between redials Enables switchboard blind dialing without a dial tone Enables Error Correction...
...used when the document is a high-quality photograph or inkjet print. Specifies the number of content that will be sent by scanning at the printer Allows driver to fax jobs to be scanned to fax Notes: • Text is used when the document is mostly text. • Text/Photo is... Redial 0-9 Redial Frequency 1-200 Behind a PABX Off On Enable ECM On Off Enable Fax Scans On Off Driver to fax On Off Allow Save as shortcuts in the printer Understanding printer menus 163 Specifies the type of minutes between redials Enables switchboard blind dialing without a dial tone Enables Error Correction...
User Guide
Page 186
...; Fonts applies this setting only to text. • Horizontally darkens horizontal lines of text and images. • Vertically darkens vertical lines of a print job. The printer driver default is the factory default setting. No pages are not stapled. Menu item N-up (pages-sides) Note: None is 1200 IQ. Stacks copies or print... the printed output Notes: • 8 is the factory default setting. Description Specifies the printed output resolution Note: 600 dpi is the factory default setting. Understanding printer menus 186
...; Fonts applies this setting only to text. • Horizontally darkens horizontal lines of text and images. • Vertically darkens vertical lines of a print job. The printer driver default is the factory default setting. No pages are not stapled. Menu item N-up (pages-sides) Note: None is 1200 IQ. Stacks copies or print... the printed output Notes: • 8 is the factory default setting. Description Specifies the printed output resolution Note: 600 dpi is the factory default setting. Understanding printer menus 186

User Guide
Page 215
... computer, print server, option, or other network device. • All options are properly installed. • The printer driver settings are basic printer problems, or the printer is unresponsive, make sure: • The power cord is plugged into the printer and a properly grounded electrical outlet. • The electrical outlet is not turned off and contact Customer...
... computer, print server, option, or other network device. • All options are properly installed. • The printer driver settings are basic printer problems, or the printer is unresponsive, make sure: • The power cord is plugged into the printer and a properly grounded electrical outlet. • The electrical outlet is not turned off and contact Customer...
User Guide
Page 269
... problems Option does not operate correctly or quits after it . If the option is not listed, then reinstall it is listed in the printer driver" on . MAKE SURE THE OPTION IS SELECTED From the computer you are possible solutions. Troubleshooting 269 Paper trays These are printing from, select... the option. For more information, see the hardware setup documentation that came with the option, or go to www.lexmark.com/publications to see if the option is installed These are possible solutions. 4 Click Analog Fax Setup. 5 In the Max Speed box,...
... problems Option does not operate correctly or quits after it . If the option is not listed, then reinstall it is listed in the printer driver" on . MAKE SURE THE OPTION IS SELECTED From the computer you are possible solutions. Troubleshooting 269 Paper trays These are printing from, select... the option. For more information, see the hardware setup documentation that came with the option, or go to www.lexmark.com/publications to see if the option is installed These are possible solutions. 4 Click Analog Fax Setup. 5 In the Max Speed box,...
User Guide
Page 304
... a fax lighter or darker 112 sending a fax at a scheduled time 112 sending using the computer 109 sending using the printer control panel 108 setting the date and time 108 setting the outgoing fax name and number 108 using shortcuts 111 using the ...Image menu 193 information, finding 9 Insert Tray 219 installation wireless network 40, 43 installing options in driver 39 printer software 38 installing options order of installation 34 installing printer software adding options 39 internal print server installing 30 troubleshooting 271 Internal Solutions Port troubleshooting 271 Internal Solutions...
... a fax lighter or darker 112 sending a fax at a scheduled time 112 sending using the computer 109 sending using the printer control panel 108 setting the date and time 108 setting the outgoing fax name and number 108 using shortcuts 111 using the ...Image menu 193 information, finding 9 Insert Tray 219 installation wireless network 40, 43 installing options in driver 39 printer software 38 installing options order of installation 34 installing printer software adding options 39 internal print server installing 30 troubleshooting 271 Internal Solutions Port troubleshooting 271 Internal Solutions...


