
User's Guide
Page 3
... your All-In-One 1 Setting up your All-In-One 1 Understanding the parts of your All-In-One 1 Using the Operator Panel 2 Understanding your software 3 Using Print Properties 3 Using the Lexmark All-In-One Center 6 Using the Lexmark Solution Center 9 Using your All-In-One 11 Printing 11 Scanning 14 Copying 15 Faxing 17 Troubleshooting 18 Troubleshooting checklist 18 Setup troubleshooting 19 Printing troubleshooting 21 Scanning, copying, and faxing troubleshooting 23 Uninstalling and reinstalling the software 25 Appendix 26 Electronic...
... your All-In-One 1 Setting up your All-In-One 1 Understanding the parts of your All-In-One 1 Using the Operator Panel 2 Understanding your software 3 Using Print Properties 3 Using the Lexmark All-In-One Center 6 Using the Lexmark Solution Center 9 Using your All-In-One 11 Printing 11 Scanning 14 Copying 15 Faxing 17 Troubleshooting 18 Troubleshooting checklist 18 Setup troubleshooting 19 Printing troubleshooting 21 Scanning, copying, and faxing troubleshooting 23 Uninstalling and reinstalling the software 25 Appendix 26 Electronic...
User's Guide
Page 5
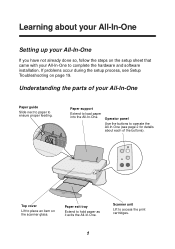
... on the setup sheet that came with your All-In-One Paper guide Slide next to paper to load paper into the All-In-One. Understanding the parts of the buttons). Paper support Extend to ensure proper feeding. Top cover Lift to place an item on page 19. Paper exit tray Extend to operate the All-In-One (see Setup Troubleshooting on the scanner glass. Operator panel Use the buttons to hold paper as it...
... on the setup sheet that came with your All-In-One Paper guide Slide next to paper to load paper into the All-In-One. Understanding the parts of the buttons). Paper support Extend to ensure proper feeding. Top cover Lift to place an item on page 19. Paper exit tray Extend to operate the All-In-One (see Setup Troubleshooting on the scanner glass. Operator panel Use the buttons to hold paper as it...
User's Guide
Page 6
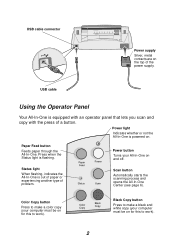
... starts the scanning process and opens the All-In-One Center (see page 6). Color Copy button Press to make a black and white copy (your computer must be on the top of the power supply. Black Copy button Press to make a color copy (your computer must be on for this to work ). USB cable Using the Operator Panel Your All-In-One is powered on and off. Press when the Status light is out of paper or experiencing another type of a button. Power button Turns...
... starts the scanning process and opens the All-In-One Center (see page 6). Color Copy button Press to make a black and white copy (your computer must be on the top of the power supply. Black Copy button Press to make a color copy (your computer must be on for this to work ). USB cable Using the Operator Panel Your All-In-One is powered on and off. Press when the Status light is out of paper or experiencing another type of a button. Power button Turns...
User's Guide
Page 7
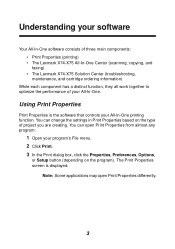
Using Print Properties Print Properties is displayed. You can change the settings in Print Properties based on the program). The Print Properties screen is the software that controls your All-In-One printing function. You can open Print Properties differently. 3 Note: Some applications may open Print Properties from almost any program: 1 Open your program's File menu. 2 Click Print. 3 In the Print dialog box, click the Properties, Preferences, Options, or Setup button (depending on the type of your All-In-One...
Using Print Properties Print Properties is displayed. You can change the settings in Print Properties based on the program). The Print Properties screen is the software that controls your All-In-One printing function. You can open Print Properties differently. 3 Note: Some applications may open Print Properties from almost any program: 1 Open your program's File menu. 2 Click Print. 3 In the Print dialog box, click the Properties, Preferences, Options, or Setup button (depending on the type of your All-In-One...
User's Guide
Page 9
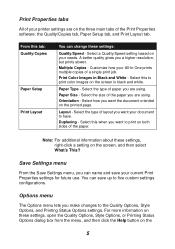
... settings configurations. A better quality gives you make changes to print on the three main tabs of a single print job. Select this tab: Quality/Copies Paper Setup Print Layout You can save your document to have. Select the size of paper you are using . You can change these settings, open the Quality Options, Style Options, or Printing Status Options dialog box from the menu, and then click the Help button on the screen, and then select What's This? Paper Type - Options menu The Options menu...
... settings configurations. A better quality gives you make changes to print on the three main tabs of a single print job. Select this tab: Quality/Copies Paper Setup Print Layout You can save your document to have. Select the size of paper you are using . You can change these settings, open the Quality Options, Style Options, or Printing Status Options dialog box from the menu, and then click the Help button on the screen, and then select What's This? Paper Type - Options menu The Options menu...

User's Guide
Page 11
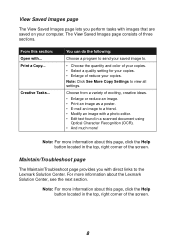
... type of exciting, creative ideas. • Enlarge or reduce an image. • Print an image as a poster. • E-mail an image to be scanned. From this page, click the Help button located in the top, right corner of the screen. 7 Note: Click See More Scan Settings to view all settings. • Choose the quantity and color of your copies. • Select a quality setting for your copies. • Adjust the size...
... type of exciting, creative ideas. • Enlarge or reduce an image. • Print an image as a poster. • E-mail an image to be scanned. From this page, click the Help button located in the top, right corner of the screen. 7 Note: Click See More Scan Settings to view all settings. • Choose the quantity and color of your copies. • Select a quality setting for your copies. • Adjust the size...
User's Guide
Page 12
... an image to view all settings. From this page, click the Help button located in a scanned document using Optical Character Recognition (OCR). • And much more! Note: For more information about the Lexmark Solution Center, see the next section. Note: Click See More Copy Settings to a friend. • Modify an image with images that are saved on your copies. Maintain/Troubleshoot page The Maintain/Troubleshoot page provides you perform tasks with a photo editor...
... an image to view all settings. From this page, click the Help button located in a scanned document using Optical Character Recognition (OCR). • And much more! Note: For more information about the Lexmark Solution Center, see the next section. Note: Click See More Copy Settings to a friend. • Modify an image with images that are saved on your copies. Maintain/Troubleshoot page The Maintain/Troubleshoot page provides you perform tasks with a photo editor...
User's Guide
Page 13
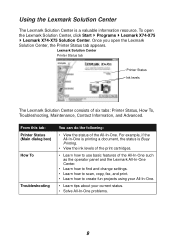
... Printer Status Ink levels The Lexmark Solution Center consists of the All-In-One. Using the Lexmark Solution Center The Lexmark Solution Center is Busy Printing. • View the ink levels of the print cartridges. • Learn how to use basic features of the All-In-One such as the operator panel and the Lexmark All-In-One Center. • Learn how to find and change settings. • Learn how to scan, copy, fax...
... Printer Status Ink levels The Lexmark Solution Center consists of the All-In-One. Using the Lexmark Solution Center The Lexmark Solution Center is Busy Printing. • View the ink levels of the print cartridges. • Learn how to use basic features of the All-In-One such as the operator panel and the Lexmark All-In-One Center. • Learn how to find and change settings. • Learn how to scan, copy, fax...
User's Guide
Page 14
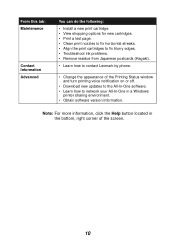
...; Print a test page. • Clean print nozzles to fix horizontal streaks. • Align the print cartridges to fix blurry edges. • Troubleshoot ink problems. • Remove residue from Japanese postcards (Hagaki). • Learn how to network your All-In-One in the bottom, right corner of the Printing Status window and turn printing voice notification on or off. • Download new updates to the All-In-One software. • Learn how to contact Lexmark by phone...
...; Print a test page. • Clean print nozzles to fix horizontal streaks. • Align the print cartridges to fix blurry edges. • Troubleshoot ink problems. • Remove residue from Japanese postcards (Hagaki). • Learn how to network your All-In-One in the bottom, right corner of the Printing Status window and turn printing voice notification on or off. • Download new updates to the All-In-One software. • Learn how to contact Lexmark by phone...
User's Guide
Page 16
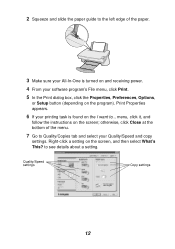
.../Copies tab and select your software program's File menu, click Print. 5 In the Print dialog box, click the Properties, Preferences, Options, or Setup button (depending on and receiving power. 4 From your Quality/Speed and copy settings. Print Properties appears. 6 If your printing task is turned on the program). to the left edge of the menu. 7 Go to ... menu, click it, and follow the instructions on the screen, and then select What's This? Quality/Speed settings Copy settings...
.../Copies tab and select your software program's File menu, click Print. 5 In the Print dialog box, click the Properties, Preferences, Options, or Setup button (depending on and receiving power. 4 From your Quality/Speed and copy settings. Print Properties appears. 6 If your printing task is turned on the program). to the left edge of the menu. 7 Go to ... menu, click it, and follow the instructions on the screen, and then select What's This? Quality/Speed settings Copy settings...
User's Guide
Page 19
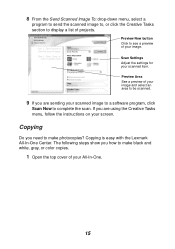
... color copies. 1 Open the top cover of your image. Preview Now button Click to see a preview of your All-In-One. 15 8 From the Send Scanned Image To: drop-down menu, select a program to send the scanned image to, or click the Creative Tasks section to display a list of your image and select an area to be scanned. 9 If you are using the Creative Tasks menu, follow the instructions on your screen. Scan Settings Adjust...
... color copies. 1 Open the top cover of your image. Preview Now button Click to see a preview of your All-In-One. 15 8 From the Send Scanned Image To: drop-down menu, select a program to send the scanned image to, or click the Creative Tasks section to display a list of your image and select an area to be scanned. 9 If you are using the Creative Tasks menu, follow the instructions on your screen. Scan Settings Adjust...
User's Guide
Page 22
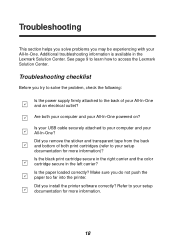
...-One. Make sure you install the printer software correctly? Additional troubleshooting information is available in the left carrier? Troubleshooting checklist Before you try to solve the problem, check the following: Is the power supply firmly attached to the back of both your computer and your setup documentation for more information. 18 Is the paper loaded correctly? Refer to access the Lexmark Solution Center. Are both print cartridges (refer...
...-One. Make sure you install the printer software correctly? Additional troubleshooting information is available in the left carrier? Troubleshooting checklist Before you try to solve the problem, check the following: Is the power supply firmly attached to the back of both your computer and your setup documentation for more information. 18 Is the paper loaded correctly? Refer to access the Lexmark Solution Center. Are both print cartridges (refer...

User's Guide
Page 23
... during setup. Make sure the black print cartridge is secure in the right carrier and the color cartridge is secure in the left carrier. Make sure you loaded the paper correctly and did not come on the operator panel. Refer to solve problems you completely removed the sticker and transparent tape from the back and bottom of both print cartridges. Press the Power button on Check the power supply connections. Power light did...
... during setup. Make sure the black print cartridge is secure in the right carrier and the color cartridge is secure in the left carrier. Make sure you loaded the paper correctly and did not come on the operator panel. Refer to solve problems you completely removed the sticker and transparent tape from the back and bottom of both print cartridges. Press the Power button on Check the power supply connections. Power light did...
User's Guide
Page 25
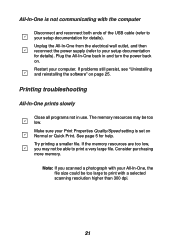
Restart your setup documentation for details). Printing troubleshooting All-In-One prints slowly Close all programs not in and turn the power back on. If problems still persist, see "Uninstalling and reinstalling the software" on page 25. The memory resources may not be too low. See page 5 for details). Try printing a smaller file. If the memory resources are too low, you scanned a photograph with a selected scanning resolution higher than 300 dpi...
Restart your setup documentation for details). Printing troubleshooting All-In-One prints slowly Close all programs not in and turn the power back on. If problems still persist, see "Uninstalling and reinstalling the software" on page 25. The memory resources may not be too low. See page 5 for details). Try printing a smaller file. If the memory resources are too low, you scanned a photograph with a selected scanning resolution higher than 300 dpi...
User's Guide
Page 26
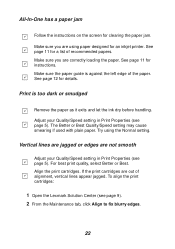
... the paper guide is too dark or smudged Remove the paper as it exits and let the ink dry before handling. Adjust your Quality/Speed setting in Print Properties (see page 9). 2 From the Maintenance tab, click Align to fix blurry edges. 22 To align the print cartridges: 1 Open the Lexmark Solution Center (see page 5). See page 11 for an inkjet printer. Print is against the left edge of alignment, vertical lines appear jagged. Try using paper designed for instructions. Make...
... the paper guide is too dark or smudged Remove the paper as it exits and let the ink dry before handling. Adjust your Quality/Speed setting in Print Properties (see page 9). 2 From the Maintenance tab, click Align to fix blurry edges. 22 To align the print cartridges: 1 Open the Lexmark Solution Center (see page 5). See page 11 for an inkjet printer. Print is against the left edge of alignment, vertical lines appear jagged. Try using paper designed for instructions. Make...
User's Guide
Page 27
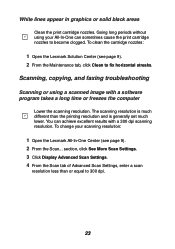
... dpi scanning resolution. To change your All-In-One can achieve excellent results with a software program takes a long time or freezes the computer Lower the scanning resolution. Scanning, copying, and faxing troubleshooting Scanning or using your scanning resolution: 1 Open the Lexmark All-In-One Center (see page 9). 2 From the Maintenance tab, click Clean to 300 dpi. 23 The scanning resolution is generally set much different than or equal to fix horizontal streaks. White lines...
... dpi scanning resolution. To change your All-In-One can achieve excellent results with a software program takes a long time or freezes the computer Lower the scanning resolution. Scanning, copying, and faxing troubleshooting Scanning or using your scanning resolution: 1 Open the Lexmark All-In-One Center (see page 9). 2 From the Maintenance tab, click Clean to 300 dpi. 23 The scanning resolution is generally set much different than or equal to fix horizontal streaks. White lines...
User's Guide
Page 28
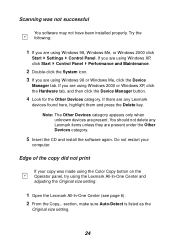
... the Delete key. If you are using Windows 2000 or Windows XP, click the Hardware tab, and then click the Device Manager button. 4 Look for the Other Devices category. Scanning was made using the Color Copy button on the Operator panel, try using the Lexmark All-In-One Center and adjusting the Original size setting: 1 Open the Lexmark All-In-One Center (see page 6). 2 From the Copy... Try the following: 1 If you are using Windows 98, Windows Me, or Windows...
... the Delete key. If you are using Windows 2000 or Windows XP, click the Hardware tab, and then click the Device Manager button. 4 Look for the Other Devices category. Scanning was made using the Color Copy button on the Operator panel, try using the Lexmark All-In-One Center and adjusting the Original size setting: 1 Open the Lexmark All-In-One Center (see page 6). 2 From the Copy... Try the following: 1 If you are using Windows 98, Windows Me, or Windows...
User's Guide
Page 29
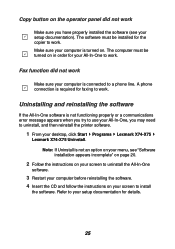
... or a communications error message appears when you try to use your All-In-One, you have properly installed the software (see your setup documentation). Refer to work . Copy button on your screen to install the software. A phone connection is connected to a phone line. Uninstalling and reinstalling the software If the All-In-One software is not an option on your menu, see "Software installation appears incomplete" on page 20. 2 Follow the instructions on your screen to uninstall...
... or a communications error message appears when you try to use your All-In-One, you have properly installed the software (see your setup documentation). Refer to work . Copy button on your screen to install the software. A phone connection is connected to a phone line. Uninstalling and reinstalling the software If the All-In-One software is not an option on your menu, see "Software installation appears incomplete" on page 20. 2 Follow the instructions on your screen to uninstall...

User's Guide
Page 32
... How To tab 9 Maintenance tab 10 opening 9 Status tab 9 Troubleshooting tab 9 loading paper 11 M Maintain/Troubleshoot page 8 Maintenance tab 10 multiple copies 5 O OCR (Optical Character Recognition) 7, 8 operator panel using 2 Optical Character Recognition (OCR) 7, 8 orientation, selecting 5 P paper acceptable types of 11 loading 11 paper exit tray 1 Paper Feed button 2 paper feed button 2 paper guide 1 adjusting 12 Paper Setup tab 5 paper support 1 parts of 9 Color Copy button 2, 16 Contact Information tab 10 copies 5 copy settings 7 copying 15 D duplexing 5 E electronic emission notices...
... How To tab 9 Maintenance tab 10 opening 9 Status tab 9 Troubleshooting tab 9 loading paper 11 M Maintain/Troubleshoot page 8 Maintenance tab 10 multiple copies 5 O OCR (Optical Character Recognition) 7, 8 operator panel using 2 Optical Character Recognition (OCR) 7, 8 orientation, selecting 5 P paper acceptable types of 11 loading 11 paper exit tray 1 Paper Feed button 2 paper feed button 2 paper guide 1 adjusting 12 Paper Setup tab 5 paper support 1 parts of 9 Color Copy button 2, 16 Contact Information tab 10 copies 5 copy settings 7 copying 15 D duplexing 5 E electronic emission notices...
User's Guide
Page 33
...... section 8 Print a Copy...section 8 voice notification turning on the glass 14 settings, saving for future use 5 setup 1 setup troubleshooting 19 software reinstalling 25 uninstalling 25 software setup 1 sound, see voice notification status light 2 Status tab 9 T top cover 1 transparencies 11 troubleshooting copying problems 23 faxing problems 23 scanning problems 23 setup problems 19 troubleshooting checklist 18 Troubleshooting tab 9 U uninstalling software 25 USB cable connector 2 V View Saved Images page 8 Open with... section 7 Scan button 2 scan settings 7 scanner unit 1 scanning 14...
...... section 8 Print a Copy...section 8 voice notification turning on the glass 14 settings, saving for future use 5 setup 1 setup troubleshooting 19 software reinstalling 25 uninstalling 25 software setup 1 sound, see voice notification status light 2 Status tab 9 T top cover 1 transparencies 11 troubleshooting copying problems 23 faxing problems 23 scanning problems 23 setup problems 19 troubleshooting checklist 18 Troubleshooting tab 9 U uninstalling software 25 USB cable connector 2 V View Saved Images page 8 Open with... section 7 Scan button 2 scan settings 7 scanner unit 1 scanning 14...

