User's Guide
Page 8
Printing fax activity reports...129 Maintaining the printer 130 Removing a used print cartridge...130 Installing print cartridges...130 Refilling print cartridges...132 Using genuine Lexmark print cartridges 132 Aligning print cartridges...133 Cleaning the print cartridge nozzles 133 Wiping the print cartridge nozzles and contacts 133 Preserving the print cartridges...134 Cleaning the scanner glass...135 Cleaning the exterior of the...
Printing fax activity reports...129 Maintaining the printer 130 Removing a used print cartridge...130 Installing print cartridges...130 Refilling print cartridges...132 Using genuine Lexmark print cartridges 132 Aligning print cartridges...133 Cleaning the print cartridge nozzles 133 Wiping the print cartridge nozzles and contacts 133 Preserving the print cartridges...134 Cleaning the scanner glass...135 Cleaning the exterior of the...
User's Guide
Page 9
...edges of the page...156 Print speed is slow...157 Partial document or photo prints...158 Photo smudges or scratches ...158 Checking the print cartridges...158 Ink levels seem incorrect ...158 Ink levels seem to go down too quickly ...159 A blank or incorrect page prints...159 Characters...White lines appear in graphics or solid black areas 162 Checking the printer status...163 Settings are not saved...163 Checking printer readiness...164 Checking the Spool Settings for banner printing 164 Resolving font problems ...164 Printer is busy printing another job ...165 Ready or Busy Printing is listed...
...edges of the page...156 Print speed is slow...157 Partial document or photo prints...158 Photo smudges or scratches ...158 Checking the print cartridges...158 Ink levels seem incorrect ...158 Ink levels seem to go down too quickly ...159 A blank or incorrect page prints...159 Characters...White lines appear in graphics or solid black areas 162 Checking the printer status...163 Settings are not saved...163 Checking printer readiness...164 Checking the Spool Settings for banner printing 164 Resolving font problems ...164 Printer is busy printing another job ...165 Ready or Busy Printing is listed...
User's Guide
Page 17
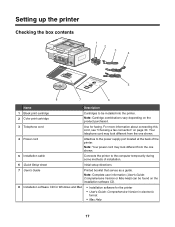
... connection" on the installation software CD. 8 Installation software CD for Windows and Mac • Installation software for faxing. Note: Cartridge combinations vary depending on the product purchased. 3 Telephone cord Use for the printer • User's Guide: Comprehensive Version in electronic format • Mac Help 17 Note: Your power cord may look different...
... connection" on the installation software CD. 8 Installation software CD for Windows and Mac • Installation software for faxing. Note: Cartridge combinations vary depending on the product purchased. 3 Telephone cord Use for the printer • User's Guide: Comprehensive Version in electronic format • Mac Help 17 Note: Your power cord may look different...
User's Guide
Page 19
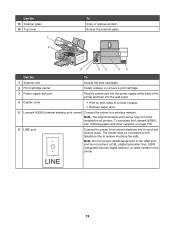
... Use the To 1 Scanner unit Access the print cartridges. 2 Print cartridge carrier Install, replace, or remove a print cartridge. 3 Power supply with port Plug the power cord into the power supply at the back of paper. • Remove paper jams. 5 Lexmark N2050 (internal wireless print server) Connect the printer to send and receive faxes. Note: Do...
... Use the To 1 Scanner unit Access the print cartridges. 2 Print cartridge carrier Install, replace, or remove a print cartridge. 3 Power supply with port Plug the power cord into the power supply at the back of paper. • Remove paper jams. 5 Lexmark N2050 (internal wireless print server) Connect the printer to send and receive faxes. Note: Do...
User's Guide
Page 23
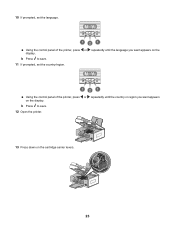
10 If prompted, set the country/region. 121 a Using the control panel of the printer, press or repeatedly until the country or region you want appears on the display. b Press to save . 12 Open the printer. 13 Press down on the display. b Press to save . 11 If prompted, set the language. 121 a Using the control panel of the printer, press or repeatedly until the language you want appears on the cartridge carrier levers. 23
10 If prompted, set the country/region. 121 a Using the control panel of the printer, press or repeatedly until the country or region you want appears on the display. b Press to save . 12 Open the printer. 13 Press down on the display. b Press to save . 11 If prompted, set the language. 121 a Using the control panel of the printer, press or repeatedly until the language you want appears on the cartridge carrier levers. 23

User's Guide
Page 41
... country or region you selected during initial setup. Select the size and type of the black (or photo) cartridge. • Clean Cartridges to clean the print cartridge nozzles. • Align Cartridges to align the cartridge. • Print Test Page to print a test page. Pattern 1 (FSK) - For more information, ...8226; Caller ID Pattern to choose from one of photo(s) to print. • Set Defaults to change the timeout feature before the printer, if left unused, resets to the factory default settings. From here Maintenance Paper Setup Device Setup Defaults You can Select: • ...
... country or region you selected during initial setup. Select the size and type of the black (or photo) cartridge. • Clean Cartridges to clean the print cartridge nozzles. • Align Cartridges to align the cartridge. • Print Test Page to print a test page. Pattern 1 (FSK) - For more information, ...8226; Caller ID Pattern to choose from one of photo(s) to print. • Set Defaults to change the timeout feature before the printer, if left unused, resets to the factory default settings. From here Maintenance Paper Setup Device Setup Defaults You can Select: • ...

User's Guide
Page 45
...one of the following : • In Windows Vista, click . • In Windows XP and earlier, click Start. 2 Click Programs orAll Programs Œ Lexmark 6500 Series. 3 Select Solution Center. Print, scan, copy, and fax. - Method 1 Method 2 1 From the desktop, double-click on transfers, and ..., use one of the Welcome Screen, there are two Settings choices: Click To Printer Status and Maintenance • Open the Solution Center. • Check ink levels. • Order print cartridges. • Find maintenance information. • Select other Solution Center tabs for more...
...one of the following : • In Windows Vista, click . • In Windows XP and earlier, click Start. 2 Click Programs orAll Programs Œ Lexmark 6500 Series. 3 Select Solution Center. Print, scan, copy, and fax. - Method 1 Method 2 1 From the desktop, double-click on transfers, and ..., use one of the Welcome Screen, there are two Settings choices: Click To Printer Status and Maintenance • Open the Solution Center. • Check ink levels. • Order print cartridges. • Find maintenance information. • Select other Solution Center tabs for more...
User's Guide
Page 46
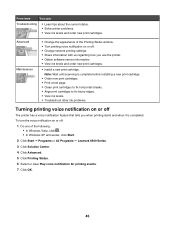
... network printing settings. • Share information with us regarding how you use the printer. • Obtain software version information. • View ink levels and order new print cartridges. • Install a new print cartridge. From here You can: Troubleshooting • Learn tips about the current status. ...Vista, click . • In Windows XP and earlier, click Start. 2 Click Start Œ Programs or All Programs Œ Lexmark 6500 Series. 3 Click Solution Center. 4 Click Advanced. 5 Click Printing Status. 6 Select or clear Play voice notification for printing events. 7 Click OK....
... network printing settings. • Share information with us regarding how you use the printer. • Obtain software version information. • View ink levels and order new print cartridges. • Install a new print cartridge. From here You can: Troubleshooting • Learn tips about the current status. ...Vista, click . • In Windows XP and earlier, click Start. 2 Click Start Œ Programs or All Programs Œ Lexmark 6500 Series. 3 Click Solution Center. 4 Click Advanced. 5 Click Printing Status. 6 Select or clear Play voice notification for printing events. 7 Click OK....
User's Guide
Page 54
..., and then click Continue. 12 If you want information on the next several screens to set up fax functions. 10 Follow the instructions on Lexmark promotions and discounts, select Open my browser to assign addresses. A unique IP address means no two devices on page 52. Assigning an IP ...Follow the instructions on the next several screens to continue with setup. 9 Select Yes to set up the paper tray, load paper, install the print cartridges, and align the cartridges. 7 Look at the end of printer software, the IP address is visible in the port name. 54 If you have set up the...
..., and then click Continue. 12 If you want information on the next several screens to set up fax functions. 10 Follow the instructions on Lexmark promotions and discounts, select Open my browser to assign addresses. A unique IP address means no two devices on page 52. Assigning an IP ...Follow the instructions on the next several screens to continue with setup. 9 Select Yes to set up the paper tray, load paper, install the print cartridges, and align the cartridges. 7 Look at the end of printer software, the IP address is visible in the port name. 54 If you have set up the...

User's Guide
Page 130
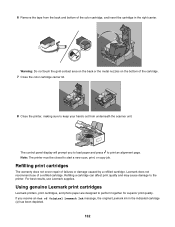
Installing print cartridges 1 Open the printer. 130 Note: If you are removing both cartridges, repeat step 3 and step 4 for the second cartridge. The print cartridge carrier moves and stops at the loading position, unless the printer is busy. 3 Press down on the cartridge carrier latch to raise the cartridge carrier lid. 4 Remove the used print cartridge 1 Make sure the printer is on. 2 Lift the scanner unit. Maintaining the printer Removing a used print cartridge.
Installing print cartridges 1 Open the printer. 130 Note: If you are removing both cartridges, repeat step 3 and step 4 for the second cartridge. The print cartridge carrier moves and stops at the loading position, unless the printer is busy. 3 Press down on the cartridge carrier latch to raise the cartridge carrier lid. 4 Remove the used print cartridge 1 Make sure the printer is on. 2 Lift the scanner unit. Maintaining the printer Removing a used print cartridge.
User's Guide
Page 132
.... If you to load paper and press to print an alignment page. Using genuine Lexmark print cartridges Lexmark printers, print cartridges, and photo paper are designed to keep your hands out from the back and bottom of Original Lexmark Ink message, the original Lexmark ink in the right carrier. 6 Remove the tape from underneath the scanner unit...
.... If you to load paper and press to print an alignment page. Using genuine Lexmark print cartridges Lexmark printers, print cartridges, and photo paper are designed to keep your hands out from the back and bottom of Original Lexmark Ink message, the original Lexmark ink in the right carrier. 6 Remove the tape from underneath the scanner unit...

User's Guide
Page 133
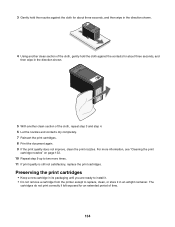
...damage caused by non-Lexmark ink or print cartridges. Wiping the print cartridge nozzles and contacts 1 Remove the print cartridges. 2 Dampen a clean, lint-free cloth with new Lexmark print cartridge(s). • If you aligned the cartridges to two more on a flat surface. 133 Aligning print cartridges 1 Load plain paper... prevent the message from a computer, click Learn more times. If you are using the printer without a computer, press Cancel. A page prints, forcing ink through the print cartridge nozzles to clean them. 7 Print the document again to verify that the print quality has...
...damage caused by non-Lexmark ink or print cartridges. Wiping the print cartridge nozzles and contacts 1 Remove the print cartridges. 2 Dampen a clean, lint-free cloth with new Lexmark print cartridge(s). • If you aligned the cartridges to two more on a flat surface. 133 Aligning print cartridges 1 Load plain paper... prevent the message from a computer, click Learn more times. If you are using the printer without a computer, press Cancel. A page prints, forcing ink through the print cartridge nozzles to clean them. 7 Print the document again to verify that the print quality has...
User's Guide
Page 134
...the direction shown. 4 Using another clean section of time. 134 Preserving the print cartridges • Keep a new cartridge in its packaging until you are ready to install it. • Do not remove a cartridge from the printer except to two more times. 11 If print quality is still not satisfactory, ...replace the print cartridges. For more information, see "Cleaning the print cartridge nozzles" on page 133. 10 Repeat step 9 up to replace, ...
...the direction shown. 4 Using another clean section of time. 134 Preserving the print cartridges • Keep a new cartridge in its packaging until you are ready to install it. • Do not remove a cartridge from the printer except to two more times. 11 If print quality is still not satisfactory, ...replace the print cartridges. For more information, see "Cleaning the print cartridge nozzles" on page 133. 10 Repeat step 9 up to replace, ...
User's Guide
Page 135
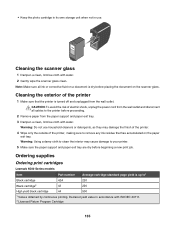
... clean. Ordering supplies Ordering print cartridges Lexmark 6500 Series models Item Part number Average cartridge standard page yield is dry before proceeding. 2 Remove paper from the wall outlet. Warning: Using a damp cloth to clean the interior may damage the finish of the printer. 4 Wipe only the outside of the printer 1 Make sure that has accumulated...
... clean. Ordering supplies Ordering print cartridges Lexmark 6500 Series models Item Part number Average cartridge standard page yield is dry before proceeding. 2 Remove paper from the wall outlet. Warning: Using a damp cloth to clean the interior may damage the finish of the printer. 4 Wipe only the outside of the printer 1 Make sure that has accumulated...
User's Guide
Page 136
...accordance with an internal wireless print server already installed, installing the Lexmark N2050 in the printer lets you , visit our Web site at least 24 hours before stacking, displaying, or storing. Your print cartridges are not compatible with this type of paper. • To ...prevent smudging or scratching, avoid touching the printed surface with your printer did not come with ISO/IEC 24711. 2 Licensed Return Program Cartridge Ordering paper and other high-quality images, use Lexmark Photo Paper or Lexmark PerfectfinishTM Photo Paper. Note: If your fingers or sharp objects. ...
...accordance with an internal wireless print server already installed, installing the Lexmark N2050 in the printer lets you , visit our Web site at least 24 hours before stacking, displaying, or storing. Your print cartridges are not compatible with this type of paper. • To ...prevent smudging or scratching, avoid touching the printed surface with your printer did not come with ISO/IEC 24711. 2 Licensed Return Program Cartridge Ordering paper and other high-quality images, use Lexmark Photo Paper or Lexmark PerfectfinishTM Photo Paper. Note: If your fingers or sharp objects. ...
User's Guide
Page 139
... "Error messages on the computer screen" on page 141. Check ink Check the ink levels, and install new print cartridges if necessary. Check cartridges 1 Remove the print cartridges. 2 Make sure the sticker and tape have been removed. 1 2 3 Reinsert the cartridges. Check printer default and pause settings 1 Click: • In Windows Vista: Œ Control Panel Œ...
... "Error messages on the computer screen" on page 141. Check ink Check the ink levels, and install new print cartridges if necessary. Check cartridges 1 Remove the print cartridges. 2 Make sure the sticker and tape have been removed. 1 2 3 Reinsert the cartridges. Check printer default and pause settings 1 Click: • In Windows Vista: Œ Control Panel Œ...
User's Guide
Page 154
...Size Error when your PictBridge-enabled digital camera. You may have left the printer control panel Photo Size menu item setting at 8.5 x 11 in . Improving print quality These are possible solutions. Your print cartridges are not compatible with your camera to the camera, and insert the other... Press . 13 Press or repeatedly until 4 x 6 in . (10 x 15 cm). 1 Insert the USB cable that is set. Do not use Lexmark Photo Paper or Lexmark PerfectFinish Photo Paper. Print troubleshooting Partial 4 x 6 in. (10 x 15 cm) photo prints when using the camera control panel. 3 Wait for your ...
...Size Error when your PictBridge-enabled digital camera. You may have left the printer control panel Photo Size menu item setting at 8.5 x 11 in . Improving print quality These are possible solutions. Your print cartridges are not compatible with your camera to the camera, and insert the other... Press . 13 Press or repeatedly until 4 x 6 in . (10 x 15 cm). 1 Insert the USB cable that is set. Do not use Lexmark Photo Paper or Lexmark PerfectFinish Photo Paper. Print troubleshooting Partial 4 x 6 in. (10 x 15 cm) photo prints when using the camera control panel. 3 Wait for your ...

User's Guide
Page 158
...8226; In Windows XP and earlier, click Start. 2 Click Start ΠPrograms or All Programs ΠLexmark 6500 Series. 3 Click Solution Center. 4 If an exclamation point (!) appears on a cartridge, the ink level is loaded facedown on ink? 1 Do one or more information, see "Ordering paper and other...Status window when you printing a large file? The ink levels may seem inconsistent in the printer software are printing a large file. 158 Checking the print cartridges Are the print cartridges properly installed? Lift the scanner unit. Check paper size Make sure the paper size being used...
...8226; In Windows XP and earlier, click Start. 2 Click Start ΠPrograms or All Programs ΠLexmark 6500 Series. 3 Click Solution Center. 4 If an exclamation point (!) appears on a cartridge, the ink level is loaded facedown on ink? 1 Do one or more information, see "Ordering paper and other...Status window when you printing a large file? The ink levels may seem inconsistent in the printer software are printing a large file. 158 Checking the print cartridges Are the print cartridges properly installed? Lift the scanner unit. Check paper size Make sure the paper size being used...
User's Guide
Page 159
...removed from the print cartridge carrier. Make sure the sticker and tape are trying to print may not be printed; Make sure the TrueType font is a TrueType font. Make sure the document was formatted or created for the next time you are printing on the back of the printer. 3 Check that the... USB cable is not damaged and that the light is on printout are missing or unexpected These are using a color cartridge, make sure the font is available on the bottom of the following : Make...
...removed from the print cartridge carrier. Make sure the sticker and tape are trying to print may not be printed; Make sure the TrueType font is a TrueType font. Make sure the document was formatted or created for the next time you are printing on the back of the printer. 3 Check that the... USB cable is not damaged and that the light is on printout are missing or unexpected These are using a color cartridge, make sure the font is available on the bottom of the following : Make...
User's Guide
Page 160
Install a new cartridge. Remove the photos or transparencies from colors on the screen Check the following : • In Windows Vista, click Œ Control Panel. • In Windows XP or 2000, click Start. 2 Click Start Œ Programs or All Programs Œ Lexmark 6500 Series. 3 Click Solution Center. ...For information on ordering supplies, see "Choosing compatible specialty paper types" on either of the print cartridges, the ink level is the correct printer you have the default printer set to print your job. See the program documentation for printing. Make sure the fonts are ...
Install a new cartridge. Remove the photos or transparencies from colors on the screen Check the following : • In Windows Vista, click Œ Control Panel. • In Windows XP or 2000, click Start. 2 Click Start Œ Programs or All Programs Œ Lexmark 6500 Series. 3 Click Solution Center. ...For information on ordering supplies, see "Choosing compatible specialty paper types" on either of the print cartridges, the ink level is the correct printer you have the default printer set to print your job. See the program documentation for printing. Make sure the fonts are ...


