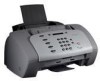

Quick Reference
Page 4
Scanning 21 Changing the scan settings 22 OCR (Optical Character Recognition 22 Troubleshooting 23 Checking first things first 23 Setup troubleshooting 23 Solving fax problems 26 Solving copy problems 27 Contacting Lexmark 27 Appendix 28 Federal Communications Commission (FCC) compliance information statement 28 Copyright advisory 28 Ringer Equivalence Number 28 Canadian regulations governing the use of modems 28 Statement of Limited Warranty 29 iv
Scanning 21 Changing the scan settings 22 OCR (Optical Character Recognition 22 Troubleshooting 23 Checking first things first 23 Setup troubleshooting 23 Solving fax problems 26 Solving copy problems 27 Contacting Lexmark 27 Appendix 28 Federal Communications Commission (FCC) compliance information statement 28 Copyright advisory 28 Ringer Equivalence Number 28 Canadian regulations governing the use of modems 28 Statement of Limited Warranty 29 iv

Quick Reference
Page 5
Installing the software Your All-In-One is on. 3 Click Cancel on any screens similar to the steps listed in your computer is set up to fax and copy without a computer according to the one shown. 4 Insert the CD. 1 In order to set up your All-In-One to fax, copy, print, and scan with a computer, follow these installation steps: 1 Make sure you have completed all of the steps in the setup documentation. 2 Make sure your setup documentation.
Installing the software Your All-In-One is on. 3 Click Cancel on any screens similar to the steps listed in your computer is set up to fax and copy without a computer according to the one shown. 4 Insert the CD. 1 In order to set up your All-In-One to fax, copy, print, and scan with a computer, follow these installation steps: 1 Make sure you have completed all of the steps in the setup documentation. 2 Make sure your setup documentation.

Quick Reference
Page 11
... Paper support Paper guide Document support Cartridge access door Display Document guides Operator panel Document exit tray Paper exit tray Use this... Keep documents straight during printing. 7 Check the status of the All-In-One. Make sure documents feed correctly. Install or replace the cartridges. Document support Cartridge access door Display Document exit tray Paper exit tray Document guides Paper guide Paper support When you want to... Stack paper after copying, scanning, or faxing. Make sure paper feeds correctly. Keep paper straight during copying, scanning...
... Paper support Paper guide Document support Cartridge access door Display Document guides Operator panel Document exit tray Paper exit tray Use this... Keep documents straight during printing. 7 Check the status of the All-In-One. Make sure documents feed correctly. Install or replace the cartridges. Document support Cartridge access door Display Document exit tray Paper exit tray Document guides Paper guide Paper support When you want to... Stack paper after copying, scanning, or faxing. Make sure paper feeds correctly. Keep paper straight during copying, scanning...

Quick Reference
Page 12
...support. • Remove paper if it does not exit after printing. Messages and errors appear on the display when your cartridges, and print reports. Press... Speaker Listen as you want to another fax machine. Fax Initiate sending a fax. The keypad buttons Dial a fax number or select a number of copies. Options Scroll through available features on . When you manually dial and connect to ... Speed Dial (# key) Access the speed dial menu. Setup Access the system setup, maintain your All-In-One is on the display. Copy Initiate a copy job. Scan Initiate a scan job...
...support. • Remove paper if it does not exit after printing. Messages and errors appear on the display when your cartridges, and print reports. Press... Speaker Listen as you want to another fax machine. Fax Initiate sending a fax. The keypad buttons Dial a fax number or select a number of copies. Options Scroll through available features on . When you manually dial and connect to ... Speed Dial (# key) Access the speed dial menu. Setup Access the system setup, maintain your All-In-One is on the display. Copy Initiate a copy job. Scan Initiate a scan job...
Quick Reference
Page 13
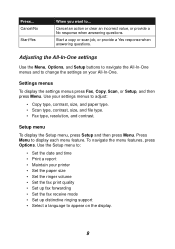
.... Adjusting the All-In-One settings Use the Menu, Options, and Setup buttons to navigate the All-In-One menus and to change the settings on your printer • Set the paper size • Set the ringer volume • Set the fax print quality • Set up fax forwarding • Set the fax receive mode • Set up distinctive ringing support • Select a language to appear on the display. 9 Use the Setup menu to ... Use your settings menus to display each menu feature. Cancel...
.... Adjusting the All-In-One settings Use the Menu, Options, and Setup buttons to navigate the All-In-One menus and to change the settings on your printer • Set the paper size • Set the ringer volume • Set the fax print quality • Set up fax forwarding • Set the fax receive mode • Set up distinctive ringing support • Select a language to appear on the display. 9 Use the Setup menu to ... Use your settings menus to display each menu feature. Cancel...

Quick Reference
Page 16
...print fax copy scan close When you can also change them using the Settings Utility. Change the default scan settings or scan to ... Select... Change the fax settings or set up the default printer properties. Change the default copy settings, including copy type, contrast, and size. Close the Settings Utility. 12 To access the Settings Utility, click Start Programs Lexmark X125 Lexmark X125 Settings Utility. Using the All-In-One software In addition to changing the settings from the operator panel, you want to : • A folder on your speed-dial list with frequently dialed numbers...
...print fax copy scan close When you can also change them using the Settings Utility. Change the default scan settings or scan to ... Select... Change the fax settings or set up the default printer properties. Change the default copy settings, including copy type, contrast, and size. Close the Settings Utility. 12 To access the Settings Utility, click Start Programs Lexmark X125 Lexmark X125 Settings Utility. Using the All-In-One software In addition to changing the settings from the operator panel, you want to : • A folder on your speed-dial list with frequently dialed numbers...
Quick Reference
Page 27
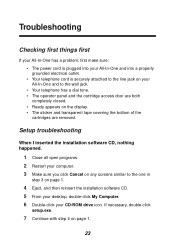
... telephone has a dial tone. • The operator panel and the cartridge access door are both completely closed. • Ready appears on page 1. 23 If necessary, double-click setup.exe. 7 Continue with step 4 on the display. • The sticker and transparent tape covering the bottom of the cartridges are removed. Setup troubleshooting When I inserted the installation software CD, nothing happened. 1 Close all open programs. 2 Restart your CD-ROM drive icon.
... telephone has a dial tone. • The operator panel and the cartridge access door are both completely closed. • Ready appears on page 1. 23 If necessary, double-click setup.exe. 7 Continue with step 4 on the display. • The sticker and transparent tape covering the bottom of the cartridges are removed. Setup troubleshooting When I inserted the installation software CD, nothing happened. 1 Close all open programs. 2 Restart your CD-ROM drive icon.

Quick Reference
Page 28
... the printer software. If the USB port is not listed, uninstall and then reinstall the printer software. The printer or scanner is not working. 1 Check the printer status: Windows 98/Me/2000 Windows XP 1 Click Start Settings Printers. 2 From the Printers folder, double-click the Lexmark X125 printer icon. 3 From the Printer menu, make sure: • Default Printer is selected. • Pause Printing is not selected. 1 Click Start Control Panel Printers and Other Hardware Printers and Faxes. 2 From the Printers folder, double-click the Lexmark X125 printer icon. 3 From the Printer menu...
... the printer software. If the USB port is not listed, uninstall and then reinstall the printer software. The printer or scanner is not working. 1 Check the printer status: Windows 98/Me/2000 Windows XP 1 Click Start Settings Printers. 2 From the Printers folder, double-click the Lexmark X125 printer icon. 3 From the Printer menu, make sure: • Default Printer is selected. • Pause Printing is not selected. 1 Click Start Control Panel Printers and Other Hardware Printers and Faxes. 2 From the Printers folder, double-click the Lexmark X125 printer icon. 3 From the Printer menu...

Quick Reference
Page 31
... color mode to Black Draft, Black Normal, or Black Photo using a USB cable. • If you have installed the All-In-One software on your computer, click Start Programs Lexmark X125 Settings Utility. Contacting Lexmark Visit our Web site at http://support.lexmark.com to receive technical support. 27 Solving copy problems PC Not Available appears on the operator panel display Most of the time, when PC Not Available appears on your operator panel display, you are attempting to make multiple black and white copies...
... color mode to Black Draft, Black Normal, or Black Photo using a USB cable. • If you have installed the All-In-One software on your computer, click Start Programs Lexmark X125 Settings Utility. Contacting Lexmark Visit our Web site at http://support.lexmark.com to receive technical support. 27 Solving copy problems PC Not Available appears on the operator panel display Most of the time, when PC Not Available appears on your operator panel display, you are attempting to make multiple black and white copies...
Quick Reference
Page 33
... servicer • Operation of a product beyond repair, or if the product is provided for loss of all print cartridges, programs, data, and removable storage media (unless directed otherwise by a Lexmark warranty, technical support may be required to the United States. This limited warranty applies to in material and workmanship If this statement as warranted during normal use , and not for resale, from new parts...
... servicer • Operation of a product beyond repair, or if the product is provided for loss of all print cartridges, programs, data, and removable storage media (unless directed otherwise by a Lexmark warranty, technical support may be required to the United States. This limited warranty applies to in material and workmanship If this statement as warranted during normal use , and not for resale, from new parts...

User's Guide
Page 1
... addressed to any obligation to this publication to state or imply that only that product, program, or service may not apply to you . Basics Copying Printing Scanning Faxing Troubleshooting Index Notices i Edition: June 2002 The following paragraph does not apply to Lexmark International, Inc., Department F95/032-2, 740 West New Circle Road, Lexington, Kentucky 40550, U.S.A. Changes are the user's responsibility. In the United...
... addressed to any obligation to this publication to state or imply that only that product, program, or service may not apply to you . Basics Copying Printing Scanning Faxing Troubleshooting Index Notices i Edition: June 2002 The following paragraph does not apply to Lexmark International, Inc., Department F95/032-2, 740 West New Circle Road, Lexington, Kentucky 40550, U.S.A. Changes are the user's responsibility. In the United...

User's Guide
Page 11
...2 Setup Access the system setup, maintain your cartridges, and print reports. 3 Fax Initiate sending a fax. 4 Copy Initiate a copy job. 5 Scan Initiate a scan job. 6 Speaker Listen as you manually dial and connect to another fax number. 7 Options Scroll through the settings for the feature you select. 8 The keypad buttons Dial a fax number or select a number of copies. 9 Paper Feed Continue printing after reloading the paper tray. 10 Pause/Redial Add a three-second pause when dialing or dial the last number called. 11 Cancel/No Cancel a fax, copy, scan, or print job...
...2 Setup Access the system setup, maintain your cartridges, and print reports. 3 Fax Initiate sending a fax. 4 Copy Initiate a copy job. 5 Scan Initiate a scan job. 6 Speaker Listen as you manually dial and connect to another fax number. 7 Options Scroll through the settings for the feature you select. 8 The keypad buttons Dial a fax number or select a number of copies. 9 Paper Feed Continue printing after reloading the paper tray. 10 Pause/Redial Add a three-second pause when dialing or dial the last number called. 11 Cancel/No Cancel a fax, copy, scan, or print job...

User's Guide
Page 38
... the Paper Size area, scroll to access the Lexmark X125 Settings. Note: Your application may override the envelope settings in the Lexmark X125 Settings. www.lexmark.com Lexmark X125 To learn more about the Settings, see page 11. Use the default settings for specialty paper When you want to the Lexmark X125 Settings. Customizing print settings for printing most documents on ... Basics Copying Printing Scanning Faxing Troubleshooting Index Printing 31 Click this tab... Printer Settings When you install the software, the default settings are assigned...
... the Paper Size area, scroll to access the Lexmark X125 Settings. Note: Your application may override the envelope settings in the Lexmark X125 Settings. www.lexmark.com Lexmark X125 To learn more about the Settings, see page 11. Use the default settings for specialty paper When you want to the Lexmark X125 Settings. Customizing print settings for printing most documents on ... Basics Copying Printing Scanning Faxing Troubleshooting Index Printing 31 Click this tab... Printer Settings When you install the software, the default settings are assigned...

User's Guide
Page 62
... medium speed. www.lexmark.com Lexmark X125 Fax good-quality graphics at a time. From this option... Black Black Photo Color Fax resolution Standard Fine When you select. 6 Press Start/Yes. Fax a document quickly. For help, see page 15. 2 Press Fax. 3 Press the keypad buttons to enter the fax number. 4 Press Menu to scroll through the advanced fax features. 5 Press Options to change the settings of the feature you want to... Basics Copying Printing Scanning Faxing Troubleshooting Index Faxing 55 Using advanced fax features 1 Load your document. Fax a document quickly, but...
... medium speed. www.lexmark.com Lexmark X125 Fax good-quality graphics at a time. From this option... Black Black Photo Color Fax resolution Standard Fine When you select. 6 Press Start/Yes. Fax a document quickly. For help, see page 15. 2 Press Fax. 3 Press the keypad buttons to enter the fax number. 4 Press Menu to scroll through the advanced fax features. 5 Press Options to change the settings of the feature you want to... Basics Copying Printing Scanning Faxing Troubleshooting Index Faxing 55 Using advanced fax features 1 Load your document. Fax a document quickly, but...

User's Guide
Page 82
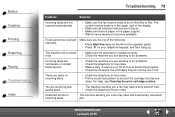
Basics Copying Printing Scanning Faxing Troubleshooting Index Troubleshooting 75 Problem: Solution: Print quality is poor at the edges of the page Like other printers, the All-In-One cannot print in .) Colors are faded or not printing correctly • Check the ink level graphic on ink. • Use a different color setting. • Use a different brand of the Print Control Program. For help , see Cleaning the print cartridge nozzles. • Wipe the cartridge nozzles. www.lexmark.com Lexmark X125 The color cartridge may be...
Basics Copying Printing Scanning Faxing Troubleshooting Index Troubleshooting 75 Problem: Solution: Print quality is poor at the edges of the page Like other printers, the All-In-One cannot print in .) Colors are faded or not printing correctly • Check the ink level graphic on ink. • Use a different color setting. • Use a different brand of the Print Control Program. For help , see Cleaning the print cartridge nozzles. • Wipe the cartridge nozzles. www.lexmark.com Lexmark X125 The color cartridge may be...
User's Guide
Page 85
... out of the display. • Make sure all extension phones are clean. The current receive mode is set to be received manually. You are not received automatically. • Make sure the fax receive mode is in the paper support. • Wait for noise. Make sure you are sending to for problems. • Check the telephone for line noise. • Print a nozzle test pattern to Ans/Fax or Fax. For help, see Cleaning the print cartridge nozzles. www.lexmark.com Lexmark X125
... out of the display. • Make sure all extension phones are clean. The current receive mode is set to be received manually. You are not received automatically. • Make sure the fax receive mode is in the paper support. • Wait for noise. Make sure you are sending to for problems. • Check the telephone for line noise. • Print a nozzle test pattern to Ans/Fax or Fax. For help, see Cleaning the print cartridge nozzles. www.lexmark.com Lexmark X125
User's Guide
Page 88
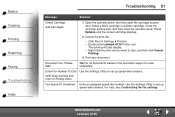
... Printing Scanning Faxing Troubleshooting Index Troubleshooting 81 Message: Solution: Check Cartridge Add Cartridges 1 Open the operator panel, and then open the cartridge access door. Double-click Lexmark X125 Printer icon. Use the Settings Utility to set up speed-dial numbers. For help, see Customizing the fax settings. www.lexmark.com Lexmark X125 Press Options until the correct cartridge displays. 2 Cancel the print job: - Undefined Enter an assigned speed-dial number. Fax Speed #? Install a black cartridge or a photo cartridge. Click Start Settings Printers...
... Printing Scanning Faxing Troubleshooting Index Troubleshooting 81 Message: Solution: Check Cartridge Add Cartridges 1 Open the operator panel, and then open the cartridge access door. Double-click Lexmark X125 Printer icon. Use the Settings Utility to set up speed-dial numbers. For help, see Customizing the fax settings. www.lexmark.com Lexmark X125 Press Options until the correct cartridge displays. 2 Cancel the print job: - Undefined Enter an assigned speed-dial number. Fax Speed #? Install a black cartridge or a photo cartridge. Click Start Settings Printers...

User's Guide
Page 90
Use the Lexmark X125 Settings Utility to a color copy mode. Remove Paper Jam Then Clear the Paper jam, and then press Start/Yes. Basics Copying Printing Scanning Faxing Troubleshooting Index Troubleshooting 83 Message: Solution: Memory To Print Your copy job will print after the print job is on your computer, click Start Programs Lexmark X125 Settings Utility. If you must attach your All-In-One to your All-In-One is set to adjust the copy settings. - If you would like to make multiple black and white copies without a computer, you...
Use the Lexmark X125 Settings Utility to a color copy mode. Remove Paper Jam Then Clear the Paper jam, and then press Start/Yes. Basics Copying Printing Scanning Faxing Troubleshooting Index Troubleshooting 83 Message: Solution: Memory To Print Your copy job will print after the print job is on your computer, click Start Programs Lexmark X125 Settings Utility. If you must attach your All-In-One to your All-In-One is set to adjust the copy settings. - If you would like to make multiple black and white copies without a computer, you...

User's Guide
Page 96
... printing 36 business cards personalizing 51 C calibrating scanner 52 cards loading 13 setting recommendations 32 cartridges aligning 19 installing 17 part numbers 16 preserving 21 removing 17 certificates creating 40 copy settings customizing 24 copying instructions 23 creating awards 40 certificates 40 signs 41 custom size paper loading 14 setting recommendations 32 D documents copying 23 faxing 54 loading 15 printing 26 scanning 44 DRPD using 61 E Electronic emission notices ii Industry Canada compliance statement iii envelopes www.lexmark.com Lexmark...
... printing 36 business cards personalizing 51 C calibrating scanner 52 cards loading 13 setting recommendations 32 cartridges aligning 19 installing 17 part numbers 16 preserving 21 removing 17 certificates creating 40 copy settings customizing 24 copying instructions 23 creating awards 40 certificates 40 signs 41 custom size paper loading 14 setting recommendations 32 D documents copying 23 faxing 54 loading 15 printing 26 scanning 44 DRPD using 61 E Electronic emission notices ii Industry Canada compliance statement iii envelopes www.lexmark.com Lexmark...

User's Guide
Page 97
...fax settings customizing 64 faxing instructions 54 G greeting cards loading 13 setting recommendations 32 H handouts printing 34 I index cards loading 13 setting recommendations 32 installing cartridges 17 instructions copying 23 faxing 54 printing 26 scanning 44 iron-on transfers loading 14 setting recommendations 32 K keypad 4 L letterhead personalizing 51 loading cards 13 custom size paper 14 documents 15 envelopes 13 greeting cards 13 index cards 13 iron-on transfers 14 photo cards 13 photo paper 13 postcards 13 specialty paper 13 transparencies 14 M messages error 80 multiple sheets feed...
...fax settings customizing 64 faxing instructions 54 G greeting cards loading 13 setting recommendations 32 H handouts printing 34 I index cards loading 13 setting recommendations 32 installing cartridges 17 instructions copying 23 faxing 54 printing 26 scanning 44 iron-on transfers loading 14 setting recommendations 32 K keypad 4 L letterhead personalizing 51 loading cards 13 custom size paper 14 documents 15 envelopes 13 greeting cards 13 index cards 13 iron-on transfers 14 photo cards 13 photo paper 13 postcards 13 specialty paper 13 transparencies 14 M messages error 80 multiple sheets feed...

