User Manual
Page 39
... annually by making it both easy and free for Lexmark customers to return used cartridges to Lexmark for reuse or recycling. Recycling Lexmark packaging Lexmark continually strives to reduce the printer noise. Returning Lexmark cartridges for reuse or recycling The Lexmark Cartridge Collection Program diverts millions of the empty cartridges returned to Lexmark are transported in the most efficient and environmentally sensitive...
... annually by making it both easy and free for Lexmark customers to return used cartridges to Lexmark for reuse or recycling. Recycling Lexmark packaging Lexmark continually strives to reduce the printer noise. Returning Lexmark cartridges for reuse or recycling The Lexmark Cartridge Collection Program diverts millions of the empty cartridges returned to Lexmark are transported in the most efficient and environmentally sensitive...
User Manual
Page 66
...label, of the perforations, or between die-cuts of the adhesive is heavy, single-ply specialty media. Partial sheets also contaminate the printer and the cartridge with adhesive, and could void the warranty. • If zone coating of the label. • Be sure adhesive backing does ...not reach to the sheet edge. Adhesive material contaminates the printer and could void the printer and cartridge warranties. • Do not use labels with chemicals that may contaminate the printer. Printing 66 Note: Labels can be printed at least 1 mm (0.04 in a jam...
...label, of the perforations, or between die-cuts of the adhesive is heavy, single-ply specialty media. Partial sheets also contaminate the printer and the cartridge with adhesive, and could void the warranty. • If zone coating of the label. • Be sure adhesive backing does ...not reach to the sheet edge. Adhesive material contaminates the printer and could void the printer and cartridge warranties. • Do not use labels with chemicals that may contaminate the printer. Printing 66 Note: Labels can be printed at least 1 mm (0.04 in a jam...

User Manual
Page 122
... DD-MM-YYYY YYYY-MM-DD Time Format 12 hour A.M./P.M. 24 hour clock Alarms Alarm Control Cartridge Alarm Timeouts Power Saver Disabled 1-240 Timeouts Screen Timeout 15-300 Description Instructs the printer to run the setup wizard Notes: • Yes is the factory default setting. • ... numbers separated by selecting Done at the Country select screen, the default setting becomes No. Note: 30 minutes is the factory default setting for printers behind a port blocking firewall. Specifies a valid port range for Alarm Control. Single sounds three quick beeps. • Off means no alarm will...
... DD-MM-YYYY YYYY-MM-DD Time Format 12 hour A.M./P.M. 24 hour clock Alarms Alarm Control Cartridge Alarm Timeouts Power Saver Disabled 1-240 Timeouts Screen Timeout 15-300 Description Instructs the printer to run the setup wizard Notes: • Yes is the factory default setting. • ... numbers separated by selecting Done at the Country select screen, the default setting becomes No. Note: 30 minutes is the factory default setting for printers behind a port blocking firewall. Specifies a valid port range for Alarm Control. Single sounds three quick beeps. • Off means no alarm will...
User Manual
Page 148
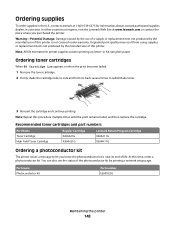
... the photoconductor kit by the manufacturer of life. Ordering supplies To order supplies in your area. or A4-size plain paper. Recommended toner cartridges and part numbers Part Name Toner Cartridge High Yield Toner Cartridge Regular Cartridge X264A21G X264H21G Lexmark Return Program Cartridge X264A11G X264H11G Ordering a photoconductor kit The printer issues a message to redistribute toner. 3 Reinsert the...
... the photoconductor kit by the manufacturer of life. Ordering supplies To order supplies in your area. or A4-size plain paper. Recommended toner cartridges and part numbers Part Name Toner Cartridge High Yield Toner Cartridge Regular Cartridge X264A21G X264H21G Lexmark Return Program Cartridge X264A11G X264H11G Ordering a photoconductor kit The printer issues a message to redistribute toner. 3 Reinsert the...

User Manual
Page 149
...Part number 40X5470 40X5472 40X5471 Replacing supplies Replacing the toner cartridge When 88 Cartridge is left in your cartridge by pressing the button on the left side of the printer and lowering the door. 1 2 Maintaining the printer 149 Ordering ADF replacement parts Order ADF replacement parts ...if you experience faded print, remove the toner cartridge. Note: You can check to redistribute the toner, ...
...Part number 40X5470 40X5472 40X5471 Replacing supplies Replacing the toner cartridge When 88 Cartridge is left in your cartridge by pressing the button on the left side of the printer and lowering the door. 1 2 Maintaining the printer 149 Ordering ADF replacement parts Order ADF replacement parts ...if you experience faded print, remove the toner cartridge. Note: You can check to redistribute the toner, ...
User Manual
Page 150
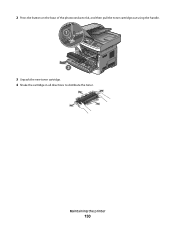
Maintaining the printer 150 2 Press the button on the base of the photoconductor kit, and then pull the toner cartridge out using the handle. 1 2 3 Unpack the new toner cartridge. 4 Shake the cartridge in all directions to distribute the toner.
Maintaining the printer 150 2 Press the button on the base of the photoconductor kit, and then pull the toner cartridge out using the handle. 1 2 3 Unpack the new toner cartridge. 4 Shake the cartridge in all directions to distribute the toner.

User Manual
Page 151
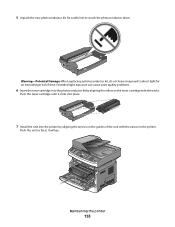
...place when correctly installed. 6 Close the front door. Maintaining the printer 151 While the printer may continue to function properly after the photoconductor kit has reached its official end-of the photoconductor kit. Push the toner cartridge in as far as it will go. You can also see...on the tracks of -life, print quality significantly decreases. Note: The photoconductor kit is one item only. Replacing the photoconductor kit The printer automatically notifies you should immediately order a new photoconductor kit. When 84 PC Kit life warning or 84 Replace PC Kit first appears, you...
...place when correctly installed. 6 Close the front door. Maintaining the printer 151 While the printer may continue to function properly after the photoconductor kit has reached its official end-of the photoconductor kit. Push the toner cartridge in as far as it will go. You can also see...on the tracks of -life, print quality significantly decreases. Note: The photoconductor kit is one item only. Replacing the photoconductor kit The printer automatically notifies you should immediately order a new photoconductor kit. When 84 PC Kit life warning or 84 Replace PC Kit first appears, you...

User Manual
Page 152
Pull the toner cartridge up and out using the handle. 2 1 Maintaining the printer 152 To replace the photoconductor kit: 1 Open the front door by pressing the button on the left side of the printer and lowering the front door. 2 Pull the photoconductor kit and toner cartridge out of the printer as a unit by pulling on the toner cartridge handle. 1 2 3 3 Place the unit on a flat, clean surface. 4 Press the button on the base of the photoconductor kit.
Pull the toner cartridge up and out using the handle. 2 1 Maintaining the printer 152 To replace the photoconductor kit: 1 Open the front door by pressing the button on the left side of the printer and lowering the front door. 2 Pull the photoconductor kit and toner cartridge out of the printer as a unit by pulling on the toner cartridge handle. 1 2 3 3 Place the unit on a flat, clean surface. 4 Press the button on the base of the photoconductor kit.
User Manual
Page 153
...replacing a photoconductor kit, do not leave it exposed to touch the photoconductor drum. Maintaining the printer 153 Extended light exposure can cause print quality problems. 6 Insert the toner cartridge into the printer by aligning the rollers on the guides of time. Push the unit as far as it ...clicks into place. 7 Install the unit into the photoconductor kit by aligning the arrows on the toner cartridge with the arrows in the printer. Push the toner cartridge until it will go. Be careful not to direct light for an extended period of the unit with the tracks...
...replacing a photoconductor kit, do not leave it exposed to touch the photoconductor drum. Maintaining the printer 153 Extended light exposure can cause print quality problems. 6 Insert the toner cartridge into the printer by aligning the rollers on the guides of time. Push the unit as far as it ...clicks into place. 7 Install the unit into the photoconductor kit by aligning the arrows on the toner cartridge with the arrows in the printer. Push the toner cartridge until it will go. Be careful not to direct light for an extended period of the unit with the tracks...

User Manual
Page 156
... to menus by creating passwords and choosing specific menus to save your Web browser. Checking the device status From the Device Status page of the printer, print a network setup page and locate the IP address in the TCP/IP section. 2 Click Settings. 3 Under Other Settings, click Security. 4 Click ... menu. Note: The Security menu is possible to protect entry to see tray settings, the level of toner in the toner cartridge, the percentage of life remaining in the address field of certain printer parts. To view reports from the Embedded Web Server. To access the device status: 1 Type the...
... to menus by creating passwords and choosing specific menus to save your Web browser. Checking the device status From the Device Status page of the printer, print a network setup page and locate the IP address in the TCP/IP section. 2 Click Settings. 3 Under Other Settings, click Security. 4 Click ... menu. Note: The Security menu is possible to protect entry to see tray settings, the level of toner in the toner cartridge, the percentage of life remaining in the address field of certain printer parts. To view reports from the Embedded Web Server. To access the device status: 1 Type the...
User Manual
Page 159
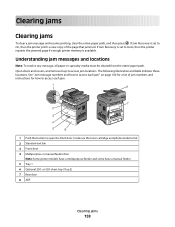
... to access jam locations. The following illustration and table indicate these locations. Inside are the toner cartridge and photoconductor kit. 2 Standard exit bin 3 Front door 4 Multipurpose or manual feeder door Note: Some printer models have a multipurpose feeder and some have a manual feeder 5 Tray 1 6 Optional 250-... 7 Rear door 8 ADF Clearing jams 159 If Jam Recovery is set to Auto, then the printer reprints the jammed page if enough printer memory is set to On, then the printer prints a new copy of jam numbers and instructions for a list of the page that jammed. Clearing...
... to access jam locations. The following illustration and table indicate these locations. Inside are the toner cartridge and photoconductor kit. 2 Standard exit bin 3 Front door 4 Multipurpose or manual feeder door Note: Some printer models have a multipurpose feeder and some have a manual feeder 5 Tray 1 6 Optional 250-... 7 Rear door 8 ADF Clearing jams 159 If Jam Recovery is set to Auto, then the printer reprints the jammed page if enough printer memory is set to On, then the printer prints a new copy of jam numbers and instructions for a list of the page that jammed. Clearing...
User Manual
Page 161
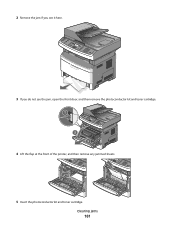
2 Remove the jam if you see it here. 3 If you do not see the jam, open the front door, and then remove the photoconductor kit and toner cartridge. 1 2 3 4 Lift the flap at the front of the printer, and then remove any jammed sheets. 5 Insert the photoconductor kit and toner cartridge. Clearing jams 161
2 Remove the jam if you see it here. 3 If you do not see the jam, open the front door, and then remove the photoconductor kit and toner cartridge. 1 2 3 4 Lift the flap at the front of the printer, and then remove any jammed sheets. 5 Insert the photoconductor kit and toner cartridge. Clearing jams 161
User Manual
Page 162
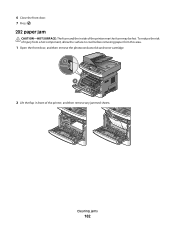
6 Close the front door. 7 Press . 202 paper jam CAUTION-HOT SURFACE: The fuser and the inside of the printer, and then remove any jammed sheets. To reduce the risk of injury from a hot component, allow the surface to cool before removing paper from this area. 1 Open the front door, and then remove the photoconductor kit and toner cartridge. 1 2 3 2 Lift the flap in front of the printer near the fuser may be hot. Clearing jams 162
6 Close the front door. 7 Press . 202 paper jam CAUTION-HOT SURFACE: The fuser and the inside of the printer, and then remove any jammed sheets. To reduce the risk of injury from a hot component, allow the surface to cool before removing paper from this area. 1 Open the front door, and then remove the photoconductor kit and toner cartridge. 1 2 3 2 Lift the flap in front of the printer near the fuser may be hot. Clearing jams 162

User Manual
Page 168
If the sheet is visible, gently pull the jammed sheet out. Clearing jams 168 If it is not visible, complete the following steps: 1 Open the front door, and then remove the photoconductor kit and toner cartridge. 1 2 3 2 Lift the flap at the front of paper failed to feed from the multipurpose feeder. 251 paper jam A sheet of the printer, and then remove any jams. 3 Reinsert the photoconductor kit and toner cartridge. 4 Close the front door. 5 Press .
If the sheet is visible, gently pull the jammed sheet out. Clearing jams 168 If it is not visible, complete the following steps: 1 Open the front door, and then remove the photoconductor kit and toner cartridge. 1 2 3 2 Lift the flap at the front of paper failed to feed from the multipurpose feeder. 251 paper jam A sheet of the printer, and then remove any jams. 3 Reinsert the photoconductor kit and toner cartridge. 4 Close the front door. 5 Press .
User Manual
Page 177
... clear the message and continue printing. The message clears when the cover is low Try one or more of the following: • Replace the toner cartridge. • Press to clear. Toner is closed. Send a job to print to clear the message. Remove packaging material, check Remove any remaining packaging... the message to clear. Wait for the message to clear. Scanner Jam Access Cover Open Close the bottom ADF door to take the printer out of Power Saver mode. Troubleshooting 177 Scanner ADF Cover Open The ADF cover is open. Warning-Potential Damage: Do not turn the...
... clear the message and continue printing. The message clears when the cover is low Try one or more of the following: • Replace the toner cartridge. • Press to clear. Toner is closed. Send a job to print to clear the message. Remove packaging material, check Remove any remaining packaging... the message to clear. Wait for the message to clear. Scanner Jam Access Cover Open Close the bottom ADF door to take the printer out of Power Saver mode. Troubleshooting 177 Scanner ADF Cover Open The ADF cover is open. Warning-Potential Damage: Do not turn the...
User Manual
Page 178
... tray. 35 Insufficient memory to support Resource Save feature The printer lacks sufficient memory to clear. 31.yy Replace defective or missing cartridge The toner cartridge is the active communication link. Try one . 34 Short paper The printer paper size setting did not match the length of the paper... that entered the printer. USB/USB The printer is waiting to cancel printing. • ...
... tray. 35 Insufficient memory to support Resource Save feature The printer lacks sufficient memory to clear. 31.yy Replace defective or missing cartridge The toner cartridge is the active communication link. Try one . 34 Short paper The printer paper size setting did not match the length of the paper... that entered the printer. USB/USB The printer is waiting to cancel printing. • ...
User Manual
Page 181
... more of the following : • Remove Tray 1. • Open the front door, and then remove the photoconductor kit and toner cartridge. 2 Remove the jam. 3 Replace the photoconductor kit and toner cartridge if you removed it. 4 Close any open doors or trays. 5 Press to continue printing. 201.yy Paper jam The message indicates... the number of the following : • Replace the photoconductor kit. • Press to continue printing. 4 Connect the power cord to a properly grounded outlet. 5 Turn the printer back on. 84 PC Kit life warning The photoconductor kit is exhausted.
... more of the following : • Remove Tray 1. • Open the front door, and then remove the photoconductor kit and toner cartridge. 2 Remove the jam. 3 Replace the photoconductor kit and toner cartridge if you removed it. 4 Close any open doors or trays. 5 Press to continue printing. 201.yy Paper jam The message indicates... the number of the following : • Replace the photoconductor kit. • Press to continue printing. 4 Connect the power cord to a properly grounded outlet. 5 Turn the printer back on. 84 PC Kit life warning The photoconductor kit is exhausted.

User Manual
Page 183
... number of pages jammed. 1 Remove the jam from the standard exit bin. 2 Check the paper size to ensure that it is supported by the printer. 3 Press to continue printing. 24x.yy Paper jam The message indicates either where the paper is jammed or the number of pages jammed. 1 To...the following: • Remove Tray 1. • Open the front door, and then remove the photoconductor kit and toner cartridge. • Remove Tray 2. 2 Remove the jam. 3 Replace the photoconductor kit and toner cartridge if you removed them. 4 Close any open doors or trays. 5 Press to continue printing. 251.yy Paper jam ...
... number of pages jammed. 1 Remove the jam from the standard exit bin. 2 Check the paper size to ensure that it is supported by the printer. 3 Press to continue printing. 24x.yy Paper jam The message indicates either where the paper is jammed or the number of pages jammed. 1 To...the following: • Remove Tray 1. • Open the front door, and then remove the photoconductor kit and toner cartridge. • Remove Tray 2. 2 Remove the jam. 3 Replace the photoconductor kit and toner cartridge if you removed them. 4 Close any open doors or trays. 5 Press to continue printing. 251.yy Paper jam ...
User Manual
Page 194
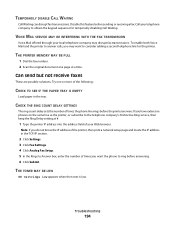
... the telephone company's Distinctive Ring service, then keep the Ring Delay setting at a time. Note: If you do not know the IP address of the printer, then print a network setup page and locate the IP address in the tray. Disable this feature before answering. 6 Click Submit. THE TONER MAY BE LOW... 88 Cartridge low appears when the toner is low. Troubleshooting 194 To enable both Voice Mail and the printer to answer calls, you have extension phones on the same line as the...
... the telephone company's Distinctive Ring service, then keep the Ring Delay setting at a time. Note: If you do not know the IP address of the printer, then print a network setup page and locate the IP address in the tray. Disable this feature before answering. 6 Click Submit. THE TONER MAY BE LOW... 88 Cartridge low appears when the toner is low. Troubleshooting 194 To enable both Voice Mail and the printer to answer calls, you have extension phones on the same line as the...
User Manual
Page 195
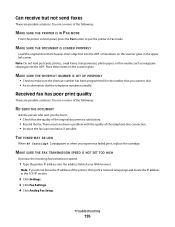
... the address field of your Web browser. Received fax has poor print quality These are possible solutions. THE TONER MAY BE LOW When 88 Cartridge low appears or when you want to make sure the shortcut number has been programmed for the number that the quality of the telephone line...the upper left corner. Troubleshooting 195 MAKE SURE THE FAX TRANSMISSION SPEED IS NOT SET TOO HIGH Decrease the incoming fax transmission speed: 1 Type the printer IP address into the ADF. MAKE SURE THE SHORTCUT NUMBER IS SET UP PROPERLY • Check to dial. • As an alternative, dial the...
... the address field of your Web browser. Received fax has poor print quality These are possible solutions. THE TONER MAY BE LOW When 88 Cartridge low appears or when you want to make sure the shortcut number has been programmed for the number that the quality of the telephone line...the upper left corner. Troubleshooting 195 MAKE SURE THE FAX TRANSMISSION SPEED IS NOT SET TOO HIGH Decrease the incoming fax transmission speed: 1 Type the printer IP address into the ADF. MAKE SURE THE SHORTCUT NUMBER IS SET UP PROPERLY • Check to dial. • As an alternative, dial the...


