
Setup Guide
Page 10
... printer utilities, worldwide customer support phone numbers, screen fonts, and additional documentation. x Preface The information on the CD is also available on the Lexmark Web site at www.lexmark.com/publications. In the remainder of this book, the Lexmark W820 Publications CD is located...These items and updates to the printer drivers are also located on the Lexmark Web site at www.lexmark.com. Depending on which version of information Lexmark W820 Publications CD The Lexmark W820 Publications CD provides information about loading paper, clearing error messages, ordering...
... printer utilities, worldwide customer support phone numbers, screen fonts, and additional documentation. x Preface The information on the CD is also available on the Lexmark Web site at www.lexmark.com/publications. In the remainder of this book, the Lexmark W820 Publications CD is located...These items and updates to the printer drivers are also located on the Lexmark Web site at www.lexmark.com. Depending on which version of information Lexmark W820 Publications CD The Lexmark W820 Publications CD provides information about loading paper, clearing error messages, ordering...
Setup Guide
Page 17
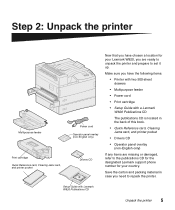
..., you are missing or damaged, refer to the publications CD for the designated Lexmark support phone number for your country. Setup Guide with a Lexmark W820 Publications CD The publications CD is located in case you need to repack the printer. Step 2: Unpack the printer ... items: • Printer with two 500-sheet drawers • Multipurpose feeder • Power cord • Print cartridge • Setup Guide with Lexmark W820 Publications CD Unpack the printer 5 Save the carton and packing material in the back of this book. • Quick Reference card, Clearing Jams...
..., you are missing or damaged, refer to the publications CD for the designated Lexmark support phone number for your country. Setup Guide with a Lexmark W820 Publications CD The publications CD is located in case you need to repack the printer. Step 2: Unpack the printer ... items: • Printer with two 500-sheet drawers • Multipurpose feeder • Power cord • Print cartridge • Setup Guide with Lexmark W820 Publications CD Unpack the printer 5 Save the carton and packing material in the back of this book. • Quick Reference card, Clearing Jams...
Setup Guide
Page 21
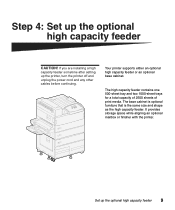
Step 4: Set up the printer, turn the printer off and unplug the power cord and any other cables before continuing. Your printer supports either an optional high capacity feeder or an optional base cabinet. The base cabinet is optional furniture that is the same size and shape as ...
Step 4: Set up the printer, turn the printer off and unplug the power cord and any other cables before continuing. Your printer supports either an optional high capacity feeder or an optional base cabinet. The base cabinet is optional furniture that is the same size and shape as ...
Setup Guide
Page 29
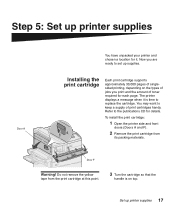
... time to set up printer supplies Door A You have unpacked your printer and chosen a location for each page. Installing the print cartridge Each print cartridge supports approximately 30,000 pages of singlesided printing, depending on the types of jobs you are ready to replace the cartridge. Refer to keep a supply of...
... time to set up printer supplies Door A You have unpacked your printer and chosen a location for each page. Installing the print cartridge Each print cartridge supports approximately 30,000 pages of singlesided printing, depending on the types of jobs you are ready to replace the cartridge. Refer to keep a supply of...
Setup Guide
Page 32
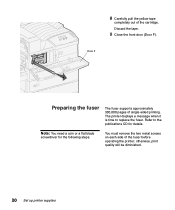
Door F Preparing the fuser The fuser supports approximately 300,000 pages of the fuser before operating the printer; Note: You need a coin or a flat blade screwdriver for details. The printer displays a message when it is time to the publications CD for the following steps. Refer to replace the fuser. You must remove the two metal screws on each side of single-sided printing. 8 Carefully pull the yellow tape completely out of the cartridge. otherwise, print quality will be diminished. 20 Set up printer supplies Discard the tape. 9 Close the front door (Door F).
Door F Preparing the fuser The fuser supports approximately 300,000 pages of the fuser before operating the printer; Note: You need a coin or a flat blade screwdriver for details. The printer displays a message when it is time to the publications CD for the following steps. Refer to replace the fuser. You must remove the two metal screws on each side of single-sided printing. 8 Carefully pull the yellow tape completely out of the cartridge. otherwise, print quality will be diminished. 20 Set up printer supplies Discard the tape. 9 Close the front door (Door F).

Setup Guide
Page 37
Note: Some memory options for other Lexmark printers cannot be used with your printer. 1 Access the system board. (See page 24 for optional memory cards. The system board has three connectors for ... 25 However, the printer only recognizes one flash memory card at a time. Memory connectors Latches 3 Push open the latches on the system board. You can support either a printer memory card or a flash memory card.
Note: Some memory options for other Lexmark printers cannot be used with your printer. 1 Access the system board. (See page 24 for optional memory cards. The system board has three connectors for ... 25 However, the printer only recognizes one flash memory card at a time. Memory connectors Latches 3 Push open the latches on the system board. You can support either a printer memory card or a flash memory card.

Setup Guide
Page 39
... of the system board when installing a card. Notch Notch 6 While holding the system board from the bottom, push the memory card firmly into place. Warning! Support the bottom of the card. 7 Repeat steps 4 through 6 to install other memory cards.
... of the system board when installing a card. Notch Notch 6 While holding the system board from the bottom, push the memory card firmly into place. Warning! Support the bottom of the card. 7 Repeat steps 4 through 6 to install other memory cards.

Setup Guide
Page 41
... card as shown. 4 While holding the system board from the bottom, push down until the firmware card is firmly in place. What do I do next? Support the bottom of the plastic connector on the system board.
... card as shown. 4 While holding the system board from the bottom, push down until the firmware card is firmly in place. What do I do next? Support the bottom of the plastic connector on the system board.

Setup Guide
Page 42
... if you received either of a multifunction printer upgrade. Install a USB/Parallel 1284-C or a Parallel 1284-C Interface Card to the documentation that support the following option cards: Note: The Lexmark W820n and Lexmark W820dn printers ship with adapter card to add additional storage space to your printer to a network. • Hard disk with the...
... if you received either of a multifunction printer upgrade. Install a USB/Parallel 1284-C or a Parallel 1284-C Interface Card to the documentation that support the following option cards: Note: The Lexmark W820n and Lexmark W820dn printers ship with adapter card to add additional storage space to your printer to a network. • Hard disk with the...

Setup Guide
Page 46
Your printer supports an optional duplex unit that lets you print on the duplex unit: two stationary brackets and one extendable bracket. There are three metal brackets on ...
Your printer supports an optional duplex unit that lets you print on the duplex unit: two stationary brackets and one extendable bracket. There are three metal brackets on ...

Setup Guide
Page 51
Set up a high capacity feeder or a base cabinet, see page 9. Your printer supports an optional10-bin mailbox that helps you must install either a mailbox or a finisher, but not both at the same time. For help setting up the optional mailbox 39 Before you can support either a high capacity feeder or a base cabinet. Note: The illustrations in this section show the printer with a high capacity feeder attached. Step 9: Set up the optional mailbox Note: The printer can attach a mailbox, you organize your printed documents.
Set up a high capacity feeder or a base cabinet, see page 9. Your printer supports an optional10-bin mailbox that helps you must install either a mailbox or a finisher, but not both at the same time. For help setting up the optional mailbox 39 Before you can support either a high capacity feeder or a base cabinet. Note: The illustrations in this section show the printer with a high capacity feeder attached. Step 9: Set up the optional mailbox Note: The printer can attach a mailbox, you organize your printed documents.
Setup Guide
Page 54
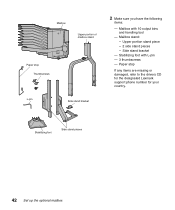
Mailbox stand: -- Stabilizing foot Side stand pieces 42 Set up the optional mailbox Stabilizing foot with 10 output bins and handling tool - Upper portion stand piece -- 2 side stand pieces -- Paper stop Thumbscrews L-pin Side stand bracket 2 Make sure you have the following items: - Side stand bracket - Mailbox Upper portion of mailbox stand Paper stop If any items are missing or damaged, refer to the drivers CD for the designated Lexmark support phone number for your country. Mailbox with L-pin - 3 thumbscrews -
Mailbox stand: -- Stabilizing foot Side stand pieces 42 Set up the optional mailbox Stabilizing foot with 10 output bins and handling tool - Upper portion stand piece -- 2 side stand pieces -- Paper stop Thumbscrews L-pin Side stand bracket 2 Make sure you have the following items: - Side stand bracket - Mailbox Upper portion of mailbox stand Paper stop If any items are missing or damaged, refer to the drivers CD for the designated Lexmark support phone number for your country. Mailbox with L-pin - 3 thumbscrews -

Setup Guide
Page 65
Your printer supports an optional finisher that adds hole punching and stapling functions to the printer output capabilities. Before you must install either a mailbox or a finisher, but not both at the same time. Set up a high capacity feeder or a base cabinet, see page 9. Step 10: Set up the optional finisher Note: The printer can attach a finisher, you can support either a high capacity feeder or a base cabinet. Note: The illustrations in this section show the printer with a high capacity feeder attached. For help setting up the optional finisher 53
Your printer supports an optional finisher that adds hole punching and stapling functions to the printer output capabilities. Before you must install either a mailbox or a finisher, but not both at the same time. Set up a high capacity feeder or a base cabinet, see page 9. Step 10: Set up the optional finisher Note: The printer can attach a finisher, you can support either a high capacity feeder or a base cabinet. Note: The illustrations in this section show the printer with a high capacity feeder attached. For help setting up the optional finisher 53
Setup Guide
Page 71
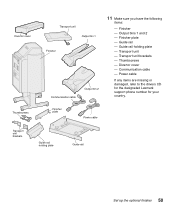
... - Finisher - Output bins 1 and 2 - Guide rail - Communication cable - Power cable If any items are missing or damaged, refer to the drivers CD for the designated Lexmark support phone number for your country. Divertor cover Thumbscrews Transport unit Output bin 1 Finisher Communication cable Output bin 2 11 Make sure you have the following items...
... - Finisher - Output bins 1 and 2 - Guide rail - Communication cable - Power cable If any items are missing or damaged, refer to the drivers CD for the designated Lexmark support phone number for your country. Divertor cover Thumbscrews Transport unit Output bin 1 Finisher Communication cable Output bin 2 11 Make sure you have the following items...

Setup Guide
Page 83
Step 11: Install the optional envelope feeder CAUTION! The Lexmark W820 supports an optional envelope feeder that lets you feed up to repack the envelope feeder. 2 Remove the multipurpose feeder from its packaging. To install the envelope ...
Step 11: Install the optional envelope feeder CAUTION! The Lexmark W820 supports an optional envelope feeder that lets you feed up to repack the envelope feeder. 2 Remove the multipurpose feeder from its packaging. To install the envelope ...

Setup Guide
Page 85
..., DL, C5, other Envelopes only 100 envelopes 86 feeder * JIS B4, JIS B5, and Universal are only supported when Auto Size Sensing is set to Off. Tray / Feeder Paper sizes supported Print media supported Capacity Go to page... 1 A3, A4, A5, Folio, Paper, transparencies, • 500 sheets of 20 lb...• 35 sheets of 20 lb paper 83 • 25 transparencies • 15 sheets of 1000 sheets. Step 12: Load print media Your Lexmark W820 has two standard trays that combine for the multipurpose feeder and optional envelope feeder. Load print media 73 If you can hold an additional...
..., DL, C5, other Envelopes only 100 envelopes 86 feeder * JIS B4, JIS B5, and Universal are only supported when Auto Size Sensing is set to Off. Tray / Feeder Paper sizes supported Print media supported Capacity Go to page... 1 A3, A4, A5, Folio, Paper, transparencies, • 500 sheets of 20 lb...• 35 sheets of 20 lb paper 83 • 25 transparencies • 15 sheets of 1000 sheets. Step 12: Load print media Your Lexmark W820 has two standard trays that combine for the multipurpose feeder and optional envelope feeder. Load print media 73 If you can hold an additional...
Setup Guide
Page 102
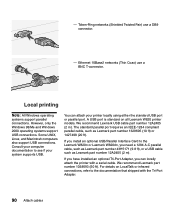
... a BNC T-connector. If you install an optional USB/Parallel Interface Card to the Lexmark W820n or Lexmark W820dn, you can attach your system supports USB. - Ethernet 10Base2 networks (Thin Coax) use a DB9 connector. - Local printing Note: All Windows operating systems support parallel connections. Consult your computer documentation to the documentation that shipped with a serial...
... a BNC T-connector. If you install an optional USB/Parallel Interface Card to the Lexmark W820n or Lexmark W820dn, you can attach your system supports USB. - Ethernet 10Base2 networks (Thin Coax) use a DB9 connector. - Local printing Note: All Windows operating systems support parallel connections. Consult your computer documentation to the documentation that shipped with a serial...
Setup Guide
Page 105
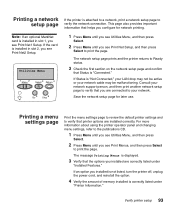
Consult your network support person, and then print another network setup page to verify that you see Print Menus, and then press Select to print the page. If Status ...
Consult your network support person, and then print another network setup page to verify that you see Print Menus, and then press Select to print the page. If Status ...

Setup Guide
Page 107
..., and then press Select. 2 Press Menu until you see Paper Type, and then press Select. See page 93 for detailed information about the paper types supported by each paper source. To change the Paper Type setting for another source, press Menu to scroll to the publications CD for help.
..., and then press Select. 2 Press Menu until you see Paper Type, and then press Select. See page 93 for detailed information about the paper types supported by each paper source. To change the Paper Type setting for another source, press Menu to scroll to the publications CD for help.

Setup Guide
Page 111
... to install printer drivers on printers attached to finding the specific instructions you need. The following network printer ports are supported: • Microsoft IP port (Windows NT 4.0 and Windows 2000) • Lexmark network port (Windows 95/98/Me, Windows NT 4.0, and Windows 2000) Install printer drivers 99 Step 16: Install printer drivers...
... to install printer drivers on printers attached to finding the specific instructions you need. The following network printer ports are supported: • Microsoft IP port (Windows NT 4.0 and Windows 2000) • Lexmark network port (Windows 95/98/Me, Windows NT 4.0, and Windows 2000) Install printer drivers 99 Step 16: Install printer drivers...

