User Manual
Page 4
... operator panel menus ...79 Restoring factory default settings ...79 Adjusting Power Saver ...80 Encrypting the disk ...80 Setting security using the Embedded Web Server (EWS 81 Black only mode ...84 Aligning the image transfer unit ...85 Using the Coverage Estimator ...86 Size sensing ...86 Configuring printer alerts ...87 Chapter 7: Troubleshooting 88 Online customer support ...88 Calling for service ...88 Checking an unresponsive printer ...88 Printing multi-language PDFs ...88 Solving printing problems ...89 Solving mailbox problems ...90 Solving option problems ...91 Solving paper feed...
... operator panel menus ...79 Restoring factory default settings ...79 Adjusting Power Saver ...80 Encrypting the disk ...80 Setting security using the Embedded Web Server (EWS 81 Black only mode ...84 Aligning the image transfer unit ...85 Using the Coverage Estimator ...86 Size sensing ...86 Configuring printer alerts ...87 Chapter 7: Troubleshooting 88 Online customer support ...88 Calling for service ...88 Checking an unresponsive printer ...88 Printing multi-language PDFs ...88 Solving printing problems ...89 Solving mailbox problems ...90 Solving option problems ...91 Solving paper feed...

User Manual
Page 5
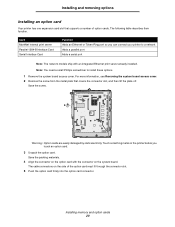
... Duplex unit Output options Output expander 5-bin mailbox StapleSmart™ finisher Internal options Memory cards - Flash memory - Parallel 1284-B interface card - Internal print servers (also called internal network adapters or INAs) Note: Some options may not be available on some models. Fonts Firmware cards - Printer memory - Installing and removing options 5 You can customize your printer memory capacity and connectivity by adding optional cards and input devices. Bar Code - 1 Installing and removing options You can also use these instructions...
... Duplex unit Output options Output expander 5-bin mailbox StapleSmart™ finisher Internal options Memory cards - Flash memory - Parallel 1284-B interface card - Internal print servers (also called internal network adapters or INAs) Note: Some options may not be available on some models. Fonts Firmware cards - Printer memory - Installing and removing options 5 You can customize your printer memory capacity and connectivity by adding optional cards and input devices. Bar Code - 1 Installing and removing options You can also use these instructions...
User Manual
Page 20
... side of option cards. The cable connectors on the option card with an integrated Ethernet print server already installed. Touch something metal on the system board. Note: You need a small Phillips screwdriver to a network Adds a parallel port Adds a serial port Note: The network models ship with the connector on the printer before you can connect your printer to install these options. 1 Remove the system board access cover. Warning: Option cards are easily damaged by static...
... side of option cards. The cable connectors on the option card with an integrated Ethernet print server already installed. Touch something metal on the system board. Note: You need a small Phillips screwdriver to a network Adds a parallel port Adds a serial port Note: The network models ship with the connector on the printer before you can connect your printer to install these options. 1 Remove the system board access cover. Warning: Option cards are easily damaged by static...

User Manual
Page 29
... message Printer Busy appears. Select Continue, and your job prints after the other file system are .gif, .jpeg, .jpg, .bmp, .png, .tiff, .tif, .pcx, and .dcx. Printing Printing from a USB flash memory device A USB Direct interface is located on and Ready or Busy appears. 2 Insert a USB flash memory device into the USB Direct interface. For information regarding tested and approved USB flash memory devices, see the Lexmark Web site at www.lexmark.com. Devices only supporting USB low...
... message Printer Busy appears. Select Continue, and your job prints after the other file system are .gif, .jpeg, .jpg, .bmp, .png, .tiff, .tif, .pcx, and .dcx. Printing Printing from a USB flash memory device A USB Direct interface is located on and Ready or Busy appears. 2 Insert a USB flash memory device into the USB Direct interface. For information regarding tested and approved USB flash memory devices, see the Lexmark Web site at www.lexmark.com. Devices only supporting USB low...

User Manual
Page 31
... can print a menu settings page to review the default printer settings and to verify printer options are printing to cancel. 6 Press the Delete key on the operator panel. 3 Press until Reports appears, and then press . 4 Press until Reports appears, and then press . Printing a menu settings page 31 Printing 4 Double-click the printer you selected when you send a job to print, the printer icon for network printing. 1 Make sure the printer is on and the Ready message appears. 2 Press on the operator panel...
... can print a menu settings page to review the default printer settings and to verify printer options are printing to cancel. 6 Press the Delete key on the operator panel. 3 Press until Reports appears, and then press . 4 Press until Reports appears, and then press . Printing a menu settings page 31 Printing 4 Double-click the printer you selected when you send a job to print, the printer icon for network printing. 1 Make sure the printer is on and the Ready message appears. 2 Press on the operator panel...

User Manual
Page 41
... changing the Configure Bins settings in the driver when you have attached an optional mailbox. Value Description Mailbox* Lets you select an output bin when you send a job to print. (If you prefer, you can use the operator panel menus to identify which held jobs are ready to print the job, you must enter the personal identification number (PIN) you specified in the Paper Menu. Note: Print and...
... changing the Configure Bins settings in the driver when you have attached an optional mailbox. Value Description Mailbox* Lets you select an output bin when you send a job to print. (If you prefer, you can use the operator panel menus to identify which held jobs are ready to print the job, you must enter the personal identification number (PIN) you specified in the Paper Menu. Note: Print and...

User Manual
Page 44
... a user name, and then send your job to the printer. Repeat Print If you have to print the job. Windows 1 From a word processor, spreadsheet, browser, or other application, select File Æ Print. 2 In the Copies & Pages or General pop-up menu, choose Job Routing. Printing confidential jobs 44 Note: If you send a Repeat Print job, the printer prints all copies are ready to retrieve your confidential print job, and follow the driver instructions. 4 Select the type of Print Time...
... a user name, and then send your job to the printer. Repeat Print If you have to print the job. Windows 1 From a word processor, spreadsheet, browser, or other application, select File Æ Print. 2 In the Copies & Pages or General pop-up menu, choose Job Routing. Printing confidential jobs 44 Note: If you send a Repeat Print job, the printer prints all copies are ready to retrieve your confidential print job, and follow the driver instructions. 4 Select the type of Print Time...
User Manual
Page 48
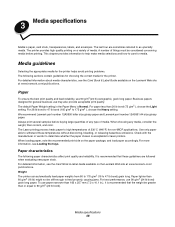
... Lexmark part number 12A5951 A4 size glossy paper. When loading paper, note the recommended print side on a variety of media. Media guidelines Selecting the appropriate media for the printer helps avoid printing problems. The following paper characteristics affect print quality and reliability. Business papers designed for general business use 90 g/m2 (24 lb) xerographic, grain long paper. For detailed information about media characteristics, see Loading the trays. For more information, see the Card Stock & Label Guide...
... Lexmark part number 12A5951 A4 size glossy paper. When loading paper, note the recommended print side on a variety of media. Media guidelines Selecting the appropriate media for the printer helps avoid printing problems. The following paper characteristics affect print quality and reliability. Business papers designed for general business use 90 g/m2 (24 lb) xerographic, grain long paper. For detailed information about media characteristics, see Loading the trays. For more information, see the Card Stock & Label Guide...
User Manual
Page 52
... Guide available on labels: • Set the Paper Type menu item to minimize jams, do not use envelopes that can cause feeding problems. • Do not use label sheets that have adhesive to the edge of the adhesive at www.lexmark.com/publications. When printing on the Lexmark Web site at least 1 mm (0.04 in .) of 25 pounds per square inch (psi). Set the Paper Type from the printer operator panel, the printer driver...
... Guide available on labels: • Set the Paper Type menu item to minimize jams, do not use envelopes that can cause feeding problems. • Do not use label sheets that have adhesive to the edge of the adhesive at www.lexmark.com/publications. When printing on the Lexmark Web site at least 1 mm (0.04 in .) of 25 pounds per square inch (psi). Set the Paper Type from the printer operator panel, the printer driver...
User Manual
Page 61
... paper. Prints colors less vividly to use these settings, see Holding a job in your color toner. When the print remains faded replace the print cartridge. For more information on the display let you can cancel the job. Multipage Print in the Settings Æ Finishing Menu Duplex in the Settings Æ Finishing Menu Causes the printer to send a Verify Print job. It lets you attach the optional duplex unit. Print cartridges The initial print cartridges that shipped with your software application or printer driver...
... paper. Prints colors less vividly to use these settings, see Holding a job in your color toner. When the print remains faded replace the print cartridge. For more information on the display let you can cancel the job. Multipage Print in the Settings Æ Finishing Menu Duplex in the Settings Æ Finishing Menu Causes the printer to send a Verify Print job. It lets you attach the optional duplex unit. Print cartridges The initial print cartridges that shipped with your software application or printer driver...
User Manual
Page 84
... set an expiration time for the next print job. When a user exceeds a specific number of PIN entry attempts, all colors print in black only mode. Black only mode In black only mode, all of that user's print jobs are deleted. To turn on black only mode through the printer operator panel: 1 Turn the printer off by entering the correct PIN on network models. 1 Open your Web browser. Confidential Print Setup Confidential Print Setup lets you want to configure using the format: http://ip_address/. 2 Click Configuration. 3 Under Other Settings...
... set an expiration time for the next print job. When a user exceeds a specific number of PIN entry attempts, all colors print in black only mode. Black only mode In black only mode, all of that user's print jobs are deleted. To turn on black only mode through the printer operator panel: 1 Turn the printer off by entering the correct PIN on network models. 1 Open your Web browser. Confidential Print Setup Confidential Print Setup lets you want to configure using the format: http://ip_address/. 2 Click Configuration. 3 Under Other Settings...
User Manual
Page 86
..., and black toner on a page. Lexmark makes no claim as to estimate the coverage on the first line of the job. Press until you want to disable size sensing, and then press . Activating Menu Changes briefly appears, followed by how full the print cartridges are printed on , the printer prints the percent coverage for each page of the display. These estimates are , environmental conditions, the media type, the software application, software settings, the driver, driver settings...
..., and black toner on a page. Lexmark makes no claim as to estimate the coverage on the first line of the job. Press until you want to disable size sensing, and then press . Activating Menu Changes briefly appears, followed by how full the print cartridges are printed on , the printer prints the percent coverage for each page of the display. These estimates are , environmental conditions, the media type, the software application, software settings, the driver, driver settings...
User Manual
Page 88
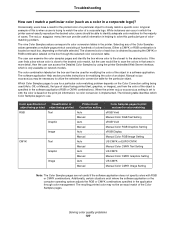
... side of the printer for printer service, describe the problem you are experiencing, the message on the display, and the troubleshooting steps you have already taken to find a solution. The Print dialog box appears. 3 Check the Print as Image option. 4 Click OK. Checking an unresponsive printer If your printer model type and serial number. For more informations, see Printing a menu settings page. Printing multi-language PDFs Symptom Some maintenance and troubleshooting documents do not print. Solution 1 Open the document you call 1-800-Lexmark...
... side of the printer for printer service, describe the problem you are experiencing, the message on the display, and the troubleshooting steps you have already taken to find a solution. The Print dialog box appears. 3 Check the Print as Image option. 4 Click OK. Checking an unresponsive printer If your printer model type and serial number. For more informations, see Printing a menu settings page. Printing multi-language PDFs Symptom Some maintenance and troubleshooting documents do not print. Solution 1 Open the document you call 1-800-Lexmark...
User Manual
Page 89
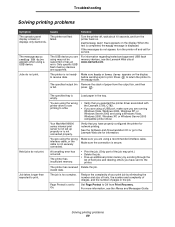
... printing problems 89 The message Error reading USB drive appears when using a recommended interface cable. The printer is not ready to print. See the Software and Documentation CD or go to the Ready state. Troubleshooting Solving printing problems Symptom The operator panel display is set up additional printer memory by eliminating the number and size of fonts, the number and complexity of images, and the number of paper from Print Recovery. Your MarkNet N8000 series internal print server is not securely connected. Make...
... printing problems 89 The message Error reading USB drive appears when using a recommended interface cable. The printer is not ready to print. See the Software and Documentation CD or go to the Ready state. Troubleshooting Solving printing problems Symptom The operator panel display is set up additional printer memory by eliminating the number and size of fonts, the number and complexity of images, and the number of paper from Print Recovery. Your MarkNet N8000 series internal print server is not securely connected. Make...

User Manual
Page 93
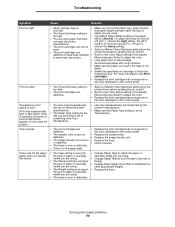
... www.lexmark.com for your print job, or change the Paper Type to the correct position. set to high humidity. An incorrect media type is set to Auto or On. The paper has absorbed moisture Load paper from . Load the correct type media for detailed specifications. For detailed instructions, see Clearing the entire paper path. Troubleshooting Solving paper feed problems Symptom Cause Solution Paper frequently jams. You are formatted. Use recommended paper and other specialty media. Make sure the stack of media loaded. Guides...
... www.lexmark.com for your print job, or change the Paper Type to the correct position. set to high humidity. An incorrect media type is set to Auto or On. The paper has absorbed moisture Load paper from . Load the correct type media for detailed specifications. For detailed instructions, see Clearing the entire paper path. Troubleshooting Solving paper feed problems Symptom Cause Solution Paper frequently jams. You are formatted. Use recommended paper and other specialty media. Make sure the stack of media loaded. Guides...

User Manual
Page 95
...; Load paper from another tray. Print irregularities ABCDE ABCDE ABCDE • Paper has absorbed moisture due to high humidity. • You are using . • Replace the image transfer unit and transfer roller. • Replace the fuser. Solving print quality problems 95 Troubleshooting Symptom Cause Solution Streaked horizontal lines ABCDE The print cartridges, the transfer roller, image transfer unit, or fuser may be replaced. Replace the print cartridge, the transfer roller, the image transfer unit, or fuser as needed. the color displayed on the control panel.
...; Load paper from another tray. Print irregularities ABCDE ABCDE ABCDE • Paper has absorbed moisture due to high humidity. • You are using . • Replace the image transfer unit and transfer roller. • Replace the fuser. Solving print quality problems 95 Troubleshooting Symptom Cause Solution Streaked horizontal lines ABCDE The print cartridges, the transfer roller, image transfer unit, or fuser may be replaced. Replace the print cartridge, the transfer roller, the image transfer unit, or fuser as needed. the color displayed on the control panel.
User Manual
Page 96
... using. • Change Paper Texture from Normal to Smooth or Rough. • Change Paper Weight from the printer driver before sending the job to print. • Scroll to the Color Adjust setting in more information, see Print cartridges. • Replace the print cartridge that corresponds to the color displayed on the control panel. Print too dark • The Toner Darkness setting is in the Paper Menu is set to something other appropriate weight). • Replace the fuser. Solving print quality problems 96 Toner...
... using. • Change Paper Texture from Normal to Smooth or Rough. • Change Paper Weight from the printer driver before sending the job to print. • Scroll to the Color Adjust setting in more information, see Print cartridges. • Replace the print cartridge that corresponds to the color displayed on the control panel. Print too dark • The Toner Darkness setting is in the Paper Menu is set to something other appropriate weight). • Replace the fuser. Solving print quality problems 96 Toner...
User Manual
Page 98
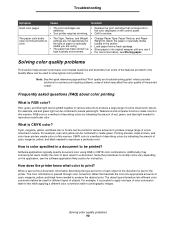
...; Replace the print cartridge that translate the color into appropriate amounts of red, green, and blue light needed to solve typical color problems. Note: See the quick reference page entitled "Print quality and troubleshooting guide" which provides solutions for the type of paper or specialty media you use it. • For more information, see the software application Help section for service. Additionally, they commonly let users modify the color of the printed output. Troubleshooting Symptom...
...; Replace the print cartridge that translate the color into appropriate amounts of red, green, and blue light needed to solve typical color problems. Note: See the quick reference page entitled "Print quality and troubleshooting guide" which provides solutions for the type of paper or specialty media you use it. • For more information, see the software application Help section for service. Additionally, they commonly let users modify the color of the printed output. Troubleshooting Symptom...
User Manual
Page 100
... be used (Auto, Off, or Manual), the type of object being printed Printer Color Correction setting RGB Text Auto Manual Graphic Auto Manual Image Auto Manual CMYK Text Auto Manual Graphic Auto Manual Image Auto Manual Color Samples pages to color conversion tables in the software application (RGB or CMYK combinations). Solving color quality problems 100 The color combination labeled on the table selected. The resulting printed color may be necessary to scan the colors in that area in helping to closely match a specific color. Troubleshooting How...
... be used (Auto, Off, or Manual), the type of object being printed Printer Color Correction setting RGB Text Auto Manual Graphic Auto Manual Image Auto Manual CMYK Text Auto Manual Graphic Auto Manual Image Auto Manual Color Samples pages to color conversion tables in the software application (RGB or CMYK combinations). Solving color quality problems 100 The color combination labeled on the table selected. The resulting printed color may be necessary to scan the colors in that area in helping to closely match a specific color. Troubleshooting How...
User Manual
Page 109
... gallium arsenide laser operating in warranty service, damaged beyond the limit of products, supplies or parts Notices 109 For customers outside of Lexmark specifications Refurbishment, repair, refilling or remanufacture by a third party of its warranty period. Before you present for a fee. The replacement may be required to the Remarketer or the Lexmark designated location. Fuser Units, Image Transfer Units, Waste Toner Bottles, and Paper Feed items, and any...
... gallium arsenide laser operating in warranty service, damaged beyond the limit of products, supplies or parts Notices 109 For customers outside of Lexmark specifications Refurbishment, repair, refilling or remanufacture by a third party of its warranty period. Before you present for a fee. The replacement may be required to the Remarketer or the Lexmark designated location. Fuser Units, Image Transfer Units, Waste Toner Bottles, and Paper Feed items, and any...


