

User's Guide
Page 3
... Chapter 1: About your printer 1 Features and functions 2 Printer description 7 Printing the demonstration sample 10 Connecting the printer to your computer 14 Setting up your Windows and DOS application software 17 Chapter 2: Using the operator panel 21 Operator panel layers 22 Setting the printer online or offline 28 Advancing the paper 29 Using Tear Off 29 Using the Load/Unload feature 30 Locking/unlocking the operator panel 30 Selecting Tractor mode 30 Selecting or locking...
... Chapter 1: About your printer 1 Features and functions 2 Printer description 7 Printing the demonstration sample 10 Connecting the printer to your computer 14 Setting up your Windows and DOS application software 17 Chapter 2: Using the operator panel 21 Operator panel layers 22 Setting the printer online or offline 28 Advancing the paper 29 Using Tear Off 29 Using the Load/Unload feature 30 Locking/unlocking the operator panel 30 Selecting Tractor mode 30 Selecting or locking...

User's Guide
Page 8
..., Setup, paper movement, Pitch, and Macro functions. For more information, see "Forms Macro menu options" on cut sheets Tear Off All models Button control for cut sheets or envelopes. • Assists you set them as the menu default. Loads and unloads continuous form paper. Enables printing on page 96. About your application software. • Font or Pitch lock is deactivated when you turn the printer Off unless you in removing printed continuous...
..., Setup, paper movement, Pitch, and Macro functions. For more information, see "Forms Macro menu options" on cut sheets Tear Off All models Button control for cut sheets or envelopes. • Assists you set them as the menu default. Loads and unloads continuous form paper. Enables printing on page 96. About your application software. • Font or Pitch lock is deactivated when you turn the printer Off unless you in removing printed continuous...

User's Guide
Page 11
...Manual feed door Pull down to load individual cut sheet. 7 Power switch Turns the printer On and Off. Paper guides Align the margins of a cut forms and envelopes. Ribbon access cover Covers the ribbon cartridge and internal printer components. Operator panel Indicates printer status and makes control of forms being printed. Printer description Forms thickness lever Ribbon access cover About your printer Front cover Operator panel Paper guides Manual feed door Power switch Paper select lever Printer parts and function Part name Function Forms thickness lever Adjusts...
...Manual feed door Pull down to load individual cut sheet. 7 Power switch Turns the printer On and Off. Paper guides Align the margins of a cut forms and envelopes. Ribbon access cover Covers the ribbon cartridge and internal printer components. Operator panel Indicates printer status and makes control of forms being printed. Printer description Forms thickness lever Ribbon access cover About your printer Front cover Operator panel Paper guides Manual feed door Power switch Paper select lever Printer parts and function Part name Function Forms thickness lever Adjusts...

User's Guide
Page 33
... use the operator panel to advance the paper when the printer is in the Setup menu or your application software. If you are at the Tear Off bar: • Press LineFeed to move the paper incrementally. • Press Tear Off to move a continuous form manually to the Top-Of-Form on page 87. Using Tear Off Tear Off works only when the tractor unit...
... use the operator panel to advance the paper when the printer is in the Setup menu or your application software. If you are at the Tear Off bar: • Press LineFeed to move the paper incrementally. • Press Tear Off to move a continuous form manually to the Top-Of-Form on page 87. Using Tear Off Tear Off works only when the tractor unit...
User's Guide
Page 34
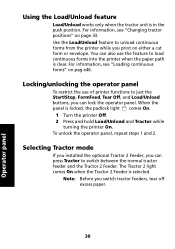
... just the Start/Stop, FormFeed, Tear Off, and Load/Unload buttons, you switch tractor feeders, tear off excess paper. 30 Operator panel The Tractor 2 light comes On when the Tractor 2 Feeder is locked, the padlock light comes On. 1 Turn the printer Off. 2 Press and hold Load/Unload and Tractor while turning the printer On. Use the Load/Unload feature to load continuous forms into the printer when the paper path is...
... just the Start/Stop, FormFeed, Tear Off, and Load/Unload buttons, you switch tractor feeders, tear off excess paper. 30 Operator panel The Tractor 2 light comes On when the Tractor 2 Feeder is locked, the padlock light comes On. 1 Turn the printer Off. 2 Press and hold Load/Unload and Tractor while turning the printer On. Use the Load/Unload feature to load continuous forms into the printer when the paper path is...

User's Guide
Page 91
... send another job to the correct position on the next page. • No data, printer control codes, or escape codes have been sent to the printer after advancing to the Top-Of-Form and begins printing. 87 The paper remains at the current Tear Off position until the printer beeps. 3 Open the operator panel cover to access layer 2. 4 Press Micro ↑ or Micro ↓ to move the paper...
... send another job to the correct position on the next page. • No data, printer control codes, or escape codes have been sent to the printer after advancing to the Top-Of-Form and begins printing. 87 The paper remains at the current Tear Off position until the printer beeps. 3 Open the operator panel cover to access layer 2. 4 Press Micro ↑ or Micro ↓ to move the paper...

User's Guide
Page 97
Using Setup mode 5 For this example, press Macro to Main Menu Press -------Set TOF LineFeed Macro Micro ↑ Micro ↓ Setup Pitch Printer menus now print in French. Menu Language To Select No Change English French German Italian (More) Return to select French. Manu contrôle Retour menu principal Revenir à la page précédente Menu langue Lecture haut de page Silence En...
Using Setup mode 5 For this example, press Macro to Main Menu Press -------Set TOF LineFeed Macro Micro ↑ Micro ↓ Setup Pitch Printer menus now print in French. Menu Language To Select No Change English French German Italian (More) Return to select French. Manu contrôle Retour menu principal Revenir à la page précédente Menu langue Lecture haut de page Silence En...

User's Guide
Page 106
... printed unidirectionally. • The factory setting is Off. The printer prints slower in Quiet mode. Enable or Disable the printers ability to Disable, the alarm does not sound. To view the list of print. • Set to On and in . Have the printer verify the Top-Of-Form before it in Quiet mode. 102 Using Setup mode Control menu options Control options Use these menu options Uni-Dir Printing Auto Ready Cut Sheet Paper Out Alarm Demo Print Menu Language...
... printed unidirectionally. • The factory setting is Off. The printer prints slower in Quiet mode. Enable or Disable the printers ability to Disable, the alarm does not sound. To view the list of print. • Set to On and in . Have the printer verify the Top-Of-Form before it in Quiet mode. 102 Using Setup mode Control menu options Control options Use these menu options Uni-Dir Printing Auto Ready Cut Sheet Paper Out Alarm Demo Print Menu Language...
User's Guide
Page 108
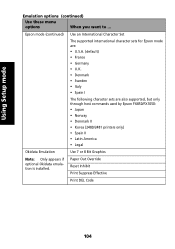
Paper Out Override Reset Inhibit Print Suppress Effective Print DEL Code 104 Epson mode (continued) Use an International Character Set The supported international character sets for Epson mode are: • U.S.A. (default) • France • Germany • U.K. • Denmark • Sweden • Italy • Spain I The following character sets are also supported, but only through host commands used by Epson FX850/FX1050: • Japan • Norway •...
Paper Out Override Reset Inhibit Print Suppress Effective Print DEL Code 104 Epson mode (continued) Use an International Character Set The supported international character sets for Epson mode are: • U.S.A. (default) • France • Germany • U.K. • Denmark • Sweden • Italy • Spain I The following character sets are also supported, but only through host commands used by Epson FX850/FX1050: • Japan • Norway •...

User's Guide
Page 120
... power switch On, the printer performs an internal check, or Power-On Self Test. Testing the printer Each time you stop the printer. Use trace mode to exit this mode. 116 Troubleshooting Running the Printer Test produces a test printout that are installed. 2 Turn the printer Off. 3 Press and hold Tractor while you turn the printer On. 4 Release Tractor when the lights go out. 5 Turn the printer Off and back On to help diagnose software/driver problems. To enter trace mode: 1 Make sure paper...
... power switch On, the printer performs an internal check, or Power-On Self Test. Testing the printer Each time you stop the printer. Use trace mode to exit this mode. 116 Troubleshooting Running the Printer Test produces a test printout that are installed. 2 Turn the printer Off. 3 Press and hold Tractor while you turn the printer On. 4 Release Tractor when the lights go out. 5 Turn the printer Off and back On to help diagnose software/driver problems. To enter trace mode: 1 Make sure paper...
User's Guide
Page 125
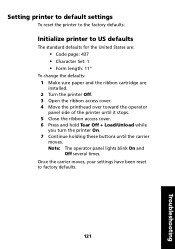
... change the defaults: 1 Make sure paper and the ribbon cartridge are installed. 2 Turn the printer Off. 3 Open the ribbon access cover. 4 Move the printhead over toward the operator panel side of the printer until it stops. 5 Close the ribbon access cover. 6 Press and hold Tear Off + Load/Unload while you turn the printer On. 7 Continue holding these buttons until the carrier moves. Setting printer to default settings To reset the printer to the factory defaults: Initialize printer to factory defaults. 121 Troubleshooting Note: The operator panel lights blink On...
... change the defaults: 1 Make sure paper and the ribbon cartridge are installed. 2 Turn the printer Off. 3 Open the ribbon access cover. 4 Move the printhead over toward the operator panel side of the printer until it stops. 5 Close the ribbon access cover. 6 Press and hold Tear Off + Load/Unload while you turn the printer On. 7 Continue holding these buttons until the carrier moves. Setting printer to default settings To reset the printer to the factory defaults: Initialize printer to factory defaults. 121 Troubleshooting Note: The operator panel lights blink On...
User's Guide
Page 132
... paper particles are Remove the ribbon cartridge stuck to be missing from the printhead. control codes do not work. Some wires seem to the ribbon and check the ribbon surface. Check the setting of paper you have loaded. surface. If the suggested action does not correct the problem, contact your software application manual. 1 Check the setting of One Second and run the job again. Refer to correct the problem...
... paper particles are Remove the ribbon cartridge stuck to be missing from the printhead. control codes do not work. Some wires seem to the ribbon and check the ribbon surface. Check the setting of paper you have loaded. surface. If the suggested action does not correct the problem, contact your software application manual. 1 Check the setting of One Second and run the job again. Refer to correct the problem...

User's Guide
Page 134
...; Contact your service representative. Forms thickness lever is set too low. Refer to the right during printing. Printer page length is incorrect for the type of paper you have loaded. problem. The stack of continuous forms is set incorrectly. For help , see "Setting Top-Of-Form" on page 81. Adjust page length in Setup menu. Reset the forms thickness lever. Troubleshooting 130 Left margin moves to your software application manual. Top-Of...
...; Contact your service representative. Forms thickness lever is set too low. Refer to the right during printing. Printer page length is incorrect for the type of paper you have loaded. problem. The stack of continuous forms is set incorrectly. For help , see "Setting Top-Of-Form" on page 81. Adjust page length in Setup menu. Reset the forms thickness lever. Troubleshooting 130 Left margin moves to your software application manual. Top-Of...
User's Guide
Page 137
... out of ink. on page 44. left grounded or shielded is set See "Setting the forms printing but doesn't print; ends. • Wrong driver in software. • Select the correct driver. See "Setting up your Windows and DOS application software" on the carrier. • Adjust the ribbon density control knob. paper you are using a • Make sure the printer cable characters print; See "Removing the ribbon cartridge" on page 142. Printer problems (continued) Problem Probable cause...
... out of ink. on page 44. left grounded or shielded is set See "Setting the forms printing but doesn't print; ends. • Wrong driver in software. • Select the correct driver. See "Setting up your Windows and DOS application software" on the carrier. • Adjust the ribbon density control knob. paper you are using a • Make sure the printer cable characters print; See "Removing the ribbon cartridge" on page 142. Printer problems (continued) Problem Probable cause...
User's Guide
Page 142
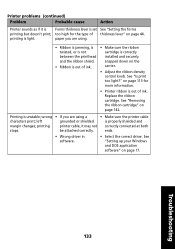
... "Cleaning the Auto Sheet Feeder rollers" on page 143. See "Paper fed from the Auto Sheet Feeder and use paper that the paper meets the paper specifications. Dirty auto sheet feed rollers. The forms thickness lever is set incorrectly for more information. Troubleshooting 138 Remove all paper from Auto Sheet Feeder jams at the wrong Top-Of-Form position. Paper is jammed in setting Top-Of-Form. The Auto Sheet Feeder places the paper at entrance to printer." Remove the paper and ensure that has a lower weight. Printer problems...
... "Cleaning the Auto Sheet Feeder rollers" on page 143. See "Paper fed from the Auto Sheet Feeder and use paper that the paper meets the paper specifications. Dirty auto sheet feed rollers. The forms thickness lever is set incorrectly for more information. Troubleshooting 138 Remove all paper from Auto Sheet Feeder jams at the wrong Top-Of-Form position. Paper is jammed in setting Top-Of-Form. The Auto Sheet Feeder places the paper at entrance to printer." Remove the paper and ensure that has a lower weight. Printer problems...

User's Guide
Page 144
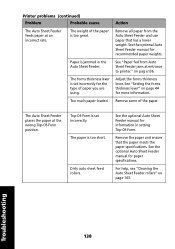
... which printer cable to use . Printer is not selected. The printer vibrates. Troubleshooting 140 Make sure the printer cable is On). • Turn Off the printer. • Press and hold Load/Unload and Tractor and turn On the printer. See "Setting up your software application manual. Close the cover. Action Set both ends. Operator panel is locked (Padlock light is correctly connected at both the printer and computer power switches Off. Printer beeps when using Printer is on page 17...
... which printer cable to use . Printer is not selected. The printer vibrates. Troubleshooting 140 Make sure the printer cable is On). • Turn Off the printer. • Press and hold Load/Unload and Tractor and turn On the printer. See "Setting up your software application manual. Close the cover. Action Set both ends. Operator panel is locked (Padlock light is correctly connected at both the printer and computer power switches Off. Printer beeps when using Printer is on page 17...

User's Guide
Page 163
... warranty period of technical support. Replacement is provided for a fee. Free remote technical support is not available to have installed a maintenance kit as specified (if applicable) • Use of printing media outside of Lexmark specifications • Use of other than Lexmark supplies (such as toner cartridges, inkjet cartridges, and ribbons) • Use of other than Lexmark product or component 159 Warranty service does not include repair of failures caused by...
... warranty period of technical support. Replacement is provided for a fee. Free remote technical support is not available to have installed a maintenance kit as specified (if applicable) • Use of printing media outside of Lexmark specifications • Use of other than Lexmark supplies (such as toner cartridges, inkjet cartridges, and ribbons) • Use of other than Lexmark product or component 159 Warranty service does not include repair of failures caused by...
User's Guide
Page 165
... adjusting 123 buttons, layer 1 operator panel 24 buttons, layer 2 operator panel 25 C change the menu language in setup mode 92 checklist of problems 112 clearing paper jams 123 configuring the printer 18 continuous forms loading 46 D description of printer parts 4 doors 33 drivers 19 E electronic emissions notices 145 Energy Star 147 envelope orientation 77 envelopes loading 72 EU defaults 121 F factory defaults setting 121 factory defaults/settings 89 features/functions 2 bar code function 6 box and line drawings 5 carriage size 1 character spacing 2 code pages 5 font lock 4 front loading...
... adjusting 123 buttons, layer 1 operator panel 24 buttons, layer 2 operator panel 25 C change the menu language in setup mode 92 checklist of problems 112 clearing paper jams 123 configuring the printer 18 continuous forms loading 46 D description of printer parts 4 doors 33 drivers 19 E electronic emissions notices 145 Energy Star 147 envelope orientation 77 envelopes loading 72 EU defaults 121 F factory defaults setting 121 factory defaults/settings 89 features/functions 2 bar code function 6 box and line drawings 5 carriage size 1 character spacing 2 code pages 5 font lock 4 front loading...

User's Guide
Page 166
... front cover 7 H How to change a language 92 L language changing 92 latch, cover 9 latching levers 33 left margin, aligning 77 Line Feed button 24, 25 load/unload feature, using 30 loading a cut form 72 an envelope 72 continuous forms 46 locking levers 33 M Macro function 4, 25, 28 maintenance cleaning 142 manual feed door 7 Micro up/down buttons 25 O offline, setting the printer 28 online, setting the printer 28 operator panel 7, 27 buttons 24, 25 Font 24 Form Feed 24 lights 27...
... front cover 7 H How to change a language 92 L language changing 92 latch, cover 9 latching levers 33 left margin, aligning 77 Line Feed button 24, 25 load/unload feature, using 30 loading a cut form 72 an envelope 72 continuous forms 46 locking levers 33 M Macro function 4, 25, 28 maintenance cleaning 142 manual feed door 7 Micro up/down buttons 25 O offline, setting the printer 28 online, setting the printer 28 operator panel 7, 27 buttons 24, 25 Font 24 Form Feed 24 lights 27...
User's Guide
Page 167
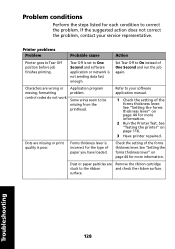
... Pitch button 26 Pitch light 28 power connector 9 switch 7 Power light 27 printer driver 19 printer parts forms thickness lever 7 front cover 7 latch 9 manual feed door 7 operator panel 7 paper guides 7 paper select lever 7 parallel interface connector 9 power connector 9 switch 7 tear bar 9 top cover 7 printer test 116 printing a cut form 73 an envelope 73 on continuous forms 46 printing becomes slower 141 problem conditions 128 characters are wrong or missing 128 dots are missing 128 formatting control codes do not work...
... Pitch button 26 Pitch light 28 power connector 9 switch 7 Power light 27 printer driver 19 printer parts forms thickness lever 7 front cover 7 latch 9 manual feed door 7 operator panel 7 paper guides 7 paper select lever 7 parallel interface connector 9 power connector 9 switch 7 tear bar 9 top cover 7 printer test 116 printing a cut form 73 an envelope 73 on continuous forms 46 printing becomes slower 141 problem conditions 128 characters are wrong or missing 128 dots are missing 128 formatting control codes do not work...


