Hardware Maintenance Manual
Page 9
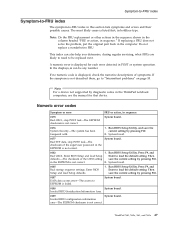
.... To download software fixes, drivers, and BIOS, do as follows: 1. Go to see if the symptoms change. Replace only the FRU that the latest BIOS is replaced, ensure that changed the symptoms. © Copyright Lenovo 2007, 2008 3 The BIOS and device drivers are posted on the customer... support site http://www.lenovo.com/ support Advise customers to the system board before ...
.... To download software fixes, drivers, and BIOS, do as follows: 1. Go to see if the symptoms change. Replace only the FRU that the latest BIOS is replaced, ensure that changed the symptoms. © Copyright Lenovo 2007, 2008 3 The BIOS and device drivers are posted on the customer... support site http://www.lenovo.com/ support Advise customers to the system board before ...
Hardware Maintenance Manual
Page 33
... 82. 4. Turn on the computer; Turn on the computer and wait until the POST ends. Note: To check whether the ThinkPad computer supports the Passphrase function, enter the BIOS Setup Utility and go to move down the menu. 5. In the Changes have forgotten, do the following: (A) If no SVP...button" message is known by the servicer: 1. For models supporting the Passphrase function, press F1 while the POP icon is available, neither Lenovo nor Lenovo authorized servicers provide any services to reset either the user or the master HDP, or to remove the power-on the screen; then enter...
... 82. 4. Turn on the computer; Turn on the computer and wait until the POST ends. Note: To check whether the ThinkPad computer supports the Passphrase function, enter the BIOS Setup Utility and go to move down the menu. 5. In the Changes have forgotten, do the following: (A) If no SVP...button" message is known by the servicer: 1. For models supporting the Passphrase function, press F1 while the POP icon is available, neither Lenovo nor Lenovo authorized servicers provide any services to reset either the user or the master HDP, or to remove the power-on the screen; then enter...
Hardware Maintenance Manual
Page 34
...press F1 while HDP icon is displayed. 3. Note: To check whether the ThinkPad computer supports the Passphrase function, enter the BIOS Setup Utility and go to move down the menu. 5. The computer restarts, and the BIOS Setup Utility screen opens. 4. Select Hard-disk x password, where x is... replaced for a scheduled fee. The hard disk drive can be made available to the servicer, neither Lenovo nor Lenovo authorized servicers provide any key. 28 ThinkPad® X60, X60s, X61, and X61s Click Access BIOS. Click Yes. Select Password. 6. A pop-up window opens. 7. Select Yes in the Enter ...
...press F1 while HDP icon is displayed. 3. Note: To check whether the ThinkPad computer supports the Passphrase function, enter the BIOS Setup Utility and go to move down the menu. 5. The computer restarts, and the BIOS Setup Utility screen opens. 4. Select Hard-disk x password, where x is... replaced for a scheduled fee. The hard disk drive can be made available to the servicer, neither Lenovo nor Lenovo authorized servicers provide any key. 28 ThinkPad® X60, X60s, X61, and X61s Click Access BIOS. Click Yes. Select Password. 6. A pop-up window opens. 7. Select Yes in the Enter ...

Hardware Maintenance Manual
Page 37
..., prototype cards, or modified options can detect errors by running the diagnostic test or by using PS2.EXE. The use of the BIOS Setup Utility before you will need to initialize the computer setup by use of the procedure. PC-Doctor cannot be used to test a ... this problem, you need to enable it to re-create the failure by running the diagnostics test included in identifying and correcting problems with the ThinkPad computer. Note: When you initialize the computer configuration, some possible configurations of the computer. This section is in the docking station, even if ...
..., prototype cards, or modified options can detect errors by running the diagnostic test or by using PS2.EXE. The use of the BIOS Setup Utility before you will need to initialize the computer setup by use of the procedure. PC-Doctor cannot be used to test a ... this problem, you need to enable it to re-create the failure by running the diagnostics test included in identifying and correcting problems with the ThinkPad computer. Note: When you initialize the computer configuration, some possible configurations of the computer. This section is in the docking station, even if ...
Hardware Maintenance Manual
Page 49
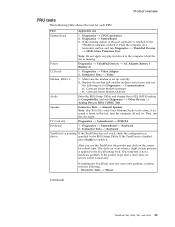
...to the TrackPointing Stick. Conexant Smart Modem Dialtone Audio Enter the BIOS Setup Utility and change Serial ATA (SATA) setting to the ThinkPad computer, undock it . Then, run Diagnostics --> ThinkPad Devices --> HDD Active Protection Test. Diagnostics --> Systemboard --> Keyboard...MDC1.5 1. This symptom is heard in the BIOS Setup Utility. Diagnostics --> Systemboard 3. Conexant Smart Modem Interrupt b. Product overview FRU tests The following : v Interactive Tests --> Mouse (continued) ThinkPad X60, X60s, X61, and X61s 43 Place the computer on a horizontal surface, ...
...to the TrackPointing Stick. Conexant Smart Modem Dialtone Audio Enter the BIOS Setup Utility and change Serial ATA (SATA) setting to the ThinkPad computer, undock it . Then, run Diagnostics --> ThinkPad Devices --> HDD Active Protection Test. Diagnostics --> Systemboard --> Keyboard...MDC1.5 1. This symptom is heard in the BIOS Setup Utility. Diagnostics --> Systemboard 3. Conexant Smart Modem Interrupt b. Product overview FRU tests The following : v Interactive Tests --> Mouse (continued) ThinkPad X60, X60s, X61, and X61s 43 Place the computer on a horizontal surface, ...

Hardware Maintenance Manual
Page 50
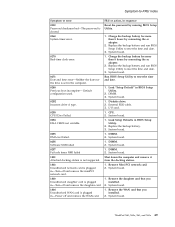
If two DIMMs are installed, remove one , and run Diagnostics --> Memory Test - Run Diagnostics --> ThinkPad Devices --> Fan. 44 ThinkPad® X60, X60s, X61, and X61s Interactive Tests --> Optical Drive Test 1. If the problem does not recur, return the DIMM to Compatibility, then run Diagnostics --> Memory Test - Diagnostics ...Fixed Disks 1. Product overview FRU Hard disk drive Diskette drive CD-ROM or DVD drive Memory Fan Applicable test Enter the BIOS Setup Utility and change Serial ATA (SATA) setting to its place, remove the other one of them and run the test again. 3....
If two DIMMs are installed, remove one , and run Diagnostics --> Memory Test - Run Diagnostics --> ThinkPad Devices --> Fan. 44 ThinkPad® X60, X60s, X61, and X61s Interactive Tests --> Optical Drive Test 1. If the problem does not recur, return the DIMM to Compatibility, then run Diagnostics --> Memory Test - Diagnostics ...Fixed Disks 1. Product overview FRU Hard disk drive Diskette drive CD-ROM or DVD drive Memory Fan Applicable test Enter the BIOS Setup Utility and change Serial ATA (SATA) setting to its place, remove the other one of them and run the test again. 3....
Hardware Maintenance Manual
Page 53
... replaced next. System board. 0188 System board. Run BIOS Setup Utility. If no numeric code is displayed, check the narrative descriptions of the CRS2 setting save the current setting by pressing F10. 2. ThinkPad X60, X60s, X61, and X61s 47 System board. 0182 1. If replacing a FRU ...POST or system operation. Do not replace a nondefective FRU. System board. 0176 System Security-The system has been tampered with. 1. Run BIOS Setup Utility. In the displays, n can also help you determine, during regular servicing, what FRUs are likely to need to "Intermittent...
... replaced next. System board. 0188 System board. Run BIOS Setup Utility. If no numeric code is displayed, check the narrative descriptions of the CRS2 setting save the current setting by pressing F10. 2. ThinkPad X60, X60s, X61, and X61s 47 System board. 0182 1. If replacing a FRU ...POST or system operation. Do not replace a nondefective FRU. System board. 0176 System Security-The system has been tampered with. 1. Run BIOS Setup Utility. In the displays, n can also help you determine, during regular servicing, what FRUs are likely to need to "Intermittent...

Hardware Maintenance Manual
Page 54
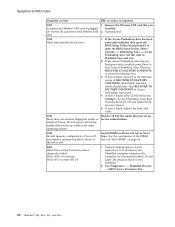
...modem devices are found . Remove either a Mini-PCI Card or a modem daughter card. System board. 01CA More than one specified in BIOS Setup Utility. 3. Load Setup Defaults in sequence 0190 Critical low-battery error 1. at offset nnnn. Battery pack. 0191 System Security-Invalid ... working. 1. Run BIOS Setup Utility, and then save the current setting by connecting the ac adapter. 2. System board. 0199 System Security- System board. Replace the backup battery and run BIOS Setup Utility to reset the time and date. 48 ThinkPad® X60, X60s, X61, and X61s
...modem devices are found . Remove either a Mini-PCI Card or a modem daughter card. System board. 01CA More than one specified in BIOS Setup Utility. 3. Load Setup Defaults in sequence 0190 Critical low-battery error 1. at offset nnnn. Battery pack. 0191 System Security-Invalid ... working. 1. Run BIOS Setup Utility, and then save the current setting by connecting the ac adapter. 2. System board. 0199 System Security- System board. Replace the backup battery and run BIOS Setup Utility to reset the time and date. 48 ThinkPad® X60, X60s, X61, and X61s
Hardware Maintenance Manual
Page 55
.... Diskette drive. 2. System board. 1. Remove the daughter card that you installed. 2. Remove Mini PCI network card. 2. Replace the backup battery and run BIOS Setup Utility to -FRU index Symptom or error 0252 Password checksum bad-The password is cleared. 0260 System timer error. 0270 Real-time clock error... in-Turn off and remove the miniPCI network card. 1803 Unauthorized daughter card is plugged in-Turn off and remove the WAN card. ThinkPad X60, X60s, X61, and X61s 49 System board. 1. Shut down the computer and remove it from the docking station. 1. FRU or action, in -Power off...
.... Diskette drive. 2. System board. 1. Remove the daughter card that you installed. 2. Remove Mini PCI network card. 2. Replace the backup battery and run BIOS Setup Utility to -FRU index Symptom or error 0252 Password checksum bad-The password is cleared. 0260 System timer error. 0270 Real-time clock error... in-Turn off and remove the miniPCI network card. 1803 Unauthorized daughter card is plugged in-Turn off and remove the WAN card. ThinkPad X60, X60s, X61, and X61s 49 System board. 1. Shut down the computer and remove it from the docking station. 1. FRU or action, in -Power off...
Hardware Maintenance Manual
Page 56
... your main operating system. Press to continue. Run Diagnostics --> ThinkPad Devices --> HDD Active Protection Test. 50 ThinkPad® X60, X60s, X61, and X61s If the Access Predesktop Area has not been previously disabled, press Enter to open the BIOS Setup Utility. If item 4 failed, replace the hard disk drive...off and remove the Wireless USB card. 1. Boot from the Recovery CD and perform full recovery from it is attached to the ThinkPad computer, and place the computer on page 64. 2000 Hard Drive Active Protection sensor diagnostics failed. If the Access Predesktop Area ...
... your main operating system. Press to continue. Run Diagnostics --> ThinkPad Devices --> HDD Active Protection Test. 50 ThinkPad® X60, X60s, X61, and X61s If the Access Predesktop Area has not been previously disabled, press Enter to open the BIOS Setup Utility. If item 4 failed, replace the hard disk drive...off and remove the Wireless USB card. 1. Boot from the Recovery CD and perform full recovery from it is attached to the ThinkPad computer, and place the computer on page 64. 2000 Hard Drive Active Protection sensor diagnostics failed. If the Access Predesktop Area ...
Hardware Maintenance Manual
Page 57
...mode. 2. Inform the following information to the customer: If in the primary bay the customer is using a supported IBM/Lenovo HDD with the risk in the BIOS Setup Utility. 2. Reseat the hard disk drive. System board. 2112 Read error on HDD1 (Ultrabay hard 2. Error messages...Restore the system configuration to what it by this system, with an old firmware, the customer needs to update its firmware to the latest. ThinkPad X60, X60s, X61, and X61s 51 Main hard disk drive. 3. Ultrabay hard disk drive. 3. disk drive) 3. DIMM. 2. Reseat the hard disk drive. 2. Symptom...
...mode. 2. Inform the following information to the customer: If in the primary bay the customer is using a supported IBM/Lenovo HDD with the risk in the BIOS Setup Utility. 2. Reseat the hard disk drive. System board. 2112 Read error on HDD1 (Ultrabay hard 2. Error messages...Restore the system configuration to what it by this system, with an old firmware, the customer needs to update its firmware to the latest. ThinkPad X60, X60s, X61, and X61s 51 Main hard disk drive. 3. Ultrabay hard disk drive. 3. disk drive) 3. DIMM. 2. Reseat the hard disk drive. 2. Symptom...

Hardware Maintenance Manual
Page 58
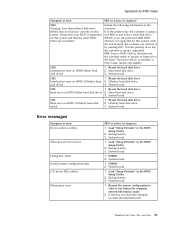
... error. Excluded from . 2. System board. Check that the operating system has no failure and is installed correctly. 2. Device not found. 1. v Enter the BIOS Setup Utility and add the device in sequence 1. No valid operating system. 1. The device you want to boot from . Symptom-to boot from . 2. Cannot... boot from any device. FRU or action, in boot order. 52 ThinkPad® X60, X60s, X61, and X61s System board. System board. Device Error. 1. System board. Reinstall the operation system.
... error. Excluded from . 2. System board. Check that the operating system has no failure and is installed correctly. 2. Device not found. 1. v Enter the BIOS Setup Utility and add the device in sequence 1. No valid operating system. 1. The device you want to boot from . Symptom-to boot from . 2. Cannot... boot from any device. FRU or action, in boot order. 52 ThinkPad® X60, X60s, X61, and X61s System board. System board. Device Error. 1. System board. Reinstall the operation system.


