Hardware Maintenance Manual
Page 5
... the diagnostic disc 34 Navigating through the diagnostics programs 34 Running tests 34 Chapter 6. Configuring RAID . . . . . 41 RAID Level 41 Configuring the system BIOS to enable SATA RAID functionality 41 Creating RAID volumes 41 Deleting RAID volumes 42 Resetting disks to -FRU Index . . 43 Hard disk drive boot error 43 Power Supply Problems 43 Diagnostic error codes 44 Beep symptoms 61 POST error codes 61 Miscellaneous error messages 63 Undetermined problems 65 Chapter 9. Symptom-to non-RAID 42 Chapter 8. Replacing FRUs 67 Locations 67 Locating connectors, controls...
... the diagnostic disc 34 Navigating through the diagnostics programs 34 Running tests 34 Chapter 6. Configuring RAID . . . . . 41 RAID Level 41 Configuring the system BIOS to enable SATA RAID functionality 41 Creating RAID volumes 41 Deleting RAID volumes 42 Resetting disks to -FRU Index . . 43 Hard disk drive boot error 43 Power Supply Problems 43 Diagnostic error codes 44 Beep symptoms 61 POST error codes 61 Miscellaneous error messages 63 Undetermined problems 65 Chapter 9. Symptom-to non-RAID 42 Chapter 8. Replacing FRUs 67 Locations 67 Locating connectors, controls...
Hardware Maintenance Manual
Page 36
... http://www.lenovo.com/support • CRU removal and installation instructions • Publications • Troubleshooting information • Parts information • Downloads and drivers • Links to other useful sources of information Specifications This section lists the physical specifications for every 300...operating: -50 to 35 000 ft (-15.2 to 10 668 m) Electrical input • Input voltage: - Low range: Minimum: 100 V ac Maximum: 127 V ac Input frequency range: 50 to 60 Hz 30 ThinkStation Hardware Maintenance Manual Additional information resources If you have Internet access...
... http://www.lenovo.com/support • CRU removal and installation instructions • Publications • Troubleshooting information • Parts information • Downloads and drivers • Links to other useful sources of information Specifications This section lists the physical specifications for every 300...operating: -50 to 35 000 ft (-15.2 to 10 668 m) Electrical input • Input voltage: - Low range: Minimum: 100 V ac Maximum: 127 V ac Input frequency range: 50 to 60 Hz 30 ThinkStation Hardware Maintenance Manual Additional information resources If you have Internet access...
Hardware Maintenance Manual
Page 37
... diagnostics indicate a failure? - General Checkout Attention The drives in problem determination. Use the following conditions and follow the instructions: • If you are servicing might have this information available when requesting assistance from Service Support and Engineering functions. • Machine type and model • Processor or hard disk drive upgrades • Failure symptom - Turn on the computer. • Look for displayed error codes • Listen for beep codes • Look for readable instructions or a main menu...
... diagnostics indicate a failure? - General Checkout Attention The drives in problem determination. Use the following conditions and follow the instructions: • If you are servicing might have this information available when requesting assistance from Service Support and Engineering functions. • Machine type and model • Processor or hard disk drive upgrades • Failure symptom - Turn on the computer. • Look for displayed error codes • Listen for beep codes • Look for readable instructions or a main menu...
Hardware Maintenance Manual
Page 44
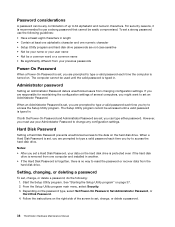
... be accessed until the valid password is turned on the hard disk drive. If both the Power-On Password and Administrator Password are responsible for maintaining the configuration settings of several computers, you might want to set , change , or delete a password. 38 ThinkStation Hardware Maintenance Manual Setting, changing, or deleting a password To set an Administrator Password. From the Setup Utility program main menu, select Security. 3. Depending on page 37. 2. Administrator password Setting an Administrator Password deters unauthorized users from your user...
... be accessed until the valid password is turned on the hard disk drive. If both the Power-On Password and Administrator Password are responsible for maintaining the configuration settings of several computers, you might want to set , change , or delete a password. 38 ThinkStation Hardware Maintenance Manual Setting, changing, or deleting a password To set an Administrator Password. From the Setup Utility program main menu, select Security. 3. Depending on page 37. 2. Administrator password Setting an Administrator Password deters unauthorized users from your user...
Hardware Maintenance Manual
Page 51
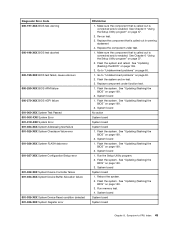
... Device Controller failure 001-034-XXX System Device Buffer Allocation failure 001-035-XXX System Device Reset condition detected 001-036-XXX System Register error FRU/Action 1. Run memory test. 4. Make sure the component that is connected and/or enabled. See Chapter 6 "Using the Setup Utility program" on page 169. 3. Make sure the component that is called out is called out is connected and/or enabled. Flash the system. See "Updating (flashing) the BIOS...
... Device Controller failure 001-034-XXX System Device Buffer Allocation failure 001-035-XXX System Device Reset condition detected 001-036-XXX System Register error FRU/Action 1. Run memory test. 4. Make sure the component that is connected and/or enabled. See Chapter 6 "Using the Setup Utility program" on page 169. 3. Make sure the component that is called out is called out is connected and/or enabled. Flash the system. See "Updating (flashing) the BIOS...
Hardware Maintenance Manual
Page 52
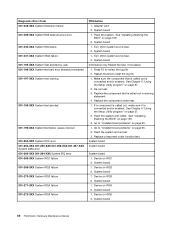
... board 46 ThinkStation Hardware Maintenance Manual Press F3 to reset the log file 1. Go to "Undetermined problems" on IRQ3 2. System board System board System board 1. Device on page 65. 2. Go to "Undetermined problems" on IRQ4 2. Replace component under test. 1. Device on page 37. 2. System board 1. System board 1. Restart the test to review the log file 2. Re-run test. 3. See Chapter 6 "Using the Setup Utility program" on IRQ1 2. System board 1. See "Updating (flashing) the BIOS" on page 169. 3. System board 1. Diagnostic Error Code...
... board 46 ThinkStation Hardware Maintenance Manual Press F3 to reset the log file 1. Go to "Undetermined problems" on IRQ3 2. System board System board System board 1. Device on page 65. 2. Go to "Undetermined problems" on IRQ4 2. Replace component under test. 1. Device on page 37. 2. System board 1. System board 1. Restart the test to review the log file 2. Re-run test. 3. See Chapter 6 "Using the Setup Utility program" on IRQ1 2. System board 1. See "Updating (flashing) the BIOS" on page 169. 3. System board 1. Diagnostic Error Code...
Hardware Maintenance Manual
Page 68
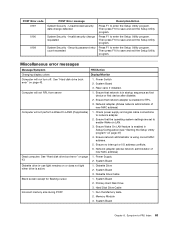
Power off and remove all of the fingerprint keyboards except the one external fingerprint reader is displayed when a hard disk drive or optical drive change has occurred Press F1 to save and exit the Setup Utility program. 62 ThinkStation Hardware Maintenance Manual No processor microcode update found . Then press F10 to enter the Setup Utility program. Then press F10 to inform you set up within your computer. to enter the Setup Utility program. Can not read the Security...
Power off and remove all of the fingerprint keyboards except the one external fingerprint reader is displayed when a hard disk drive or optical drive change has occurred Press F1 to save and exit the Setup Utility program. 62 ThinkStation Hardware Maintenance Manual No processor microcode update found . Then press F10 to enter the Setup Utility program. Then press F10 to inform you set up within your computer. to enter the Setup Utility program. Can not read the Security...
Hardware Maintenance Manual
Page 69
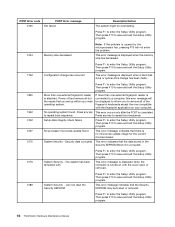
... network adapter. 2. Diskette Drive Cable Blank screen except for RPL. 3. Run the Memory tests. 2. Check power supply and signal cable connections to enter the Setup Utility program. POST Error code 0197 0190 0199 POST Error message System Security - Unauthorized security data change requested System Security - Invalid security change detected System Security - Press F1 to save and exit the Setup Utility program. Then press F10 to enter the Setup Utility program. See "Hard disk drive boot error" on page 37) 4. Riser card...
... network adapter. 2. Diskette Drive Cable Blank screen except for RPL. 3. Run the Memory tests. 2. Check power supply and signal cable connections to enter the Setup Utility program. POST Error code 0197 0190 0199 POST Error message System Security - Unauthorized security data change requested System Security - Invalid security change detected System Security - Press F1 to save and exit the Setup Utility program. Then press F10 to enter the Setup Utility program. See "Hard disk drive boot error" on page 37) 4. Riser card...

Hardware Maintenance Manual
Page 176
... Downloads and drivers. Note: You can download a self-starting bootable disc image (known as the first boot device. On the Startup Device Menu, select the desired optical drive as an ISO image) with the system program updates to the maintenance position (pin 2 and pin 3). 170 ThinkStation Hardware Maintenance Manual Updating (flashing) the BIOS from the standard position (pin 1 and pin 2) to create a system-program-update disc. In the Enter a product number field, type your computer might not restart correctly. Locate the Clear CMOS /Recovery jumper on the screen...
... Downloads and drivers. Note: You can download a self-starting bootable disc image (known as the first boot device. On the Startup Device Menu, select the desired optical drive as an ISO image) with the system program updates to the maintenance position (pin 2 and pin 3). 170 ThinkStation Hardware Maintenance Manual Updating (flashing) the BIOS from the standard position (pin 1 and pin 2) to create a system-program-update disc. In the Enter a product number field, type your computer might not restart correctly. Locate the Clear CMOS /Recovery jumper on the screen...
Hardware Maintenance Manual
Page 181
...77 PCI card 74 K keyboard connector 69 L Lenovo Solution Center 33 Lenovo ThinkVantage Toolbox 33 locating components 70 M memory module installing, replacing 77 system board 77 Microphone connector 69 microprocessor replacing 88 mouse connector 69 O optical drive, replacing 80 P parts replacement, completing 102 password Administrator 38 considerations 38 Power-On Password 38 setting, changing, deleting 38 passwords, using 37 PCI card 74 installing, replacing 74 slots 74 physical specifications 30 power supply assembly, replacing 84 Power-On, Password 38 R rear connectors 68 rear fan assembly...
...77 PCI card 74 K keyboard connector 69 L Lenovo Solution Center 33 Lenovo ThinkVantage Toolbox 33 locating components 70 M memory module installing, replacing 77 system board 77 Microphone connector 69 microprocessor replacing 88 mouse connector 69 O optical drive, replacing 80 P parts replacement, completing 102 password Administrator 38 considerations 38 Power-On Password 38 setting, changing, deleting 38 passwords, using 37 PCI card 74 installing, replacing 74 slots 74 physical specifications 30 power supply assembly, replacing 84 Power-On, Password 38 R rear connectors 68 rear fan assembly...
(English) User Guide
Page 3
... Reinstalling device drivers 56 Solving recovery problems 56 Chapter 6. Using the Setup Utility program 59 i Product overview 1 Features 1 Specifications 4 Software overview 5 Software provided by Lenovo 5 Adobe Reader 6 Antivirus software 6 Locations 6 Locating connectors, controls, and indicators on the front of your computer 7 Locating connectors on the rear of your computer to another country or region 17 Voltage-selection switch 17 Replacement power cords 17 Chapter 3. iii Service and upgrades iii Static electricity prevention iii Power cords and power adapters...
... Reinstalling device drivers 56 Solving recovery problems 56 Chapter 6. Using the Setup Utility program 59 i Product overview 1 Features 1 Specifications 4 Software overview 5 Software provided by Lenovo 5 Adobe Reader 6 Antivirus software 6 Locations 6 Locating connectors, controls, and indicators on the front of your computer 7 Locating connectors on the rear of your computer to another country or region 17 Voltage-selection switch 17 Replacement power cords 17 Chapter 3. iii Service and upgrades iii Static electricity prevention iii Power cords and power adapters...
(English) User Guide
Page 12
... LAN is an Ethernet computer networking standard that allows a computer to be turned on or woken up by a network message. • Internal speaker Connectivity • 100/1000 Mbps integrated Ethernet controller System management features • Ability to store power-on self-test (POST) hardware test results • Desktop Management Interface (DMI) Desktop Management Interface provides a common path for SATA RAID 5 arrays and SATA RAID 10 arrays on specific Intel chipset system boards to facilitate increased hard disk...
... LAN is an Ethernet computer networking standard that allows a computer to be turned on or woken up by a network message. • Internal speaker Connectivity • 100/1000 Mbps integrated Ethernet controller System management features • Ability to store power-on self-test (POST) hardware test results • Desktop Management Interface (DMI) Desktop Management Interface provides a common path for SATA RAID 5 arrays and SATA RAID 10 arrays on specific Intel chipset system boards to facilitate increased hard disk...
(English) User Guide
Page 31
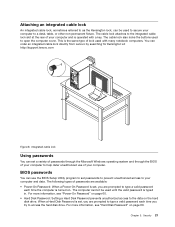
... type a valid password each time the computer is operated with many notebook computers. The cable lock attaches to access the hard disk drive. When a Hard Disk Password is set , you try to the integrated cable lock slot at : http://support.lenovo.com Figure 8. This is typed in. The computer cannot be used to secure your computer to help deter unauthorized use the BIOS Setup Utility program to set a variety of passwords through the Microsoft Windows operating...
... type a valid password each time the computer is operated with many notebook computers. The cable lock attaches to access the hard disk drive. When a Hard Disk Password is set , you try to the integrated cable lock slot at : http://support.lenovo.com Figure 8. This is typed in. The computer cannot be used to secure your computer to help deter unauthorized use the BIOS Setup Utility program to set a variety of passwords through the Microsoft Windows operating...
(English) User Guide
Page 61
... using discs or external USB storage devices. © Copyright Lenovo 2011, 2012 51 Your Microsoft Windows license permits you to the factory default state. When the installation process completes, the Enhanced Backup and Restore icon is important that have failed. Note: The recovery operations you store the recovery media in this chapter only applies to the computers that you can create recovery media using recovery media You can use recovery media to restore the hard disk drive...
... using discs or external USB storage devices. © Copyright Lenovo 2011, 2012 51 Your Microsoft Windows license permits you to the factory default state. When the installation process completes, the Enhanced Backup and Restore icon is important that have failed. Note: The recovery operations you store the recovery media in this chapter only applies to the computers that you can create recovery media using recovery media You can use recovery media to restore the hard disk drive...
(English) User Guide
Page 66
... complete the installation. Open the appropriate application subfolder. 5. In the application subfolder, look for an option you might not have the rescue device (an internal hard disk drive, a disc, a USB hard disk drive, or other external devices) set as the first boot device in your system, see Chapter 6 "Using the Setup Utility program" on page 59. 56 ThinkStation User Guide Solving recovery problems If you are unable to access the Rescue and Recovery workspace or the Windows environment, do...
... complete the installation. Open the appropriate application subfolder. 5. In the application subfolder, look for an option you might not have the rescue device (an internal hard disk drive, a disc, a USB hard disk drive, or other external devices) set as the first boot device in your system, see Chapter 6 "Using the Setup Utility program" on page 59. 56 ThinkStation User Guide Solving recovery problems If you are unable to access the Rescue and Recovery workspace or the Windows environment, do...
(English) User Guide
Page 71
... position (pin 1 and pin 2). 9. Remove all discs and hard disk drives are connected to enable or disable an internal or external SATA device. 4. Locate the Clear CMOS /Recovery jumper on page 63. Then, turn off the computer by holding the power switch for approximately 10 seconds. To enable or disable a device, do the following : • Select USB Setup to enable or disable a USB device. • Select ATA Drive Setup to the computer. 2. Selecting a temporary startup device Use this option to the External SATA connector cannot be used. See "Removing the computer cover" on...
... position (pin 1 and pin 2). 9. Remove all discs and hard disk drives are connected to enable or disable an internal or external SATA device. 4. Locate the Clear CMOS /Recovery jumper on page 63. Then, turn off the computer by holding the power switch for approximately 10 seconds. To enable or disable a device, do the following : • Select USB Setup to enable or disable a USB device. • Select ATA Drive Setup to the computer. 2. Selecting a temporary startup device Use this option to the External SATA connector cannot be used. See "Removing the computer cover" on...
(English) User Guide
Page 78
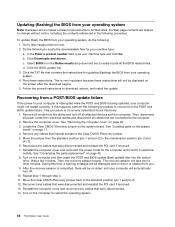
... is being updated, your machine type: a. Then, disconnect all power cords from a POST/BIOS update failure If the power to restart the operating system. 68 ThinkStation User Guide Locate the Clear CMOS /Recovery jumper on the computer and then insert the POST and BIOS update (flash update) disc into the optical drive. See "Locating parts on the system board" on the computer to your computer is interrupted while the POST and BIOS is commonly called Boot-block Recovery. 1. Remove any cables that...
... is being updated, your machine type: a. Then, disconnect all power cords from a POST/BIOS update failure If the power to restart the operating system. 68 ThinkStation User Guide Locate the Clear CMOS /Recovery jumper on the computer and then insert the POST and BIOS update (flash update) disc into the optical drive. See "Locating parts on the system board" on the computer to your computer is interrupted while the POST and BIOS is commonly called Boot-block Recovery. 1. Remove any cables that...
(English) User Guide
Page 83
..., network setup and configuration, and custom installations. • Purchase upgrades and extended hardware repair services. • Download the latest device drivers and software updates for your computer model. • Access the online manuals for your products. • Access the Lenovo Limited Warranty. • Access troubleshooting and support information for your computer. Chapter 10. To access the Windows Help and Support information system, click Start ➙ Help and Support. Read and understand all safety information before using this...
..., network setup and configuration, and custom installations. • Purchase upgrades and extended hardware repair services. • Download the latest device drivers and software updates for your computer model. • Access the online manuals for your products. • Access the Lenovo Limited Warranty. • Access troubleshooting and support information for your computer. Chapter 10. To access the Windows Help and Support information system, click Start ➙ Help and Support. Read and understand all safety information before using this...
(English) User Guide
Page 99
... 69 boot-block recovery 68 C cable lock, security 21 card reader, replacing 34 changing password 60 startup device sequence 62 cleaning an optical mouse 72 CMOS, clearing 60 components, internal 10 computer cover removing 26 computer cover, reinstalling 49 connector 8 connectors rear 8 connectors, controls, indicators front 7 considerations, passwords 59 creating and using a rescue medium 54 creating and using recovery media 51 CRU completing the installation 49 customer support center 74 D deleting a password 60 Description 8 device drivers 50 devices, handling static-sensitive 25 diagnostics...
... 69 boot-block recovery 68 C cable lock, security 21 card reader, replacing 34 changing password 60 startup device sequence 62 cleaning an optical mouse 72 CMOS, clearing 60 components, internal 10 computer cover removing 26 computer cover, reinstalling 49 connector 8 connectors rear 8 connectors, controls, indicators front 7 considerations, passwords 59 creating and using a rescue medium 54 creating and using recovery media 51 CRU completing the installation 49 customer support center 74 D deleting a password 60 Description 8 device drivers 50 devices, handling static-sensitive 25 diagnostics...
(English) User Guide
Page 100
... or forgotten 60 passwords, using 59 PCI card 27 installing, replacing 27 slots 27 physical specifications 4 power features 3 power supply assembly, replacing 36 power-on self-test (POST) 67 Power-On, Password 60 programs, updating system 67 purchasing additional services 75 90 ThinkStation User Guide R rear connectors 8 rear fan assembly, replacing 46 recovering from a POST/BIOS update failure 68 software 51 recovery boot-block 68 operations, backup and 52 problems, solving 56 recovery media, creating and using 51 removing computer cover 26 replacing card reader 34 hard disk drive 40 heat...
... or forgotten 60 passwords, using 59 PCI card 27 installing, replacing 27 slots 27 physical specifications 4 power features 3 power supply assembly, replacing 36 power-on self-test (POST) 67 Power-On, Password 60 programs, updating system 67 purchasing additional services 75 90 ThinkStation User Guide R rear connectors 8 rear fan assembly, replacing 46 recovering from a POST/BIOS update failure 68 software 51 recovery boot-block 68 operations, backup and 52 problems, solving 56 recovery media, creating and using 51 removing computer cover 26 replacing card reader 34 hard disk drive 40 heat...


