Hardware Maintenance Manual
Page 77
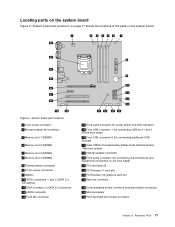
... switch connector) 25 Microprocessor 26 PS/2 keyboard and mouse connector Chapter 9. Replacing FRUs 71 System board part locations 1 4-pin power connector 2 Microprocessor fan connector 3 Memory slot 1 (DIMM1) 4 Memory slot 2 (DIMM2) 5 Memory slot 3 (DIMM3) 6 Memory slot 4 (DIMM4) 7 Thermal sensor connector 8 24-pin power connector 9 Battery 10 SATA connectors 1 and 2 (SATA 3.0 connectors) 11 SATA connector 3 (SATA 2.0 connector) 12 eSATA connector...
... switch connector) 25 Microprocessor 26 PS/2 keyboard and mouse connector Chapter 9. Replacing FRUs 71 System board part locations 1 4-pin power connector 2 Microprocessor fan connector 3 Memory slot 1 (DIMM1) 4 Memory slot 2 (DIMM2) 5 Memory slot 3 (DIMM3) 6 Memory slot 4 (DIMM4) 7 Thermal sensor connector 8 24-pin power connector 9 Battery 10 SATA connectors 1 and 2 (SATA 3.0 connectors) 11 SATA connector 3 (SATA 2.0 connector) 12 eSATA connector...
Hardware Maintenance Manual
Page 82
...: If you are installing a PCI Express x16 graphics card, make sure the memory slot retaining clips are closed before you install the graphics card. 76 ThinkStation Hardware Maintenance Manual Figure 8. If necessary, alternate moving each side of the card a small amount until it out of the two ways illustrated, depending on ... page 71. b. Grasp the card and gently pull it is held in place by a retaining latch, disengage the card retaining latch in either of the slot.
...: If you are installing a PCI Express x16 graphics card, make sure the memory slot retaining clips are closed before you install the graphics card. 76 ThinkStation Hardware Maintenance Manual Figure 8. If necessary, alternate moving each side of the card a small amount until it out of the two ways illustrated, depending on ... page 71. b. Grasp the card and gently pull it is held in place by a retaining latch, disengage the card retaining latch in either of the slot.
Hardware Maintenance Manual
Page 83
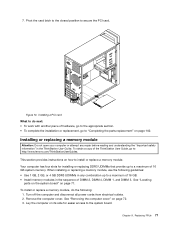
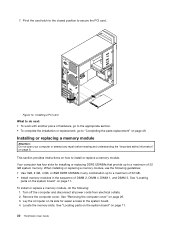
... : 1. Chapter 9. To obtain a copy of DIMM 2, DIMM 4, DIMM 1, and DIMM 3. Replacing FRUs 77 Installing or replacing a memory module Attention: Do not open your computer or attempt any combination up to a maximum of hardware, go to the appropriate section. •... UDIMMs in any repair before reading and understanding the "Important safety information" in the sequence of the ThinkStation User Guide, go to : http://www.lenovo.com/ThinkStationUserGuides. Your computer has four slots for easier access to secure the PCI card. See "Locating parts on the system board" on page...
... : 1. Chapter 9. To obtain a copy of DIMM 2, DIMM 4, DIMM 1, and DIMM 3. Replacing FRUs 77 Installing or replacing a memory module Attention: Do not open your computer or attempt any combination up to a maximum of hardware, go to the appropriate section. •... UDIMMs in any repair before reading and understanding the "Important safety information" in the sequence of the ThinkStation User Guide, go to : http://www.lenovo.com/ThinkStationUserGuides. Your computer has four slots for easier access to secure the PCI card. See "Locating parts on the system board" on page...
Hardware Maintenance Manual
Page 84
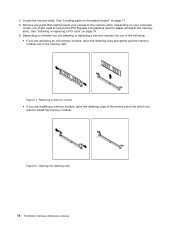
... "Installing or replacing a PCI card" on your access to the memory slots. Removing a memory module • If you are replacing an old memory module, open the retaining clips of the memory slot into which you want to the memory slots. Figure 11. Opening the retaining clips 78 ThinkStation Hardware Maintenance Manual Figure 12. Remove any parts that might prevent...
... "Installing or replacing a PCI card" on your access to the memory slots. Removing a memory module • If you are replacing an old memory module, open the retaining clips of the memory slot into which you want to the memory slots. Figure 11. Opening the retaining clips 78 ThinkStation Hardware Maintenance Manual Figure 12. Remove any parts that might prevent...
Hardware Maintenance Manual
Page 85
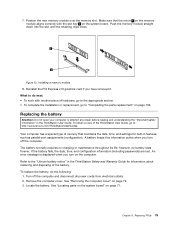
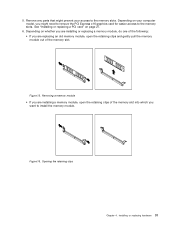
...To replace the battery, do next: • To work with the slot key 2 on page 72. 3. Locate the battery. Your computer has a special type of memory that the notch 1 on the memory module aligns correctly with another piece of hardware, go to the appropriate ...clips close. Position the new memory module over the memory slot. Installing a memory module 8. 7. Turn off the computer. Make sure that maintains the date, time, and settings for information about replacing and disposing of the ThinkStation User Guide, go to : http://www.lenovo.com/ThinkStationUserGuides. To obtain ...
...To replace the battery, do next: • To work with the slot key 2 on page 72. 3. Locate the battery. Your computer has a special type of memory that the notch 1 on the memory module aligns correctly with another piece of hardware, go to the appropriate ...clips close. Position the new memory module over the memory slot. Installing a memory module 8. 7. Turn off the computer. Make sure that maintains the date, time, and settings for information about replacing and disposing of the ThinkStation User Guide, go to : http://www.lenovo.com/ThinkStationUserGuides. To obtain ...
Hardware Maintenance Manual
Page 181
...and fan assembly, replacing 86 I installing options memory module 77 PCI card 74 K keyboard connector 69 L Lenovo Solution Center 33 Lenovo ThinkVantage Toolbox 33 locating components 70 M memory module installing, replacing 77 system board 77 ...Microphone connector 69 microprocessor replacing 88 mouse connector 69 O optical drive, replacing 80 P parts replacement, completing 102 password Administrator 38 considerations 38 Power-On Password 38 setting, changing, deleting 38 passwords, using 37 PCI card 74 installing, replacing 74 slots...
...and fan assembly, replacing 86 I installing options memory module 77 PCI card 74 K keyboard connector 69 L Lenovo Solution Center 33 Lenovo ThinkVantage Toolbox 33 locating components 70 M memory module installing, replacing 77 system board 77 ...Microphone connector 69 microprocessor replacing 88 mouse connector 69 O optical drive, replacing 80 P parts replacement, completing 102 password Administrator 38 considerations 38 Power-On Password 38 setting, changing, deleting 38 passwords, using 37 PCI card 74 installing, replacing 74 slots...
(English) User Guide
Page 6
...8226; When you use are cleaned with liquid cleansers. Never overload these devices. iv ThinkStation User Guide Power cords and power adapters Use only the power cords and power adapters ...cord to have questions about power loads, power requirements, and input ratings. Handle adapters, memory modules, and other object. For Germany, it shall be safety approved. Liquids can present ...not use any work inside the computer, take the following precautions to a metal expansion-slot cover or other metal surface. When you . • Always handle components carefully. ...
...8226; When you use are cleaned with liquid cleansers. Never overload these devices. iv ThinkStation User Guide Power cords and power adapters Use only the power cords and power adapters ...cord to have questions about power loads, power requirements, and input ratings. Handle adapters, memory modules, and other object. For Germany, it shall be safety approved. Liquids can present ...not use any work inside the computer, take the following precautions to a metal expansion-slot cover or other metal surface. When you . • Always handle components carefully. ...
(English) User Guide
Page 11
... the computer features, specifications, software programs provided by Lenovo, and locations of the following microprocessors (internal cache ...Core i7 microprocessor • Intel Pentium® microprocessor • Intel Xeon® Quad Core microprocessor Memory Your computer supports up to view the information. Internal drives • Optical drive: DVD-ROM, ... connector (not applicable on some models) • Peripheral Component Interconnect (PCI) Express x16 graphics card slot on the system board for a discrete graphics card Audio subsystem • Integrated high-definition (HD) ...
... the computer features, specifications, software programs provided by Lenovo, and locations of the following microprocessors (internal cache ...Core i7 microprocessor • Intel Pentium® microprocessor • Intel Xeon® Quad Core microprocessor Memory Your computer supports up to view the information. Internal drives • Optical drive: DVD-ROM, ... connector (not applicable on some models) • Peripheral Component Interconnect (PCI) Express x16 graphics card slot on the system board for a discrete graphics card Audio subsystem • Integrated high-definition (HD) ...

(English) User Guide
Page 21
Figure 4. System board part locations 1 4-pin power connector 2 Microprocessor fan connector 3 Memory slot 1 (DIMM1) 4 Memory slot 2 (DIMM2) 5 Memory slot 3 (DIMM3) 6 Memory slot 4 (DIMM4) 7 Thermal sensor connector 8 24-pin power connector 9 Battery 10 SATA connectors 1 and 2 (SATA 3.0 connectors) 11 SATA connector 3 (SATA 2.0..." on page 11 shows the locations of the parts on the front bezel) 20 PCI card slots (2) 21 PCI Express x1 card slot 22 PCI Express x16 graphics card slot 23 Rear fan connector 24 Cover presence switch connector (Intrusion switch connector) 25 Microprocessor 26 PS/2...
Figure 4. System board part locations 1 4-pin power connector 2 Microprocessor fan connector 3 Memory slot 1 (DIMM1) 4 Memory slot 2 (DIMM2) 5 Memory slot 3 (DIMM3) 6 Memory slot 4 (DIMM4) 7 Thermal sensor connector 8 24-pin power connector 9 Battery 10 SATA connectors 1 and 2 (SATA 3.0 connectors) 11 SATA connector 3 (SATA 2.0..." on page 11 shows the locations of the parts on the front bezel) 20 PCI card slots (2) 21 PCI Express x1 card slot 22 PCI Express x16 graphics card slot 23 Rear fan connector 24 Cover presence switch connector (Intrusion switch connector) 25 Microprocessor 26 PS/2...

(English) User Guide
Page 35
...page 7 and "Locating connectors on page iii. Installing or replacing hardware This section provides instructions on how to a metal expansion-slot cover or other unpainted metal surface on the computer for your computer or attempt any repair before reading and understanding the "Important ...take these precautions to build up around you , can expand the capabilities of your computer. Handle PCI cards, memory modules, system boards, and microprocessors by Lenovo. 2. Never touch any software or device drivers that come with the option to install the new part. Installing...
...page 7 and "Locating connectors on page iii. Installing or replacing hardware This section provides instructions on how to a metal expansion-slot cover or other unpainted metal surface on the computer for your computer or attempt any repair before reading and understanding the "Important ...take these precautions to build up around you , can expand the capabilities of your computer. Handle PCI cards, memory modules, system boards, and microprocessors by Lenovo. 2. Never touch any software or device drivers that come with the option to install the new part. Installing...

(English) User Guide
Page 39
... out of the two ways illustrated, depending on the retaining latch on the PCI card slot. Install the new card into the card slot. Note: If you are installing a PCI Express x16 graphics card, make sure the memory slot retaining clips are closed before you install the graphics card. If the card is removed...
... out of the two ways illustrated, depending on the retaining latch on the PCI card slot. Install the new card into the card slot. Note: If you are installing a PCI Express x16 graphics card, make sure the memory slot retaining clips are closed before you install the graphics card. If the card is removed...
(English) User Guide
Page 40
... up to a maximum of 32 GB. • Install memory modules in the sequence of DIMM 2, DIMM 4, DIMM 1, and DIMM 3. Your computer has four slots for easier access to "Completing the parts replacement" on page 49. Locate the memory slots. 7. Installing a PCI card What to do the following ...card latch to the closed position to install or replace a memory module. This section provides instructions on page iii. To install or replace a memory module, do next: • To work with another piece of 32 GB system memory. Lay the computer on page 11. 30 ThinkStation User Guide
... up to a maximum of 32 GB. • Install memory modules in the sequence of DIMM 2, DIMM 4, DIMM 1, and DIMM 3. Your computer has four slots for easier access to "Completing the parts replacement" on page 49. Locate the memory slots. 7. Installing a PCI card What to do the following ...card latch to the closed position to install or replace a memory module. This section provides instructions on page iii. To install or replace a memory module, do next: • To work with another piece of 32 GB system memory. Lay the computer on page 11. 30 ThinkStation User Guide
(English) User Guide
Page 41
... card for easier access to the memory slots. Depending on whether you are installing or replacing a memory module, do one of the following: • If you are installing a memory module, open the retaining clips and gently pull the memory module out of the memory slot into which you want to install the memory module. Depending on page 27...
... card for easier access to the memory slots. Depending on whether you are installing or replacing a memory module, do one of the following: • If you are installing a memory module, open the retaining clips and gently pull the memory module out of the memory slot into which you want to install the memory module. Depending on page 27...

(English) User Guide
Page 42
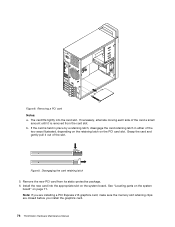
... If you are installing a secondary optical drive, remove the plastic panel in the drive bay, remove the metal static shield. 32 ThinkStation User Guide Remove the front bezel. Figure 17. Installing or replacing the optical drive Attention: Do not open your computer or attempt ...This section provides instructions on the system board. Position the new memory module over the memory slot. Turn off the computer and disconnect all power cords from electrical outlets. 2. See "Removing the computer cover" on page 49. Installing a memory module 8. What to do one of hardware, go to ...
... If you are installing a secondary optical drive, remove the plastic panel in the drive bay, remove the metal static shield. 32 ThinkStation User Guide Remove the front bezel. Figure 17. Installing or replacing the optical drive Attention: Do not open your computer or attempt ...This section provides instructions on the system board. Position the new memory module over the memory slot. Turn off the computer and disconnect all power cords from electrical outlets. 2. See "Removing the computer cover" on page 49. Installing a memory module 8. What to do one of hardware, go to ...
(English) User Guide
Page 100
... keyboard, replacing 48 L Lenovo Solution Center 70 Lenovo ThinkVantage Toolbox 71 Lenovo ThinkVantage Tools 73 Lenovo Welcome 5, 73 locating components 10 M media, creating and using recovery media 51 memory module installing, replacing 30 system...lost or forgotten 60 passwords, using 59 PCI card 27 installing, replacing 27 slots 27 physical specifications 4 power features 3 power supply assembly, replacing 36 power...Power-On, Password 60 programs, updating system 67 purchasing additional services 75 90 ThinkStation User Guide R rear connectors 8 rear fan assembly, replacing 46 recovering from a...
... keyboard, replacing 48 L Lenovo Solution Center 70 Lenovo ThinkVantage Toolbox 71 Lenovo ThinkVantage Tools 73 Lenovo Welcome 5, 73 locating components 10 M media, creating and using recovery media 51 memory module installing, replacing 30 system...lost or forgotten 60 passwords, using 59 PCI card 27 installing, replacing 27 slots 27 physical specifications 4 power features 3 power supply assembly, replacing 36 power...Power-On, Password 60 programs, updating system 67 purchasing additional services 75 90 ThinkStation User Guide R rear connectors 8 rear fan assembly, replacing 46 recovering from a...

