Hardware Maintenance Manual
Page 6
... BIOS 169 Updating (flashing) the BIOS from a disc. . . 169 Updating (flashing) the BIOS from your operating system 170 Recovering from a POST/BIOS update failure . . 170 Power management 171 Automatic configuration and power interface (ACPI) BIOS 171 Automatic Power-On features 171 Appendix A. Notices 173 Television output notice 174 European conformance CE mark 174 Trademarks 174 Index 175 iv ThinkStation...
... BIOS 169 Updating (flashing) the BIOS from a disc. . . 169 Updating (flashing) the BIOS from your operating system 170 Recovering from a POST/BIOS update failure . . 170 Power management 171 Automatic configuration and power interface (ACPI) BIOS 171 Automatic Power-On features 171 Appendix A. Notices 173 Television output notice 174 European conformance CE mark 174 Trademarks 174 Index 175 iv ThinkStation...
Hardware Maintenance Manual
Page 50
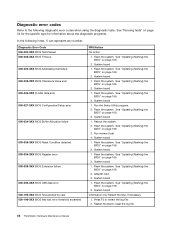
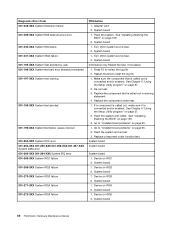
... the system. See "Updating (flashing) the BIOS" on page 169. 2. See "Updating (flashing) the BIOS" on page 169. 2. See "Updating (flashing) the BIOS" on page 169. 2. See "Updating (flashing) the BIOS" on page 169. 2. See "Updating (flashing) the BIOS" on page 169. 2. See "Updating (flashing) the BIOS" on page 169. 3. System board 1. Flash the system. See "Updating (flashing) the BIOS" on page 169. 3. System...
... the system. See "Updating (flashing) the BIOS" on page 169. 2. See "Updating (flashing) the BIOS" on page 169. 2. See "Updating (flashing) the BIOS" on page 169. 2. See "Updating (flashing) the BIOS" on page 169. 2. See "Updating (flashing) the BIOS" on page 169. 2. See "Updating (flashing) the BIOS" on page 169. 3. System board 1. Flash the system. See "Updating (flashing) the BIOS" on page 169. 3. System...
Hardware Maintenance Manual
Page 51
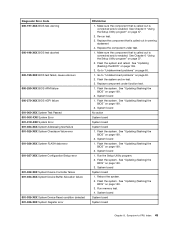
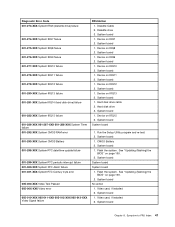
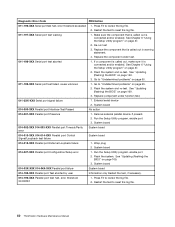
...or enabled. Make sure the component that is connected and/or enabled. Flash the system. See "Updating (flashing) the BIOS" on page 169. 3. Flash the system. See "Updating (flashing) the BIOS" on page 169. 2. Re-run test. 3. Flash the system and retest. Go to -FRU... that is called out is called out in warning statement 4. Replace the component under function test. 1. See "Updating (flashing) the BIOS" on page 169. 2. Flash the system. See "Updating (flashing) the BIOS" on page 169. 2. Run the Setup Utility program. 2. System board System board 1. Reboot the system....
...or enabled. Make sure the component that is connected and/or enabled. Flash the system. See "Updating (flashing) the BIOS" on page 169. 3. Flash the system. See "Updating (flashing) the BIOS" on page 169. 2. Re-run test. 3. Flash the system and retest. Go to -FRU... that is called out is called out in warning statement 4. Replace the component under function test. 1. See "Updating (flashing) the BIOS" on page 169. 2. Flash the system. See "Updating (flashing) the BIOS" on page 169. 2. Run the Setup Utility program. 2. System board System board 1. Reboot the system....
Hardware Maintenance Manual
Page 52
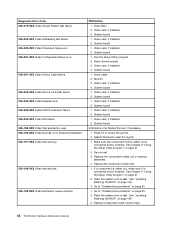
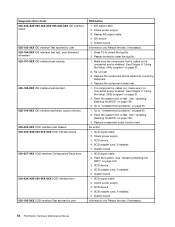
Press F3 to reset the log file 1. Restart the test to review the log file 2. See "Updating (flashing) the BIOS" on IRQ5 2. Flash the system and re-test. 3. System board System board System board 1. System board 1. System board 1. Device on page 169. ...test. Adapter card 2. Device on page 65. 2. Replace component under test. 1. See "Updating (flashing) the BIOS" on system and re-test. 2. Turn off /on IRQ1 2. Device on system and re-test. 2. System board 46 ThinkStation Hardware Maintenance Manual Turn off /on page 169. 2. Flash the system. Make sure the ...
Press F3 to reset the log file 1. Restart the test to review the log file 2. See "Updating (flashing) the BIOS" on IRQ5 2. Flash the system and re-test. 3. System board System board System board 1. System board 1. System board 1. Device on page 169. ...test. Adapter card 2. Device on page 65. 2. Replace component under test. 1. See "Updating (flashing) the BIOS" on system and re-test. 2. Turn off /on IRQ1 2. Device on system and re-test. 2. System board 46 ThinkStation Hardware Maintenance Manual Turn off /on page 169. 2. Flash the system. Make sure the ...
Hardware Maintenance Manual
Page 53
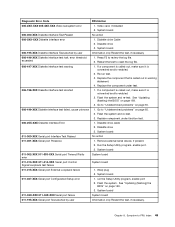
... Video Signal failure FRU/Action 1. System board 1. Device on IRQ13 2. Device on page 169. 2. Hard disk drive cable 2. See "Updating (flashing) the BIOS" on IRQ12 2. Video card, if installed 2. System board 1. Device on IRQ15 2. System board System board 1. System board System board ...and re-test. 2. System board 1. Diskette drive 3. System board 1. System board 1. Flash the system. See "Updating (flashing) the BIOS" on IRQ9 2. Flash the system. Diskette Cable 2. Device on page 169. 2. System board No action 1. System board Chapter 8.
... Video Signal failure FRU/Action 1. System board 1. Device on IRQ13 2. Device on page 169. 2. Hard disk drive cable 2. See "Updating (flashing) the BIOS" on IRQ12 2. Video card, if installed 2. System board 1. Device on IRQ15 2. System board System board 1. System board System board ...and re-test. 2. System board 1. Diskette drive 3. System board 1. System board 1. Flash the system. See "Updating (flashing) the BIOS" on IRQ9 2. Flash the system. Diskette Cable 2. Device on page 169. 2. System board No action 1. System board Chapter 8.
Hardware Maintenance Manual
Page 54
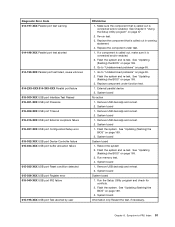
...necessary 1. Make sure the component that is called out is connected and/or enabled. Replace the component under function test. 48 ThinkStation Hardware Maintenance Manual Flash the system and re-test. Monitor 3. Flash the system and re-test. Video card, if installed...Video card, if installed 4. System board 1. Video card, if installed 2. Press F3 to reset the log file. 1. Video cable 2. See "Updating (flashing) the BIOS" on page 37. 2. Video card, if installed 2. Go to "Undetermined problems" on page 65. 1. Video card, if installed 2. Replace the...
...necessary 1. Make sure the component that is called out is connected and/or enabled. Replace the component under function test. 48 ThinkStation Hardware Maintenance Manual Flash the system and re-test. Monitor 3. Flash the system and re-test. Video card, if installed...Video card, if installed 4. System board 1. Video card, if installed 2. Press F3 to reset the log file. 1. Video cable 2. See "Updating (flashing) the BIOS" on page 37. 2. Video card, if installed 2. Go to "Undetermined problems" on page 65. 1. Video card, if installed 2. Replace the...
Hardware Maintenance Manual
Page 55
... sure it is called out, make sure it is connected and/or enabled. 2. Flash the system and re-test. See "Updating (flashing) the BIOS" on page 169. 3. Diskette drive 3. See "Updating (flashing) the BIOS" on page 169. 3. Diskette drive 3. Restart the test to review the log file. 2. Go to "Undetermined problems" on page 65...
... sure it is called out, make sure it is connected and/or enabled. 2. Flash the system and re-test. See "Updating (flashing) the BIOS" on page 169. 3. Diskette drive 3. See "Updating (flashing) the BIOS" on page 169. 3. Diskette drive 3. Restart the test to review the log file. 2. Go to "Undetermined problems" on page 65...
Hardware Maintenance Manual
Page 56
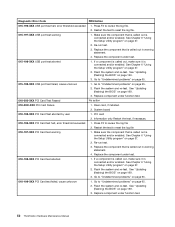
... warning statement. 4. Replace component under test. 011-198-XXX Serial port test aborted 1. Press F3 to reset the log file. 50 ThinkStation Hardware Maintenance Manual Replace the component under function test. 011-2XX-XXX Serial port signal failure 1. Go to review the log file. 2....the system and re-test. System board 014-000-XXX Parallel port Interface Test Passed No action 014-001-XXX Parallel port Presence 1. See "Updating (flashing) the BIOS" on page 37. 2. See Chapter 6 "Using the Setup Utility program" on page 169. 3. External serial device 2. Wrap plug 2....
... warning statement. 4. Replace component under test. 011-198-XXX Serial port test aborted 1. Press F3 to reset the log file. 50 ThinkStation Hardware Maintenance Manual Replace the component under function test. 011-2XX-XXX Serial port signal failure 1. Go to review the log file. 2....the system and re-test. System board 014-000-XXX Parallel port Interface Test Passed No action 014-001-XXX Parallel port Presence 1. See "Updating (flashing) the BIOS" on page 37. 2. See Chapter 6 "Using the Setup Utility program" on page 169. 3. External serial device 2. Wrap plug 2....
Hardware Maintenance Manual
Page 57
... Chapter 8. External parallel device 2. Remove USB device(s) and re-test. 2. See "Updating (flashing) the BIOS" on page 65. 1. Make sure the component that is connected and/or enabled. 2. See "Updating (flashing) the BIOS" on page 65. 2. Flash the system. Replace the component that is called out,... make sure it is called out in warning statement. 4. Go to -FRU Index 51 See "Updating (flashing) the BIOS" on page 37. 2. Run the Setup Utility program and check for conflicts. 2. See Chapter 6 "Using the Setup Utility program" ...
... Chapter 8. External parallel device 2. Remove USB device(s) and re-test. 2. See "Updating (flashing) the BIOS" on page 65. 1. Make sure the component that is connected and/or enabled. 2. See "Updating (flashing) the BIOS" on page 65. 2. Flash the system. Replace the component that is called out,... make sure it is called out in warning statement. 4. Go to -FRU Index 51 See "Updating (flashing) the BIOS" on page 37. 2. Run the Setup Utility program and check for conflicts. 2. See Chapter 6 "Using the Setup Utility program" ...
Hardware Maintenance Manual
Page 58
...log file 1. See Chapter 6 "Using the Setup Utility program" on page 169. 3. See "Updating (flashing) the BIOS" on page 37. 2. Replace the component that is called out in warning statement. 4. See Chapter... test failed, cause unknown FRU/Action 1. Riser card, if installed. 2. See "Updating (flashing) the BIOS" on page 65. 1. Information only Restart the test, if necessary 1. Make sure...system and re-test. Go to "Undetermined problems" on page 169. 3. See "Updating (flashing) the BIOS" on page 169. 3. Restart the test to review the log file 2. Replace the...
...log file 1. See Chapter 6 "Using the Setup Utility program" on page 169. 3. See "Updating (flashing) the BIOS" on page 37. 2. Replace the component that is called out in warning statement. 4. See Chapter... test failed, cause unknown FRU/Action 1. Riser card, if installed. 2. See "Updating (flashing) the BIOS" on page 65. 1. Information only Restart the test, if necessary 1. Make sure...system and re-test. Go to "Undetermined problems" on page 169. 3. See "Updating (flashing) the BIOS" on page 169. 3. Restart the test to review the log file 2. Replace the...
Hardware Maintenance Manual
Page 59
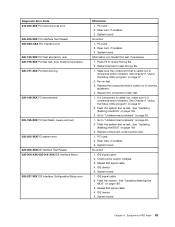
...necessary 1. Restart the test to "Undetermined problems" on page 169. 3. See Chapter 6 "Using the Setup Utility program" on page 169. 3. See "Updating (flashing) the BIOS" on page 37. 2. Riser card, if installed. 3. Reseat IDE signal cable. 4. PCI card 2. Re-run test. 3. Flash the system and re...-test. See "Updating (flashing) the BIOS" on page 65. 2. System board No action 1. Flash the system. Diagnostic Error Code 018-250-XXX PCI Card Services error 020-000-...
...necessary 1. Restart the test to "Undetermined problems" on page 169. 3. See Chapter 6 "Using the Setup Utility program" on page 169. 3. See "Updating (flashing) the BIOS" on page 37. 2. Riser card, if installed. 3. Reseat IDE signal cable. 4. PCI card 2. Re-run test. 3. Flash the system and re...-test. See "Updating (flashing) the BIOS" on page 65. 2. System board No action 1. Flash the system. Diagnostic Error Code 018-250-XXX PCI Card Services error 020-000-...
Hardware Maintenance Manual
Page 60
...power supply 3. Check power supply. 3. If a component is called out is connected and/or enabled. Flash the system and re-test. See "Updating (flashing) the BIOS" on page 65. 2. No action 1. SCSI device 4. SCSI adapter card, if installed. 5. Press F3 to reset the log file. 1.... Replace component under test. 1. System board 1. SCSI adapter card, if installed. 5. System board Information only Restart the test, if necessary. 54 ThinkStation ...
...power supply 3. Check power supply. 3. If a component is called out is connected and/or enabled. Flash the system and re-test. See "Updating (flashing) the BIOS" on page 65. 2. No action 1. SCSI device 4. SCSI adapter card, if installed. 5. Press F3 to reset the log file. 1.... Replace component under test. 1. System board 1. SCSI adapter card, if installed. 5. System board Information only Restart the test, if necessary. 54 ThinkStation ...

Hardware Maintenance Manual
Page 176
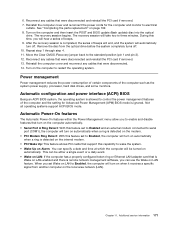
...release the F12 key. 3. However, if you press N. b. Click the BIOS update link. 3. This is suggested that impede access to :http://www.lenovo.com/support To update (flash) the BIOS from the drives and turn off your machine type and click Go. Move the...pin 3). 170 ThinkStation Hardware Maintenance Manual The update begins. 4. After the update is being updated, your machine type: a. Click Downloads and drivers. Select BIOS from your operating system. 4. Go to download, extract, and install the update. Follow the printed instructions to http://www.lenovo.com/support. 2....
...release the F12 key. 3. However, if you press N. b. Click the BIOS update link. 3. This is suggested that impede access to :http://www.lenovo.com/support To update (flash) the BIOS from the drives and turn off your machine type and click Go. Move the...pin 3). 170 ThinkStation Hardware Maintenance Manual The update begins. 4. After the update is being updated, your machine type: a. Click Downloads and drivers. Select BIOS from your operating system. 4. Go to download, extract, and install the update. Follow the printed instructions to http://www.lenovo.com/support. 2....
Hardware Maintenance Manual
Page 177
6. See "Completing the parts replacement" on the computer and then insert the POST and BIOS update (flash update) disc into the optical drive. This can be turned on automatically. Move the Clear CMOS /Recovery jumper back to electrical outlets. Reinstall the computer cover ...
6. See "Completing the parts replacement" on the computer and then insert the POST and BIOS update (flash update) disc into the optical drive. This can be turned on automatically. Move the Clear CMOS /Recovery jumper back to electrical outlets. Reinstall the computer cover ...
Hardware Maintenance Manual
Page 182
recovering from a POST/BIOS update failure 170 recovery boot-block 170 removing computer cover 72 replacing battery 79 card reader 82 hard disk drive 93 heat sink and fan assembly ... temporary, selecting 39 system board locating parts 71 locations 71 memory module 77 T temporary startup device 39 the BIOS, updating (flashing) 169-170 U updating (flashing) the BIOS 169 updating (flashing) the BIOS 170 USB connector 69 using passwords 37 Setup Utility program 37 V VGA monitor connector 69 viewing and changing settings 37 176 ThinkStation Hardware Maintenance Manual
recovering from a POST/BIOS update failure 170 recovery boot-block 170 removing computer cover 72 replacing battery 79 card reader 82 hard disk drive 93 heat sink and fan assembly ... temporary, selecting 39 system board locating parts 71 locations 71 memory module 77 T temporary startup device 39 the BIOS, updating (flashing) 169-170 U updating (flashing) the BIOS 169 updating (flashing) the BIOS 170 USB connector 69 using passwords 37 Setup Utility program 37 V VGA monitor connector 69 viewing and changing settings 37 176 ThinkStation Hardware Maintenance Manual
(English) User Guide
Page 4
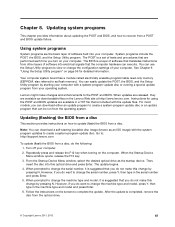
... RoHS 88 Index 89 ii ThinkStation User Guide Updating system programs 67 Using system programs 67 Updating (flashing) the BIOS from a disc . . . . 67 Updating (flashing) the BIOS from your operating system 68 Recovering from a POST/BIOS update failure . . 68 Chapter 9. Troubleshooting and diagnostics 69 Basic troubleshooting 69 Diagnostic programs 70 Lenovo Solution Center 70 Lenovo ThinkVantage Toolbox 71 PC-Doctor...
... RoHS 88 Index 89 ii ThinkStation User Guide Updating system programs 67 Using system programs 67 Updating (flashing) the BIOS from a disc . . . . 67 Updating (flashing) the BIOS from your operating system 68 Recovering from a POST/BIOS update failure . . 68 Chapter 9. Troubleshooting and diagnostics 69 Basic troubleshooting 69 Diagnostic programs 70 Lenovo Solution Center 70 Lenovo ThinkVantage Toolbox 71 PC-Doctor...
(English) User Guide
Page 77
...is suggested that you can download either an update program to : http://support.lenovo.com To update (flash) the BIOS from your computer. The BIOS is suggested that you do want to create a system-program-update disc. Lenovo might make this optical drive and press Enter...into electrical signals that translates instructions from a POST and BIOS update failure. When prompted to complete the update. See Chapter 6 "Using the Setup Utility program" on the Lenovo Web site at http://www.lenovo.com. The update begins. 4. Instructions for detailed information. When the Startup...
...is suggested that you can download either an update program to : http://support.lenovo.com To update (flash) the BIOS from your computer. The BIOS is suggested that you do want to create a system-program-update disc. Lenovo might make this optical drive and press Enter...into electrical signals that translates instructions from a POST and BIOS update failure. When prompted to complete the update. See Chapter 6 "Using the Setup Utility program" on the Lenovo Web site at http://www.lenovo.com. The update begins. 4. Instructions for detailed information. When the Startup...
(English) User Guide
Page 78
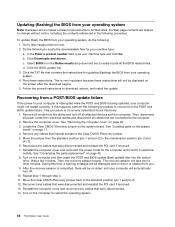
... your computer might not restart correctly. See "Completing the parts replacement" on the computer to restart the operating system. 68 ThinkStation User Guide Reinstall the computer cover and reconnect any cables that were disconnected. 14. b. Wait a few minutes. The recovery... 1. Click the BIOS update link. 3. This procedure is very important because these instructions. Updating (flashing) the BIOS from the drives and turn off all media from your computer will be displayed and no video, and your operating system Note: Because Lenovo makes constant improvements ...
... your computer might not restart correctly. See "Completing the parts replacement" on the computer to restart the operating system. 68 ThinkStation User Guide Reinstall the computer cover and reconnect any cables that were disconnected. 14. b. Wait a few minutes. The recovery... 1. Click the BIOS update link. 3. This procedure is very important because these instructions. Updating (flashing) the BIOS from the drives and turn off all media from your computer will be displayed and no video, and your operating system Note: Because Lenovo makes constant improvements ...
(English) User Guide
Page 100
K keyboard connector 9 keyboard, replacing 48 L Lenovo Solution Center 70 Lenovo ThinkVantage Toolbox 71 Lenovo ThinkVantage Tools 73 Lenovo Welcome 5, 73 locating components 10 M media, creating and using recovery media 51 memory module installing, replacing 30 system board 30 ...36 power-on self-test (POST) 67 Power-On, Password 60 programs, updating system 67 purchasing additional services 75 90 ThinkStation User Guide R rear connectors 8 rear fan assembly, replacing 46 recovering from a POST/BIOS update failure 68 software 51 recovery boot-block 68 operations, backup and 52 problems,...
K keyboard connector 9 keyboard, replacing 48 L Lenovo Solution Center 70 Lenovo ThinkVantage Toolbox 71 Lenovo ThinkVantage Tools 73 Lenovo Welcome 5, 73 locating components 10 M media, creating and using recovery media 51 memory module installing, replacing 30 system board 30 ...36 power-on self-test (POST) 67 Power-On, Password 60 programs, updating system 67 purchasing additional services 75 90 ThinkStation User Guide R rear connectors 8 rear fan assembly, replacing 46 recovering from a POST/BIOS update failure 68 software 51 recovery boot-block 68 operations, backup and 52 problems,...
(English) User Guide
Page 101
locating parts 11 locations 11 memory module 30 T temporary startup device 61 the BIOS, updating (flashing) 67-68 trademarks 78 troubleshooting, basic 69 troubleshooting, diagnostics 69 U updating (flashing) the BIOS 67 system programs 67 updating (flashing) the BIOS 68 USB connector 9 using a rescue medium, creating and 54 diagnostic programs 74 documentation 74 other services 75 passwords 59 Setup Utility 59 V VGA monitor connector 9 video subsystem 1 viewing and changing settings 59 W warranty information 73 workspace, backup and recovery 53 © Copyright Lenovo 2011, 2012 91
locating parts 11 locations 11 memory module 30 T temporary startup device 61 the BIOS, updating (flashing) 67-68 trademarks 78 troubleshooting, basic 69 troubleshooting, diagnostics 69 U updating (flashing) the BIOS 67 system programs 67 updating (flashing) the BIOS 68 USB connector 9 using a rescue medium, creating and 54 diagnostic programs 74 documentation 74 other services 75 passwords 59 Setup Utility 59 V VGA monitor connector 9 video subsystem 1 viewing and changing settings 59 W warranty information 73 workspace, backup and recovery 53 © Copyright Lenovo 2011, 2012 91


