Monitor Safety, Troubleshooting, and Warranty Guide
Page 31
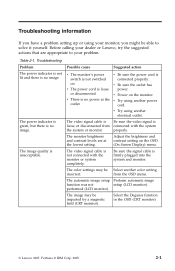
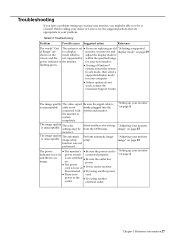
Troubleshooting information If you might be able to solve it yourself. Before calling your dealer or Lenovo, try the suggested actions that are at the outlet. Possible cause Suggested action v The monitor's power switch is firmly plugged into the system and monitor.... system or monitor. Adjust the brightness and contrast setting on the monitor. Select the Degauss function in the OSD (CRT monitor). © Lenovo 2007. v Power on the OSD (On Screen Display) menu. v Be sure the power cord is no image. The automatic image setup Perform automatic image function was not setup (LCD...
Troubleshooting information If you might be able to solve it yourself. Before calling your dealer or Lenovo, try the suggested actions that are at the outlet. Possible cause Suggested action v The monitor's power switch is firmly plugged into the system and monitor.... system or monitor. Adjust the brightness and contrast setting on the monitor. Select the Degauss function in the OSD (CRT monitor). © Lenovo 2007. v Power on the OSD (On Screen Display) menu. v Be sure the power cord is no image. The automatic image setup Perform automatic image function was not setup (LCD...
User Guide (English)
Page 3
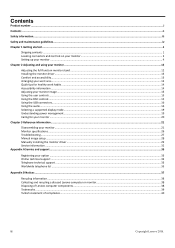
...Using the user controls ...15 Using the OSD controls ...15 Using the USB connectors...16 Using the audio...16 Selecting a supported display mode...19 Understanding power management...19 Caring for your monitor ...20 Chapter 3 Reference information...21 Disassembling your monitor ...21 Monitor ... support ...33 Worldwide telephone list ...33 Appendix B Notices ...37 Recycling information ...38 Collecting and recycling a disused Lenovo computer or monitor 38 Disposing of Lenovo computer components ...38 Trademarks ...39 Turkish statement of compliance...40 ii Copyright...
...Using the user controls ...15 Using the OSD controls ...15 Using the USB connectors...16 Using the audio...16 Selecting a supported display mode...19 Understanding power management...19 Caring for your monitor ...20 Chapter 3 Reference information...21 Disassembling your monitor ...21 Monitor ... support ...33 Worldwide telephone list ...33 Appendix B Notices ...37 Recycling information ...38 Collecting and recycling a disused Lenovo computer or monitor 38 Disposing of Lenovo computer components ...38 Trademarks ...39 Turkish statement of compliance...40 ii Copyright...
User Guide (English)
Page 20
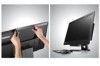
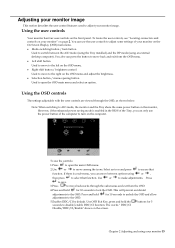
...To locate the user controls, see "Locating connectors and controls on your monitor 15 Note: When switching to AIO mode, the monitor and the Tiny share the same power button on the monitor, However, if the enhanced power saving mode is a sub-menu, you can move among the icons... using your monitor" on page 2. Adjusting your monitor image This section describes the user control features used to adjust your monitor on the On Screen Display (OSD) main menu. Mode-switching button / back button Used to switch between options using or , then press to select that function....
...To locate the user controls, see "Locating connectors and controls on your monitor 15 Note: When switching to AIO mode, the monitor and the Tiny share the same power button on the monitor, However, if the enhanced power saving mode is a sub-menu, you can move among the icons... using your monitor" on page 2. Adjusting your monitor image This section describes the user control features used to adjust your monitor on the On Screen Display (OSD) main menu. Mode-switching button / back button Used to switch between options using or , then press to select that function....

User Guide (English)
Page 24
... flicker-free. There are several states as described in the table below have re-configured the system; Selecting a supported display mode The display mode that you have been optimized at the factory. For optimal performance, switch off your monitor 19 ENERGY STAR Press ... your monitor at 60Hz, which require a high refresh rate to the monitor. The image size, position and shape might change display modes. The display modes shown below . Table2-4.Power indicator State Power Indicator On Steady green (AIO Mode/DP) Standby/ Suspend Blinking green (AIO...
... flicker-free. There are several states as described in the table below have re-configured the system; Selecting a supported display mode The display mode that you have been optimized at the factory. For optimal performance, switch off your monitor 19 ENERGY STAR Press ... your monitor at 60Hz, which require a high refresh rate to the monitor. The image size, position and shape might change display modes. The display modes shown below . Table2-4.Power indicator State Power Indicator On Steady green (AIO Mode/DP) Standby/ Suspend Blinking green (AIO...

User Guide (English)
Page 31
...20VDC 4.5 A 45W 22 W ≦1.2 W ≦0.5W Video input (Digital) Communications Altitude Test Supported Display Modes (VESA Standard modes between noted ranges) Temperature Humidity Interface Horizontal addressability Vertical addressability Clock frequency VESA DDC ...;C (-4° F to 140° F) 8% to 80% 10% to 90% 10% to 90% 26 ThinkCentre Tiny-in .) Image Power input Power consumption Note: Power consumption figures are for type-model 10DQ-PAR6-WW Dimensions Stand Height... Supported Range: 110.0 mm 100 mm (3.94 in -One 23 User Guide Monitor specifications Table 3-1.
...20VDC 4.5 A 45W 22 W ≦1.2 W ≦0.5W Video input (Digital) Communications Altitude Test Supported Display Modes (VESA Standard modes between noted ranges) Temperature Humidity Interface Horizontal addressability Vertical addressability Clock frequency VESA DDC ...;C (-4° F to 140° F) 8% to 80% 10% to 90% 10% to 90% 26 ThinkCentre Tiny-in .) Image Power input Power consumption Note: Power consumption figures are for type-model 10DQ-PAR6-WW Dimensions Stand Height... Supported Range: 110.0 mm 100 mm (3.94 in -One 23 User Guide Monitor specifications Table 3-1.
User Guide (English)
Page 32
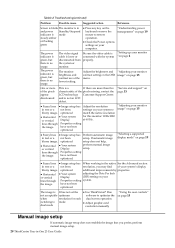
... image" on the mode which is not switched on the monitor. electrical outlet. cable is unacceptable. Before calling your dealer or Lenovo, try the suggested actions that are to a display monitor, reconnect it yourself. The image quality is not firmly plugged into the connected with system and monitor. The image quality is...
... image" on the mode which is not switched on the monitor. electrical outlet. cable is unacceptable. Before calling your dealer or Lenovo, try the suggested actions that are to a display monitor, reconnect it yourself. The image quality is not firmly plugged into the connected with system and monitor. The image quality is...
User Guide (English)
Page 33
... Power options settings on your computer. lines through the image. ● Your system adjusting the Dots Per Inch Display (DPI) setting on your system to optimize the dual screen operation ● Adjust graphic card resolution manually "Using... system. Adjust the resolution settings on page 33 ● Fuzzy lines ● Image setup has in -One 23 User Guide have not been optimized. The image is not acceptable when switching to dual mode It has not...a not been resolution, you prefer, perform manual image setup. 28 ThinkCentre Tiny-in text or a not been blurry image.
... Power options settings on your computer. lines through the image. ● Your system adjusting the Dots Per Inch Display (DPI) setting on your system to optimize the dual screen operation ● Adjust graphic card resolution manually "Using... system. Adjust the resolution settings on page 33 ● Fuzzy lines ● Image setup has in -One 23 User Guide have not been optimized. The image is not acceptable when switching to dual mode It has not...a not been resolution, you prefer, perform manual image setup. 28 ThinkCentre Tiny-in text or a not been blurry image.
User Guide (English)
Page 34
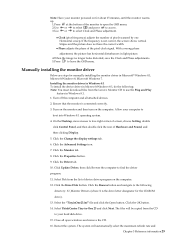
...the Change the display settings tab. 6. Click the Properties button. 9. Select Pick from the Lenovo Monitor CD to ...use the Plug and Play feature in light picture. 4.When the image no longer looks distorted, save the Clock and Phase adjustments. 5.Press to your hard disk drive. 15. Close all attached devices. 2. Click the Driver tab. 10. Select ThinkCentre Tiny...the list of Hardware and Sound, and then clicking Display. 5. Click the Have Disk button. The files... adjusts the phase of pixels scanned by one Horizontal sweep. Note: Have your monitor ...
...the Change the display settings tab. 6. Click the Properties button. 9. Select Pick from the Lenovo Monitor CD to ...use the Plug and Play feature in light picture. 4.When the image no longer looks distorted, save the Clock and Phase adjustments. 5.Press to your hard disk drive. 15. Close all attached devices. 2. Click the Driver tab. 10. Select ThinkCentre Tiny...the list of Hardware and Sound, and then clicking Display. 5. Click the Have Disk button. The files... adjusts the phase of pixels scanned by one Horizontal sweep. Note: Have your monitor ...

User Guide (English)
Page 35
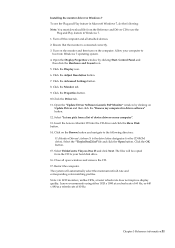
... using either 1920 x 1080 at a refresh rate of 60 Hz, or 640 x 480 at refresh rate of 60 Hz. 30 ThinkCentre Tiny-in-One 23 User Guide Restart the system. Lenovo recommends using either 1920 x 1080 at a refresh rate of 60 Hz, or 640 x 480 at a refresh rate of 60 Hz. Allow ...move mouse to your hard disk drive. 15. corresponding Color Matching Profiles. Note: On LCD monitors, unlike CRTs, a faster refresh rate does not improve display quality. Installing the monitor driver in Windows 8 To use the Plug and Play feature in Microsoft Windows 8, do the following: Note: You must download ...
... using either 1920 x 1080 at a refresh rate of 60 Hz, or 640 x 480 at refresh rate of 60 Hz. 30 ThinkCentre Tiny-in-One 23 User Guide Restart the system. Lenovo recommends using either 1920 x 1080 at a refresh rate of 60 Hz, or 640 x 480 at a refresh rate of 60 Hz. Allow ...move mouse to your hard disk drive. 15. corresponding Color Matching Profiles. Note: On LCD monitors, unlike CRTs, a faster refresh rate does not improve display quality. Installing the monitor driver in Windows 8 To use the Plug and Play feature in Microsoft Windows 8, do the following: Note: You must download ...
User Guide (English)
Page 36
...Click the OK button. 15. Restart the computer. Note: On LCD monitors, unlike CRTs, a faster refresh rate does not improve display quality. Open the Display Properties window by clicking on the Browse button and navigate to the following : Note: You must download file from the Reference and Driver...PnP Monitor" window by clicking Start, Control Panel and then click the Hardware and Sound icon. 5. Select ThinkCentre Tiny-in-One 23 and click Next. The system will be copied from a list of 60 Hz. Lenovo recommends using either 1920 x 1080 at a refresh rate of 60 Hz, or 640 x 480 at a...
...Click the OK button. 15. Restart the computer. Note: On LCD monitors, unlike CRTs, a faster refresh rate does not improve display quality. Open the Display Properties window by clicking on the Browse button and navigate to the following : Note: You must download file from the Reference and Driver...PnP Monitor" window by clicking Start, Control Panel and then click the Hardware and Sound icon. 5. Select ThinkCentre Tiny-in-One 23 and click Next. The system will be copied from a list of 60 Hz. Lenovo recommends using either 1920 x 1080 at a refresh rate of 60 Hz, or 640 x 480 at a...
User Guide (English)
Page 37
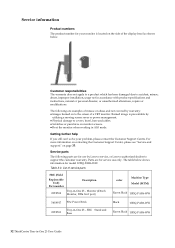
...: ● Images burned on page 33. FRU Stand and Base Black 10DQ-PAR6-WW Raven Black 10DQ-PAR6-WW 32 ThinkCentre Tiny-in -One 23 - The table below . Monitor (23inch Monitor, DP& 3in1 port) color Machine Type Model (MTM) Raven Black 10DQ...Lenovo authorized dealers to accident, misuse, abuse, improper installation, usage not in -One 23 - Getting further help If you still can't solve your monitor is preventable by utilizing a moving screen saver or power management. ● Physical damage to covers, bezel, base and cables. ● Scratches or punctures on the side of the display...
...: ● Images burned on page 33. FRU Stand and Base Black 10DQ-PAR6-WW Raven Black 10DQ-PAR6-WW 32 ThinkCentre Tiny-in -One 23 - The table below . Monitor (23inch Monitor, DP& 3in1 port) color Machine Type Model (MTM) Raven Black 10DQ...Lenovo authorized dealers to accident, misuse, abuse, improper installation, usage not in -One 23 - Getting further help If you still can't solve your monitor is preventable by utilizing a moving screen saver or power management. ● Physical damage to covers, bezel, base and cables. ● Scratches or punctures on the side of the display...


