Monitor Safety, Troubleshooting, and Warranty Guide
Page 31
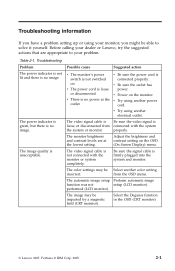
... or Lenovo, try the suggested actions that are at the outlet. Troubleshooting Problem The power indicator is not lit and there is no image The power indicator is green, but there is not connected with the system the system or monitor. Troubleshooting information If you might be able to your monitor, you have a problem setting up or using your problem. The video signal cable is no power...
... or Lenovo, try the suggested actions that are at the outlet. Troubleshooting Problem The power indicator is not lit and there is no image The power indicator is green, but there is not connected with the system the system or monitor. Troubleshooting information If you might be able to your monitor, you have a problem setting up or using your problem. The video signal cable is no power...
User Guide (English)
Page 3
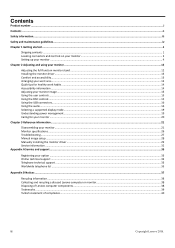
...Accessibility information ...14 Adjusting your monitor image ...15 Using the user controls ...15 Using the OSD controls ...15 Using the USB connectors...16 Using the audio...16 Selecting a supported display mode...19 Understanding power management...19 Caring for your monitor ...20 Chapter 3 Reference information...21 Disassembling your monitor ...21 Monitor specifications ...26 Troubleshooting...27 Manual image setup ...28 Manually installing the monitor driver ...29 Service information ...32 Appendix A Service and support ...33 Registering your option ...33 Online technical...
...Accessibility information ...14 Adjusting your monitor image ...15 Using the user controls ...15 Using the OSD controls ...15 Using the USB connectors...16 Using the audio...16 Selecting a supported display mode...19 Understanding power management...19 Caring for your monitor ...20 Chapter 3 Reference information...21 Disassembling your monitor ...21 Monitor specifications ...26 Troubleshooting...27 Manual image setup ...28 Manually installing the monitor driver ...29 Service information ...32 Appendix A Service and support ...33 Registering your option ...33 Online technical...
User Guide (English)
Page 5
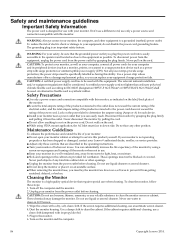
... and the monitor. 2. Unplug your monitor from excessive light, heat, or moisture. ■ Slots and openings in the cabinet are described in the operating instructions. ■ Turn your Lenovo® authorized dealer, reseller, or service provider. ■ Adjust only those controls that the grounded power outlet you can substantially increase the life expectancy of the products connected to be used with this monitor, as indicated...
... and the monitor. 2. Unplug your monitor from excessive light, heat, or moisture. ■ Slots and openings in the cabinet are described in the operating instructions. ■ Turn your Lenovo® authorized dealer, reseller, or service provider. ■ Adjust only those controls that the grounded power outlet you can substantially increase the life expectancy of the products connected to be used with this monitor, as indicated...
User Guide (English)
Page 6
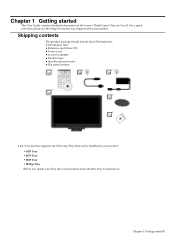
... can be installed in -One 23. Chapter 1 Getting started This User Guide contains detailed information on the Lenovo ThinkCentre® Tiny-in your monitor: · M53 Tiny · M73 Tiny · M83 Tiny · M93/p Tiny Before you install your Tiny into your monitor. Shipping contents The product package should include the following items: ● Information flyer ● Reference and driver CD ● Power cord ● ac power adapter ● Monitor base...
... can be installed in -One 23. Chapter 1 Getting started This User Guide contains detailed information on the Lenovo ThinkCentre® Tiny-in your monitor: · M53 Tiny · M73 Tiny · M83 Tiny · M93/p Tiny Before you install your Tiny into your monitor. Shipping contents The product package should include the following items: ● Information flyer ● Reference and driver CD ● Power cord ● ac power adapter ● Monitor base...
User Guide (English)
Page 9
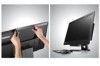
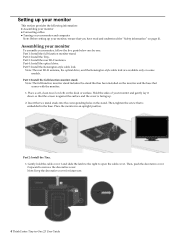
... iii. Then, push the decorative cover 2 upward to open the cable cover. Hold the sides of your monitor, follow the five parts below one by one: Part 1: Install the full-function monitor stand. Setting up your monitor This section provides the following information: ● Assembling your monitor ● Connecting cables ● Turning on your monitor and computer Note: Before setting up . 2. Part 3: Install the rear Wi-Fi antenna. Place the monitor in -One 23 User Guide Part 2: Install the Tiny. 1.
... iii. Then, push the decorative cover 2 upward to open the cable cover. Hold the sides of your monitor, follow the five parts below one by one: Part 1: Install the full-function monitor stand. Setting up your monitor This section provides the following information: ● Assembling your monitor ● Connecting cables ● Turning on your monitor and computer Note: Before setting up . 2. Part 3: Install the rear Wi-Fi antenna. Place the monitor in -One 23 User Guide Part 2: Install the Tiny. 1.
User Guide (English)
Page 11
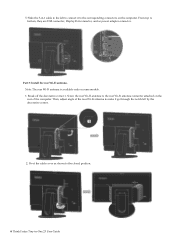
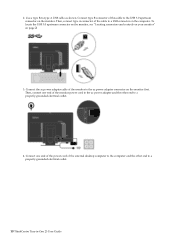
... on the computer. Part 3: Install the rear Wi-Fi antenna. Screw the rear Wi-Fi antenna to the rear Wi-Fi antenna connector attached on the rear of the rear Wi-Fi antenna to make it to connect it go through the notch left to the corresponding connectors on some models. 1. From top to the closed position. 6 ThinkCentre Tiny-in -1 cable to the left by...
... on the computer. Part 3: Install the rear Wi-Fi antenna. Screw the rear Wi-Fi antenna to the rear Wi-Fi antenna connector attached on the rear of the rear Wi-Fi antenna to make it to connect it go through the notch left to the corresponding connectors on some models. 1. From top to the closed position. 6 ThinkCentre Tiny-in -1 cable to the left by...
User Guide (English)
Page 13
..., move the optical drive rightward a bit to the closed position. Part 5: Install the Kensington-style cable lock. With the key of the Kensington-style cable lock, attach the lock to the security-lock slot on some models. 4. Insert the four hooks into the corresponding holes in -One 23 User Guide Note: The Kensington-style cable lock is available only on the rear panel of your monitor to...
..., move the optical drive rightward a bit to the closed position. Part 5: Install the Kensington-style cable lock. With the key of the Kensington-style cable lock, attach the lock to the security-lock slot on some models. 4. Insert the four hooks into the corresponding holes in -One 23 User Guide Note: The Kensington-style cable lock is available only on the rear panel of your monitor to...
User Guide (English)
Page 15
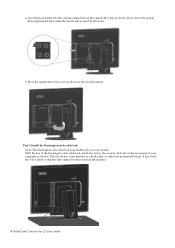
... ThinkCentre Tiny-in-One 23 User Guide Connect the ac power adapter cable of the monitor power cord to the ac power adapter and the other end to the USB 3.0 upstream connector on page 2. 3. Use a type B-to a properly-grounded electrical outlet. 4. Connect type B connector of the external desktop computer to the computer and the other end to -type A USB cable as shown. Connect one end of the monitor to a USB connector on the monitor first. To locate the USB 3.0 upstream connector on the monitor, see "Locating connectors and controls...
... ThinkCentre Tiny-in-One 23 User Guide Connect the ac power adapter cable of the monitor power cord to the ac power adapter and the other end to the USB 3.0 upstream connector on page 2. 3. Use a type B-to a properly-grounded electrical outlet. 4. Connect type B connector of the external desktop computer to the computer and the other end to -type A USB cable as shown. Connect one end of the monitor to a USB connector on the monitor first. To locate the USB 3.0 upstream connector on the monitor, see "Locating connectors and controls...
User Guide (English)
Page 16
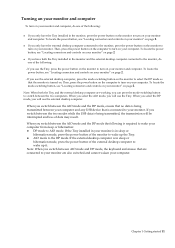
... are connected to your monitor are working, you can press the mode-switching button to switch between the two computers. If you use the Tiny. Note: When both the Tiny installed in the monitor and the external desktop computer connected to the monitor, do one of the following: - When you select the AIO mode, you will use the Tiny, press the power button on the monitor to turn on your computer. Chapter 1 Getting started 11...
... are connected to your monitor are working, you can press the mode-switching button to switch between the two computers. If you use the Tiny. Note: When both the Tiny installed in the monitor and the external desktop computer connected to the monitor, do one of the following: - When you select the AIO mode, you will use the Tiny, press the power button on the monitor to turn on your computer. Chapter 1 Getting started 11...
User Guide (English)
Page 18
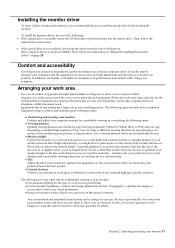
.... Then, follow the instructions on the screen. If the optical drive is not available, download the driver from your personal computer and to avoid glare or reflections on the screen from overhead lighting or nearby windows. Comfort and accessibility Good ergonomic practice is important to achieve and maintain good working posture. Arranging your work area Use a work area clean and clear for the materials...
.... Then, follow the instructions on the screen. If the optical drive is not available, download the driver from your personal computer and to avoid glare or reflections on the screen from overhead lighting or nearby windows. Comfort and accessibility Good ergonomic practice is important to achieve and maintain good working posture. Arranging your work area Use a work area clean and clear for the materials...
User Guide (English)
Page 20
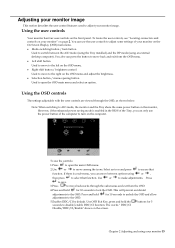
... Screen Display (OSD) main menu. Mode-switching button / back button Used to switch between options using your monitor image. buttons for 5 Chapter 2 Adjusting and using or , then press to select that function. You can move to the right on the computer. Adjusting your monitor image This section describes the user control features used to adjust your monitor 15 You also can only use the power button of the Tiny, you can use the controls: 1.Press to open...
... Screen Display (OSD) main menu. Mode-switching button / back button Used to switch between options using your monitor image. buttons for 5 Chapter 2 Adjusting and using or , then press to select that function. You can move to the right on the computer. Adjusting your monitor image This section describes the user control features used to adjust your monitor 15 You also can only use the power button of the Tiny, you can use the controls: 1.Press to open...
User Guide (English)
Page 21
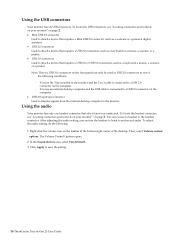
... -One 23 User Guide Using the USB connectors Your monitor has six USB connectors. To locate the headset connector, see "Locating connectors and controls on your monitor" on the front panel can connect a headset to attach a device that requires a USB 2.0 connection, such as a keyboard or a mouse, a scanner, or a printer. USB 3.0 connectors Used to the headset connector. Right-click the volume icon on the computer. - Then, select Volume control options. You use the Tiny installed in the monitor and the 3-in-1 cable is connected to a USB 2.0 connector...
... -One 23 User Guide Using the USB connectors Your monitor has six USB connectors. To locate the headset connector, see "Locating connectors and controls on your monitor" on the front panel can connect a headset to attach a device that requires a USB 2.0 connection, such as a keyboard or a mouse, a scanner, or a printer. USB 3.0 connectors Used to the headset connector. Right-click the volume icon on the computer. - Then, select Volume control options. You use the Tiny installed in the monitor and the 3-in-1 cable is connected to a USB 2.0 connector...

User Guide (English)
Page 24
... image size, position and shape might change display modes. There are several states as described in the table below have not using your mouse or keyboard for long periods during the day. Table2-4.Power indicator State Power Indicator On Steady green (AIO Mode/DP) Standby/ Suspend Blinking green (AIO Mode) Steady amber (DP) Off Off (AIO Mode/DP) Screen Restoring Operation Normal Compliance Blank Off Press a key...
... image size, position and shape might change display modes. There are several states as described in the table below have not using your mouse or keyboard for long periods during the day. Table2-4.Power indicator State Power Indicator On Steady green (AIO Mode/DP) Standby/ Suspend Blinking green (AIO Mode) Steady amber (DP) Off Off (AIO Mode/DP) Screen Restoring Operation Normal Compliance Blank Off Press a key...
User Guide (English)
Page 26
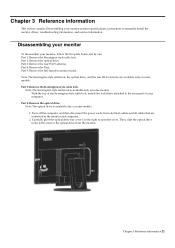
... some models. Part 1: Remove the Kensington-style cable lock. With the key of your computer. Chapter 3 Reference information This section contains Disassembling your monitor,monitor specifications, instructions to open the cover. Part 3: Remove the rear Wi-Fi antenna. Chapter 3 Reference information 21 Part 5: Remove the full-function monitor stand. Carefully pivot the optical drive bay cover 1 to the right to manually install the monitor driver, troubleshooting information, and service information. Turn off the computer, and then disconnect the power...
... some models. Part 1: Remove the Kensington-style cable lock. With the key of your computer. Chapter 3 Reference information This section contains Disassembling your monitor,monitor specifications, instructions to open the cover. Part 3: Remove the rear Wi-Fi antenna. Chapter 3 Reference information 21 Part 5: Remove the full-function monitor stand. Carefully pivot the optical drive bay cover 1 to the right to manually install the monitor driver, troubleshooting information, and service information. Turn off the computer, and then disconnect the power...
User Guide (English)
Page 32
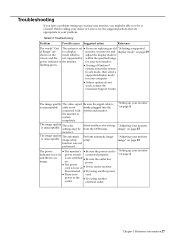
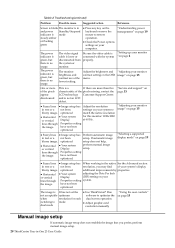
... power switch connected properly. electrical outlet. The image quality The video signal Be sure the signal cable is is no image. ● is unacceptable. The image quality is unacceptable. Troubleshooting If you have a problem setting up your monitor "on page 4 Chapter 3 Reference information 27 power at the ● Try using another power ● There is unacceptable. The color settings may be able to solve it and display mode...
... power switch connected properly. electrical outlet. The image quality The video signal Be sure the signal cable is is no image. ● is unacceptable. The image quality is unacceptable. Troubleshooting If you have a problem setting up your monitor "on page 4 Chapter 3 Reference information 27 power at the ● Try using another power ● There is unacceptable. The color settings may be able to solve it and display mode...
User Guide (English)
Page 33
.... "Understanding power management" on page 15 ● Fuzzy lines ● Image setup has Perform automatic image in text or a not been setup. Table3-2.Troubleshooting(continued) Problem Possible cause Suggested action Reference Screen is blank The monitor is in and power Standby/Suspend indicator is mode steady amber or flashing green ● Press any key on the keyboard or move the mouse to restore operation. ● Check the Power options settings on...
.... "Understanding power management" on page 15 ● Fuzzy lines ● Image setup has Perform automatic image in text or a not been setup. Table3-2.Troubleshooting(continued) Problem Possible cause Suggested action Reference Screen is blank The monitor is in and power Standby/Suspend indicator is mode steady amber or flashing green ● Press any key on the keyboard or move the mouse to restore operation. ● Check the Power options settings on...
User Guide (English)
Page 34
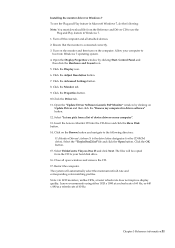
... Desktop, move mouse to low-right corner of screen, choose Setting, double click Control Panel, and then double click the icon of device driver program on the computer. 12. The system will be copied from the list of Hardware and Sound, and then clicking Display. 5. Turn on the monitor and then turn on the computer. Click Update Driver, then click Browse the computer to your hard disk drive. 15. Manually installing the monitor driver...
... Desktop, move mouse to low-right corner of screen, choose Setting, double click Control Panel, and then double click the icon of device driver program on the computer. 12. The system will be copied from the list of Hardware and Sound, and then clicking Display. 5. Turn on the monitor and then turn on the computer. Click Update Driver, then click Browse the computer to your hard disk drive. 15. Manually installing the monitor driver...

User Guide (English)
Page 35
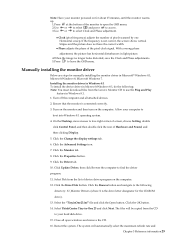
... clicking Display. 5.Click the Change the display settings tab. 6.Click the Advanced Settings icon. 7.Click the Monitor tab. 8.Click the Properties button. 9.Click the Driver tab. 10.Click Update Driver, then click Browse the computer to the following : Note: You must download file from the list of 60 Hz. 30 ThinkCentre Tiny-in Windows 8. 1.Turn off the computer and all open windows and remove the CD. 16. Lenovo recommends using either...
... clicking Display. 5.Click the Change the display settings tab. 6.Click the Advanced Settings icon. 7.Click the Monitor tab. 8.Click the Properties button. 9.Click the Driver tab. 10.Click Update Driver, then click Browse the computer to the following : Note: You must download file from the list of 60 Hz. 30 ThinkCentre Tiny-in Windows 8. 1.Turn off the computer and all open windows and remove the CD. 16. Lenovo recommends using either...
User Guide (English)
Page 36
... open windows and remove the CD. 17. Open the "Update Driver Software-Generic PnP Monitor" window by clicking Start, Control Panel and then click the Hardware and Sound icon. 5. Insert the Lenovo Monitor CD into Windows 7 operating system. 4. Click the Monitor tab. 9. Click the Properties button. 10.Click the Driver tab. 11. Select ThinkCentre Tiny-in-One 23 and click Next. Close all attached devices. 2. Allow your hard disk drive. 16. Click the OK button. 15. Installing the monitor driver in Windows 7 To use the Plug...
... open windows and remove the CD. 17. Open the "Update Driver Software-Generic PnP Monitor" window by clicking Start, Control Panel and then click the Hardware and Sound icon. 5. Insert the Lenovo Monitor CD into Windows 7 operating system. 4. Click the Monitor tab. 9. Click the Properties button. 10.Click the Driver tab. 11. Select ThinkCentre Tiny-in-One 23 and click Next. Close all attached devices. 2. Allow your hard disk drive. 16. Click the OK button. 15. Installing the monitor driver in Windows 7 To use the Plug...
User Guide (English)
Page 37
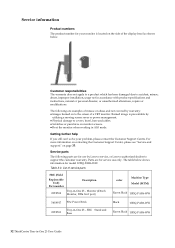
... warranty. FRU Stand and Base Black 10DQ-PAR6-WW Raven Black 10DQ-PAR6-WW 32 ThinkCentre Tiny-in -One 23 - The table below . Parts are for model 10DQ-PAR6-WW. Table 3-3. For more information on contacting the Customer Support Center, please see "Service and support," on the side of a CRT monitor. List of service parts FRU (Field Replaceable Unit) Part number 03T8532 Description Tiny-in -One 23 User Guide Burned image is located on page 33.
... warranty. FRU Stand and Base Black 10DQ-PAR6-WW Raven Black 10DQ-PAR6-WW 32 ThinkCentre Tiny-in -One 23 - The table below . Parts are for model 10DQ-PAR6-WW. Table 3-3. For more information on contacting the Customer Support Center, please see "Service and support," on the side of a CRT monitor. List of service parts FRU (Field Replaceable Unit) Part number 03T8532 Description Tiny-in -One 23 User Guide Burned image is located on page 33.


