Hardware Maintenance Manual
Page 83
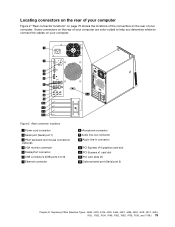
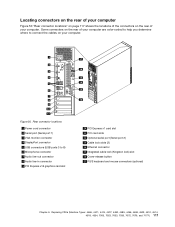
... you determine where to 8) 7 Ethernet connector 8 Microphone connector 9 Audio line-out connector 10 Audio line-in connector 11 PCI Express x16 graphics card slot 12 PCI Express x1 card slot 13 PCI card slots (2) 14 Optional serial port (Serial port 2) Chapter 8. Figure 2. Rear connector locations 1 Power cord connector 2 Serial port (Serial port 1) 3 PS/2 keyboard...
... you determine where to 8) 7 Ethernet connector 8 Microphone connector 9 Audio line-out connector 10 Audio line-in connector 11 PCI Express x16 graphics card slot 12 PCI Express x1 card slot 13 PCI card slots (2) 14 Optional serial port (Serial port 2) Chapter 8. Figure 2. Rear connector locations 1 Power cord connector 2 Serial port (Serial port 1) 3 PS/2 keyboard...

Hardware Maintenance Manual
Page 85
... speaker connector 8 Thermal sensor connector 22 Front audio connector 9 24-pin power connector 23 PCI card slots (2) 10 Battery 24 PCI Express x1 card slot 11 Clear CMOS (Complementary Metal Oxide Semiconductor) /Recovery jumper 25 PCI Express x16 graphics card slot 12 Parallel connector 26 System fan connector 13 SATA connectors 1 and 2 (SATA 3.0 connectors...
... speaker connector 8 Thermal sensor connector 22 Front audio connector 9 24-pin power connector 23 PCI card slots (2) 10 Battery 24 PCI Express x1 card slot 11 Clear CMOS (Complementary Metal Oxide Semiconductor) /Recovery jumper 25 PCI Express x16 graphics card slot 12 Parallel connector 26 System fan connector 13 SATA connectors 1 and 2 (SATA 3.0 connectors...
Hardware Maintenance Manual
Page 89
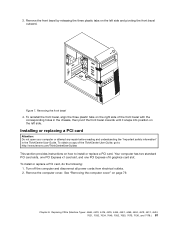
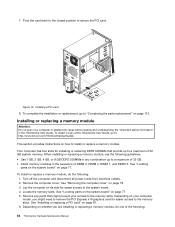
... cover" on the left side and pivoting the front bezel outward. Your computer has two standard PCI card slots, one PCI Express x1 card slot, and one PCI Express x16 graphics card slot. Turn off the computer and disconnect all power cords from electrical outlets. 2. Chapter 8. Figure ... 4. To obtain a copy of the front bezel with the corresponding holes in the ThinkCentre User Guide. Remove the computer cover. Remove the front bezel by releasing the three plastic tabs on how to : http://www.lenovo.com/ThinkCentreUserGuides This section provides instructions on the left side.
... cover" on the left side and pivoting the front bezel outward. Your computer has two standard PCI card slots, one PCI Express x1 card slot, and one PCI Express x16 graphics card slot. Turn off the computer and disconnect all power cords from electrical outlets. 2. Chapter 8. Figure ... 4. To obtain a copy of the front bezel with the corresponding holes in the ThinkCentre User Guide. Remove the computer cover. Remove the front bezel by releasing the three plastic tabs on how to : http://www.lenovo.com/ThinkCentreUserGuides This section provides instructions on the left side.
Hardware Maintenance Manual
Page 91
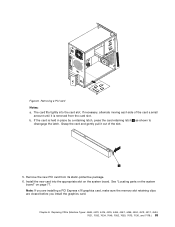
..., 7073, 7136, and 7178.) 83 b. Install the new card into the card slot. See "Locating parts on the system board" on the system board. The card fits tightly into the appropriate slot on page 77. Chapter 8. Note: If you are installing a PCI Express x16 graphics card, make sure the memory slot retaining clips are closed...
..., 7073, 7136, and 7178.) 83 b. Install the new card into the card slot. See "Locating parts on the system board" on the system board. The card fits tightly into the appropriate slot on page 77. Chapter 8. Note: If you are installing a PCI Express x16 graphics card, make sure the memory slot retaining clips are closed...
Hardware Maintenance Manual
Page 92
... http://www.lenovo.com/ThinkCentreUserGuides This section provides instructions on page 113. Lay the computer on its side for installing or replacing DDR3 UDIMMs that might need to remove the PCI Express x16 graphics card for easier access to the system board. 4. Pivot the card latch to the... closed position to "Completing the parts replacement" on how to the memory slots. To obtain a copy of the ThinkCentre User Guide, go to secure the PCI card. See "Locating parts...
... http://www.lenovo.com/ThinkCentreUserGuides This section provides instructions on page 113. Lay the computer on its side for installing or replacing DDR3 UDIMMs that might need to remove the PCI Express x16 graphics card for easier access to the system board. 4. Pivot the card latch to the... closed position to "Completing the parts replacement" on how to the memory slots. To obtain a copy of the ThinkCentre User Guide, go to secure the PCI card. See "Locating parts...
Hardware Maintenance Manual
Page 94
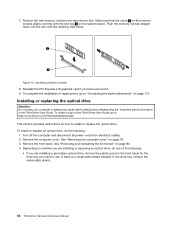
... PCI Express x16 graphics card if you want to "Completing the parts replacement" on page 80. 4. Installing or replacing the optical drive Attention: Do not open your computer or attempt any repair before reading and understanding the "Important safety information" in the drive bay, remove the metal static shield. 86 ThinkCentre Hardware Maintenance...
... PCI Express x16 graphics card if you want to "Completing the parts replacement" on page 80. 4. Installing or replacing the optical drive Attention: Do not open your computer or attempt any repair before reading and understanding the "Important safety information" in the drive bay, remove the metal static shield. 86 ThinkCentre Hardware Maintenance...
Hardware Maintenance Manual
Page 125
... color-coded to help you determine where to 8) 6 Microphone connector 7 Audio line-out connector 8 Audio line-in connector 9 PCI Express x16 graphics card slot 10 PCI Express x1 card slot 11 PCI card slots 12 Optional serial port (Serial port 2) 13 Cable lock slots (2) 14 Ethernet connector 15 Integrated cable lock (Kingston lock) slot...
... color-coded to help you determine where to 8) 6 Microphone connector 7 Audio line-out connector 8 Audio line-in connector 9 PCI Express x16 graphics card slot 10 PCI Express x1 card slot 11 PCI card slots 12 Optional serial port (Serial port 2) 13 Cable lock slots (2) 14 Ethernet connector 15 Integrated cable lock (Kingston lock) slot...
Hardware Maintenance Manual
Page 126
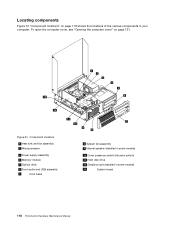
...) 11 Hard disk drive 12 Graphics card (installed in your computer. Component locations 1 Heat sink and fan assembly 2 Microprocessor 3 Power supply assembly 4 Memory module 5 Optical drive 6 Front audio and USB assembly 7 Front bezel 8 System fan assembly 9 Internal speaker (installed in some models) 13 System board 118 ThinkCentre Hardware Maintenance Manual Figure 51. Locating...
...) 11 Hard disk drive 12 Graphics card (installed in your computer. Component locations 1 Heat sink and fan assembly 2 Microprocessor 3 Power supply assembly 4 Memory module 5 Optical drive 6 Front audio and USB assembly 7 Front bezel 8 System fan assembly 9 Internal speaker (installed in some models) 13 System board 118 ThinkCentre Hardware Maintenance Manual Figure 51. Locating...

Hardware Maintenance Manual
Page 127
... speaker connector 8 Thermal sensor connector 22 Front audio connector 9 24-pin power connector 23 PCI card slots (2) 10 Battery 24 PCI Express x1 card slot 11 Clear CMOS (Complementary Metal Oxide Semiconductor) /Recovery jumper 25 PCI Express x16 graphics card slot 12 Parallel connector 26 System fan connector 13 SATA connectors 1 and 2 (SATA 3.0 connectors...
... speaker connector 8 Thermal sensor connector 22 Front audio connector 9 24-pin power connector 23 PCI card slots (2) 10 Battery 24 PCI Express x1 card slot 11 Clear CMOS (Complementary Metal Oxide Semiconductor) /Recovery jumper 25 PCI Express x16 graphics card slot 12 Parallel connector 26 System fan connector 13 SATA connectors 1 and 2 (SATA 3.0 connectors...

Hardware Maintenance Manual
Page 134
..." on the system board. To install or replace a PCI card, do the following: 1. To complete the installation or replacement, go to: http://www.lenovo.com/ThinkCentreUserGuides This section provides instructions on page 121. 126 ThinkCentre Hardware Maintenance Manual Make sure that the notch 1 on the memory...of the memory slot into the slot until the retaining clips close. Your computer has two standard PCI card slots, one PCI Express x1 card slot, and one PCI Express x16 graphics card slot. Open the computer cover. • If you want to install the memory module. Installing a ...
..." on the system board. To install or replace a PCI card, do the following: 1. To complete the installation or replacement, go to: http://www.lenovo.com/ThinkCentreUserGuides This section provides instructions on page 121. 126 ThinkCentre Hardware Maintenance Manual Make sure that the notch 1 on the memory...of the memory slot into the slot until the retaining clips close. Your computer has two standard PCI card slots, one PCI Express x1 card slot, and one PCI Express x16 graphics card slot. Open the computer cover. • If you want to install the memory module. Installing a ...

(English) User Guide
Page 15
... by Lenovo, and locations of models. Internal drives • Optical drive: DVD ROM or DVD recordable (optional) • Serial Advanced Technology Attachment (SATA) hard disk drive • SATA solid state drive Video subsystem • Integrated graphics for a Video Graphics Array (VGA) connector and a DisplayPort connector • Peripheral Component Interconnect (PCI) Express x16 graphics card slot...
... by Lenovo, and locations of models. Internal drives • Optical drive: DVD ROM or DVD recordable (optional) • Serial Advanced Technology Attachment (SATA) hard disk drive • SATA solid state drive Video subsystem • Integrated graphics for a Video Graphics Array (VGA) connector and a DisplayPort connector • Peripheral Component Interconnect (PCI) Express x16 graphics card slot...
(English) User Guide
Page 17
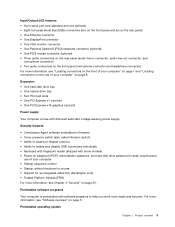
... your computer" on page 5. Expansion • One hard disk drive bay • One optical drive bay • Two PCI card slots • One PCI Express x1 card slot • One PCI Express x16 graphics card slot Power supply Your computer comes with some models) • Power-on password (POP), administrator password, and hard disk...
... your computer" on page 5. Expansion • One hard disk drive bay • One optical drive bay • Two PCI card slots • One PCI Express x1 card slot • One PCI Express x16 graphics card slot Power supply Your computer comes with some models) • Power-on password (POP), administrator password, and hard disk...
(English) User Guide
Page 23
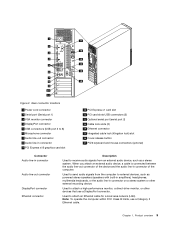
... connector DisplayPort connector Ethernet connector Description Used to 8) 6 Microphone connector 7 Audio line-out connector 8 Audio line-in connector 9 PCI Express x16 graphics card slot 10 PCI Express x1 card slot 11 PCI card slots USB connectors (2) 12 Optional serial port (serial port 2) 13 Cable lock slots (2) 14 Ethernet connector 15 Integrated cable lock (Kingston...
... connector DisplayPort connector Ethernet connector Description Used to 8) 6 Microphone connector 7 Audio line-out connector 8 Audio line-in connector 9 PCI Express x16 graphics card slot 10 PCI Express x1 card slot 11 PCI card slots USB connectors (2) 12 Optional serial port (serial port 2) 13 Cable lock slots (2) 14 Ethernet connector 15 Integrated cable lock (Kingston...

(English) User Guide
Page 26
...22 Front audio connector 9 24-pin power connector 23 PCI card slots (2) 10 Battery 24 PCI Express x1 card slot 11 Clear CMOS (Complementary Metal Oxide Semiconductor) /Recovery jumper 25 PCI Express x16 graphics card slot 12 Parallel connector 26 System fan connector 13 SATA ...connectors 1 and 2 (SATA 3.0 connectors) 27 Cover presence switch connector (Intrusion switch connector) 14 SATA connector 3 (SATA 2.0 connector) 28 PS/2 keyboard and mouse connector 12 ThinkCentre User Guide Figure...
...22 Front audio connector 9 24-pin power connector 23 PCI card slots (2) 10 Battery 24 PCI Express x1 card slot 11 Clear CMOS (Complementary Metal Oxide Semiconductor) /Recovery jumper 25 PCI Express x16 graphics card slot 12 Parallel connector 26 System fan connector 13 SATA ...connectors 1 and 2 (SATA 3.0 connectors) 27 Cover presence switch connector (Intrusion switch connector) 14 SATA connector 3 (SATA 2.0 connector) 28 PS/2 keyboard and mouse connector 12 ThinkCentre User Guide Figure...
(English) User Guide
Page 47
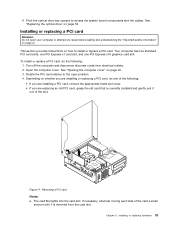
... is currently installed and gently pull it is removed from electrical outlets. 2. To install or replace a PCI card, do one PCI Express x16 graphics card slot. Figure 11. See "Opening the computer cover" on how to access the system board components and the cables. Pivot the optical... drive bay upward to install or replace a PCI card. Your computer has two standard PCI card slots, one PCI Express x1 card slot, and ...
... is currently installed and gently pull it is removed from electrical outlets. 2. To install or replace a PCI card, do one PCI Express x16 graphics card slot. Figure 11. See "Opening the computer cover" on how to access the system board components and the cables. Pivot the optical... drive bay upward to install or replace a PCI card. Your computer has two standard PCI card slots, one PCI Express x1 card slot, and ...
(English) User Guide
Page 107
...to the ThinkCentre Safety and Warranty Guide that : • The computer is turned on. • The keyboard is securely connected to the Lenovo Support Web site at http://www.lenovo.com/support/phone. The monitor screen is correctly connected to help , and service" on the graphics card. The ...No keys are set correctly. • The computer voltage matches the voltage available at the electrical outlet for further information. © Copyright Lenovo 2011, 2012 93 Verify that : • The monitor signal cable is correctly connected to the monitor and to the appropriate monitor connector...
...to the ThinkCentre Safety and Warranty Guide that : • The computer is turned on. • The keyboard is securely connected to the Lenovo Support Web site at http://www.lenovo.com/support/phone. The monitor screen is correctly connected to help , and service" on the graphics card. The ...No keys are set correctly. • The computer voltage matches the voltage available at the electrical outlet for further information. © Copyright Lenovo 2011, 2012 93 Verify that : • The monitor signal cable is correctly connected to the monitor and to the appropriate monitor connector...

(English) User Guide
Page 89
...to a working electrical outlet. • The monitor is correctly connected to the rear of service and support telephone numbers, refer to the ThinkCentre Safety and Warranty Guide that : • The power cord is turned on page 71 for additional troubleshooting resources. For a list of ...turned on page 95 for further information. © Copyright Lenovo 2011, 2012 75 The monitor screen is not described here, see Chapter 11 "Getting information, help you troubleshoot your computer or go to a USB connector on the graphics card. Verify that : • The computer is clean. ...
...to a working electrical outlet. • The monitor is correctly connected to the rear of service and support telephone numbers, refer to the ThinkCentre Safety and Warranty Guide that : • The power cord is turned on page 71 for additional troubleshooting resources. For a list of ...turned on page 95 for further information. © Copyright Lenovo 2011, 2012 75 The monitor screen is not described here, see Chapter 11 "Getting information, help you troubleshoot your computer or go to a USB connector on the graphics card. Verify that : • The computer is clean. ...


