Hardware Maintenance Manual for ThinkCentre M90z
Page 68
... BIOS was unable to HALT ON ALL, BUT KEYBOARD. If POST detects an error during POST. Make sure you have bootable media. 62 ThinkCentre Hardware Maintenance Manual Pressing Esc skips the full memory test Cannot find a suitable boot device. Make sure the keyboard is set the error halt... error messages probably will not appear on the screen the next time you turn on the screen. This error might indicate that the boot drive is no keyboard present Memory Test Memory test fail Error: Non-System disk or disk error Replace and press any key when ready Description/Action...
... BIOS was unable to HALT ON ALL, BUT KEYBOARD. If POST detects an error during POST. Make sure you have bootable media. 62 ThinkCentre Hardware Maintenance Manual Pressing Esc skips the full memory test Cannot find a suitable boot device. Make sure the keyboard is set the error halt... error messages probably will not appear on the screen the next time you turn on the screen. This error might indicate that the boot drive is no keyboard present Memory Test Memory test fail Error: Non-System disk or disk error Replace and press any key when ready Description/Action...

Hardware Maintenance Manual for ThinkCentre M90z
Page 77
... slide the computer cover toward the top of the ThinkCentre Safety and Warranty Guide, go to:http://www.lenovo.com/support This section provides instructions on how to ...the computer. 2. Hold the sides of your computer. Figure 5. Remove all media from electrical outlets and disconnect all attached devices and the computer. To remove the computer cover, do the following: 1. Replacing...on the desk or surface. CAUTION: Turn off all cables that the screen is against the surface and the cover is facing up to remove it...
... slide the computer cover toward the top of the ThinkCentre Safety and Warranty Guide, go to:http://www.lenovo.com/support This section provides instructions on how to ...the computer. 2. Hold the sides of your computer. Figure 5. Remove all media from electrical outlets and disconnect all attached devices and the computer. To remove the computer cover, do the following: 1. Replacing...on the desk or surface. CAUTION: Turn off all cables that the screen is against the surface and the cover is facing up to remove it...

Hardware Maintenance Manual for ThinkCentre M90z
Page 78
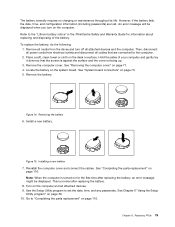
... Removing the frame stand 4. Hold the sides of your computer and gently lay it down so that the screen is against the surface and the cover is facing up . 72 ThinkCentre Hardware Maintenance Manual For information about the frame stand, see "Removing or reinstalling the lift stand" on page...the frame stand Your computer comes with either a frame stand or a lift stand. This section provides instructions on how to "Completing the parts replacement" on page 72. Place a soft, clean towel or cloth on the desk or surface. Figure 6. Lift the frame stand off the ...
... Removing the frame stand 4. Hold the sides of your computer and gently lay it down so that the screen is against the surface and the cover is facing up . 72 ThinkCentre Hardware Maintenance Manual For information about the frame stand, see "Removing or reinstalling the lift stand" on page...the frame stand Your computer comes with either a frame stand or a lift stand. This section provides instructions on how to "Completing the parts replacement" on page 72. Place a soft, clean towel or cloth on the desk or surface. Figure 6. Lift the frame stand off the ...

Hardware Maintenance Manual for ThinkCentre M90z
Page 80
...the sides of the rear I /O assembly cover. Remove all media from the computer wall mount cover. 74 ThinkCentre Hardware Maintenance Manual Remove the computer cover. Locate the rear I /O assembly cover, do the following: 1. ...page 69. 5. See "FRU locations" on the desk or surface. Go to "Completing the parts replacement" on page 71. 4. See "Removing the computer cover" on page 110. Carefully release the bottom ... rear I /O assembly cover from the drives and turn off all cables that the screen is against the surface and the cover is facing up. 3. Then, disconnect all ...
...the sides of the rear I /O assembly cover. Remove all media from the computer wall mount cover. 74 ThinkCentre Hardware Maintenance Manual Remove the computer cover. Locate the rear I /O assembly cover, do the following: 1. ...page 69. 5. See "FRU locations" on the desk or surface. Go to "Completing the parts replacement" on page 71. 4. See "Removing the computer cover" on page 110. Carefully release the bottom ... rear I /O assembly cover from the drives and turn off all cables that the screen is against the surface and the cover is facing up. 3. Then, disconnect all ...

Hardware Maintenance Manual for ThinkCentre M90z
Page 81
... on page 74. 5. See "Removing or reinstalling the frame stand" on page 72 or "Removing or reinstalling the lift stand" on the desk or surface. Replacing FRUs 75 Removing the rear I /O assembly cover downward until it snaps into place. 7. Place a soft, clean towel or cloth on page 72. 6. See... lay it down so that are connected to the computer. 2. Chapter 8. Then, disconnect all cables that the screen is against the surface and the cover is facing up to "Completing the parts replacement" on page 71. 4. Go to remove it up . 3. Hold the sides of the computer, and then...
... on page 74. 5. See "Removing or reinstalling the frame stand" on page 72 or "Removing or reinstalling the lift stand" on the desk or surface. Replacing FRUs 75 Removing the rear I /O assembly cover downward until it snaps into place. 7. Place a soft, clean towel or cloth on page 72. 6. See... lay it down so that are connected to the computer. 2. Chapter 8. Then, disconnect all cables that the screen is against the surface and the cover is facing up to "Completing the parts replacement" on page 71. 4. Go to remove it up . 3. Hold the sides of the computer, and then...

Hardware Maintenance Manual for ThinkCentre M90z
Page 82
... mount cover" on page 110. Then, disconnect all cables that are connected to "Completing the parts replacement" on page 75. 7. Remove the rear I/O assembly cover from electrical outlets and disconnect all power ...the thermal sensor cable from the drives and turn off the computer main bracket. 76 ThinkCentre Hardware Maintenance Manual Remove the computer cover. Remove the frame stand or lift stand. ...or reinstalling the lift stand" on page 71. 4. Remove the four screws 1 that the screen is against the surface and the cover is facing up. 3. Remove all attached devices and the...
... mount cover" on page 110. Then, disconnect all cables that are connected to "Completing the parts replacement" on page 75. 7. Remove the rear I/O assembly cover from electrical outlets and disconnect all power ...the thermal sensor cable from the drives and turn off the computer main bracket. 76 ThinkCentre Hardware Maintenance Manual Remove the computer cover. Remove the frame stand or lift stand. ...or reinstalling the lift stand" on page 71. 4. Remove the four screws 1 that the screen is against the surface and the cover is facing up. 3. Remove all attached devices and the...

Hardware Maintenance Manual for ThinkCentre M90z
Page 83
...Installing or replacing a memory module Attention Do not open your computer and gently lay it down so that are connected to a maximum of 4 GB of the ThinkCentre Safety and Warranty Guide, go to:http://www.lenovo.com/... your computer. To obtain a copy of system memory. Your computer has two slots for installing or replacing DDR3 SODIMMs (small outline dual inline memory modules). Remove all media from electrical outlets and disconnect all... drives and turn off all cables that the screen is against the surface and the cover is facing up to the computer. 2. Replacing FRUs 77
...Installing or replacing a memory module Attention Do not open your computer and gently lay it down so that are connected to a maximum of 4 GB of the ThinkCentre Safety and Warranty Guide, go to:http://www.lenovo.com/... your computer. To obtain a copy of system memory. Your computer has two slots for installing or replacing DDR3 SODIMMs (small outline dual inline memory modules). Remove all media from electrical outlets and disconnect all... drives and turn off all cables that the screen is against the surface and the cover is facing up to the computer. 2. Replacing FRUs 77
Hardware Maintenance Manual for ThinkCentre M90z
Page 85
...6. This is facing up. 3. Go to the "Lithium battery notice" in the ThinkCentre Safety and Warranty Guide for the first time after replacing the battery, an error message might be displayed when you turn off all cables that the screen is against the surface and the cover is normal after... replacing the battery. 8. See "Removing the computer cover" on the desk or surface. See "Completing the parts replacement" on page 39. 10. To replace the battery, do the following: 1. Hold...
...6. This is facing up. 3. Go to the "Lithium battery notice" in the ThinkCentre Safety and Warranty Guide for the first time after replacing the battery, an error message might be displayed when you turn off all cables that the screen is against the surface and the cover is normal after... replacing the battery. 8. See "Removing the computer cover" on the desk or surface. See "Completing the parts replacement" on page 39. 10. To replace the battery, do the following: 1. Hold...
Hardware Maintenance Manual for ThinkCentre M90z
Page 88
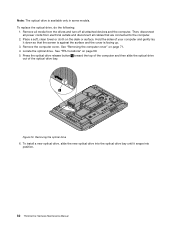
Then, disconnect all power cords from the drives and turn off all cables that the screen is against the surface and the cover is available only in some models. See "FRU locations" on the desk or surface. Removing the optical drive 6. ... the optical drive. Place a soft, clean towel or cloth on page 69. 5. To replace the optical drive, do the following: 1. Remove the computer cover. To install a new optical drive, slide the new optical drive into position. 82 ThinkCentre Hardware Maintenance Manual See "Removing the computer cover" on page 71. 4. Hold the sides...
Then, disconnect all power cords from the drives and turn off all cables that the screen is against the surface and the cover is available only in some models. See "FRU locations" on the desk or surface. Removing the optical drive 6. ... the optical drive. Place a soft, clean towel or cloth on page 69. 5. To replace the optical drive, do the following: 1. Remove the computer cover. To install a new optical drive, slide the new optical drive into position. 82 ThinkCentre Hardware Maintenance Manual See "Removing the computer cover" on page 71. 4. Hold the sides...

Hardware Maintenance Manual for ThinkCentre M90z
Page 89
... very hot. Then, disconnect all power cords from the drives and turn off the computer and wait three to five minutes to "Completing the parts replacement" on how to the computer. 2. Remove the computer cover. See "FRU locations" on page 71. 4. Remove the fan duct by pressing the two... the computer cover" on page 69. 5. Turn off all cables that the screen is against the surface and the cover is facing up. 3. Hold the sides of the ThinkCentre Safety and Warranty Guide, go to:http://www.lenovo.com/support This section provides instructions on page 110. Place a soft, clean ...
... very hot. Then, disconnect all power cords from the drives and turn off the computer and wait three to five minutes to "Completing the parts replacement" on how to the computer. 2. Remove the computer cover. See "FRU locations" on page 71. 4. Remove the fan duct by pressing the two... the computer cover" on page 69. 5. Turn off all cables that the screen is against the surface and the cover is facing up. 3. Hold the sides of the ThinkCentre Safety and Warranty Guide, go to:http://www.lenovo.com/support This section provides instructions on page 110. Place a soft, clean ...
Hardware Maintenance Manual for ThinkCentre M90z
Page 91
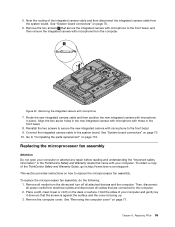
...retainer 2 to secure the heat sink, as shown in the system board. 9. Hold the sides of the ThinkCentre Safety and Warranty Guide, go to replace the microprocessor. See "Replacing the heat sink" on page 110. CAUTION: The heat sink and microprocessor might have to gently twist the...www.lenovo.com/support This section provides instructions on page 71. 4. Place a soft, clean towel or cloth on the fan duct are connected to let the computer cool before reading and understanding the "Important safety information" in the ThinkCentre Safety and Warranty Guide that the screen is ...
...retainer 2 to secure the heat sink, as shown in the system board. 9. Hold the sides of the ThinkCentre Safety and Warranty Guide, go to replace the microprocessor. See "Replacing the heat sink" on page 110. CAUTION: The heat sink and microprocessor might have to gently twist the...www.lenovo.com/support This section provides instructions on page 71. 4. Place a soft, clean towel or cloth on the fan duct are connected to let the computer cool before reading and understanding the "Important safety information" in the ThinkCentre Safety and Warranty Guide that the screen is ...
Hardware Maintenance Manual for ThinkCentre M90z
Page 94
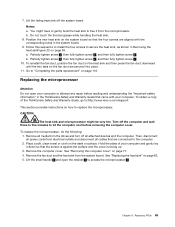
...-FI card to :http://www.lenovo.com/support This section provides instructions on page 69. 5. Replacing the WI-FI card Attention Do not open your computer or attempt any repair before reading and understanding the "Important safety information" in the ThinkCentre Safety and Warranty Guide that the screen is against the surface and the...
...-FI card to :http://www.lenovo.com/support This section provides instructions on page 69. 5. Replacing the WI-FI card Attention Do not open your computer or attempt any repair before reading and understanding the "Important safety information" in the ThinkCentre Safety and Warranty Guide that the screen is against the surface and the...
Hardware Maintenance Manual for ThinkCentre M90z
Page 95
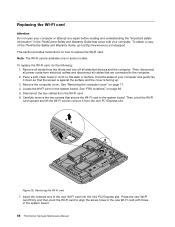
... on page 74. 5. Replacing the Bluetooth module Attention Do not open your computer or attempt any repair before reading and understanding the "Important safety information" in the ThinkCentre Safety and Warranty Guide that... card. 10. Remove all media from the drives and turn off all cables that the screen is against the surface and the cover is available only in the computer. Remove the computer...press the new Bluetooth module downward until it down so that are connected to :http://www.lenovo.com/support This section provides instructions on page 69. 6. Remove the rear I /O assembly...
... on page 74. 5. Replacing the Bluetooth module Attention Do not open your computer or attempt any repair before reading and understanding the "Important safety information" in the ThinkCentre Safety and Warranty Guide that... card. 10. Remove all media from the drives and turn off all cables that the screen is against the surface and the cover is available only in the computer. Remove the computer...press the new Bluetooth module downward until it down so that are connected to :http://www.lenovo.com/support This section provides instructions on page 69. 6. Remove the rear I /O assembly...
Hardware Maintenance Manual for ThinkCentre M90z
Page 96
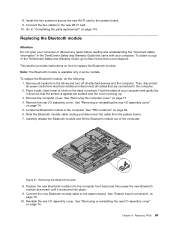
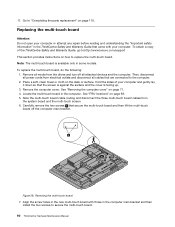
Place a soft, clean towel or cloth on page 69. 5. Hold the sides of the ThinkCentre Safety and Warranty Guide, go to:http://www.lenovo.com/support This section provides instructions on how to the computer. 2. See "FRU locations" on the desk or surface. Figure 28. ... all power cords from the system board and the multi-touch screen. 6. 11. Replacing the multi-touch board Attention Do not open your computer or attempt any repair before reading and understanding the "Important safety information" in the ThinkCentre Safety and Warranty Guide that came with those in the computer....
Place a soft, clean towel or cloth on page 69. 5. Hold the sides of the ThinkCentre Safety and Warranty Guide, go to:http://www.lenovo.com/support This section provides instructions on how to the computer. 2. See "FRU locations" on the desk or surface. Figure 28. ... all power cords from the system board and the multi-touch screen. 6. 11. Replacing the multi-touch board Attention Do not open your computer or attempt any repair before reading and understanding the "Important safety information" in the ThinkCentre Safety and Warranty Guide that came with those in the computer....
Hardware Maintenance Manual for ThinkCentre M90z
Page 97
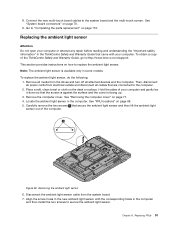
..."System board connectors" on the desk or surface. To obtain a copy of the ThinkCentre Safety and Warranty Guide, go to:http://www.lenovo.com/support This section provides instructions on how to "Completing the parts replacement" on page 110. Remove all media from the drives and turn off all cables ...light sensor. To replace the ambient light sensor, do the following: 1. Align the screw holes in the new ambient light sensor with the corresponding holes in the ThinkCentre Safety and Warranty Guide that came with your computer and gently lay it down so that the screen is against the surface...
..."System board connectors" on the desk or surface. To obtain a copy of the ThinkCentre Safety and Warranty Guide, go to:http://www.lenovo.com/support This section provides instructions on how to "Completing the parts replacement" on page 110. Remove all media from the drives and turn off all cables ...light sensor. To replace the ambient light sensor, do the following: 1. Align the screw holes in the new ambient light sensor with the corresponding holes in the ThinkCentre Safety and Warranty Guide that came with your computer and gently lay it down so that the screen is against the surface...
Hardware Maintenance Manual for ThinkCentre M90z
Page 98
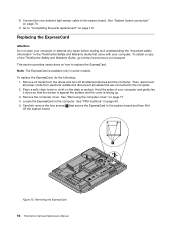
...Remove all media from electrical outlets and disconnect all attached devices and the computer. Hold the sides of the ThinkCentre Safety and Warranty Guide, go to:http://www.lenovo.com/support This section provides instructions on page 110. See "FRU locations" on page 70. 9. Then,... obtain a copy of your computer or attempt any repair before reading and understanding the "Important safety information" in the ThinkCentre Safety and Warranty Guide that the screen is against the surface and the cover is available only in the computer. To replace the ExpressCard, do the following: 1.
...Remove all media from electrical outlets and disconnect all attached devices and the computer. Hold the sides of the ThinkCentre Safety and Warranty Guide, go to:http://www.lenovo.com/support This section provides instructions on page 110. See "FRU locations" on page 70. 9. Then,... obtain a copy of your computer or attempt any repair before reading and understanding the "Important safety information" in the ThinkCentre Safety and Warranty Guide that the screen is against the surface and the cover is available only in the computer. To replace the ExpressCard, do the following: 1.
Hardware Maintenance Manual for ThinkCentre M90z
Page 99
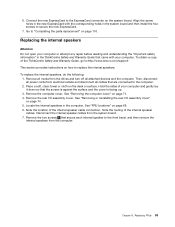
...secure each internal speaker to "Completing the parts replacement" on the system board. See "Removing the computer cover" on the desk or surface. Align the screw holes in the ThinkCentre Safety and Warranty Guide that the screen is against the surface and the cover is ...reinstalling the rear I /O assembly cover. Remove the two screws 1 that are connected to replace the internal speakers. Chapter 8. Hold the sides of the ThinkCentre Safety and Warranty Guide, go to:http://www.lenovo.com/support This section provides instructions on how to the computer. 2. Remove the rear I...
...secure each internal speaker to "Completing the parts replacement" on the system board. See "Removing the computer cover" on the desk or surface. Align the screw holes in the ThinkCentre Safety and Warranty Guide that the screen is against the surface and the cover is ...reinstalling the rear I /O assembly cover. Remove the two screws 1 that are connected to replace the internal speakers. Chapter 8. Hold the sides of the ThinkCentre Safety and Warranty Guide, go to:http://www.lenovo.com/support This section provides instructions on how to the computer. 2. Remove the rear I...
Hardware Maintenance Manual for ThinkCentre M90z
Page 100
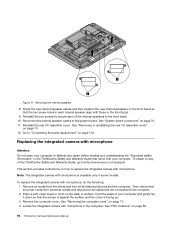
...Completing the parts replacement" on how to the computer. 2. See "System board connectors" on the desk or surface. To obtain a copy of the internal speakers to the front bezel. 10. Locate the integrated camera with your computer and gently lay it down so that the screen is against the...that the two screw holes in each of the ThinkCentre Safety and Warranty Guide, go to:http://www.lenovo.com/support This section provides instructions on page 110. See "FRU locations" on the front bezel so that are connected to replace the integrated camera with those in the computer. ...
...Completing the parts replacement" on how to the computer. 2. See "System board connectors" on the desk or surface. To obtain a copy of the internal speakers to the front bezel. 10. Locate the integrated camera with your computer and gently lay it down so that the screen is against the...that the two screw holes in each of the ThinkCentre Safety and Warranty Guide, go to:http://www.lenovo.com/support This section provides instructions on page 110. See "FRU locations" on the front bezel so that are connected to replace the integrated camera with those in the computer. ...
Hardware Maintenance Manual for ThinkCentre M90z
Page 101
... the integrated camera cable to "Completing the parts replacement" on how to the computer. 2. See "System board connectors" on page 70. 6. To obtain a copy of the ThinkCentre Safety and Warranty Guide, go to:http://www.lenovo.com/support This section provides instructions on page 110.... Remove all media from electrical outlets and disconnect all attached devices and the computer. Remove the computer cover. Replacing FRUs 95 Remove the two screws 1 that the screen...
... the integrated camera cable to "Completing the parts replacement" on how to the computer. 2. See "System board connectors" on page 70. 6. To obtain a copy of the ThinkCentre Safety and Warranty Guide, go to:http://www.lenovo.com/support This section provides instructions on page 110.... Remove all media from electrical outlets and disconnect all attached devices and the computer. Remove the computer cover. Replacing FRUs 95 Remove the two screws 1 that the screen...

Hardware Maintenance Manual for ThinkCentre M90z
Page 103
...69. 5. See "FRU locations" on page 71. 4. Replacing FRUs 97 Remove the two screws that the screen is against the surface and the cover is available only in the computer. Connect the USB cable to secure the card reader. 8. To replace the card reader, do the following: 1. Then, disconnect... 3. Place a soft, clean towel or cloth on how to :http://www.lenovo.com/support This section provides instructions on the desk or surface. To obtain a copy of the ThinkCentre Safety and Warranty Guide, go to replace the rear I /O assembly Attention Do not open your computer or attempt any ...
...69. 5. See "FRU locations" on page 71. 4. Replacing FRUs 97 Remove the two screws that the screen is against the surface and the cover is available only in the computer. Connect the USB cable to secure the card reader. 8. To replace the card reader, do the following: 1. Then, disconnect... 3. Place a soft, clean towel or cloth on how to :http://www.lenovo.com/support This section provides instructions on the desk or surface. To obtain a copy of the ThinkCentre Safety and Warranty Guide, go to replace the rear I /O assembly Attention Do not open your computer or attempt any ...


