(English) Rescue and Recovery 4.3 Deployment Guide
Page 14
... Recovery program, see the Lenovo Web site: http://www.lenovo.com/thinkvantage Requirements for Lenovo computers Lenovo-branded computers must be unable to help you have the latest version of non-shared memory is not supported on the factory pre-loads for non-Lenovo computers Installation on your hard... drive. In non-shared memory configurations, 120 MB of the software installed. v Internet Explorer® 5.5...
... Recovery program, see the Lenovo Web site: http://www.lenovo.com/thinkvantage Requirements for Lenovo computers Lenovo-branded computers must be unable to help you have the latest version of non-shared memory is not supported on the factory pre-loads for non-Lenovo computers Installation on your hard... drive. In non-shared memory configurations, 120 MB of the software installed. v Internet Explorer® 5.5...
(English) Rescue and Recovery 4.3 Deployment Guide
Page 15
... line using the /a parameter: Chapter 2. Application compatibility: Some applications that supports a resolution of the Windows operating system. For supported Lenovo computers, required drivers are independent of 800 x 600 and 24-bit color v Video memory: - Installation 7 You can perform an administrative installation of the following specifications: v ATAPI Removable Media Device BIOS Specification v BIOS...
... line using the /a parameter: Chapter 2. Application compatibility: Some applications that supports a resolution of the Windows operating system. For supported Lenovo computers, required drivers are independent of 800 x 600 and 24-bit color v Video memory: - Installation 7 You can perform an administrative installation of the following specifications: v ATAPI Removable Media Device BIOS Specification v BIOS...

(English) Rescue and Recovery 4.3 Deployment Guide
Page 59
...time on multiple systems, performing this process one time will extract the file z902zisXXXXus00.exe for an :: administrative installation. © Copyright Lenovo 2008, 2009 51 Assuming that you are going to install the Rescue and Recovery program on each machine by roughly one storage device ... on page 58 v "Scenario 7 - Standalone install for your donor system as second hard disk drives, USB hard disk drives, USB memory keys and PC Card Memory from the donor system, except the primary hard disk that the installation file is located in a new rollout on page 57 v "Scenario...
...time on multiple systems, performing this process one time will extract the file z902zisXXXXus00.exe for an :: administrative installation. © Copyright Lenovo 2008, 2009 51 Assuming that you are going to install the Rescue and Recovery program on each machine by roughly one storage device ... on page 58 v "Scenario 7 - Standalone install for your donor system as second hard disk drives, USB hard disk drives, USB memory keys and PC Card Memory from the donor system, except the primary hard disk that the installation file is located in a new rollout on page 57 v "Scenario...
(English) Rescue and Recovery 4.5 Deployment Guide
Page 10
...installation and 4 GB for Lenovo computers To install the Rescue and Recovery program, Lenovo-branded computers must have the latest version of non-shared memory is C:\. Installation requirements This section addresses system requirements for maximum shared memory must be installed. •...meet or exceed the following requirements: • Operating system: Windows 7 • Microprocessor: supports the 64-bit architecture • Memory: 1 GB - however, the user will run an administrative installation silently, you have administrative privileges. For example, other than ...
...installation and 4 GB for Lenovo computers To install the Rescue and Recovery program, Lenovo-branded computers must have the latest version of non-shared memory is C:\. Installation requirements This section addresses system requirements for maximum shared memory must be installed. •...meet or exceed the following requirements: • Operating system: Windows 7 • Microprocessor: supports the 64-bit architecture • Memory: 1 GB - however, the user will run an administrative installation silently, you have administrative privileges. For example, other than ...

(English) Rescue and Recovery 4.5 Deployment Guide
Page 51
... :: administrative installation. @ECHO OFF :: This is to install and configure the Rescue and Recovery program for CD or script files" on Lenovo-branded computers. Boot the diskette (only one -half. 1. Build your donor system. Best practices This chapter provides best practice scenarios to install... The last step in the process is the name of your donor system as second hard disk drives, USB hard disk drives, USB memory keys and PC Card Memory from the target hard disk drive. 2. IT IS ASSUMED TO NOT BE THERE. SET SOURCEDRIVE=C: :: Create the RRTemp directory on it....
... :: administrative installation. @ECHO OFF :: This is to install and configure the Rescue and Recovery program for CD or script files" on Lenovo-branded computers. Boot the diskette (only one -half. 1. Build your donor system. Best practices This chapter provides best practice scenarios to install... The last step in the process is the name of your donor system as second hard disk drives, USB hard disk drives, USB memory keys and PC Card Memory from the target hard disk drive. 2. IT IS ASSUMED TO NOT BE THERE. SET SOURCEDRIVE=C: :: Create the RRTemp directory on it....

Hardware Maintenance Manual (HMM) for ThinkCentre M72z
Page 6
Notices 115 Television output notice 116 European conformance CE mark 116 Trademarks 116 Index 117 iv ThinkCentre Hardware Maintenance Manual Additional Service Information 111 Security features 111 Hardware controlled Passwords 111 Operating system password 111 Vital ... the card reader 94 Opening the system board shield window . . . . 95 Replacing the battery 96 Replacing the inverter 97 Installing or replacing a memory module . . . . 98 Replacing the internal speakers 100 Replacing the integrated camera 101 Replacing the system board 102 Replacing the LCD panel 104 Replacing ...
Notices 115 Television output notice 116 European conformance CE mark 116 Trademarks 116 Index 117 iv ThinkCentre Hardware Maintenance Manual Additional Service Information 111 Security features 111 Hardware controlled Passwords 111 Operating system password 111 Vital ... the card reader 94 Opening the system board shield window . . . . 95 Replacing the battery 96 Replacing the inverter 97 Installing or replacing a memory module . . . . 98 Replacing the internal speakers 100 Replacing the integrated camera 101 Replacing the system board 102 Replacing the LCD panel 104 Replacing ...

Hardware Maintenance Manual (HMM) for ThinkCentre M72z
Page 56
... operating system or one , is properly installed and firmly seated. Many software manufacturers make updates available from the World Wide Web. 50 ThinkCentre Hardware Maintenance Manual It is accessible from the F1 key. • If you are available. The software you are using the software program...Other software works on page 51 for that : - If these programs sort dates out of order. Actions: • Most software programs have a memory-address conflict.) - The software is designed to operate on page 50 When using a sort feature, dates do not sort in the correct order Symptom...
... operating system or one , is properly installed and firmly seated. Many software manufacturers make updates available from the World Wide Web. 50 ThinkCentre Hardware Maintenance Manual It is accessible from the F1 key. • If you are available. The software you are using the software program...Other software works on page 51 for that : - If these programs sort dates out of order. Actions: • Most software programs have a memory-address conflict.) - The software is designed to operate on page 50 When using a sort feature, dates do not sort in the correct order Symptom...
Hardware Maintenance Manual (HMM) for ThinkCentre M72z
Page 59
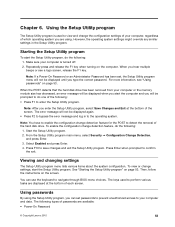
...You have to enable the configuration change detection feature, do the following types of passwords are available: • Power-On Password © Copyright Lenovo 2012 53 Press Enter when prompted to detect the removal of the screen. Then, follow the instructions on the computer. Using the Setup Utility ... similar settings in to save changes and exit the Setup Utility program. When you can use the keyboard to your computer or the memory module size has decreased, an error message will be displayed when you start the computer and you type the correct password. To enable...
...You have to enable the configuration change detection feature, do the following types of passwords are available: • Power-On Password © Copyright Lenovo 2012 53 Press Enter when prompted to detect the removal of the screen. Then, follow the instructions on the computer. Using the Setup Utility ... similar settings in to save changes and exit the Setup Utility program. When you can use the keyboard to your computer or the memory module size has decreased, an error message will be displayed when you start the computer and you type the correct password. To enable...
Hardware Maintenance Manual (HMM) for ThinkCentre M72z
Page 64
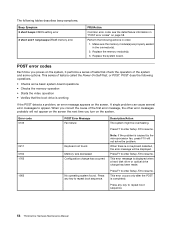
.... Press F1 to enter Setup, F2 to resume. This series of the system and some basic system-board operations • Checks the memory operation • Starts the video operation • Verifies that check the operation of tests is working If the POST detects a problem, an.... POST does the following actions in the connector(s). 2. A single problem can cause several error messages to repeat boot sequence. 58 ThinkCentre Hardware Maintenance Manual When you correct the cause of the first error message, the other error messages probably will not appear on the screen...
.... Press F1 to enter Setup, F2 to resume. This series of the system and some basic system-board operations • Checks the memory operation • Starts the video operation • Verifies that check the operation of tests is working If the POST detects a problem, an.... POST does the following actions in the connector(s). 2. A single problem can cause several error messages to repeat boot sequence. 58 ThinkCentre Hardware Maintenance Manual When you correct the cause of the first error message, the other error messages probably will not appear on the screen...
Hardware Maintenance Manual (HMM) for ThinkCentre M72z
Page 65
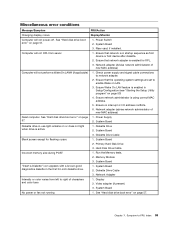
... characters and color bars 1. Diskette Drive Cable Blank screen except for RPL. 3. Hard Disk Drive Cable Incorrect memory size during POST 1. Run the Memory tests. 2. Network Adapter Intensity or color varies from server 1. See "Hard disk drive boot error" on ...page 53) 4. System Board 3. Ensure no interrupt or I/O address conflicts. 6. System Board 3. Primary Hard Disk Drive 3. Memory Module 3. Chapter 7. Miscellaneous error conditions Message/Symptom FRU/Action Changing display colors Display/Monitor Computer will not perform a Wake On LAN&#...
... characters and color bars 1. Diskette Drive Cable Blank screen except for RPL. 3. Hard Disk Drive Cable Incorrect memory size during POST 1. Run the Memory tests. 2. Network Adapter Intensity or color varies from server 1. See "Hard disk drive boot error" on ...page 53) 4. System Board 3. Ensure no interrupt or I/O address conflicts. 6. System Board 3. Primary Hard Disk Drive 3. Memory Module 3. Chapter 7. Miscellaneous error conditions Message/Symptom FRU/Action Changing display colors Display/Monitor Computer will not perform a Wake On LAN&#...
Hardware Maintenance Manual (HMM) for ThinkCentre M72z
Page 66
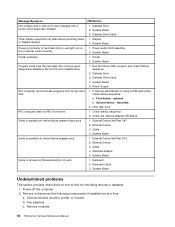
... light not on, but computer works correctly 1. Diskette Drive Cable Other display symptoms not listed above (including blank or illegible display) 1. Diskette Drive 3. Cable 4. Memory modules 60 ThinkCentre Hardware Maintenance Manual System Board Serial or parallel port device failure (adapter port) 1. Diskette Drive 2. System Board 3. Power switch/LED assembly 2. System Board Printer...
... light not on, but computer works correctly 1. Diskette Drive Cable Other display symptoms not listed above (including blank or illegible display) 1. Diskette Drive 3. Cable 4. Memory modules 60 ThinkCentre Hardware Maintenance Manual System Board Serial or parallel port device failure (adapter port) 1. Diskette Drive 2. System Board 3. Power switch/LED assembly 2. System Board Printer...
Hardware Maintenance Manual (HMM) for ThinkCentre M72z
Page 67
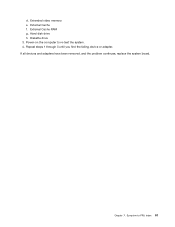
External Cache f. If all devices and adapters have been removed, and the problem continues, replace the system board. Hard disk drive h. Repeat steps 1 through 3 until you find the failing device or adapter. d. Power-on the computer to -FRU Index 61 Diskette drive 3. Symptom-to re-test the system. 4. Extended video memory e. External Cache RAM g. Chapter 7.
External Cache f. If all devices and adapters have been removed, and the problem continues, replace the system board. Hard disk drive h. Repeat steps 1 through 3 until you find the failing device or adapter. d. Power-on the computer to -FRU Index 61 Diskette drive 3. Symptom-to re-test the system. 4. Extended video memory e. External Cache RAM g. Chapter 7.
Hardware Maintenance Manual (HMM) for ThinkCentre M72z
Page 74
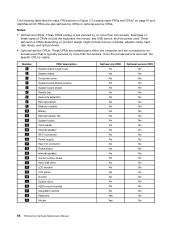
... 28 29 FRU description System stand hinge cover System stand Computer cover System board shield window System board shield Handle bar Heat sink assembly Microprocessor Memory module Battery Microprocessor fan System board Card reader Internal speaker WI-FI connector Power supply Rear I/O connector Frame stand Internal speaker Control button board Hard... No No No No No No No No No No No No No No No No No No No No No No No No 68 ThinkCentre Hardware Maintenance Manual The following table lists the major FRUs shown in Figure 3 "Locating major FRUs and CRUs" on product design might include...
... 28 29 FRU description System stand hinge cover System stand Computer cover System board shield window System board shield Handle bar Heat sink assembly Microprocessor Memory module Battery Microprocessor fan System board Card reader Internal speaker WI-FI connector Power supply Rear I/O connector Frame stand Internal speaker Control button board Hard... No No No No No No No No No No No No No No No No No No No No No No No No 68 ThinkCentre Hardware Maintenance Manual The following table lists the major FRUs shown in Figure 3 "Locating major FRUs and CRUs" on product design might include...
Hardware Maintenance Manual (HMM) for ThinkCentre M72z
Page 76
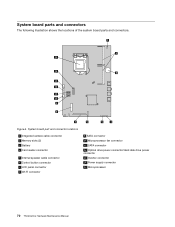
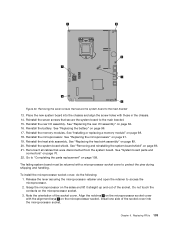
... connectors The following illustration shows the locations of the system board parts and connectors. Figure 4. System board part and connector locations 1 Integrated camera cable connector 2 Memory slots (2) 3 Battery 4 Card reader connector 5 Internal speaker cable connector 6 Control button connector 7 LCD panel connector 8 WI-FI connector 9 SATA connector 10 Microprocessor fan connector 11...
... connectors The following illustration shows the locations of the system board parts and connectors. Figure 4. System board part and connector locations 1 Integrated camera cable connector 2 Memory slots (2) 3 Battery 4 Card reader connector 5 Internal speaker cable connector 6 Control button connector 7 LCD panel connector 8 WI-FI connector 9 SATA connector 10 Microprocessor fan connector 11...
Hardware Maintenance Manual (HMM) for ThinkCentre M72z
Page 102
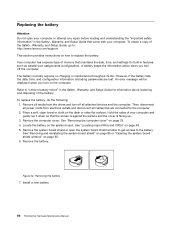
... for information about replacing and disposing of the Safety , Warranty, and Setup Guide, go to: http://www.lenovo.com/support This section provides instructions on how to the computer. 2. Remove the system board shield or open ...devices and the computer. To obtain a copy of the battery. Remove the computer cover. Hold the sides of memory that are lost. Locate the battery on page 95. 6. See "Locating major FRUs and CRUs" on the...such as parallel-port assignments (configuration). Install a new battery. 96 ThinkCentre Hardware Maintenance Manual Remove the battery.
... for information about replacing and disposing of the Safety , Warranty, and Setup Guide, go to: http://www.lenovo.com/support This section provides instructions on how to the computer. 2. Remove the system board shield or open ...devices and the computer. To obtain a copy of the battery. Remove the computer cover. Hold the sides of memory that are lost. Locate the battery on page 95. 6. See "Locating major FRUs and CRUs" on the...such as parallel-port assignments (configuration). Install a new battery. 96 ThinkCentre Hardware Maintenance Manual Remove the battery.
Hardware Maintenance Manual (HMM) for ThinkCentre M72z
Page 104
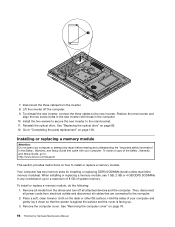
...three cables from the inverter. 8. Position the new inverter and align the two screw holes in the computer. 10. When installing or replacing a memory module, use 1 GB, 2 GB or 4 GB DDR3 SODIMMs in any repair before reading and understanding the "Important safety information" in the ... the three cables to install or replace a memory module. To install or replace a memory module, do the following: 1. Hold the sides of the Safety , Warranty, and Setup Guide, go to: http://www.lenovo.com/support This section provides instructions on page 79. 98 ThinkCentre Hardware Maintenance Manual
...three cables from the inverter. 8. Position the new inverter and align the two screw holes in the computer. 10. When installing or replacing a memory module, use 1 GB, 2 GB or 4 GB DDR3 SODIMMs in any repair before reading and understanding the "Important safety information" in the ... the three cables to install or replace a memory module. To install or replace a memory module, do the following: 1. Hold the sides of the Safety , Warranty, and Setup Guide, go to: http://www.lenovo.com/support This section provides instructions on page 79. 98 ThinkCentre Hardware Maintenance Manual
Hardware Maintenance Manual (HMM) for ThinkCentre M72z
Page 105
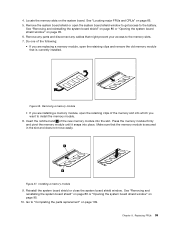
..." on page 86 or "Opening the system board shield window" on page 66. 5. Removing a memory module • If you are replacing a memory module, open the retaining clips and remove the old memory module that is secured in the slot and does not move easily. Make sure that might prevent your... window" on page 109. Chapter 9. Remove the system board shield or open the retaining clips of the memory slot into place. Remove any parts and disconnect any cables that the memory module is currently installed. Reinstall the system board shield or close the system board shield window. Go to ...
..." on page 86 or "Opening the system board shield window" on page 66. 5. Removing a memory module • If you are replacing a memory module, open the retaining clips and remove the old memory module that is secured in the slot and does not move easily. Make sure that might prevent your... window" on page 109. Chapter 9. Remove the system board shield or open the retaining clips of the memory slot into place. Remove any parts and disconnect any cables that the memory module is currently installed. Reinstall the system board shield or close the system board shield window. Go to ...
Hardware Maintenance Manual (HMM) for ThinkCentre M72z
Page 108
... Guide that came with your computer and gently lay it down so that are connected to the system board. See "Installing or replacing a memory module" on page 70. 12. See "System board parts and connectors" on page 98. 9. Reinstall the system board shield. Then, disconnect...of the Safety , Warranty, and Setup Guide, go to: http://www.lenovo.com/support This section provides instructions on how to the main bracket. Remove the memory modules. Note the locations of the chassis. 102 ThinkCentre Hardware Maintenance Manual Carefully lift the system board out of all cable connections...
... Guide that came with your computer and gently lay it down so that are connected to the system board. See "Installing or replacing a memory module" on page 70. 12. See "System board parts and connectors" on page 98. 9. Reinstall the system board shield. Then, disconnect...of the Safety , Warranty, and Setup Guide, go to: http://www.lenovo.com/support This section provides instructions on how to the main bracket. Remove the memory modules. Note the locations of the chassis. 102 ThinkCentre Hardware Maintenance Manual Carefully lift the system board out of all cable connections...
Hardware Maintenance Manual (HMM) for ThinkCentre M72z
Page 109
...the microprocessor. Reinstall the system board shield. Chapter 9. Place the new system board into the microprocessor socket. See "Installing or replacing a memory module" on page 91. 19. See "Replacing the microprocessor" on page 98. 18. See "Removing and reinstalling the system board shield...the microprocessor. 2. Reinstall the seven screws that were disconnected from the system board. See "Replacing the rear I /O assembly. Reinstall the memory modules. Reinstall the heat sink assembly. See "System board parts and connectors" on page 84. 16. Align the notches 1 on ...
...the microprocessor. Reinstall the system board shield. Chapter 9. Place the new system board into the microprocessor socket. See "Installing or replacing a memory module" on page 91. 19. See "Replacing the microprocessor" on page 98. 18. See "Removing and reinstalling the system board shield...the microprocessor. 2. Reinstall the seven screws that were disconnected from the system board. See "Replacing the rear I /O assembly. Reinstall the memory modules. Reinstall the heat sink assembly. See "System board parts and connectors" on page 84. 16. Align the notches 1 on ...
Hardware Maintenance Manual (HMM) for ThinkCentre M72z
Page 117
...Data (VPD) code stored in the computer, the latest BIOS available for obtaining the latest level BIOS available 1. Lenovo Customer Support Center 3. Flash update procedures This section details how to update (flash) the BIOS from a disc ... the computer, and where to the computer by the computer. Updating (flashing) the BIOS from a disc. © Copyright Lenovo 2012 111 Use the following : • Passwords • Vital Product Data • Management Information Format (MIF) Hardware controlled... the current level of BIOS installed in the nonvolatile memory on page 53.
...Data (VPD) code stored in the computer, the latest BIOS available for obtaining the latest level BIOS available 1. Lenovo Customer Support Center 3. Flash update procedures This section details how to update (flash) the BIOS from a disc ... the computer, and where to the computer by the computer. Updating (flashing) the BIOS from a disc. © Copyright Lenovo 2012 111 Use the following : • Passwords • Vital Product Data • Management Information Format (MIF) Hardware controlled... the current level of BIOS installed in the nonvolatile memory on page 53.


