Hardware Maintenance Manual (HMM) for ThinkCentre Edge 72
Page 39
... and to the appropriate monitor connector on the computer. • The monitor power cord is securely connected to a USB connector on the graphics card. Verify that it is switched on. • The power indicator on the front of the computer is on the computer. • ... help you troubleshoot your country or region. The keyboard does not work . Basic troubleshooting The following table provides information to the Lenovo Support Web site at the electrical outlet for additional troubleshooting resources. Symptom The computer does not start when you cannot correct the problem...
... and to the appropriate monitor connector on the computer. • The monitor power cord is securely connected to a USB connector on the graphics card. Verify that it is switched on. • The power indicator on the front of the computer is on the computer. • ... help you troubleshoot your country or region. The keyboard does not work . Basic troubleshooting The following table provides information to the Lenovo Support Web site at the electrical outlet for additional troubleshooting resources. Symptom The computer does not start when you cannot correct the problem...
Hardware Maintenance Manual (HMM) for ThinkCentre Edge 72
Page 72
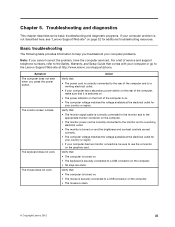
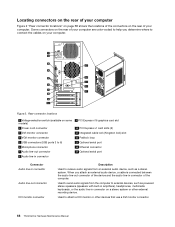
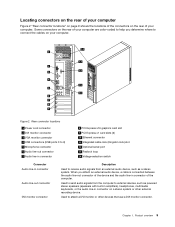
...headphones, multimedia keyboards, or the audio line-in connector on a stereo system or other devices that use a DVI monitor connector. 68 ThinkCentre Hardware Maintenance Manual When you determine where to external devices, such as a stereo system. Rear connector locations 1 Voltage-selection switch (...(USB ports 3 to 6) 6 Microphone connector 7 Audio line-out connector 8 Audio line-in connector 9 PCI Express x16 graphics card slot 10 PCI Express x1 card slots (2) 11 Integrated cable lock (Kingston lock) slot 12 Padlock loop 13 Optional serial port 14 Ethernet connector 15 Optional ...
...headphones, multimedia keyboards, or the audio line-in connector on a stereo system or other devices that use a DVI monitor connector. 68 ThinkCentre Hardware Maintenance Manual When you determine where to external devices, such as a stereo system. Rear connector locations 1 Voltage-selection switch (...(USB ports 3 to 6) 6 Microphone connector 7 Audio line-out connector 8 Audio line-in connector 9 PCI Express x16 graphics card slot 10 PCI Express x1 card slots (2) 11 Integrated cable lock (Kingston lock) slot 12 Padlock loop 13 Optional serial port 14 Ethernet connector 15 Optional ...

Hardware Maintenance Manual (HMM) for ThinkCentre Edge 72
Page 76
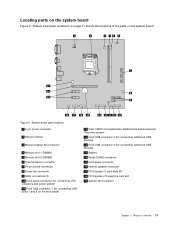
Figure 4. Locating parts on the system board Figure 4 "System board part locations" on page 72 shows the locations of the parts on the front bezel) 12 Clear CMOS (Complementary Metal Oxide Semiconductor) /Recovery jumper 13 ... USB devices) 15 Battery 16 Serial (COM2) connector 17 Front audio connector 18 Internal speaker connector 19 PCI Express x1 card slots (2) 20 PCI Express x16 graphics card slot 21 System fan connector 72 ThinkCentre Hardware Maintenance Manual System board part locations 1 4-pin power connector 2 Microprocessor 3 Microprocessor fan connector 4 Memory slot 1 (DIMM1...
Figure 4. Locating parts on the system board Figure 4 "System board part locations" on page 72 shows the locations of the parts on the front bezel) 12 Clear CMOS (Complementary Metal Oxide Semiconductor) /Recovery jumper 13 ... USB devices) 15 Battery 16 Serial (COM2) connector 17 Front audio connector 18 Internal speaker connector 19 PCI Express x1 card slots (2) 20 PCI Express x16 graphics card slot 21 System fan connector 72 ThinkCentre Hardware Maintenance Manual System board part locations 1 4-pin power connector 2 Microprocessor 3 Microprocessor fan connector 4 Memory slot 1 (DIMM1...
Hardware Maintenance Manual (HMM) for ThinkCentre Edge 72
Page 79
... monitor connector 3 VGA monitor connector 4 USB connectors (USB ports 3 to 6) 5 Microphone connector 6 Audio line-out connector 7 Audio line-in connector 8 PCI Express x16 graphics card slot 9 PCI Express x1 card slots (2) 10 Ethernet connector 11 Integrated cable lock (Kingston lock) slot 12 Optional serial port 13 Padlock loop 14 Voltage-selection switch Connector...
... monitor connector 3 VGA monitor connector 4 USB connectors (USB ports 3 to 6) 5 Microphone connector 6 Audio line-out connector 7 Audio line-in connector 8 PCI Express x16 graphics card slot 9 PCI Express x1 card slots (2) 10 Ethernet connector 11 Integrated cable lock (Kingston lock) slot 12 Optional serial port 13 Padlock loop 14 Voltage-selection switch Connector...

Hardware Maintenance Manual (HMM) for ThinkCentre Edge 72
Page 83
... USB connector 1 (for connecting additional USB devices) 15 Battery 16 Serial (COM2) connector 17 Front audio connector 18 Internal speaker connector 19 PCI Express x1 card slots (2) 20 PCI Express x16 graphics card slot 21 System fan connector Chapter 8.
... USB connector 1 (for connecting additional USB devices) 15 Battery 16 Serial (COM2) connector 17 Front audio connector 18 Internal speaker connector 19 PCI Express x1 card slots (2) 20 PCI Express x16 graphics card slot 21 System fan connector Chapter 8.
Hardware Maintenance Manual (HMM) for ThinkCentre Edge 72
Page 88
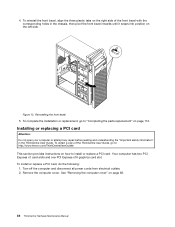
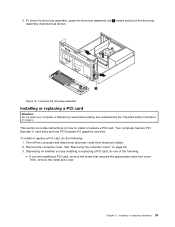
...lenovo.com/ThinkCentreUserGuides This section provides instructions on how to "Completing the parts replacement" on the left side. Remove the computer cover. Figure 13. To install or replace a PCI card, do the following: 1. To obtain a copy of the front bezel with the corresponding holes in the ThinkCentre... User Guide. Your computer has two PCI Express x1 card slots and one PCI Express x16 graphics card slot. Reinstalling the front bezel 5. ...
...lenovo.com/ThinkCentreUserGuides This section provides instructions on how to "Completing the parts replacement" on the left side. Remove the computer cover. Figure 13. To install or replace a PCI card, do the following: 1. To obtain a copy of the front bezel with the corresponding holes in the ThinkCentre... User Guide. Your computer has two PCI Express x1 card slots and one PCI Express x16 graphics card slot. Reinstalling the front bezel 5. ...

Hardware Maintenance Manual (HMM) for ThinkCentre Edge 72
Page 90
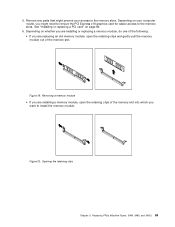
... slot. 5. Note: If you install the graphics card. 86 ThinkCentre Hardware Maintenance Manual Install the new PCI card into the card slot. Figure 15. If the card is removed from its static-protective package. 6. Remove the new PCI card from the card slot. The card fits tightly into the appropriate slot on page 72. See "Locating parts on the system...
... slot. 5. Note: If you install the graphics card. 86 ThinkCentre Hardware Maintenance Manual Install the new PCI card into the card slot. Figure 15. If the card is removed from its static-protective package. 6. Remove the new PCI card from the card slot. The card fits tightly into the appropriate slot on page 72. See "Locating parts on the system...
Hardware Maintenance Manual (HMM) for ThinkCentre Edge 72
Page 93
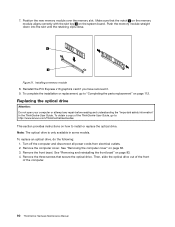
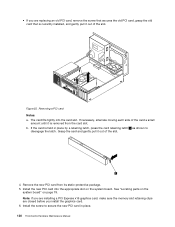
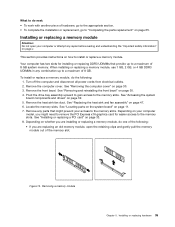
...: 3484, 3485, and 3492) 89 Figure 20. Remove any parts that might prevent your computer model, you might need to remove the PCI Express x16 graphics card for easier access to the memory slots. Opening the retaining clips Chapter 9. Removing a memory module • If you are installing a memory module, open the retaining... memory module out of the following: • If you want to the memory slots. Depending on page 84. 6. Figure 19. 5. See "Installing or replacing a PCI card" on your access to install the memory module.
...: 3484, 3485, and 3492) 89 Figure 20. Remove any parts that might prevent your computer model, you might need to remove the PCI Express x16 graphics card for easier access to the memory slots. Opening the retaining clips Chapter 9. Removing a memory module • If you are installing a memory module, open the retaining... memory module out of the following: • If you want to the memory slots. Depending on page 84. 6. Figure 19. 5. See "Installing or replacing a PCI card" on your access to install the memory module.
Hardware Maintenance Manual (HMM) for ThinkCentre Edge 72
Page 94
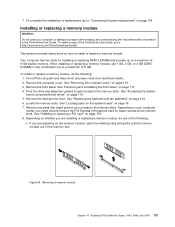
To complete the installation or replacement, go to: http://www.lenovo.com/ThinkCentreUserGuides This section provides instructions on how to "Completing the parts replacement" on the system board. Replacing the optical drive Attention: Do not open .... See "Removing the computer cover" on page 83. 4. 7. Note: The optical drive is only available in the ThinkCentre User Guide. Turn off the computer and disconnect all power cords from electrical outlets. 2. Position the new memory module over the memory slot. Reinstall the PCI Express x16 graphics card if you have removed it. 9.
To complete the installation or replacement, go to: http://www.lenovo.com/ThinkCentreUserGuides This section provides instructions on how to "Completing the parts replacement" on the system board. Replacing the optical drive Attention: Do not open .... See "Removing the computer cover" on page 83. 4. 7. Note: The optical drive is only available in the ThinkCentre User Guide. Turn off the computer and disconnect all power cords from electrical outlets. 2. Position the new memory module over the memory slot. Reinstall the PCI Express x16 graphics card if you have removed it. 9.
Hardware Maintenance Manual (HMM) for ThinkCentre Edge 72
Page 123
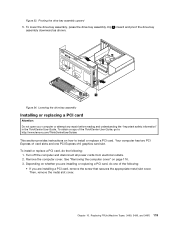
... Your computer has two PCI Express x1 card slots and one of the ThinkCentre User Guide, go to install or replace a PCI card. To install or replace a PCI card, do one PCI Express x16 graphics card slot. Figure 54. See "Removing the computer cover" on how to : http://www.lenovo.com/ThinkCentreUserGuides This section provides instructions on...
... Your computer has two PCI Express x1 card slots and one of the ThinkCentre User Guide, go to install or replace a PCI card. To install or replace a PCI card, do one PCI Express x16 graphics card slot. Figure 54. See "Removing the computer cover" on how to : http://www.lenovo.com/ThinkCentreUserGuides This section provides instructions on...
Hardware Maintenance Manual (HMM) for ThinkCentre Edge 72
Page 124
...ThinkCentre Hardware Maintenance Manual If necessary, alternate moving each side of the card a small amount until it is currently installed, and gently pull it out of the slot. Install the new PCI card into the card slot. Grasp the card and gently pull it out of the slot. 4. Figure 55. Note: If you install the graphics card... before you are installing a PCI Express x16 graphics card, make sure the memory slot retaining clips are replacing an old PCI card, remove the screw that secures the old PCI card, grasp the old card that is removed from its static-protective package...
...ThinkCentre Hardware Maintenance Manual If necessary, alternate moving each side of the card a small amount until it is currently installed, and gently pull it out of the slot. Install the new PCI card into the card slot. Grasp the card and gently pull it out of the slot. 4. Figure 55. Note: If you install the graphics card... before you are installing a PCI Express x16 graphics card, make sure the memory slot retaining clips are replacing an old PCI card, remove the screw that secures the old PCI card, grasp the old card that is removed from its static-protective package...
Hardware Maintenance Manual (HMM) for ThinkCentre Edge 72
Page 125
... or replacing DDR3 UDIMMs that might need to remove the PCI Express x16 graphics card for easier access to "Completing the parts replacement" on how to a ...access to the memory slots. To complete the installation or replacement, go to: http://www.lenovo.com/ThinkCentreUserGuides This section provides instructions on page 154. See "Replacing the heat sink and fan...reinstalling the front bezel" on page 118. 5. Remove any parts that provide up to a maximum of the ThinkCentre User Guide, go to the memory slots. Removing a memory module Chapter 10. When installing or replacing a ...
... or replacing DDR3 UDIMMs that might need to remove the PCI Express x16 graphics card for easier access to "Completing the parts replacement" on how to a ...access to the memory slots. To complete the installation or replacement, go to: http://www.lenovo.com/ThinkCentreUserGuides This section provides instructions on page 154. See "Replacing the heat sink and fan...reinstalling the front bezel" on page 118. 5. Remove any parts that provide up to a maximum of the ThinkCentre User Guide, go to the memory slots. Removing a memory module Chapter 10. When installing or replacing a ...

Hardware Maintenance Manual (HMM) for ThinkCentre Edge 72
Page 126
...the "Important safety information" in features, such as parallel-port assignments (configuration). Reinstall the PCI Express x16 graphics card if you turn off the computer. 122 ThinkCentre Hardware Maintenance Manual A battery keeps this information active when you have removed it. 11. Position the new memory... straight down into which you want to : http://www.lenovo.com/ThinkCentreUserGuides Your computer has a special type of the memory slot into the slot until the retaining clips close. To obtain a copy of the ThinkCentre User Guide, go to "Completing the parts replacement" on...
...the "Important safety information" in features, such as parallel-port assignments (configuration). Reinstall the PCI Express x16 graphics card if you turn off the computer. 122 ThinkCentre Hardware Maintenance Manual A battery keeps this information active when you have removed it. 11. Position the new memory... straight down into which you want to : http://www.lenovo.com/ThinkCentreUserGuides Your computer has a special type of the memory slot into the slot until the retaining clips close. To obtain a copy of the ThinkCentre User Guide, go to "Completing the parts replacement" on...
(English) User Guide
Page 13
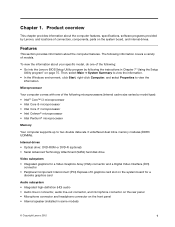
... drive Video subsystem • Integrated graphics for a Video Graphics Array (VGA) connector and a Digital Video Interface (DVI) connector • Peripheral Component Interconnect (PCI) Express x16 graphics card slot on the system board for a discrete graphics card Audio subsystem • Integrated high-...). The following the instructions in some models) © Copyright Lenovo 2012 1 Features This section provides information about the computer features, specifications, software programs provided by Lenovo, and locations of models. Microprocessor Your computer comes with one...
... drive Video subsystem • Integrated graphics for a Video Graphics Array (VGA) connector and a Digital Video Interface (DVI) connector • Peripheral Component Interconnect (PCI) Express x16 graphics card slot on the system board for a discrete graphics card Audio subsystem • Integrated high-...). The following the instructions in some models) © Copyright Lenovo 2012 1 Features This section provides information about the computer features, specifications, software programs provided by Lenovo, and locations of models. Microprocessor Your computer comes with one...
(English) User Guide
Page 15
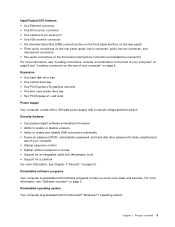
..." on page 9. Expansion • One hard disk drive bay • One optical drive bay • One PCI Express x16 graphics card slot • One slim card reader drive bay • Two PCI Express x1 card slots Power supply Your computer comes with a 180-watt power supply with the Microsoft® Windows® 7 operating system...
..." on page 9. Expansion • One hard disk drive bay • One optical drive bay • One PCI Express x16 graphics card slot • One slim card reader drive bay • Two PCI Express x1 card slots Power supply Your computer comes with a 180-watt power supply with the Microsoft® Windows® 7 operating system...
(English) User Guide
Page 21
... monitor connector 3 VGA monitor connector 4 USB connectors (USB ports 3 to 6) 5 Microphone connector 6 Audio line-out connector 7 Audio line-in connector 8 PCI Express x16 graphics card slot 9 PCI Express x1 card slots (2) 10 Ethernet connector 11 Integrated cable lock (Kingston lock) slot 12 Optional serial port 13 Padlock loop 14 Voltage-selection switch Connector...
... monitor connector 3 VGA monitor connector 4 USB connectors (USB ports 3 to 6) 5 Microphone connector 6 Audio line-out connector 7 Audio line-in connector 8 PCI Express x16 graphics card slot 9 PCI Express x1 card slots (2) 10 Ethernet connector 11 Integrated cable lock (Kingston lock) slot 12 Optional serial port 13 Padlock loop 14 Voltage-selection switch Connector...
(English) User Guide
Page 23
... 3 (for connecting additional USB devices) 15 Battery 16 Serial (COM2) connector 17 Front audio connector 18 Internal speaker connector 19 PCI Express x1 card slots (2) 20 PCI Express x16 graphics card slot 21 System fan connector Chapter 1. Product overview 11 Figure 4. System board part locations 1 4-pin power connector 2 Microprocessor 3 Microprocessor fan connector 4 Memory...
... 3 (for connecting additional USB devices) 15 Battery 16 Serial (COM2) connector 17 Front audio connector 18 Internal speaker connector 19 PCI Express x1 card slots (2) 20 PCI Express x16 graphics card slot 21 System fan connector Chapter 1. Product overview 11 Figure 4. System board part locations 1 4-pin power connector 2 Microprocessor 3 Microprocessor fan connector 4 Memory...
(English) User Guide
Page 45
... provides instructions on page 30. 3. To install or replace a PCI card, do one PCI Express x16 graphics card slot. Turn off the computer and disconnect all power cords from electrical outlets. 2. See "Removing the computer cover" on how to install or replace a PCI card. Depending on page v. Figure 13. Lowering the drive bay assembly...
... provides instructions on page 30. 3. To install or replace a PCI card, do one PCI Express x16 graphics card slot. Turn off the computer and disconnect all power cords from electrical outlets. 2. See "Removing the computer cover" on how to install or replace a PCI card. Depending on page v. Figure 13. Lowering the drive bay assembly...

(English) User Guide
Page 46
... installing a PCI Express x16 graphics card, make sure the memory slot retaining clips are replacing an old PCI card, remove the screw that secures the old PCI card, grasp the old card that is currently installed, and gently pull it is held in place. 34 ThinkCentre User Guide Figure 14. If the card is removed from its...
... installing a PCI Express x16 graphics card, make sure the memory slot retaining clips are replacing an old PCI card, remove the screw that secures the old PCI card, grasp the old card that is currently installed, and gently pull it is held in place. 34 ThinkCentre User Guide Figure 14. If the card is removed from its...
(English) User Guide
Page 47
Depending on your computer model, you might need to remove the PCI Express x16 graphics card for installing or replacing DDR3 UDIMMs that might prevent your computer or attempt any parts that provide up to a maximum of 8 GB. Your computer has ... on page 11. 7. Remove the computer cover. Pivot the drive bay assembly upward to gain access to the memory slots. See "Installing or replacing a PCI card" on page 47. 6. Turn off the computer and disconnect all power cords from electrical outlets. 2. See "Replacing the heat sink and fan assembly" on page...
Depending on your computer model, you might need to remove the PCI Express x16 graphics card for installing or replacing DDR3 UDIMMs that might prevent your computer or attempt any parts that provide up to a maximum of 8 GB. Your computer has ... on page 11. 7. Remove the computer cover. Pivot the drive bay assembly upward to gain access to the memory slots. See "Installing or replacing a PCI card" on page 47. 6. Turn off the computer and disconnect all power cords from electrical outlets. 2. See "Replacing the heat sink and fan assembly" on page...


