Safety and Warranty guide
Page 17
... options installed The notice below applies to products containing television (TV) tuner devices that connect to external antennas or to cable/CATV systems, or both, and that the cable ground shall be connected 12 Safety and warranty guide If you suspect a problem with optical ...installer's attention to the beam. Do not stare into the beam, do not view directly with one of the National Electrical Code (NEC) that has the following . Note the following label attached. Laser radiation when open. Hazardous voltage, current, and energy levels are no serviceable parts inside any part...
... options installed The notice below applies to products containing television (TV) tuner devices that connect to external antennas or to cable/CATV systems, or both, and that the cable ground shall be connected 12 Safety and warranty guide If you suspect a problem with optical ...installer's attention to the beam. Do not stare into the beam, do not view directly with one of the National Electrical Code (NEC) that has the following . Note the following label attached. Laser radiation when open. Hazardous voltage, current, and energy levels are no serviceable parts inside any part...
Safety and Warranty guide
Page 28
...: +61 2 8003 8200. The warranty period for the product starts on the original date of warranty service that apply to a covered defect during the warranty period, Lenovo will provide you purchase is free from defects in Part 1: What this Warranty Covers: Lenovo warrants that each hardware product that you a remedy under normal use and conditions during the warranty period. Warranty...
...: +61 2 8003 8200. The warranty period for the product starts on the original date of warranty service that apply to a covered defect during the warranty period, Lenovo will provide you purchase is free from defects in Part 1: What this Warranty Covers: Lenovo warrants that each hardware product that you a remedy under normal use and conditions during the warranty period. Warranty...
Safety and Warranty guide
Page 29
... added to your property. Neither Lenovo nor the Service Provider is capable of retaining user-generated data. The replacement product or part provided by refurbished products or parts of the same type rather than being repaired. Refurbished parts may result in good working order and at least functionally equivalent to the original product or part. and repair of the product may be used to repair...
... added to your property. Neither Lenovo nor the Service Provider is capable of retaining user-generated data. The replacement product or part provided by refurbished products or parts of the same type rather than being repaired. Refurbished parts may result in good working order and at least functionally equivalent to the original product or part. and repair of the product may be used to repair...
Lenovo H5 Series User Guide
Page 8
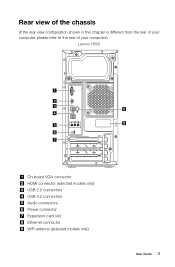
Rear view of the chassis (If the rear view configuration shown in this chapter is different from the rear of your computer, please refer to the rear of your computer.) Lenovo H505 On-board VGA connector HDMI connector (selected models only) USB 2.0 connectors USB 3.0 connectors Audio connectors Power connector Expansion card slot Ethernet connector WiFi antenna (selected models only) User Guide 3
Rear view of the chassis (If the rear view configuration shown in this chapter is different from the rear of your computer, please refer to the rear of your computer.) Lenovo H505 On-board VGA connector HDMI connector (selected models only) USB 2.0 connectors USB 3.0 connectors Audio connectors Power connector Expansion card slot Ethernet connector WiFi antenna (selected models only) User Guide 3
Lenovo H5 Series User Guide
Page 10
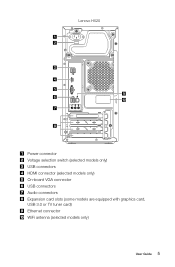
Lenovo H520 Power connector Voltage selection switch (selected models only) USB connectors HDMI connector (selected models only) On-board VGA connector USB connectors Audio connectors Expansion card slots (some models are equipped with graphics card, USB 3.0 or TV tuner card) Ethernet connector WiFi antenna (selected models only) User Guide 5
Lenovo H520 Power connector Voltage selection switch (selected models only) USB connectors HDMI connector (selected models only) On-board VGA connector USB connectors Audio connectors Expansion card slots (some models are equipped with graphics card, USB 3.0 or TV tuner card) Ethernet connector WiFi antenna (selected models only) User Guide 5
Lenovo H5 Series User Guide
Page 26
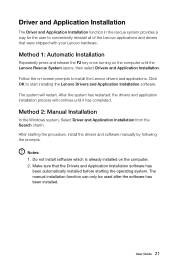
... the Lenovo Rescue System opens, then select Drivers and Application Installation. Method 2: Manual Installation In the Windows system, Select Driver and Application Installation from the Search charm. After starting the operating system. Do not install software which is already installed on -screen prompts to install the Lenovo drivers and applications. The manual installation function can only be used after the software has been installed. Method 1: Automatic Installation Repeatedly press and release the F2 key once turning...
... the Lenovo Rescue System opens, then select Drivers and Application Installation. Method 2: Manual Installation In the Windows system, Select Driver and Application Installation from the Search charm. After starting the operating system. Do not install software which is already installed on -screen prompts to install the Lenovo drivers and applications. The manual installation function can only be used after the software has been installed. Method 1: Automatic Installation Repeatedly press and release the F2 key once turning...

Lenovo H5 Series User Guide
Page 31
... device does not work, ensure that the device is properly connected. • If an error message appears on the monitor. Solving Problems Follow these tips when troubleshooting your computer: • If you added or removed a part before the problem started, review the installation procedures to see if the monitor power cord is loose; Troubleshooting Display Problems Problem: Blank screen or no image is displayed on the screen, write down the computer then connect the signal cable of...
... device does not work, ensure that the device is properly connected. • If an error message appears on the monitor. Solving Problems Follow these tips when troubleshooting your computer: • If you added or removed a part before the problem started, review the installation procedures to see if the monitor power cord is loose; Troubleshooting Display Problems Problem: Blank screen or no image is displayed on the screen, write down the computer then connect the signal cable of...

Lenovo H5 Series User Guide
Page 35
... to start the BIOS setup utility and select Startup → Boot Priority, then set boot mode to UEFI or Legacy support on the boot menu. Repeatedly press and release the F1 key once turning on your computer is the UEFI mode. There are two boot modes: UEFI and Legacy. BIOS setup utility What is ROM-based software. The BIOS setup utility is the BIOS setup utility? To change the boot mode? The legacy Windows operating system cannot be installed if you have a problem with the operating...
... to start the BIOS setup utility and select Startup → Boot Priority, then set boot mode to UEFI or Legacy support on the boot menu. Repeatedly press and release the F1 key once turning on your computer is the UEFI mode. There are two boot modes: UEFI and Legacy. BIOS setup utility What is ROM-based software. The BIOS setup utility is the BIOS setup utility? To change the boot mode? The legacy Windows operating system cannot be installed if you have a problem with the operating...
Lenovo H5 Series User Guide
Page 39
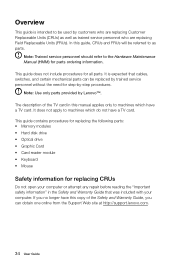
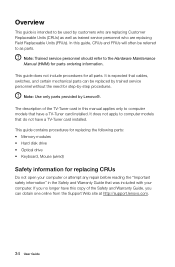
... need for replacing CRUs Do not open your computer. Note: Trained service personnel should refer to the Hardware Maintenance Manual (HMM) for all parts. The description of the Safety and Warranty Guide, you no longer have a TV card. This guide contains procedures for replacing the following parts: • Memory modules • Hard disk drive • Optical drive • Graphic Card • Card reader module • Keyboard • Mouse Safety information for step-by Lenovo™. Note: Use...
... need for replacing CRUs Do not open your computer. Note: Trained service personnel should refer to the Hardware Maintenance Manual (HMM) for all parts. The description of the Safety and Warranty Guide, you no longer have a TV card. This guide contains procedures for replacing the following parts: • Memory modules • Hard disk drive • Optical drive • Graphic Card • Card reader module • Keyboard • Mouse Safety information for step-by Lenovo™. Note: Use...
Lenovo H5s Series User Guide
Page 12
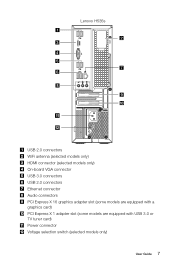
Lenovo H535s 11 12 USB 2.0 connectors WiFi antenna (selected models only) HDMI connector (selected models only) On-board VGA connector USB 3.0 connectors USB 2.0 connectors Ethernet connector Audio connectors PCI Express X 16 graphics adapter slot (some models are equipped with a graphics card) PCI Express X 1 adapter slot (some models are equipped with USB 3.0 or TV tuner card) Power connector Voltage selection switch (selected models only) User Guide 7
Lenovo H535s 11 12 USB 2.0 connectors WiFi antenna (selected models only) HDMI connector (selected models only) On-board VGA connector USB 3.0 connectors USB 2.0 connectors Ethernet connector Audio connectors PCI Express X 16 graphics adapter slot (some models are equipped with a graphics card) PCI Express X 1 adapter slot (some models are equipped with USB 3.0 or TV tuner card) Power connector Voltage selection switch (selected models only) User Guide 7
Lenovo H5s Series User Guide
Page 39
... following parts: • Memory modules • Hard disk drive • Optical drive • Keyboard, Mouse (wired) Safety information for all parts. In this manual applies only to computer models that do not have a TV-Tuner card installed. If you can be replaced by -step procedures. Overview This guide is expected that cables, switches, and certain mechanical parts can obtain one online from the Support Web site at http://support.lenovo.com. 34 User Guide This guide...
... following parts: • Memory modules • Hard disk drive • Optical drive • Keyboard, Mouse (wired) Safety information for all parts. In this manual applies only to computer models that do not have a TV-Tuner card installed. If you can be replaced by -step procedures. Overview This guide is expected that cables, switches, and certain mechanical parts can obtain one online from the Support Web site at http://support.lenovo.com. 34 User Guide This guide...

Lenovo H5s Series User Guide
Page 42
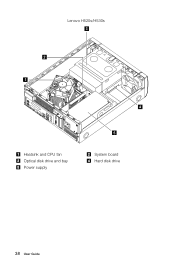
Internal components The following illustrations show the components inside your computer. Lenovo H505s/H515s 3 2 1 4 Heatsink and CPU fan Optical disk drive and bay System board Hard disk drive User Guide 37
Internal components The following illustrations show the components inside your computer. Lenovo H505s/H515s 3 2 1 4 Heatsink and CPU fan Optical disk drive and bay System board Hard disk drive User Guide 37
Lenovo H5s Series User Guide
Page 43
Lenovo H520s/H530s 3 2 1 Heatsink and CPU fan Optical disk drive and bay Power supply 4 5 System board Hard disk drive 38 User Guide
Lenovo H520s/H530s 3 2 1 Heatsink and CPU fan Optical disk drive and bay Power supply 4 5 System board Hard disk drive 38 User Guide

Lenovo H5s Series User Guide
Page 56
... in . Install the new hard disk drive. (1) Insert the new hard disk drive into the drive bay. (2) Screw back the 4 screws on the drive bay. 9. Reattach the optical drive disk bay. Refer to the Support Web site at http://support.lenovo.com. Replacing a memory module Attention: Do not remove the computer cover or attempt any repair before reading the "Important safety information" in the Safety and Warranty Guide that secure the hard disk drive to the...
... in . Install the new hard disk drive. (1) Insert the new hard disk drive into the drive bay. (2) Screw back the 4 screws on the drive bay. 9. Reattach the optical drive disk bay. Refer to the Support Web site at http://support.lenovo.com. Replacing a memory module Attention: Do not remove the computer cover or attempt any repair before reading the "Important safety information" in the Safety and Warranty Guide that secure the hard disk drive to the...
Lenovo H530s Hardware Maintenance Manual
Page 5
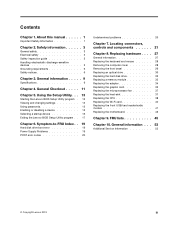
...29 Replacing an optical drive 30 Replacing the hard disk drive 32 Replacing a memory module 33 Replacing the adapter 34 Replacing the graphic card 35 Replacing the microprocessor fan 37 Replacing the heat-sink 37 Replacing the CPU 38 Replacing the Wi-Fi card 40 Replacing the front USB/card reader/audio module 41 Replacing the motherboard 42 Chapter 9. About this manual 1 Important Safety Information 1 Chapter 2. Using the Setup Utility. . . 13 Starting the Lenovo BIOS Setup Utility program . 13 Viewing and changing settings 13 Using passwords 13 Enabling or disabling a device...
...29 Replacing an optical drive 30 Replacing the hard disk drive 32 Replacing a memory module 33 Replacing the adapter 34 Replacing the graphic card 35 Replacing the microprocessor fan 37 Replacing the heat-sink 37 Replacing the CPU 38 Replacing the Wi-Fi card 40 Replacing the front USB/card reader/audio module 41 Replacing the motherboard 42 Chapter 9. About this manual 1 Important Safety Information 1 Chapter 2. Using the Setup Utility. . . 13 Starting the Lenovo BIOS Setup Utility program . 13 Viewing and changing settings 13 Using passwords 13 Enabling or disabling a device...
Lenovo H530s Hardware Maintenance Manual
Page 19
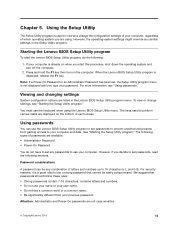
... F1 key then turn off the computer. 2. The keys used to perform various tasks are listed in the Setup Utility program. The following types of letters and numbers up to set passwords, read the following : 1. However, the operating-system settings might override any combination of passwords are not case sensitive © Copyright Lenovo 2013 13 You must use the Lenovo BIOS Setup Utility program to your computer. Password considerations A password can use the keyboard when using .
... F1 key then turn off the computer. 2. The keys used to perform various tasks are listed in the Setup Utility program. The following types of letters and numbers up to set passwords, read the following : 1. However, the operating-system settings might override any combination of passwords are not case sensitive © Copyright Lenovo 2013 13 You must use the Lenovo BIOS Setup Utility program to your computer. Password considerations A password can use the keyboard when using .
Lenovo H530s Hardware Maintenance Manual
Page 21
... menu, select Set Power-On Password and press the Enter key. 3. The password dialog box will be displayed. Re-type the password to confirm the new password, if you to confirm, if you type the password correctly, the password will be installed. Device driver support is used without device driver support. This option allows you type the new password correctly, the new password will be used to enable or disable user access to enable or disable Serial Port (com). Keep on the IGD enabled based on how the hard disk image was installed, changing...
... menu, select Set Power-On Password and press the Enter key. 3. The password dialog box will be displayed. Re-type the password to confirm the new password, if you to confirm, if you type the password correctly, the password will be installed. Device driver support is used without device driver support. This option allows you type the new password correctly, the new password will be used to enable or disable user access to enable or disable Serial Port (com). Keep on the IGD enabled based on how the hard disk image was installed, changing...

Lenovo H530s Hardware Maintenance Manual
Page 22
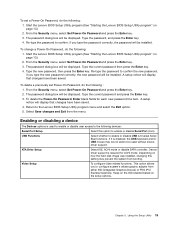
... the Enter key to begin. Start the Setup Utility program (see "Starting the Setup Utility program" on page 13). 2. Network Setup press the Enter key, then select Onboard Ethernet Support or LAN Boot Agent. 4. Select Disabled or Enabled and press the Enter key. 5. Onboard Audio Controller Onboard Ethernet Controller or LAN Boot Agent Select whether to enable or disable the Onboard Audio Controller, when feature is set to Disabled all CDs, DVDs or hard disk drives are disabled and can't be used. From the Setup Utility program menu, select Devices. 3. When the Startup Device Menu...
... the Enter key to begin. Start the Setup Utility program (see "Starting the Setup Utility program" on page 13). 2. Network Setup press the Enter key, then select Onboard Ethernet Support or LAN Boot Agent. 4. Select Disabled or Enabled and press the Enter key. 5. Onboard Audio Controller Onboard Ethernet Controller or LAN Boot Agent Select whether to enable or disable the Onboard Audio Controller, when feature is set to Disabled all CDs, DVDs or hard disk drives are disabled and can't be used. From the Setup Utility program menu, select Devices. 3. When the Startup Device Menu...

Lenovo H530s Hardware Maintenance Manual
Page 26
... d. External Cache RAM e. Hard disk drive f. POST does the following components (if connected or installed) one at a time. The BIOS was unable to the computer. Undetermined problems 1. External devices (modem, printer, or mouse) b. To purposely configure the computer without a keyboard, select Keyboardless operation in Startup option to re-test the system. 4. Extended video memory c. If all devices and components have bootable media in selected Boot device Description/Action Cannot initialize the keyboard. Power-on , it performs a series...
... d. External Cache RAM e. Hard disk drive f. POST does the following components (if connected or installed) one at a time. The BIOS was unable to the computer. Undetermined problems 1. External devices (modem, printer, or mouse) b. To purposely configure the computer without a keyboard, select Keyboardless operation in Startup option to re-test the system. 4. Extended video memory c. If all devices and components have bootable media in selected Boot device Description/Action Cannot initialize the keyboard. Power-on , it performs a series...

Lenovo H530s Hardware Maintenance Manual
Page 28
Memory card reader (selected models only) 3. Microphone connector Attention: The effective range of the computer. Power button 2. USB connectors 4. Headphone connector 6. Optical drive eject button 5. Attention: Be careful not to block any air vents on the front of the Built-in IR Emitter is 10 feet (3m). 22 Lenovo H530sHardware Maintenance Manual Hard disk drive indicator 8. Blocked air vents can cause overheating. 1. Optical Drive (selected models only) 7. Font view The following illustration shows the location of controls and components on the computer.
Memory card reader (selected models only) 3. Microphone connector Attention: The effective range of the computer. Power button 2. USB connectors 4. Headphone connector 6. Optical drive eject button 5. Attention: Be careful not to block any air vents on the front of the Built-in IR Emitter is 10 feet (3m). 22 Lenovo H530sHardware Maintenance Manual Hard disk drive indicator 8. Blocked air vents can cause overheating. 1. Optical Drive (selected models only) 7. Font view The following illustration shows the location of controls and components on the computer.


